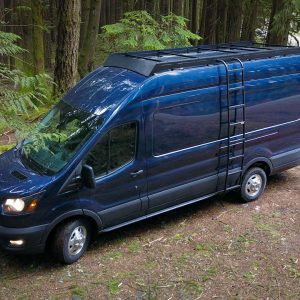
This is the Build Journal for FarOutVan #2, our second Ford Transit DIY van conversion.
We are currently working on it, we will update this page as we progress!
Van
- Ford Transit | AWD | Ecoboost
- High-Roof | Extended-Length
Mission
- 4 Seasons Full Time Travel
- Adventure Van | Mountain Biking | Skiing
Heads up! If you’re looking for a start-to-finish Build Journal, look no further!

How To’s
Products
Techniques
Second Thoughts

Tool List
First things first, here is a list of the tools we are using for our DIY van conversion and throughout this Build Journal. A down-to-earth list with the essential and not-so-essential tools that make our build easier and better.

Swivel Seats (Driver & Passenger)
The swivel seats help optimizing space in our van. The Transit, Sprinter, andProMaster can be ordered with factory swivels (with some limitations), but installing an aftermarket adapter is often cheaper and it’s actually quite a simple task. Let’s get into it!
Roof Rack (FVC Low Pro)
A roof rack is a great way of adding real estate to the roof of our van! It’s also a safe and easy way to attach accessories such as solar panels, storage box, awning, etc. And with the permanent ladder, clearing the solar panels from dirt/snow is much less hassle!

Larger All-Terrain Tire Upgrade
We’re not off road enthusiasts, but we’re not roadies either. We need tires that can handle highway, off-road, and snow as well. And we don’t mind the badass look too, because we’re such badass people. Whether you are converting a campervan or own a work van, this is something to consider.

Aftermarket WHeel Upgrade
Our 2021 AWD Ford Transit is definitely getting the tried-and-true KO2 tires upgrade, but this time we’re also in the market for a wheel upgrade!

Lagun Table for Passenger/Driver Seats
Here is a very easy and efficient way of installing a Lagun Table to the passenger/driver seats in a Ford Transit. It’s a bolt-on solution that takes about 30 minutes to implement, thanks to our custom B-Pillar aluminum mount plate and our Bamboo tabletop!

Nudge Bar
A nudge bar offers some protection to the factory bumper against small impacts, allows to mount accessories on such as LED, and we think it looks pretty awesome on our van! Mad props to Flatline Van Co for coming up with a minimalist design that blends beautifully with the curves of the Transit, that’s easy to install and light-weight. Let’s go!

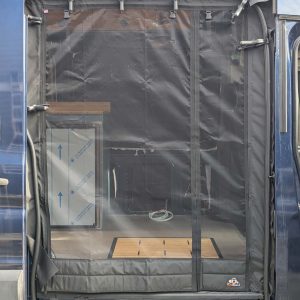
Sliding Door Stopper
This door stopper holds the sliding door partially opened for added privacy (it adds an intermediate stop at the position of our choice). It is strong enough to hold the sliding door on inclines. Compatible with Transit, Sprinter and ProMaster vans (all years). Made of 6061-T6 Aluminum.

Rear Door Additional Exit Handle
It’s a concern we had for years: with an elevated bed and garage underneath, access to the factory exit handle is lost and it’s not possible to open the rear doors (for emergencies, convenience, etc.). We took the matter in our own hands and made an exit handle that’s super easy to install and doesn’t require any screws! Very happy on how it turned out 🙂 We installed it on both our 2021 & 2016 Transit.

Motorized Antenna Tilt (weBoost Fold Up/Down)
Here is the solution we came up with to remotely fold up and down an antenna on the roof of our campervan. It allows us to tilt our WeBoost antenna up or down (90 degrees) by the press of a button inside our van, neat! This electric motorized system would also work with HAM radio antennas (or any Series-C coax cable antenna) and on pretty much any vehicle (Van, Jeep, Car, etc.). Let’s get to work!

Rear Door Platform (Cargo Carrier)
Offers additional cargo-carrying capacity for bikes, Rotopax Gas Can, skis/snowboards, etc. It is versatile, allows to be customized to our needs and it’s easy to swap or reconfigure accessories with season’s change. We especially look forward to having two extra bike mounts outside the van, it’s useful when shuttling with friends or to carry our bikes around when they’re dirty.

Tire Carrier
A tire carrier allows to store a larger tire than stock (which is problematic on the non-extended length Transit), provides easier access to the spare tire, and frees up space underneath the van (e.g. to add water tank instead).

Upfitter Auxiliary Switches
Wiring guide for the optional Auxiliary Upfitter Switches. Each Upfitter Switch can provide a 12V output to an auxiliary load, such as Air Lift Spring Kit Compressor, an exterior LED bar, etc.

Factory Floor Removal
Our Ford Transit came with the optional Front & Rear Vinyl Floor Covering (Option Code 16E), which includes a cargo mat, slider door scuff plate, rear door sill plate, and wheelhouse covers. The time has come to move on and remove them all!

Rear Door Bike Rack
The bikes will be stored inside the van, but our previous van lacked an exterior bike rack for shuttles, dirty bikes, and to take friends with us on a ride.

Pass-Through Holes and Access Holes
We are adding a few pass-through holes (AKA access holes) in the floor of our Ford Transit, in order to route electrical wiring, plumbing, vents, and so on. Here is a list of these holes, so that we can refer to them

Air Lift Wireless Air Bags with Tank
An Air Lift kit reduces the sag, increase ground clearance and improves the ride. As a bonus, we can use it to level the van when camping (left/right and front/back), and to air up the tires of the van and bikes!

Headliner Shelf
The Ford Transit overhead console is not exactly optimal… so here is how you can unlock its full potential and create extra storage!

Espar AS3-B2l Gas Heater
We chose the newest Espar AS3-B2L gasoline heater because of a few features we really like: automatic altitude adjustment up to 13,000 feet, easy to install (pre-wired kit), and the EasyStart Pro Controller has a built-in room temperature sensor.

Maxxfan Roof Vent
A roof fan helps regulate the temperature, control humidity, and maintain good air quality. Here is a straightforward guide on installing a Maxxfan in your van. Material, tools, and tips to get it right the first time!

Bed Platform
Here is how we made a bed platform using 80/20 aluminum, standard tools, and hardware. The bed platform can be made/assembled by one person, removed/reinstalled, and is flush with the walls. The t-slots in the 80/20 allow for easy addition/removal/reconfiguration of accessories!
Bunk Window
Not installing a window was a mistake on FarOutVan#1, because we lacked an intake for the Maxxfan. So here is our redemption on FarOutVan#2! It’s our very first time installing a window, and we chose a 300x700mm Arctic Tern window (new “Flat” style).

Floor (Insulation, Subfloor, Vinyl)
The floor provides thermal and sound insulation, protects against water infiltration, and anchors the cabinets. While we stuck with many of the same ideas from our first van, we made some tweaks to make things simpler and better.

Thinsulate Insulation
Insulating a van isn’t just about thermal insulation—it also cuts down noise and helps control condensation. It’s a small investment in both time and money for all the comfort it adds!

Water System
Installation of the fresh and gray tanks, water heater, pump and accumulator, sink, plumbing, etc.

Ceiling: Tongue and Groove Wood Planks
Just like FarOutVan1, we are installing knotty pine tongue and groove planks!
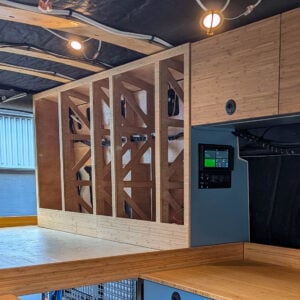
Upper Cabinet Driver-Side
The upper cabinet will store the kitchen’s stuff (dishes, pans, coffee maker, etc.).

Insulated Window Covers
We fabricated our own covers for FarOutVan1, but we learned they’re extremely time-consuming to make and don’t offer much cost savings. So here are the off-the-shelf window covers we went with for FarOutVan2!

Electrical System: EcoFlow Power Kit
An all-in-one, plug-and-play, no-compromises electrical system that can be implemented in a few hours, rather than a few days. We love this!

Solar Power
Now that the electrical system is up and running in our van, it’s time to install the solar panels!

Upholstery
Wrapping bare components with upholstery fabric in a van isn’t just about aesthetics! It also helps with noise reduction, thermal insulation, and comfort 🙂

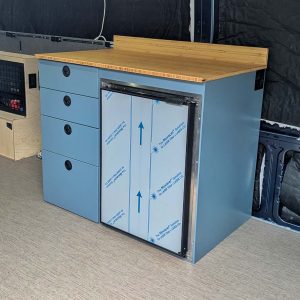
Water Cabinet
We’re almost ready to work on the water system! But first, we need to build the water cabinet that’ll house the fresh tank, pump, water heater, and more.

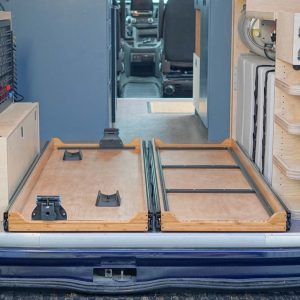
Slide-Out Trays for Bikes & Storage
We’re big fans of the pull-out trays: the bike tray makes loading/unloading our bikes super easy, and the storage tray helps us stay organized. And no need to crawl into the van to reach our gear!
Bedroom Cubbies
The cabinet lines the wall above the 80/20 bed platform, adding a row of open cubbies for everyday gear. Hides the van’s factory wiring harness. It bolts to the van wall with rivet nuts and to the bed frame with t-nuts, so it’s solid yet removable.
To be continued…!


