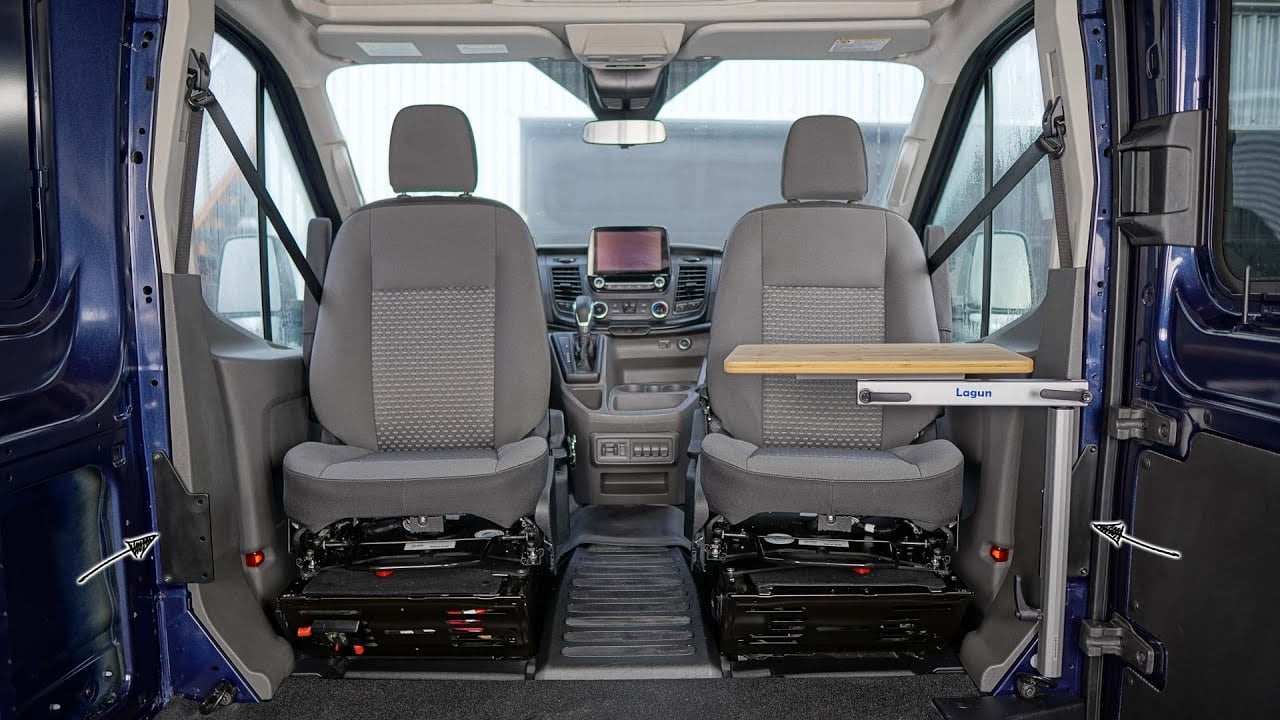
Today we install a Lagun table to the passenger/driver seat of our Ford Transit van. We mount the Lagun Leg System to the Transit’s B-Pillar. It’s a simple project that can be completed in a few minutes using our aluminum mount plate, or in a few hours if you choose to go the full DIY route. We documented the entire fabrication and installation process so you can follow along. Let’s go!


Disclosure: This post contains affiliate links, which means that if you click a product link and buy anything from the merchant (Amazon, eBay, etc.) we will receive a commission fee. The price you pay remains the same, affiliate link or not.

Material and Resources
Time
4 HOURS (DIY)
30 MIN (Non-DIY)
Cost
$225 USD (DIY)
$300 USD (Non-DIY)
Weight
13 lbs (per side)
Material
| Item | Description | QTY | Buy |
|---|---|---|---|
| Lagun Leg System | Lagun Leg System with sliver (slim) bracket. | 1 | Vanlife Outfitters |
| Lagun Table Mount Plate (Aluminum) | Aluminum mount plate. B-Pillar installation hardware included. | 1 | FarOutRide |
| Bamboo Table Top | 22″ x 15″ x 5/8″ bamboo table top. | 1 | FarOutRide |
| #8 Screws | To install the table top to the Lagun Leg System. | 6 | Amazon |
| Swivel Seat (pre-requisite) | See our Swivel Seat Installation Guide and Review | TheSwivelShop |
DIY:
| Item | Description | QTY | Buy |
|---|---|---|---|
| Lagun Table Mount Plate (DIY) | Use this template to make your own mount plate out of hardwood plywood. | 1 | FarOutRide |
| M6 x 25mm Screws | To install mount plate to passenger-side B-Pillar. | 2 | Amazon |
| M6 Flat Washers | To install mount plate to passenger-side B-Pillar. | 2 | Amazon |
| M8 Rivet-Nuts | B-pillar factory holes are unthreaded on the driver-side, so threaded inserts are required. | 2 | Amazon |
| M8 x 25mm Screws | To install mount plate to driver-side B-Pillar. | 2 | Amazon |
| M8 Flat Washers | To install mount plate to driver-side B-Pillar. | 2 | Amazon |
| Tabletop | Wood and finish of your choice! | 1 |
Tools
| Item | Description |
|---|---|
| Allen Hex Drive 4mm | For M6 screws. |
| Allen Hex Drive 5mm | For M8 screws. |
| Hex Socket 13mm | For M8 nuts. |
| Astro 1450 Crossnuts & Rivet-nuts Setter | For Rivet-nuts (driver side only). |
DIY Mount Plate:
| Item | Description |
|---|---|
| Jigsaw with wood blade | To trim the DIY mount plate. |
| Powerdrill with 1/4″ and 3/8″ drill bits | To drill the DIY mount plate. |
| Glue Stick or Spray Adhesive | To glue paper template to plywood. |
| Sanding Paper | To smooth the edges. |
Lagun Table System Installation
Install the Mount Plate to the B-Pillar
Passenger Side:
The mount will be installed using these two factory threaded holes located in the B-Pillar:

Install the aluminum mount plate to the B-Pillar using the two M6 screws (included):

Driver Side:
The factory holes on the B-Pillar driver side are unthreaded, so we first need to add threaded inserts:
1. Install the two M8 rivet-nuts provided with this kit into these two holes in the B-Pillar:

2. It takes just a few seconds with the Astro 1450 tool (more info: Threaded Inserts Guide) :

The remaining of the installation is identical as for the passenger side (except use the provided M8 screws into the rivet-nuts instead of M6 screws)!
Install the Sliver Bracket to the Mount Plate
Install the Sliver (slim) Lagun bracket with 3 x M8 screws/washers/nuts. The screws provided by Lagun are a bit too long (they stick out behind the aluminum mount), it works, but you could cut them shorter if you want:

Install the lagun Leg System and the Table Top
Install the leg and arm of your Lagun System, as well as the bamboo table top:

That’s It!


Disassemble & Stow When Driving (Storage)
The Lagun Leg System is easy and quick to disassemble and store for travel. Simply turn the built-in handle (1 or 2 turns) to unlock the section of your choice:
Leg, Arm & Tabletop
If you choose to remove all the section (leg, arm, and tabletop), you should know that the leg can conveniently be attached to the tabletop plate as follows (the back of the tabletop mount has a groove to slide the leg in):

Arm & Tabletop Only
In our Ford Transit and with the B-Pillar installation, we will most likely leave the leg attached to the mount plate because we don’t find it to be too intrusive. Even with the leg in place into the mount plate, we can still swivel the seat and incline it all the way down:

Now that we disassembled and removed the Lagun Table, we can stow it somewhere against a wall and secure it in place with a strap or some sort of DIY bracket. We’ll cross that bridge when we get there, because as the time of writing these lines our van conversion is not exactly finished… 😆

How To Make A DIY Mount Plate(Optional)
We are personally using the aluminum mount plate in our van, but we thought some people might want to make their as a lower cost alternative. Here’s how!
Download the template
The DIY B-Pillar Bracket Template is included in your Builder’s Dashboard:

Includes:
- Wiring Diagram & Tutorial.
- Water Diagram & Tutorial.
- Propane Diagram.
- Floor Layout.
- Free Stickers (optional).
- DIY B-Pillar Bracket for Lagun Table.
- Discounts on our products (breaker enclosure, Lagun B-Pillar Bracket, etc.).
- And we keep adding more as we progress!
Print the template
Print with 1:1 scale (actual size, no fit) on a letter sheet (8.5″ x 11″). Measure “Print Calibration” to ensure the template didn’t get resized during the print:

Trim the template & glue to plywood
NOTE: We recommend hardwood plywood (such as baltic birch, maple, oak). We used 3/8″ thick, but 1/2″ would work too. 1/4″ won’t be strong enough! Hardware stores such as Home Depot normally carry this, or you can buy small 12″x12″ baltic birch squares online.
You can trace the contour with a pen, but we find gluing the template to the plywood is a bit more accurate. A glue stick works fine, or spray adhesive such 3M 77 is good too (not much is needed)!


Cut the Plywood
Use a jigsaw with a wood blade to cut along the template’s contour:

Drill the holes
“Punch” the center of each hole; it’s more precise and prevents the drill bit from roaming on the surface (we use an automatic center punch because we have one, but anything sharp works).

Clamp the bracket on a scrap piece of wood and drill the holes to their final size. It’s a simple way to prevent tearing off the back side of the plywood when the drill bit exits the hole.

Finish the wood
Finish the wood to seal it from moisture, protect it from stains and to enhance the appearance. We often use Watco Danish Oil or Varathane Stain & Polyurethane, but anything to your taste will work!
How To Switch the Lagun Table Handle to the Opposite Side (Optional)
Lagun Leg Systems are sold with the handle either to the left-side or right-side. Didn’t get the side you wanted? Turns out it’s fairly easy to switch the handle to the opposite side. Here’s how:
1. Remove the handle and the washer:

2. Use a rubber mallet (or a hammer with the nut installed on the bolt) to pop the carriage bolt out:

3. Insert the bolt on the opposite side with a washer & nut. Insert a washer or anything in the slot to prevent damage from compression, then torque the nut to press the carriage bolt in:

4. Success!


Inspiration & Story
We borrowed the idea of a B-Pillar mount plate from the creative and resourceful folks on the FordTransitUSAforum (this thread if I recall properly). Credits to them for coming up with this idea! 🙂
We really wanted to take advantage of the new “Sliver” (slim) Lagun bracket, because it has a much smaller footprint than the regular bracket. So we went ahead and started designing our own aluminum mount. The awesome Ford Transit 3D scan really helped designing a part that works and fits on the first try:

Laser cutting and powder coating is not cheap, so it’s always a good idea to validate a design BEFORE having a bunch of parts manufactured (and risk wasting thousands of dollars)! The 3D printer is an invaluable tool for prototyping new designs:


Now that we’re confident about our design, we can get in touch with a machine shop and have the parts manufactured!
On Second Thought…
We had a Folding Table in our first van on the driver-side only, and we were looking for a solution for the passenger-side… here it is! The Lagun Leg System is super modular and versatile, and on top of that it’s easy to install with the Transit’s B-Pillar mount plate.
You should know that the table has some wobbling. It is coming from the B-Pillar which is not super stiff for this usage, not the mount plate itself. If you think that the wobbling will annoy you, you should look for another solution. We can definitely notice the wobbling when using the table, but it’s a compromise we can live with! We actually don’t mind it 🙂
We’re still in the early stages of our van conversion at the time of writing these lines, but we know for sure we will keep this solution for the passenger seat (and driver coming soon)!


are your passenger side aluminum Laguna table Mount plates in stock and ready to ship?
great website. will be hitting the donate button in the near future.
thank you
In stock yeah! We ship every other day.
Cheers, antoine
Looks like a great option. Can this be used with 2023 Promaster 136” WB? I have Lagune table so hoping bracket for pillar and thinner mounting bar will work. Thanks!
My understanding is the the ProMaster doesn’t have threaded hole in the pillar, you would have to drill them out.
Heads up: the optional M8x30 mm bolts linked do not work with the Lagun mount. The head diameter is too wide to sit flush in the mount and blocks the leg from sliding in. Everything else went well on the install!
You’re right! I just measured the head of the M8 flat head socket screws provided by Lagun and they’re smaller than standard screws… So I guess it might be easier to cut them instead (I updated the page accordingly)!
Thanks for the heads up, glad you had yours installed 🙂
Of course, if you have a wall up on the driver side, very hard to mount driver side table as you do. (I can _just_ see the holes you use to mount. I guess the work around might be to mount the normal lagoon table mount to the plywood/pine paneling wall, and work from there…
I’m so happy. I received the passenger side mounting plate today. Wish I’d already ordered the sliver bracket, but it’s on its way now.
I’m so thankful for the wealth of advice and expertise you’ve shared. I have no experience building anything before; your build journal has been incredibly helpful.
If you ship mounting plates to others, I’d suggest you add a strip of heavy duty tape on the ends of the package. Mine had split almost completely at one end. Fortunately the plate, screws and stickers were still inside.
Thank you!
Thanks Amy for the Feedback! We just enabled reviews on the product page, any chance you can leave a quick review over there to help us?? Thanks 🙂 https://faroutride.com/product/lagun-table-mount/#tab-reviews
Ugh, sorry about the packaging. We will definitely follow your advice from now on. Shipping products is totally new to us, we’re learning as we go. But it’s fun and we’ll get better!
If anyone is reading this and had issues (e.g. damage) during shipping, it’s our mistake and we’ll fix this (write to us faroutride at gmail).
Thanks again,
Antoine
Can you post or send a picture of what it looks like stored?
Just added a section about Disassembly and Storage! 🙂 https://faroutride.com/lagun-table/#stow
Great solution for use of the passenger seat! As a question, do you have plans to either release the template in another file format (i.e. DXF, SVG, or AI)? Main reason I ask is to use for a company like OSH Cut to ship a metal version to your home. Or, do you have plans to release a metal version for purchase on your website? Thanks so much for the great post!
Hi!
Actually our aluminum mount plate is available NOW for purchase: https://faroutride.com/product/lagun-table-mount/
🙂
Nice solution to the lack of a place to drink coffee or beer on the passenger side.
Sort of thinking they both will get stored in the space between the latrine box and the front seat.
And you said the b-pillar is the cause of the wobble. That pillar is god-like strong (because it holds the van up when you roll it in an accident). Thinking the wobble is in the LAGUN pillars.
Cheers!
This is great thanks!
Do you pull the table out when not in use and store or does it rest by the seat belt in between the doors?
We’ll remove the arm (horizontal section) then store it against a wall somewhere. Not sure exactly where yet, but we’ll cross that bridge when we get there 🙂
Do you see a way to lower the lagoon table and use it as a table outside? I see how you use the standard mounting for a high table.
Do you see a way to modify it for a lower table. One that might be closer to the floor height to use while lounging in chairs outside? I don’t care if I have to have an additional support bracket.
I think you could trim the leg and relocate the handle.
We had this table in our first van, you can easily take it outside 🙂 The folding legs allow to stow it neatly against a wall somewhere: https://amzn.to/3X6PzvZ
You’ll see photos of it in action here (deployed and stowed between the toilet/fridge): https://faroutride.com/van-tour
I like this idea. When the table is not in use, looks like it needs to be stowed somewhere? Thank you.
Indeed. We’ll remove the arm (horizontal section) and stow it somewhere against a wall! Not sure where yet, but we’ll get there 🙂