Victron has been working hard to develop a range of high quality products offered at a fair price and the Multiplus Inverter/Charger (2K & 3K) is no exception. It’s an advanced solution for those looking to power energy-hungry appliances (such as air conditioning or an induction cooktop) and for people spending time in serviced campgrounds (thanks to its built-in transfer switch). Want to learn more about the Victron Multiplus inverter/charger? Keep reading!
Inverter/Charger Devices in a Nutshell
Inverter/Charger devices combine a power inverter and a charger/converter into a single unit, making the installation and wiring a bit more streamlined:
Power Inverter
1. Convert power from 12V DC (from the battery bank) to 120V AC, allowing you to use common household appliances.
Charger/Converter
1. Charge the battery bank from a 120V source (a.k.a. “shore”) by providing a multi-stage charging profile adapted to the battery type (AGM, Lithium, etc.).
2. Convert 120V AC to 12V DC to power the 12V appliances directly. This means using 12V loads (refrigerator, lights, etc.) won’t discharge the battery when the charger/converter is plugged in.
Inverter/Charger
1. Convert power from 12V DC (from the battery bank) to 120V AC, allowing you to use common household appliances.
2. Charge the battery bank from a 120V source (a.k.a. “shore”) by providing a multi-stage charging profile adapted to the battery type (AGM, Lithium, etc.).
3. Convert 120V AC to 12V DC to power the 12V appliances directly. This means using 12V loads (refrigerator, lights, etc.) won’t discharge the battery when the charger/converter is plugged in.
Typically, an inverter/charger does NOT include a solar charger nor an alternator charger; you’ll need separate devices for that (see installation section below).
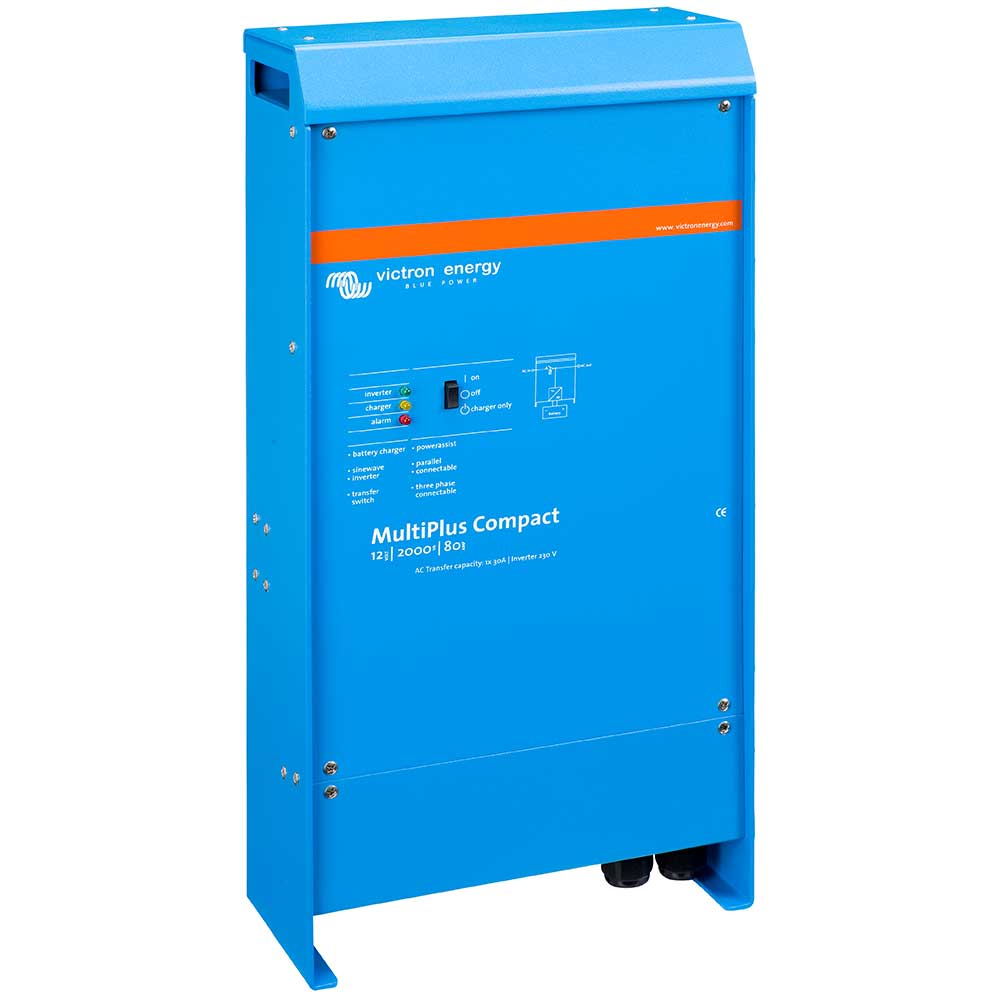
Victron Multiplus Features
Power Inverter (Duh)
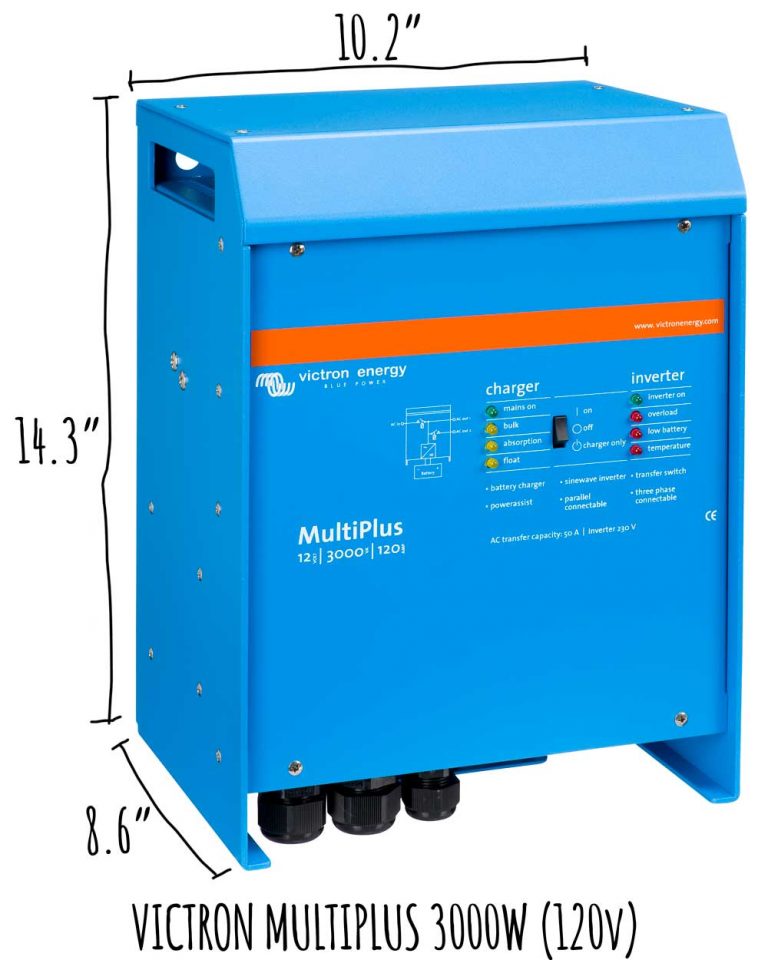
Heads up! The 2000VA model is rated for 1600W continuous output and the 3000VA model is rated for 2400W continuous output. Also, keep in mind that inductive loads (anything that has a motor generally speaking) and higher ambient temperature reduce the output capacity (see Victron’s datasheet below), so keep that in mind when sizing your inverter!
Battery Charger
The 2000VA model can charge a battery at a current rate up to 80A, while the 3000VA model can charge at a current rate up to 120A. The charge rate can be limited and configured according to your battery bank (chemistry, size, etc.).
Transfer Switch
Both models come with a built-in transfer switch. This means that when the shore power is connected (house, serviced campground or generator), the Multiplus instantly switches the power input to the shore instead of the battery bank.
AC Output(s)
The 3000VA model (only) has 2 AC outputs. The first output is active at all times (battery or shore), while the second output is active only when plugged into the shore. That’s useful to prevent battery drain from power-hungry appliances (A/C, water heater, etc.).
AC Input Limitation
It is possible to limit the AC current that the inverter can draw. That’s convenient when plugged into a house outlet (15A) or when plugged into a small generator. This can be configured with the DIP switches, or more easily with the rotary knob of the Digital Multi Control remote (optional).
PowerAssist
When plugged into shore, the output current (to appliances) cannot exceed the input current (from shore). With PowerAssist enabled, the Multiplus can increase the maximum output current by getting assistance from the battery bank. In other words, the Multiplus gets its power from the shore + battery simultaneously. That’s roughly an additional 15A output (2000VA/120V) for the 2000VA, or 25A output (3000VA/120V) for the 3000VA inverter. This, of course, discharges the battery bank; but when power demand is reduced, the Multiplus will compensate by re-charging the battery bank.
Dimensions

Digital Multi Control Remote

The optional remote allows you to turn the Multiplus ON, OFF or to Charger Only (no inverter). The rotary knob allows you to limit the input AC current. So let’s say you’ve configured your system for 30A shore power (30A shore receptacle and 30A AC main breaker), you could use the remote to limit the input current to 15A when plugging into a regular house outlet (to prevent tripping the house breaker which is typically 15A). That’s also useful if you plan on using a small generator as input.
Where to Buy the Victron Multiplus
Victron Multiplus 2000VA
12V / 120V

Victron Multiplus 3000VA
12V / 120V

Digital Multi Control

Victron MK3-USB Interface
Installation
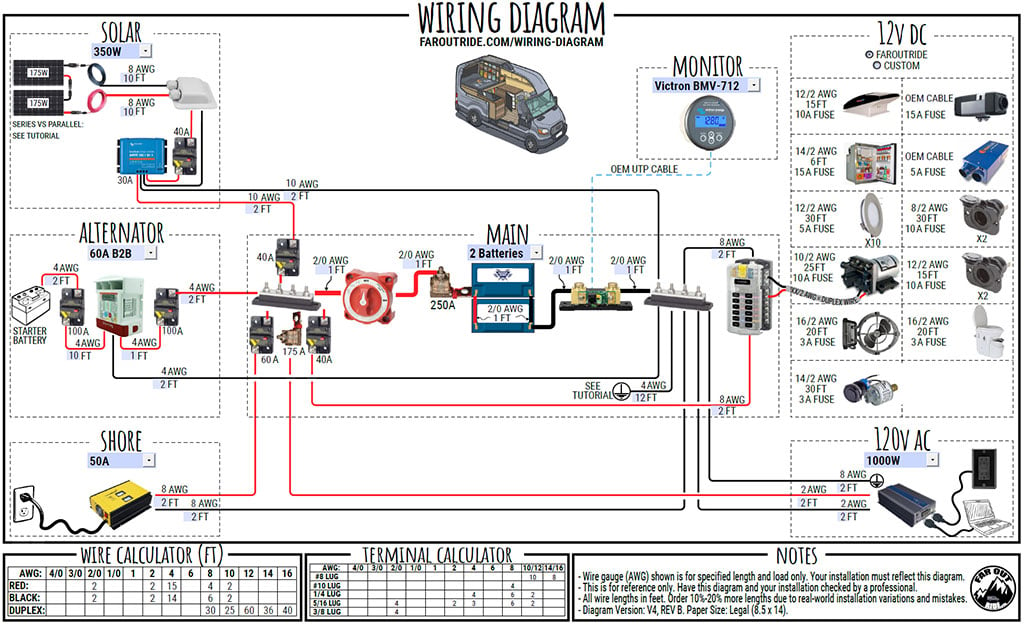
First things first, let’s compare the wiring diagram of an electrical system with a power inverter + battery charger (separate devices) versus an inverter/charger:
Inverter + Battery Charger
Above you’ll notice a power inverter under “120V AC” and a battery charger under “SHORE”. The biggest inverter allowed with this wiring diagram is 2000W, so components (wire gauge, terminal fuse, bus bars, etc.) are sized accordingly. Because this diagram is designed for modest 120V needs (mostly off-the-grid), there is no 120V AC distribution panel (loads are connected directly to the inverter) nor shore power receptacle.
Inverter/Charger

Above you’ll notice a Victron Multiplus inverter/charger under “SHORE (INVERTER/CHARGER)”. The biggest inverter allowed with this wiring diagram is 3000W, so some of the components must be beefed-up to handle the huge amount of current (wire gauge, terminal fuse, bus bars, etc.). In addition, a 120V AC distribution panel is hardwired to the Victron Multiplus in order to safely distribute the power (via breakers) to the 120V AC appliances. Finally, a 30A shore receptacle is installed outside the van to take advantage of the Multiplus’s built-in transfer switch.
You’ll want to refer to the Victron Multiplus Quick Installation Guide for the wiring of the inverter/charger:

Victron Multiplus 2000VA
12V / 120V

Victron Multiplus 3000VA
12V / 120V
Configuration of the Victron Multiplus
On delivery, the Victron Multiplus inverter/charger is set to standard factory settings:
| Inverter frequency | 60Hz |
| Input frequency range | 45-65Hz |
| Input voltage range | 94-143VAC |
| Inverter voltage | 120VAC |
| Stand-alone/parallel/3-phase | stand-alone |
| AES (Automatic Economy Switch) | OFF |
| Ground relay | ON |
| Charger ON/OFF | ON |
| Battery charge curve | four-stage adaptive with BatterySafe mode |
| Charging current | 75% of the maximum charging current |
| Battery type | Gel deep discharge |
| Automatic equalization charging | OFF |
| Absorption voltage | 14.4V |
| Absorption time | up to 8 hours |
| Float voltage | 13.8V |
| Storage voltage | 13.2V |
| Repeated absorption time | 1 hour |
| Absorption repeat interval | 7 days |
| Bulk protection | ON |
| AC input current limit | 50A |
| Dynamic current limiter | OFF |
| WeakAC | OFF |
| BoostFactor | 2 |
| Programmable relay | alarm function |
| PowerAssist | ON |
While the owner’s manual mentions that the factory settings are OK for most setups (AGM, Lithium, etc.), we recommend configuring it properly to get the most out of your system:
Configuration
What You Need

Victron MK3-USB Interface

Victron VE-Configure Software
Firmware Update
Click the 3 dots at the upper-right corner

The password to enable the settings is: ZZZ
Click “Product Info” and update as required

General Tab

AC1 input current limit should be set according to your shore power inlet (and AC main breaker) capacity: 50A, 30A (or 15A when plugged into a “normal” house outlet or a small generator).
Grid Tab

UPS function should be disabled with a generator as input.
Inverter Tab

Charger Tab

The “Charge current” limit is set to 50% of the total battery bank capacity for lithium, or 20% for AGM. For example, it is set to 100A (200*50%) for a 200Ah lithium battery bank (2 Battle Born batteries) or to 40A (200*20%) for a 200Ah AGM battery bank.
For a lithium battery bank, “Absorption time” can be set to 0.5h for each 100Ah battery. That’s 1h for a 200Ah battery bank, 1.5h for a 300Ah battery bank, and so on.
Reset
At this point it’s OK to click on “Reset” in order for everything to work.
Resources
Downloads
Quick installation guide, Owner’s Manual, Datasheet, etc.
– That’s it folks, hope that helps! –


Bonjour Antoine,
Voici ma question. Sur la figure 5.4- GENERAL TAB: vous avez programmer à la case AC1 input current limit should 30A. Si nous nous branchons dans une prise 15A et que la programmation est de 30A, est-ce que c’est dangereux de briser quelque chose? Est-ce que je dois toujours modifier AC1 input current limit should selon le branchement ou je peux me brancher dans les prises tant que je ne dépasse pas 30A. Merci! Francis
We cant get response from tecnical support. Want to install solar panels but they do not come back to us.
If someone can contact me with help.
Hi, I purchased an used Transit with a solar system on it (renogy Dual Imput DC-DC, 3k inverter, and 2x 170Ah batteries) .. but no shore power. I did get you guys diagrams package (awesome, thx!) .. i’m trying to increase capacity and add shore power connection capability .. considering replacing inverter with Victron 3000 .. do you see any compatibility issues? i might use the existing batteries for now, but eventually i need to replace them so i can increase capacity ( Renogy stopped making 170Ah batt ..ouch!) .. i dont want to replace the entire system (costly).. trying to reuse as much as possible. thank yo for all the content!!
Eric
You can re-use the components, BUT make sure ALL the components can handle changes you make. Since you have our diagram, use it to find what’s the current (A) rating required for the components (wires, bus bars, fuse, breaker, etc.).
Good luck!
Hey guys I am having an issue with my victron inverter and was curious if you came across it in your travels. I opted to install a 50Amp AC board to run an AC on its own dedicated 20 Amp breaker. My house battery bank is 400Ah LiFePO4 (two 200Ah in parallel) and every time I try to test my Ac the inverter gives a low battery alarm and the inverter switches off. I have tried to figure this out and have come across multiple people with similar issues as well using Victron. My wiring is per your instructions and I have a 30A shore power capable outlet but I have only been using the 15A house. Using the blue tooth dongle to view the set up real time it shows 15 A in with 1600W but once the compressor kicks on the AC it changes the draw from 300-400 W to 1500 or so on low mode.
I understand the concept of the power supplementation from the batteries when the draw exceeds the input from the shore however something seems amiss and I cannot figure out which setting I might need to update. Any thoughts?
I would really like to know if you figured out what the solution is to your stated problem?
” Hey guys I am having an issue with my victron inverter and was curious if you came across it in your travels. I opted to install a 50Amp AC board to run an AC on its own dedicated 20 Amp breaker. My house battery bank is 400Ah LiFePO4 (two 200Ah in parallel) and every time I try to test my Ac the inverter gives a low battery alarm and the inverter switches off. I have tried to figure this out and have come across multiple people with similar issues as well using Victron. My wiring is per your instructions and I have a 30A shore power capable outlet but I have only been using the 15A house. Using the blue tooth dongle to view the set up real time it shows 15 A in with 1600W but once the compressor kicks on the AC it changes the draw from 300-400 W to 1500 or so on low mode.
I understand the concept of the power supplementation from the batteries when the draw exceeds the input from the shore however something seems amiss and I cannot figure out which setting I might need to update. Any thoughts? ”
Any help will be greatly appreciated!
I would also like help with this. I don’t know much about inverters or batteries but every time I turn on the AC the starter battery downloads in 15 minutes, and the voltage drops to 6 and I have to shut it down. I don’t know what to do with the Victron settings to try and make this work. The AC unit came with the trailer an was working fine in the beginning. I’ve burned through four or five AC units and can’t figure it out. Also curious if you or someone you know offers a “FaceTime virtual “ consultation to help me out. Thank you!
Phenomenal, Thank you. Even Victron’s own guide is not as good as this…. >_<
They don't mention that you can use VE Connect to configure the Multiplus. The VE Configure software is very outdated and has problems with drivers.
One note; you mention VICTRON VE-CONFIGURE SOFTWARE as the required software, but pictured you are using VE Connect. Small thing, but could be a point of confusion.
Thanks again!
Hi,
If you plan to update this article in the future, there is now a third inverter/charger option from Victron that is suitable for van life use in North America. The MultiPlus-II 3000VA, 12V DC, 120V AC Inverter / Charger.
Overall it’s performance and capability are almost identical to the older MultiPlus 3000VA. It seems that the new inverter uses a steel enclosure instead of aluminum, has a new transformer design that slightly improves the inverter efficiency and no-load losses, uses new integrated circuit design that reduces the overall size and number of chips in the device, and has an additional relay that satisfies various grid-code requirements if you want to configure the inverter to back feed excess power into the grid from your solar system (probably not something you would ever want to do from a van).
I think the main reason someone might want to choose the new MultiPlus-II 3000VA would be the new form factor of the device that is now more tall and shallow compared to the cube like shape of the original MultiPlus-II 3000VA. Depending on your electrical layout in the van, one may fit better than the other.
I’m curious where you found room to install this in a Transit. The manual mumbles something about how vertical installation is best but horizontal is OK (less good cooling), and I’m not sure whether by horizontal they mean wall-mounted but rotated 90 degrees or flat on a horizontal surface. Especially since it looks like the cables feed out the bottom, I am guessing I’d need 25+ inches vertically to install the 2kW model in the recommended position. My inverter which I would be replacing is mounted on a horizontal surface which I think was the recommended orientation for that. Especially as a retrofit in a Transit where’d you find room? Seems like it’s important to put this near the battery… my battery box is maybe only 15″ high. There’s probably room if I laid it flat on its back but not sure if that would be OK.
Great write up! I think you might be mixing up the apparent power (VA) and real power (W) rating of these inverters. The Victron datasheet for these inverters shows that the MultiPlus 2000 unit has a continuous real power output capability of only 1600 Watts with an apparent power rating of 2000 Volt Amps. This might be of importance to someone who for example wants power a standard 15 Amp, 1800 Watt, appliance like a toaster oven with their MultiPlus 2000 inverter. I think they would find that an 1800 Watt appliance might trip unexpectedly due to overload depending on ambient temperature.
The apparent power (VA) rating of the inverter comes into play when you’re powering inductive loads like motors where both real power (W) and reactive power (VAR) are being consumed by the load. The 2000VA/1600W rating of the MultiPlus 2000 essentially means that it can power 1600 Watt loads as long as the power factor (W/VA) of the device is 0.8 or better.
I think we’re on the same page, maybe the way we wrote our article is confusing… We’ll review it and try to make better! Either way, in our calculator (faroutride.com/van-electrical-calculator), we recommend a 3000W inverter for any load over 1600W; it would be too complicated to try to take account of the power factor…
Thanks for taking the time to write this!!
Cheers,
antoine
Hi
I also noticed the error in your article. It looks like you haven’t corrected it yet as you still refer to the MultiPlus 3000 as a 3000 Watt inverter. It’s a 2400 Watt inverter (3000 VA).
Could you please update the article. Please, please.
Best regards,
Dylan
Done! Sorry for the confusion! 🙂
Yeah, pure sine.
We just released a wiring diagram featuring the Victron Multiplus. Our previous diagram had a limitation of 2000W inverter and had no transfer switch, so that ruled out people that want A/C, induction cooktop, etc.
cheers