After two winters spent full time skiing from the van (faroutride.com/winter-vanlife), we can definitely say that using Thinsulate insulation was a GREAT decision. It has kept us warm (down to -25F!), and it is still in great condition after that time (no mold, no bugs, still holding in place). We think Thinsulate is the best van insulation option:
- VERY easy to install
- Doesn’t absorb moisture
- Doesn’t off-gas
- Excellent noise insulator (no need for extra sound barrier)
- Doesn’t attract bugs
- Can be removed for body repair
The current page is about the installation process of the Thinsulate. To build your knowledge about vanlife insulation and what’s best for you, we highly recommend reading this article first:

Time Spent
16 HOURS
Total Cost
$ 850 USD
Prerequisite
Material
| Item | Description | Quantity | Link |
| Thinsulate Insulation | SM600L | 40’x 60″ + 30’x 60″ | Campervan-HQ |
| Spray Adhesive | 3M 90 | 4 cans | Amazon |
Tools
| Item | Description | Quantity | Link |
| Rotary Cutter | A good pair of scissors works, but this rotary cutter makes it MUCH easier! | 1 | Amazon |
Thinsulate Calculator
How much Thinsulate should you buy?
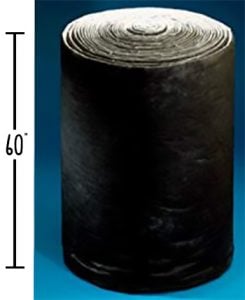
Thinsulate comes in 60 inches wide rolls. It’s up to you to determine what length (feet) you need! So take a measuring tape and find out the surface area you need to cover. To make things easier, we came up with the “Thinsulate Calculator” just below; hope that helps!

Cargo Surface
Don’t own a van yet? We listed the dimensions for the Transit, Sprinter, Promaster, & Nissan here: Van Selection
| Dimension (in) | |
|---|---|
| Cargo Length | |
| Cargo Height | |
| Cargo Width | |
| Cargo Surface (sq.ft.)* |
*Cargo Surface = passenger wall (including the sliding door opening, which will be subtracted next in “Remove Surface”), driver wall, & ceiling.
Remove Surface
As required
| Height (in) | Width (in) | |
|---|---|---|
| Remove Surface (sq.ft.) | ||
Add Surface
As required
| Height (in) | Width (in) | |
|---|---|---|
| Add Surface (sq.ft.) | ||
Result
Includes: passenger & driver walls, ceiling, and all your custom ADD/REMOVE.
| Surface (sq. ft.) | |
|---|---|
| Cargo | |
| Remove | |
| Add | |
| Waste 1 | 50 |
| TOTAL SURFACE | |
| LENGTH OF THINSULATE NEEDED (FEET) |
1: To account for waste (it’s inevitable due to the multiple funky-shaped pieces needed), mistakes and estimation errors. 50 Sq.Ft. adds 10 linear feet of Thinsulate. We don’t recommend skipping the “Waste”, unless you don’t mind interrupting your build to wait for your next order of Thinsulate…
As a general rule of thumb:
| Small Vans | 40 feet |
| Medium Vans | 50 feet |
| Large Vans | 60 feet |
| Extended Vans | 70 feet |
Thinsulate Installation In A Nutshell:
1- Cut the Thinsulate using tailor scissors:
2- Apply 3M 90 spray adhesive to the van surface & on the white surface of the thinsulate, then wait 30-60 seconds for the adhesive to become tacky:
3- Press the Thinsulate against the surface and voilà!
Cabin Overhead Storage (Headliner)
There is about a 1.5″ gap between the van ceiling & the headliner, that’s perfect to insert some insulation in there. We did not use adhesive since the gap between the ceiling and the headliner is about the same as the Thinsulate thickness.
1- We used a vise-grip and raw power to remove the pins (they were not damaged in the process, and we were able to reuse them):
2- Foam pieces removed:
3- Then, we removed the four screws (total) under the driver and passenger side handles:
4- Next, we unsnapped the three pins in the center of the headliner. To unsnap them, the overhead storage must be pushed forward. This is quite tricky, keep calm! Some people have damaged them in the process, but they can be glued back in place later…
5- BAM! (third one not shown in picture)
6- It is now possible to lower the headliner a few inches and install the Thinsulate. We used three pieces of insulation to fill the gap: one on the left-hand side, one on the right-hand side, and one in the center.
7- Sliding-in the insulation right-piece (left not shown…)
8- Reinstall the fasteners and voilà!
Ceiling
The challenge with the ceiling is to work against gravity. However, it proved to be fairly easy for 2 people. We won’t go into details here because there is not much to say…
We left the Thinsulate as shown in the picture above for several months and we did not lose a piece. The 3M 90 spray adhesive is doing a great job!
Walls
Large cutouts were filled with insulation:
We also filled the cavities where possible:
It’s in!
Sliding Door
The plastic panel is attached with several push pins. They are fairly easy to remove with a flat screwdriver, or you can do it with a push pin pliers.

Since the sliding door is exposed to exterior elements, there is a plastic sheet to protect the door mechanism. The plastic sheet can be removed simply by pulling it; the goo should remain glued to it for later re-assembly.

Here is how it looks without Thinsulate in:

Thinsulate was then placed in the cutouts:

Driver/Passenger Doors
We insulated the driver & passenger doors when we upgraded the speakers; therefore, it is documented here:

Windows
You can spend a lot of money and time on the best insulation, but remember that glass is an excellent heat conductor (in other words, a horrible insulator). You can make cheap & dirty Reflectix covers to reflect the sun in summer, but if you are skiers like us, you will want something that performs better… To minimize heat loss during winter, we made insulated window covers out of ez-cool + thinsulate + fabric. They make a HUGE difference in sub-freezing temperatures, and they’re just plain essential below 5F (-15°C). Here is how we made them:

On Second Thought…
We could go on forever about R values, thermal bridges, etc., but here are the real questions:
Q: How does our insulation solution (Thinsulate, EZ-Cool, and Insulated Window Covers) perform in real life?
A: It’s GREAT! It does what it’s supposed to: keep us warm in winter, keep us cool in summer.
Q: If we had to start over, would we go the same route again?
A: Yes!
Now, here is a more thorough discussion:
Summer:
1- On a very hot and sunny day, the Magnetic Grey sheet metal of our Ford Transit is burning hot. The Thinsulate is warm-hot, but the wood paneling is warm-cool. It shows that Thinsulate alone is fine, but the finished van (thinsulate+ez-cool+wood paneling) is even better! (It might be wise to choose a van with a light color if you are living in a hot and sunny region).
2- If the van is left in the sun without the insulated window covers, the temperature will increase beyond our comfort level (ventilation or not); if the window covers are installed, we can keep the van within our comfort level (with the help of the Maxxair fan).
Winter:
On any cold day, it’s possible to keep the van to our comfort level (66-68F / 18-20°C) when running the Webasto heater. Below -18°C (0F), inside temperature starts to lower; for example at -30°C (-22F) the maximum inside temperature is 15°C (58F) which is actually not that bad considering how cold it is outside!
But what if we turn off the Webasto heater? Does our insulation solution maintain the ambient temperature for a while? The answer is YES, if the insulated window covers are installed (if the window covers are removed, the temperature drops much faster, AND it gets uncomfortable near the windows). In fact, we took the habit of turning the heater off when going to bed and back on when we wake up (or use the MultiControl timer to automatically turn it on 30 minutes before we wake up). The temperature drop during the night, of course, will vary a lot with the outside temperature:
-Outside temperature of 50F (10°C) in the evening dropping down to 28F (-2°C) in the morning: the temperature inside the van will go from about 68F (20°C) in the evening and will drop down to about 50-53F (10-12°C) in the morning. (remember, we turned off the Webasto heater when going to bed).
-Below what outside temperature do we need to leave the Webasto heater running all night? We still don’t know, wait for it! We spent a week at -10F/-15F (-20 to -27°C) last year in the Chic-Chocs (faroutride.com/chic-chocs-winter-wonderland-december-2016), but we didn’t have insulated window covers at that time and our insulation was about halfway done (no ez-cool), so we cannot draw real conclusions from that trip.
Conclusion
We can conclude that insulating a van is not only about Thinsulate, or spray foam; it’s about the combination of different items. In our case: Thinsulate, Ez-Cool, Wood Paneling and Insulated Window Covers.
About thermal bridge:
This photo was taken during the conversion without ez-cool installed; it means all the frames inside the van had no insulation on them:
It was a cold and damp morning (37F), and we were heating the van with the Webasto heater (55F). Note that there was condensation everywhere outside (on the van, on the ground, etc.).
We observed that condensation remains where Thinsulate is installed, but this condensation is “evaporated” at the frame locations where there is no Thinsulate. This is because the frames are forming a thermal bridge for the heat to be conducted from the inside to the outside of the vehicle, thus providing enough heat for the water to evaporate. In other words, there is heat loss where there is no condensation.
We also observed inside the van that the Thinsulate is warm to the touch, while the adjacent “bare” metal frames are cold to the touch. The Thinsulate is doing its job, the bare metal forms a thermal bridge.
To minimize the thermal bridges, we will apply Low-E EZ-Cool to the “bare” frames (the wood finish will help as well). The EZ-Cool is a closed-cell foam sandwiched between two aluminum sheets.


I love your website and instructions. They are so thorough. I noticed during the insulation portion, it appears you did not use a sound deadener, such as Kilmat. Did you decide you don’t need Kilmat and only using Thinsulate is sufficient for both sound deadening and insulation?
Thank you,
Susan
That’s correct! We judge that Thinsulate alone is sufficient. 🙂
Hello
Thanks for all the great detailed information, makes planning much easier.
I have a 2023 Ford Transit that came with a bench seat, which I have removed along with all the hardware it required. I am starting to insulated and have run into a bit of a dilemma. There are two parts to the bulkhead, one above the driver and passenger seats and another above where the bench seat was. The piece above where the bench seat was, was easy to take out and now has exposed the airbags on either side of the van, one above the sliding door, one above the window on the opposite side. At first I was going to just remove them as I thought they were installed specifically because of the bench seat. I noticed that the airbags extend forward into the bulkhead above the driver and passenger seats and looking at your pictures of you guys insulating the bulkhead above the driver and passenger seats I see there is a smaller airbag in the same location of the bulkhead above the driver and passengers.
So I assume that my airbags are bigger as they served two purposes, protect the people on the bench seat heads and the driver/passenger heads. If I remove them, I am thinking this may be a bad move as I would no longer have head protection for passenger and driver.
I don’t mind leaving them and retaining the second bulkhead, I will insulate the ceiling and walls prior to reinstalling it. While the finish of the bulkhead is not what I want I am okay with it. I think the only real loss, besides keeping the factory second bulkhead, is that it may be harder to put any cabinets above the window and even if one did they may be smallish as they would have to be above the airbags.
I would love your thoughts on this.
Cheers
Doug
Hi
Thank you for the very detailed build information. As I understand it the Thinsulate is R factor of 3 – did you double up on the Thinsulate to get a higher R factor or was one layer sufficient. Not sure covered in the installation description.
Thank you
Nicola
Thinsulate’s R-Value is 3.3 per inch, and SM-600L is about 1.75in thick. We didn’t double, except with the leftovers we had (walls close to the roof). Otherwise one layer is good!
salut antoine question sur isolement je vais mette thinsulate entre les ponts thermique et le la laine Havelock Wool dans les ponts thermique et sur lers ponts duck liner auto collant https://tecvan.co/products/famous-duck-liner-camper-van-conversion-insulation
quand pense tu ?
merci a vous pour votre site !
Hello. I am a total beginner starting my first build. Thank you for all your information, you guys are legends. I’m a little confused with sound dampening. I see alot of people using kilmat or siles sound dampening. But then I was told by a Van Builder that his company doesnt use it because Thinsulate is enough to dampen sound. And of course kilmat is quite heavy. So it appears that you guys also do not use any kind of kilmat. Should I forget about kilmat and just use Thisulate and Low E? Ty
I’m wondering the same and did not see a response. I’d love to know the thoughts around this. I see so many people using Kilmat (or similar) for sound dampening.
Have been reading your site for literally years. I finally have a van (2023 Crew High Awd) that I am outfitting.
I plan to use the thinsulate that you have recommended. I purchased Kilmat but have not installed it yet. After reviewing your article, I am wondering if there are are any pros or cons (mainly cons) that I may not be aware of to installing the Kilmat under the thinsulate.
Thanks again for your amazing site!
-John
Great website. i am a retired engineer with 40 years of building science experiance, and expect to finally receive a transit trail in the next month to build out for very cold weather travel. where do i get the document from ford?that tells me how to not void my warranty? i expect to be ordering some materials through your web sites congratulations on what you have accomplished and sharing it.
Hello, thank you so much for sharing your knowledge and experience.
For the ez-cool installation, it looks like before applying the ez-cool, you pre-installed rivnuts and screwed in hangar bolts so that they would penetrate the ez-cool and you could mark the location for later use. I can’t think of another way to ensure that those hole locations could be found for future use.
Is my assumption correct, or did you devise another way to locate the holes for the threaded inserts?
Thanks!
Correct, I think that’s what we did if I recall properly!
I’m having a hard time finding EZ-Cool insulation that ships to Canada. The eBay merchant you linked to does not ship here 🙁 …I feel like I’ve looked everywhere, can you please help?
We used kinek in the past to ship items to the border: https://www.kinek.com/how/
Or use MyUS to forward items to Canada: MyUS.com
Hope this helps,
Antoine
Salut Antoine, petite question, le Thinsulate c’est mince ! Et il reste un bide entre la paroi finition et le Thinsulate dans les « cubicules » est-ce que tu recommandes de rajouter Un isolant supplémentaire entre le Thinsulate et la paroi intérieur de finition?
À ta discrétion.
On a utilisé le Thinsulate extra qu’il nous restait à ces endroits, mais je ne pense pas que l’on aurait doublé autrement.
Antoine