This is an archive of how we installed a Webasto Air Top 2000 STC to our 2016 Ford Transit. Since then, we bought a new 2021 Ford Transit and, again, installed a gas heater. We recommend heading to our latest article for the most complete and up-to-date information:
Good To Know
How to install a new burner following carbon buildup

Where to Buy

Webasto Air Top 2000 ST/STC High Altitude Adjustment Procedure
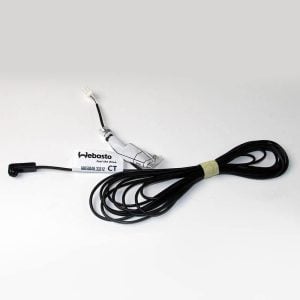
The high-altitude adjustment can be performed by a Webasto dealer; they have access to specialized tools that analyze the exhaust gas to validate that the air-fuel ratio is correct at the altitude where the adjustment is performed. Or you can actually perform the adjustment yourself, like we did. To do so, you will need the rheostat controller:
Webasto Rheostat

Preps
At this point, your heater should be connected (electrical, fuel, etc.) and ready to use. The rheostat should be connected to the pigtail labeled as “User Potentiometer” (ours was located near the heater itself). If you’re using the MultiControl HD, disconnect it. OK let’s do this!

1- Connect the CO2 calibration wire with the ground
- Using any electrical wire, connect the CO2 calibration wire to your system ground. This can be, for example, your negative bus bar.
- Depending on your heater/controller model, the CO2 calibration wire is either brown (look for a 2-wire pigtail; there should be one brown wire and one green wire) or is either grey/red (look for a pigtail with only 1 wire; it’s close to the “Diagnose/Thermocall/Telestart” pigtail). It should be located near the extremity of the harness (far from the heater unit itself).

2- Turn the control knob to 12:00
- Or turn it up to 1:00 for very high altitude (around 10,000ft).
- This will fire up the heater. Wait a few minutes. The LED on the rheostat will eventually begin to flash. Go to the next step.
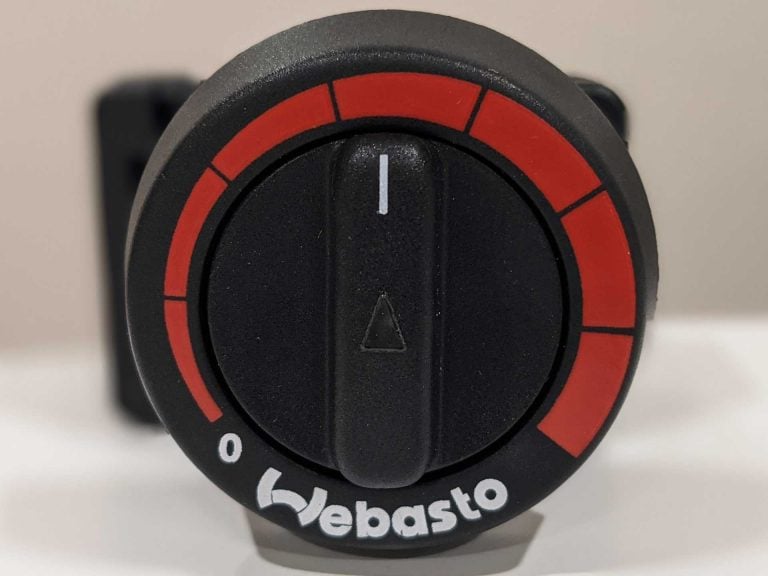
3- Turn the control knob to 9:00
- Or 8:00 for very high altitude adjustment (around 10,000ft).
- Keep the heater running for 3 minutes.

4- While the heater is still running, disconnect the CO2 calibration wire from the ground
The procedure is over! Let the heater run for an extra 10 minutes (this is just so it reaches a high temperature and stays clean) then turn it off.
5- Did it actually work?
At this point, a Webasto dealer would analyze the exhaust gas to make sure the air-fuel ratio adjustment is correct… In our case, there is no way to tell if the procedure was successful or not. Gotta have faith! Time will tell!
6- Driving back to sea level
- According to Tech Webasto, a lean combustion does not damage the heater, so there is no need to change the adjustment back to sea level. A lean combustion will not damage the heater but will, however, reduce the heat output by approximately 100-200 BTU/h which is almost negligible.
- We made the high altitude adjustment in 2017, and since then we have been running our heater adjusted for high altitude at all times (even at sea level). We didn’t notice the reduced output, and we believe that a leaner combustion actually helps prevent carbon buildup (as discussed with Tech Webasto).
High altitude adjustment is permanent
It means that if the Webasto is unplugged, or if the main power is turned off, the adjustment will still be there. This is good news, but you have to take this into consideration when adjusting the heater back to sea level: follow the high altitude adjustment procedure as if you were adjusting it for high altitude, but with the knob in a different position. See section below.
Adjusting the Webasto Air Top 2000 ST/STC back to sea level altitude
- Connect the CO2 calibration wire to ground.
- Turn the heater control knob to 9:00.
- Wait until the LED on the rheostat flashes.
- Turn the heater control knob to 12:00.
- Wait 3 minutes.
- Disconnect the CO2 calibration wire from ground (while the heater is running).
- The procedure is over!
Remote Room Temperature Sensor
The temperature sensor of the Webasto/Espar is located in the heater cold air intake, not in the controller (except for the Espar S2/M2 with EasyStart Pro controller)! This is important to know, as many people believe their heater is wayyyy out of adjustment when they first use it.
Take the case where the heater is installed under the passenger seat: ambient air under the seat is much colder than ambient air in the living space. So setting the temperature of 20°C on the controller is equivalent to setting the temperature to 20°C under the seat; as a result, ambient air in the living space will be much higher than 20°C! It’s not a major issue, but it’s a bit irritating.
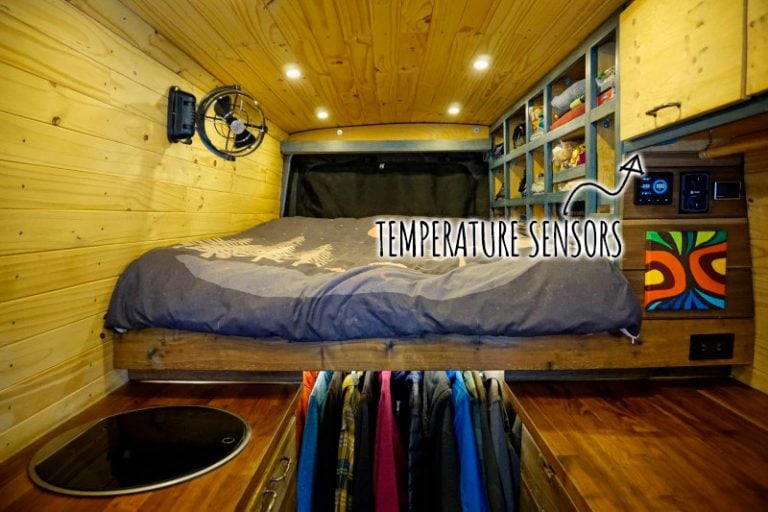
Fortunately, there is a way around it. It is possible to install a remote room temperature sensor. Once installed, the heater will use this sensor instead of the built-in sensor at the cold air intake. We personally installed our remote room temperature sensor near the MultiControl HD, approximately at shoulder height in the middle of the living space (further away from the hot air exhaust). This way, choosing 20°C on the controller means the living space will actually be 20°C!
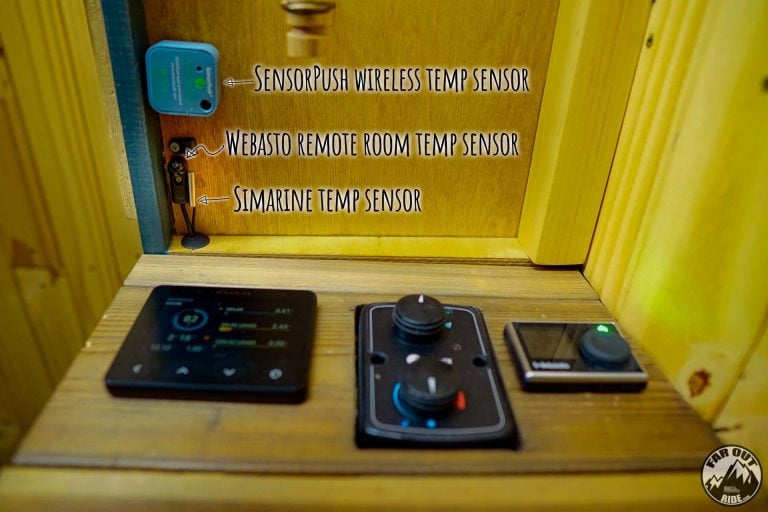
Temperature sensors are best located at shoulder height in a central location:
Webasto, SensorPush (faroutride.com/sensorpush-review) and Simarine (faroutride.com/simarine-pico) temperature sensors:
Remote Room Temperature Sensor for Webasto Air Top 2000 ST/STC
Remote Room Temperature Sensor for Webasto Air Top Evo 40

EasyStart Pro Controller for (new) Espar S2/M2 models

The controller includes an integrated room temperature sensor. Nice!
How to activate all timers on the Webasto MultiControl HD
The MultiControl HD is advertised as having 21 timers, and it does. But there is a catch: only one timer can be active, meaning you can’t actually pre-program your heater for multiple ON/OFF cycles. This is due to legal requirements for passenger vehicles.
Fortunately, there is a way to re-program the MultiControl HD to unlock all 21 timers. After this procedure, you will be able to make all of them active simultaneously:
1- Remove the back cover of the MultiControl HD
Use a small flat bit to pry the back of the MultiControl HD away (pry all around).

2- Connect the brown wire to the second tab of the diagnostic access connector
The MultiControl HD will reboot. Don’t let go! You have to keep the connection until the end of the procedure or you’ll have to start over (that’s the hardest part!).

3- Select “Service” menu and choose the number of active timers
Don’t be shy, select all 21 of them!


Note: The “Service” menu also has a bunch of other options
So be careful not to mess with them unless you know what you are doing!
- Change heater
- Adjust min-max duration
- Permanent mode
- Cancel ventilation
- Temperature range
- Show room temperature (a cool feature)
- Unibox set
- Undervoltage shutdown
- Unlock heater (careful with that one)
- Base configuration
Webasto Installation
This is an archive of how we installed a Webasto Air Top 2000 STC to our 2016 Ford Transit. Since then, we bought a new 2021 Ford Transit and, again, installed a gas heater. We recommend heading to our latest article for the most up-to-date information:
Overview
Time Spent
25 hours
We had a lot to figure out at the time, but we hope this guide helps you finish the job faster than us!
Pre-Requisite
Material
| Item | Description | Qty | Link |
|---|---|---|---|
| Webasto Air Top 2000 STC | Heater kit | 1 | Heatso |
| Mount Plate | *If your kit doesn’t already include one. | 1 | Amazon |
| Ford Transit Auxiliary Fuel Port Kit (per Bulletin Q-228) | Part Number: CK4Z-9B210-A (gasoline Transit) | 1 | eBay |
| Part Number: CK4Z-9B210-B (diesel Transit) | 1 | eBay | |
| Webasto Fuel Line Reducer (7.5mm to 4.5mm) | To connect to the Transit aux. fuel port | 1 | vmacs.net |
| Heat Shield Sleeve 3 feet length | Radiant Heat Barrier for fuel line | 1 | Amazon |
| 3M Undercoating Spray (Rust Proofing) | To seal and protect cut/drilled metal against corrosion | 1 | Amazon |
| 3M SM600L Thinsulate | To insulate the seat pedestal area (you most likely have leftovers from insulating your van!) | 1 | TheSwivelShop |
Install the Webasto/Espar Under The Passenger Seat
Remove the passenger seat
Remove the 2 screws in the front:

Remove the 2 screws in the back:

Disconnect the wiring harness. The seat is free to go!

Remove the jack and trim the bolt
Take the jack out of the way (it can be re-fitted here afterwards). We had to trim one of the jack’s bolts to make room for the heater:

Locate where to install the heater
Good to know
Mount Plate
It is critical to install the heater on a flat surface. This way, the gasket (the large rubber thingy under the heater) can seal effectively and prevent fumes (and carbon monoxide) from entering the cabin. Most likely, your van’s floor is not perfectly flat. That’s why using a mount plate is so important.
The heater must be located so it doesn’t clash with the seat base (black structure with the bar code sticker in the photo below), but also so the combustion exhaust/intake, the fuel line, and the installation bolts are accessible under the floor… it’s more difficult than it looks because space under the floor is VERY tight!
Looking on top:

Under the floor (this is an “after” photo):

If we had to start over
As you can see, we drilled a hole for each component (intake, exhaust, fuel line, mount bolts). This makes the installation / removal of the heater a real struggle because it is SO HARD to work from under the van (because of the very tight space). If we had to do it again, we would probably do it like this:
- Cut a single “large” cutout in the van’s floor.
- Install the heater on the mount plate (exhaust, intake, fuel line and bolts).
- Secure the mount plate to the van’s floor and seal it.
This way, the installation / removal can be performed from ABOVE the floor (instead of under the floor), which makes things MUCH easier!
Update: Check out FarOutVan 2 Espar Install Guide, we did exactly that!
Good to know
Rust Prevention
Paint adds a pretty finish and colors, but it also plays a critical role: paint prevents metal from rusting. When trimming a cutout (e.g. roof fan opening), drilling a hole, or even when screwing a self-tapping screw in the van (we recommend using cross nuts instead), metal is left bare around the edge and eventually initiates rust. The best way to prevent rust is to restore the finish on the bare metal by applying a layer of primer, paint, and clear coat (your local Auto Parts Store can provide this, and they can match your van’s color). Each layer must be allowed to dry, so this is really time consuming… The second best way to prevent rust is to apply a layer of rust proof undercoating (see “Material” section above) on the edges where bare metal is exposed. This is quicker, but not as effective as restoring the finish; it’s definitely better than doing nothing though.
Install the Combustion Exhaust
Good to know
Installation Requirements
To prevent carbon buildup / sooting issues, follow all the installation requirements from the manual (as reiterated in our “Installation Requirements” section above)
Following all the installation requirements (length, slope, bends, etc.) left us with little choice: our exhaust is routed near the passenger-side rear wheel. People often point out that installing the exhaust near the passenger door can let the gas get inside the van… But in reality, the doors and windows are always closed when we use our heater; remember it’s cold outside 😉 So we don’t get anything inside the van. Using the door to enter/exit is not problematic either.

Install the Combustion Intake
We made a mud-deflector-3000 from an old plastic bucket, and it’s zip-tied to the van. Then we attached the intake to it. As simple as that:

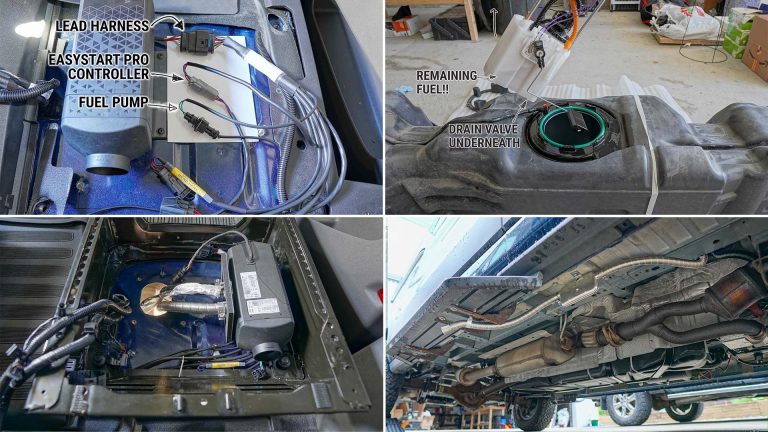
Install the Webasto / Espar Fuel Pump and Fuel Line
Fuel Line
We routed the fuel line (and the fuel pump’s electrical wire) under our Ford Transit as follows:


Fuel Pump
We initially installed the fuel pump using a cross nut and the clamp provided with the Webasto installation kit (not shown in the photo, a small piece of foam as an attempt to dampen the clicking noise):


However, we recently tried to mount the pump with a Quick Fist (amzn.to/39VWWQZ), and the clicking noise reduction is HUGE – to the point where we don’t really hear the pump inside the van anymore. The quick-fist is zip-tied to the tank attachment strap:

Tapping into the fuel tank
Heads Up!
The Transit’s auxiliary fuel port inner diameter is 6mm, which is much larger than what Espar & Webasto recommend (2mm). That’s more volume of fuel to pump and as a result the heater may have more difficulty to start (especially at high elevations) and the fuel line may not stay primed. It may also increase risk of carbon buildup.
We used the auxiliary fuel port for years and it worked (and still works), as described below, but we did have some carbon buildup issues at first and we noticed the heater would lose its prime after 24 hours or so.
From now on, we recommend using Espar & Webasto provided fuel standpipe instead of the Transit aux. fuel port. This is per Espar of Michigan‘s recommendation, following an investigation they performed on the Transit.
You will have to completely remove the fuel tank, which is a bit more involving. We don’t have the instructions yet because we still haven’t installed the heater on our new van, so for now you can refer to the following threads:
The Transit fuel tank features an auxiliary fuel port and pick up straw; no need to drill! That being said, the auxiliary fuel port comes with a plug; you need to purchase and install the aux fuel pump kit (purchase link under “Material” section in this page).
To connect the Webasto fuel line to the Transit aux. fuel port, we initially made our own reducer out of 5/16″ and 1/4″ rubber fuel line:

HOWEVER, we later found this Webasto reducer and we would recommend it instead (it minimizes the formation of bubbles, that’s what we have on our van now):

To install the auxiliary fuel port, the tank must be lowered. So first things first, make sure that the fuel tank is almost empty before lowering it.
Remove the 6 bolts securing the tank and lower it. The tank is surprisingly light weight if emptied. No need to unplug anything, but it won’t go all the way to the ground, so use about just anything to keep it higher:

This is how it looks after putting it back together. We protected the Webasto fuel line inside a rubber fuel hose, but looking back many years later, it seems that might be unnecessary as we didn’t observe any damage from rocks or any flying object.

Fuel Pump Electrical Connection
The fuel pump has no polarity. In other words, it doesn’t matter which wires you connect together.
Cabin Exhaust (Hot Air Duct)
We used a holesaw (2-3/8″) to create a cutout in the seat pedestal (and restored the finish on the bare edge):

We installed the Webasto outlet on the seat pedestal and we used the provided clamps to secure the duct:

Cabin Intake (Cold Air)
Simply snap the protective screen on the Webasto intake (sorry no photo, but you’ll figure it out!).
Electrical Wiring
Connect the wiring harness to the Webasto. We routed our harness between the seat pedestal and the floor and then in the driver-side wall all the way to our electrical system cabinet.
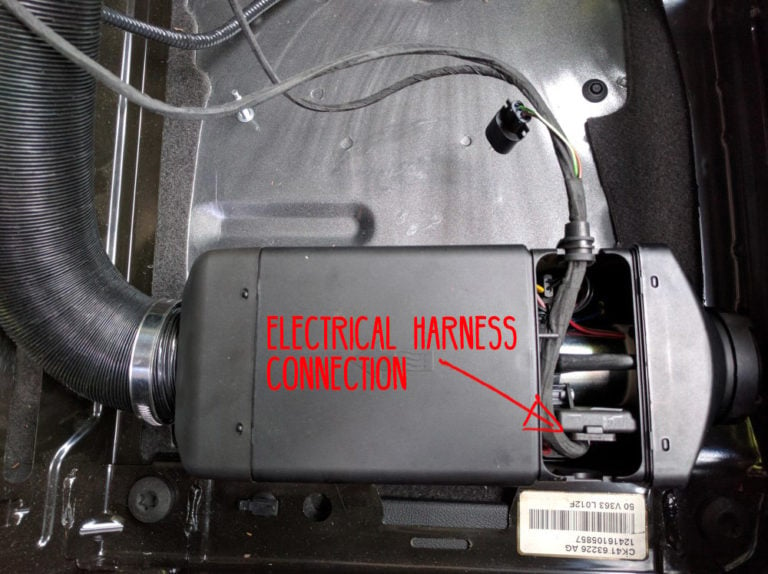
Connect your controller to the harness (the rheostat is connected to the pigtail labeled as “Potentiometer”, or the MultiControl HD to the pigtail labeled as “Telestart”):

Connect the wiring harness to your 12V distribution (fuse block). Red wire is positive, brown wire is negative. We’ve got a diagram & tutorial for you if you’re still at the stage of figuring things out 😉

Remote Room Temperature Sensor (Optional)
We mentioned in the “Good To Know” section that the temperature sensor of the Webasto is located at the cold air intake of the heater. As a result, there is always a mismatch between the temperature obtained in the living space compared to the temperature selected on the MultiControl HD (the living space is warmer than selected). The solution is to install a remote room temperature sensor in the living space (near the controller): once installed, the Webasto heater will use this sensor instead of the one in the cold air intake. Then the living space temperature will match with the one selected on the MultiControl HD! Here is how to install the remote room temperature sensor on the Webasto Air Top 2000 STC:
There is a resistor hidden somewhere in the wiring harness. The goal is to replace the resistor with the remote room temperature sensor instead:

Here is what the resistor looks like (after we trimmed it). Expect it to be hidden in the wiring harness under black tape, so you’ll have to search for it:

We found the resistor near the Webasto heater itself. The remote room temperature sensor is 5 meters long, that was more than enough to route it towards the back of the van:

We installed the remote room temperature sensor near the MultiControl HD, and, since then, the temperature of our living space matches with the temperature we select on the MultiControl HD!
Starting The Webasto for the First Time
You made it! Ready to fire up!
- Not so fast… we emptied the fuel tank in order to lower it, right? Remember to refill it 😛 On the Ford Transit, the tank must be above 1/3 full or otherwise the pump will only suck air.
- If you’re doing the installation during summer, you should know that the maximum outside temperature (for combustion air) allowed is 20°C. Above 20°C the heater might not want to start or might automatically shut down.
- The fuel pump on the Webasto/Espar is self-priming. There is no need to manually fill the fuel line. However, expect around 2 to 4 false starts before the fuel line is primed (before the fuel reaches the Webasto heater). The longer the fuel run between the fuel tank and the Webasto, the longer it takes for priming.
- A “false start” is when the heater does not detect fire and aborts the startup sequence. It takes about 2 minutes for the abort sequence to kick in. Once it kicks in, the heater stops pumping fuel, and the combustion fan goes full speed to evacuate the excess unburnt gas from the combustion chamber. Let it do its thing. After a false start, the controller flashes to indicate an error; it has to be reset before it can be fired up again.
- Once it successfully starts, let it run at max power for at least 15 minutes. As you know (you read the “Good To Know” section, right?), once started, the Webasto/Espar should always be allowed to reach its maximum temperature to keep it clean.
Review
Recap of Events and Issues we had
2016
- Installation (July).
- Carbon buildup issues. Heater won’t start (December).
2017
- Heater is sent for inspection and cleanup. It’s working again.
- Full time vanlife (August)
- Issues come back (October).
- New burner install (see our detailed How-to). It’s working like new. Exhaust silencer is removed, drain holes are added, better downward slope. We adjust the heater for high altitude. From now on we operate our heater as described in “Good To Know” section.
- A Propex HS2000 propane heater is added as a backup in prevision of winter (we’re still nervous about our Webasto). Unless we have issues with the Webasto, we don’t use the Propex.
2018
- No issues at all.
2019
- No issues at all.
- Remote room temperature is added.
- We activate all 21 timers on the MultiControl HD.
2020
- Still no issues! It’s fair to say our corrective actions from 2017 solved the issues.
2021-Present
- Still no issues! But as winter is coming, we decided to install a new combustion chamber as preventive maintenance.
What we like / don’t like about our Webasto Air Top 2000 STC
- We absolutely LOVE that it’s using the fuel from the van tank. This is a MAJOR benefit as we don’t have to fill an auxiliary tank (e.g. propane tank).
- It’s DRY heat, which is critical in a van. Using the heater lowers the humidity, and we can easily keep it below 40-50% RH in winter.
- The hot air fan is powerful; it dries our gear (ski boots & clothes) super fast.
- The fact that it can be programmed to start/stop automatically is neat.
- Low fuel and electrical consumption.
- It pushed way more heat than the Propex HS2000.
- Gas/Diesel heaters are more finicky than a propane equivalent. They’re sensitive to a proper installation and usage.
- The pickup straw will “unprime” if the tank is lower than 1/2 and we go for a drive (the pickup straw is emptied when it’s not in contact with fuel). This means it sometimes takes 2 startup attempts the next time to re-prime it.
- More noise than a propane heater.
If we had to start over
We’ve been living full time in our van since 2017, and we’ve been through a lot, so it’s fair to say we know what works and what doesn’t work for us. SO, if we had to build another van, what heater would we choose? We would go for a gasoline/diesel heater again over a propane heater. We did have issues at first, but we learned a lot and we’re confident we can get it right the next time.
Related Guides
That’s it, you reached the end… but there’s more! We also prepared the following guides, which are very related to the heater topic:


I’m wondering if you could expand on why the worm drive hose clamps are bad? And what you would use instead on the fuel line hose connections?
A lot of us who use Chinese diesel heaters are left to troubleshoot which components we should “upgrade”.
Sure!
Worm-drive clamps are not intended to maintain a seal in a high-pressure system and can pinch the hose, allowing air to enter and causing bubbles.
They may also loose due to vibration over time.
Good luck!
Antoine 🙂
Hi,
Ive been wondering about the longevity of something like this. I recently bought my own heater and am installing it as i write this but as i was doing so, it occurred to me that this is going to feel every hole this goes over.
You guys have had your heaters for quite a long time. Is there anything you’ve done to dampen the vibrations from off roading/normal wear tear from driving? Or wanted to do?
Are there any parts of this that youd be concerned over the robustness of the heater?
These things are extremely robust. Expect for the fan, there are no moving parts!
The only concern is carbon buildup in the combustion chamber over time. But if you install and operate your heater properly (we discuss that in this article), it shouldn’t be too much of a concern and the heater will outlive the van!
cheers,
Antoine
Hey there!
I installed our Webasto Air Top 2000 STC and works great, thanks to your guidance. I’ve tried the Service Menu hack on my MultiControl HD, but it doesn’t seem to work. Every time I release the two connection points noted, it and not in Service mode. I’ve tried holding for up to 2 minutes and it still does the same thing. Is there a change to newer units perhaps?
I spliced the temp sensor into the harness of my airtop stc and definitely still reading temp from the air intake still. Any wisdom on how to troubleshoot this.
Howdy,
I’m a longtime follower and on my second van build. Your website has been a priceless resource. Last one I had the Propex which was amazing, but I’m going propane free on this build. Trying to decide between the Espar AS3-B2L and the Webasto 2000 STC. Seems on paper the Espar would be the better decision, but after reading some reviews, seems a lot of people are having issues with it. Now that you’ve had it for a bit, have you used it much? Would you recommend one over the other?
Thanks!
We haven’t use it much, to be honest. Still in the build process!
I’m expecting the Espar to be as reliable as the Webasto, even more considering the automatic altitude adjustment. Both brands are very common, similar design; these things are very robust (unless you’re getting a cheap knockoff on Amazon).
Any tips for sourcing a wiring harness for the programable multi control unit?
I have rheostat and harness and the multi control unit but I have not attempted to install the new control unit yet.
Most of the harness options I have found are $200+
Any tips?
No hack or tips, sorry. We just ordered ours from an official distributor (I think we used Mellor Online at the time).
Good luck,
Antoine
I Antoine and Isabelle,
Webasto finally gave me a definitive answer, so I have what I need. ‘By the way,
the standpipe I bought was U shaped and had a large bolt and washer that was too big to fit. I spent a lot of time trimming plastic and the standpipe washer and seal and marking the EXACT spot to drill the hole to make it work. It would be most helpful to others if you posted a link to the straight Espar standpipe with the small bolt assembly on the website and warned people not to buy the one that I did!! m
Thanks so much as always for the incredible work that you two do!!
Larry
Hey Antoine,
Its me. Larry from Santa Rosa again. I just installed my heater and fired it up today. it works and all seems good. Thanks to you and your detailed install instructions. I have bought my heater a few years ago and then got the older Multicontrol that looks just like the Multicontrol in 2.9 above. I also got the remote sensor, 1319842A, but cannot find the resistor you mentioned so I can hook it up, I hope its not behind the paneling in the wall!! Can you please tell me how far from the heater the resistor is? I think that I cut out the resistor and splice in the two wires from the sensor. Correct?
Cheers, take some time off, tell the entrepreneur side of your brain, your going to shred instead!
Hi Lawrence,

We found the resistor near the Webasto unit, it was under black tape. Sorry I don’t have access to it right now, but here is a photo of when we installed it:
You have to remove the resistor and install the sensor like so:

Hope this helps!
Cheers,
Antoine
Hi Antoine and Isabelle,
Thank you so much for taking the time to try to help me. My wires are deep inside the paneling and I cannot reach the resistor. But actually, I don’t think I need to. I have found the red, white, blue and black wire loom that comes out of the heater. All I need to know is which two of the four wires to cut and splice with the brown and white wire that come from the remote heat sensor. I have been corresponding with the company that sold it to me (Butler Technik) and after a week of vague answers, the closest I have come to figuring it out is from the photo they sent this morning. It conflicts with the one you sent because your drawing shows only the heat sensor being connected to a yellow wire that the resistor was in. Please let me know if you have any further information. If not, I will keep hoping that Butler Technik will provide an answer.
Cheers to you!
Hello
Hard to tell from the pictures but is it possible to have the fuel pump on the other side of the tank so you don’t have to cross over the muffler etc?
Thanks
Peter
Not sure about that, I haven’t checked.
But either way you’ll have to cross over the exhaust if you want to install the heater on the passenger seat. NOTE: It’s very important that the fuel pump is not installed in high-temperature environment (near the vehicle exhaust) to prevent cavitation (gas evaporating and making bubbles = vapor lock).
antoine
Hi,
I am Gary and am planning my Ford van conversion and trying to do this methodically.
In sizing my electrical demands, I am planning
Eberspacher Airtronic AS3B2L Gas Heater (2.2A max)
Norcold 1.7 cu ft Upright fridge (3.6Amp )
Maxxifan deluxe (6Amp max, 0.4Amp on medium)
3 or 4 LED puck lights
A few USB outlets for charging battery pack (65W) iPad, iPhone and Surface when needed.
I plan on installing
2 100ah Li Batteries,
Renology 60A DC-DC charger (choosing 60 to charge batteries from alternator
2 200W Renology solar panels
My questions..
… “what is your experience with the heater .. Is it really 24 hours at 2.2 Amps = 53AmpH per day or is there a 50% 0r 30% factor?
Related question..
… “Any your experience with fridge .. Is it really 24 hours at 3.6 Amps = 86AmpH per day or is there a 50% 0r 30% factor?
I am hoping to confirm my battery storage (200 ampH) is sufficient for a few days “off grid”.
Hello,
The heater doesn’t run 24h; the running time varies A LOT depending on outside temps. It can go from 1h or 2h a day (just to warm up in the morning until the sun come up), up to 15h (guesstimate) if it’s very cold (we spent some time at -32°C). Related:
– Winter Vanlife Guide
– Air Heater Installation
The fridge doesn’t run 24h neither, and again it depends on ambiant air temperature. As a general rule, our fridge run around 20% in winter, close to 50%-60% if it`s really hot.
Related: 12V Fridge Guide.
From what you listed, 200aH Lithium seems enough. This setup is exactly what we have in our first van and we had plenty of power!