We often say that our Webasto air heater is one of the best feature we added to our campervan conversion… until it stopped working… Unfortunately, Webasto / Espar are prone to carbon buildup if some parameters are not right. What is carbon buildup (also know as soot, coking, carbon debris)? It’s evil! It takes root in the burner insert and slowly accumulates under the form of hard black/grey ashes:

This hard carbon deposit clogs the stainless steel “sponge” found in the burner insert; the role of this sponge is to diffuse the fuel and mix it with air. The hard carbon also builds its way up just outside this sponge, messing up the air flow in the burner and speeding up the carbon debris accumulation.

If the Webasto heater can’t start and/or shut down prematurely, it’s probably a symptom of hard carbon buildup. We had these symptoms after only 200 hours of using our Webasto Air Top 2000STC (we have the gasoline model).
Carbon buildup CANNOT be removed/cleaned from the burner insert! Because the stainless-steel sponge is so fine, it’s impossible to remove the carbon from there. An attempt to clean it will give the impression that it solved the issue, but carbon buildup will come back after a short period. This is what TechWebasto told us and we believe it’s true, because our burner insert was cleaned and the symptoms came back after about 75-100 hours…
Well, cleaning the burner insert didn’t work. It looks like we have to replace the burner insert and this is the topic of this article! But first, we would like to eliminate the source of the issue… what causes hard carbon formation in the first place?? We’re no expert, but here is the information we gathered during our saga.
Causes of hard carbon formation
- Webasto gasoline models are more prone to carbon buildup than diesel models! This is counter-intuitive, but this is what we were told by TechWebasto (quote: “because gasoline is less energy-dense than diesel“) AND we found SO MANY people with issues that we believe it’s true.
- A rich fuel/air ratio (too much fuel) will lead to carbon buildup. There is less oxygen at higher elevation, so the mix get too rich in fuel. If used frequently at more than 5000 feet, the unit should be adjusted for high-altitude usage (faroutride.com/webasto-espar-high-altitudes/). In fact, we will go ahead and say that the gasoline models should be adjusted for high altitude out-of-the-box, whatever the altitude you will be using the heater.
- Air flow restriction in the intake/exhaust pipe. The total length of the intake + exhaust pipe should be less than 5 meters. If using a silencer, the length is reduced to 2 meters! Condensation accumulation in the exhaust pipe will also create air flow restriction, so a 3/16″ drain hole MUST be drilled at each low point in the exhaust routing (see our Installation Article).
- Short cycle time. If the Webasto is fired-up, it should be run for no less than 20-30 minutes.
- Running on LOW for extended period of time and cycling ON/OFF.
Now that we have a better understanding of the carbon buildup causes, here is our plan.
Installation mods to prevent carbon buildup
- Replace the burner insert with a new one (keep reading for more!)
- Perform the following to reduce the chance of carbon buildup:
- Remove the exhaust silencer.
- Drill drain holes at low points of the exhaust routing.
- Adjust the Webasto heater for high-altitude usage (we would do this even we didn’t plan on going to high altitudes). This is still O.K. to use it at sea level; the downside is that we can lose around 3-4% BTU, but we rather live with it than have carbon buildup again!
Operation mods to prevent carbon buildup
- Run the heater at HIGH for about 10 minutes before turning it off, every time.
- Don’t let the heater run at LOW for more than a few hours. And NEVER let it cycle ON/OFF. To do so, we use the Timer and Program features of the MultiControl HD (Buy on Amazon). For example, we run the heater at HIGH when we go to bed and set the Timer to turn it off an hour or so later (the time totally depends on the temperature outside). Then we set the heater to start early in the morning using the Program feature. That prevents the heater from running on LOW and cycling all night.
Are we sure these will solve the carbon buildup problem? NO! But we like our heater so much (when it works) that we’re willing to give it a try!
Follow-up
- October 2017: We performed the mods listed above.
- March 2018: The Webasto worked fine all winter 🙂 No maintenance performed.
- February 2019: Still running fine, no issues! No maintenance performed.
- September 2020: Still running fine! No maintenance performed.
- September 2021: Still running fine, but we noticed it takes a little more time to ignite. After 4 years without performing any maintenance, we decided to replace the burner insert as preventive maintenance for our peace of mind (winter is coming!). The amount of carbon is actually not that bad for 4 years without any maintenance:

Material
Order these from a local Webasto dealer (Webasto Dealer Locator) or from Amazon:
- A new burner insert
- Gasoline/Petrol (for AirTop 2000ST or STC model): Part Number 84883A (amzn.to/2GZXM36)
- Diesel (for AirTop 2000ST or STC model): Part Number 1302799A (amzn.to/33Y7coG)
- A new set of gaskets (Do NOT re-use the same gasket!)
- Gasoline/Diesel: Part number 82302A (amzn.to/340RHfx)

Resource
- Webasto Air Top 2000 STC Workshop Manual
- Webasto Air Top 2000 ST Workshop Manual
- This video made by TechWebasto: (this video is pretty much all you need, MAKE SURE TO WATCH IT)

Let’s do this!
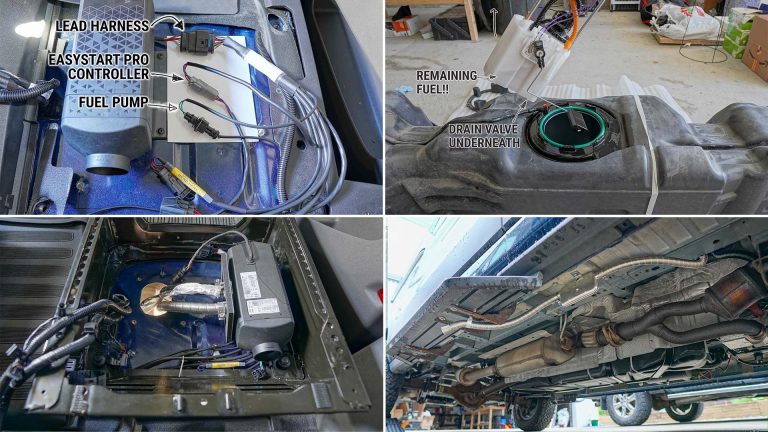
First things first, get that faulty Webasto heater out of the van. Since we installed it ourselves, we figured how to remove it: https://faroutride.com/air-heater-installation/

We want to thank our friends Chuck and Sam for hosting at their place during that process, that helped A LOT!! Sam is a young talented photographer about to build and move into a van, make sure to check him out!!
- Website: samuelwerstak.wixsite.com/mysite
- Instagram: www.instagram.com/samwerstakphotography/
We now remove the plastic outer casing. No tools needed, it’s all clipped-on:

We then use a flat head screwdriver to spread the retaining clip of the fan:

Next, we disconnect all the connectors from the control module:

And we remove the control module. There are 3 screws to remove:

The control module can then be removed:

Next, we remove the combustion fan module. There are 5 screws to remove:

The combustion fan module can now be removed. Discard the gasket:

We’re getting close to the burner insert. Remove these 4 screws and the 3 rubber grommets:

Now, pay attention. The complete combustion chamber assembly wants to come off, but it won’t work because the fuel pipe (which is attached to the burner insert) won’t clear the cutout. You need to separate the burner insert from the rest of the combustion chamber assembly. They are slightly sticked together, use a little bit of force or use a flat head screwdriver to pry them apart. Here is a picture showing how they come apart (the picture was shot later in the process):

Note that there is a gasket between the burner insert and the combustion chamber, discard it.
Here is the removed burner insert:

There is definitely carbon buildup in there:

The flame monitor (gasoline models only!) and the glow pin are still attached to the old burner insert. Remove them and keep them for re-installation in the new burner insert:

Here is a sneak peek inside:

There is soot in the form of fine black powder. We cleaned it using a toothbrush and White Gas (Camp Fuel). (the manual says to use benzine, but we’re not sure where to find that?!):

O.K., it’s time to re-assemble everything using the new burner insert and the new gaskets. Just do everything in the opposite order! Be very careful not to bend the fuel pipe of the new burner insert and be careful to replace the electrical wire at the exact same place they were. Just look at the pictures above as reference.
We’re done with the burner insert replacement!


Hello, Im living off grid in a 10×16 insulated building using propane blue flame heater 75 bucks to fill tank. Was wondering your opinion on what diesel heater to use. I would like to use also in my full size van when traveling. Thanks for your response and time on recommendations. Sincerely Terry
Isabelle and Antoine, your website has been a huge inspiration and guide for our self-built-out Promaster. Thank you for all your hard work, we share your site with everyone interested in van life. We are ready to purchase and install a heater. I have studied your information very carefully (and a zillion hours on Youtube), we feel the Airtop STC2000 will be good for us, and I will follow all your recommendations for install and operation. We want to do a trip out west and where we will be at elevation for weeks. You mention your units has worked well for you for the past few winters – were you at elevation (say at 7000’+) for weeks at a time? I really don’t want the unit to shut down mid-trip and overall it on the road, but I may bring a spare burner just in case.
We spent extended time at elevation, yes. When you do, try to run the heater at higher settings to keep it clean, it should be fine!
Do you know if it’s possible to replace the stainless steel sponge?
It’s been a while since I opened that thing, but if I recall correctly it’s not possible. And I don’t think there’s a part number for it (cannot be ordered).
Our 2018 Safari Condo Promaster Mx has a Webasto 2000 ST. In 2019, we used your instructions to calibrate for high altitude. Other than frequent false starts (error F 01), always resolved on the 2nd or 3rd attempt, we’ve had no issues with the furnace, and are big fans. This week we were camped at 9300′ elevation The furnace started, but the exhaust was dark and stinky. We’ve never seen that before, and immediately shut the furnace off. We’re home now, and I turned the furnace on, hoping the issue might have been bad gas or high altitude. Now the furnace shuts down after a couple of minutes, and flashes an F14 code (per Webasto Troubleshooting table, overheating sensor incorrect posiition). In your experience, does the need for a new burner manifest itself so suddenly?
Not necessarily suddenly, but after some run time at high altitude. There’s many variables so it’s hard to tell. Only way to really know is to open it and check. Personally, before opening it up, I’d get a replacement burner handy in case it has to be changed (so you don’t have to do the job twice).
Good luck!
I want to thank you for the guide. It is very well done and maintained through the years. I recently;y purchased a vehicle with a non-working Webasto air top and the information here looks to be what I need to get it going again. One detail I notice is the repair parts are higher in price than buying a new heater. Plus, the new heater is ready to work when it arrives no tinkering. I’m curious why did you invest the extra funds and time into the older device instead of purchasing a working replacement for $150 on Amazon? Thanks
At $150, you must be talking about the Chinese knockoffs, and personally we stay away from them. They COULD be OK, but we believe the quality control is lacking and we don’t want to recommend or use them.
A genuine Webasto sells for well over $1,000…
Thank you. A great article.
Thank you a lot for your post. Interesting.
I have a Petrol Airtop 2000 st WEBASTO.
I believe I have to install new burner.
I am expecting problems will come back tough. I have been told my Model do not have altitude kit and is not even possible to install.
Practically I leave pretty high altitude, about 1800/2700mt and I do think this kit will have problems alltime.
Different is the 2000stc Model wich have altitude kit included.
Do you think I should switch. Is your a 2000st or stc
Just installed my 2000 STC and it’s working great all thanks to your guide! I also got the multicontrol. When you mention “Run the heater at HIGH”, what do you mean by that? On the multicontrol I only see one heat option which is “normal” and then I can set the temperature range between 5-35 degrees. Do you mean setting it to 35 degrees when you say “run on HIGH”?
Thanks!
Yes, setting to the highest temperature will make it run on HIGH.
Awesome, thanks so much for the quick reply Isabelle 🙂
Hi Antoine and Isabelle –
You folks are our heros! Thank you for sharing so much detail with the world of van lovers. We just upgraded from a old, minimally converted Sprinter to a “new” used 2015 Sprinter Van that was converted by a enthusiast who did a really nice job. The only item not working well was the Webasco gasoline heater. Your post on this was a great find for us.
We’ve ordered the replacement parts and are now wondering if we need to remove the whole unit in order to get to the innards that need replaced or if this can be done more simply by accessing the top of the unit under the seat. Any insights would be helpful.
Thanks and happy new year + travels! Laurie and Dan, Fruita, CO
You’ll have to remove it to be able to work on it, and also because it’s really dirty 🙂
Hey,
Thanks so much for all your detailed hard work. I am just about to purchase a burner insert as I have run into the same issue. I was wondering if you got the genuine webasto burner insert or one of the many many others that exist out there for about 1/6th the price. I am struggling to find any reviews of the webasto version or the off brand ones.
Thanks,
Eric
We got a genuine one, sourced as noted in “MATERIAL” section above. I believe it was around $120-$140.
Cheers
Thanks for the quick reply. Is there a trick to getting the glow pin out that you found? Mine wiggles a little, but will not come out.
Thanks,
Eric
It’s been a while, but if I recall correctly it came out pretty easily… Did you watch the video embeded on top of this page, maybe that would help? Good luck!
Is your heater still going strong a year later? I just pulled my gasoline 2000ST apart after an F-02 error and found an insane amount of carbon built up inside the burner tube and heat exchanger. Hard to tell if the burner itself is really that fouled up but seems worth it to just replace it while I’m in there.
The dealer I paid to install the heater originally claimed to have adjusted the unit for high altitude (I told them I regularly use it above 8,500 feet) but I got the feeling they didn’t actually do anything. I’ll be following your adjustment method once I reinstall the heater.
Still working fine! Didn’t do any maintenance since October 2017 (when we replaced the burner assembly).
Make sure to run it on HIGH frequently. Also do you have a silencer?
I bought an exhaust muffler and intended to install it but won’t now that I’ve read this. You do recommend an intake silencer/filter though? I have been pretty good about running my heater on high regularly. The problem is I live at 7,000 feet, so I might have been doing more harm than good with an unadjusted unit!
Also, I’m going to run the high altitude adjustment on mine and have a few questions:
– I have the 2000 ST (as opposed to the STC) — have you heard from others with my unit that have had success following the procedure in your how-to? Looks like it’s just a different wire that needs to be grounded in the case of the ST (the brown one!) but want to make sure it’s not some wildly different procedure.
– Did you end up having your exhaust gas analyzed for % CO2 after you made the adjustment? And did tech webasto share the document with you containing the suggested levels per elevation?
Hi,
– We are running the intake silencer, it seems fine (not much air restriction, provides some kind of air filter).
– Yep, the procedure is the same ST vs STC (like you mentioned, maybe just a different wire to ground?). We haven’t analyzed our %CO2 and I don’t know the exact level to aim for.
Cheers!