Condensation and moisture are pretty much inevitable when living the vanlife. While it is normal occasionally and at a certain level, precautions should be taken during the van conversion by selecting the appropriate materials and techniques, but care should also be taken after the conversion in the day-to-day. Ignoring this issue could turn your van into a fungus incubator… Sharing your home with mold colonies could lead to serious health issues, no joke. And once the molds invite themselves to the party, it’s almost impossible to kick them out definitely.
And in the short term, living in a high-humidity environment is uncomfortable. That’s plenty of reasons to do something about it!
Prologue
WE ARE NOT ALONE.
An aircraft is basically a big van with wings.
No, really, we mean it: it’s a big box made of metal and has humans in it. So they share the same moisture problem, and a lot of money is invested in understanding and controlling moisture as it’s leading to multiple problems: it “rains” on passengers and electronic equipment, condensation is trapped on sheet metal (skin) and creates corrosion issues, gallons of water accumulate in insulation (a.k.a. blankets) and at the bottom of the fuselage (there are drain valves, but they sometimes get plugged with dirt). So aircraft manufacturers spend big money in R&D to understand and control nuisance moisture.
Here’s a very interesting and highly recommended article published by Boeing:

This passage is an absolute classic. You shall memorize it:
Because moist air will inevitably come in contact with cold structure, condensation cannot be eliminated. As a result, Boeing chose to evaluate potential moisture-control systems that can help […] minimize condensation, minimize dripping onto equipment and into the passenger cabin, maximize liquid drainage, optimize evaporative drying from wet surfaces and insulation blankets.
Theory
Don’t worry we’ll do this quick.
Concepts
ABSOLUTE HUMIDITY (AH)
Air contains gases (Nitrogen, Oxygen, etc.) and water vapor as well. AH is the total mass of water vapor present in a given volume or mass of air.
AH doesn’t vary with temperature because the amount of water remains the same.
RELATIVE HUMIDITY (RH)
The amount of water vapor divided by the amount needed for saturation at the same temperature.
0% means there’s no water in the air; 100% means that the air is saturated with water vapor.
RH varies with temperature because hot air can contain far more water vapor than cold air.
DEW POINT
Temperature to which air must be cooled to become saturated with water vapor.
CONDENSATION
Water that collects as droplets on a cold surface (below dew point) when humid air is in contact with it.
Think Inside the Box
This is a box filled with air:
- It’s sealed, so nothing can come in/out.
- It has a given amount of water in it under vapor phase (AH).
- Air has a given relative humidity (RH).

If temperature is increased:
- AH: Remains the same (no water was added into the box).
- RH: Lowers (hot air can contain more water vapor).

If temperature is lowered:
- AH: Remains the same (no water was added into the box).
- RH: Increases (cold air can contain less water vapor).

Skeptical?
Reality Check (no heat source)
- If our FarOutVan is left alone for a few days (no humans, no heat, no ventilation), it should act like our box above right?
- With the help of the awesome SensorPush sensors (faroutride.com/sensorpush-review), we plotted this graph which is exactly in line with the theory above!

Reality Check (Webasto)
- Now let’s fire up the Webasto and see what happens…
- Yep, it works! Let’s continue with more theory then.

Neat, we just found a way to lower the relative humidity (RH): HEAT!
Don’t celebrate too fast because these will add more water to the air (and therefore increase AH):
- Humans and pets (breathing and sweating).
- Cooking.
- Damp clothes.
- etc.

Dang, now what?
Increasing temperature will lower the RH, but it’ll get too hot in that box…
- What about exchanging the air from inside with fresh air from outside?
- It’s a good way of getting rid of water that was added by humans, cooking, etc.

And even better…
Ventilation + heat will lower the AH, RH and keep the ambient temperature at an acceptable level!

Wait… we created a…
… A DRYING MACHINE!

Back to our box
Condensation happens even if ambient air is below 100% RH…
- Here, we have a nice ambient T° (68F) and RH (50%).
- At 68F and 50%, the Dew Point (TD) is 48F. It means cooling the air to 48F will bring RH to 100% (and vapor will turn into liquid on surfaces).
- Because the T° outside is cold, it lowers the surface temperature below Dew Point.
- The closer the air gets to the cold surfaces, the cooler it gets, the higher RH gets.
- T° of air in contact with cold surfaces is below Dew Point (TD), so there is condensation.

So what?
The solution is to add insulation so that the T° of the surfaces (inside) is above the Dew Point!
- The dew point is now somewhere inside the insulation; if the insulation is perfectly impermeable to water vapor, we eliminated the condensation issue!
- We’re still in the “THEORY” section, so that works. In the real world, it’s hard to achieve…

How to Control Moisture and Condensation in a Van
Moisture Sources
These increase the absolute humidity level by evaporating water in the air:

Respiration and Transpiration
At rest: about 50 mL per hour per person (that’s 400 mL overnight).
Cooking
More or less, about 250 mL of water is evaporated when cooking a meal.
Propane Combustion
A 10,000 BTU burner produces 450 mL of water per hour.
Water vapor (H2O) is a product of propane combustion: C3H8 + 5O2 –> 3CO2 + 4H2O
Drying Stuff
Guesstimate: 250+ mL per day.
Dishes, dish cloth, boots, jacket, etc.
TOTAL
1L to 3L of water is added each day to the air, contributing to increased MOISTURE CONTENT.
Mythbusters
We’d like to start with ideas that are frequently mentioned in discussion forums or Facebook groups. Please make the Internet a better place by NOT RECOMMENDING these! 😉

Moisture Absorbents
TYPES: Clay, silica gel, calcium oxide, calcium sulfate, etc.
A.K.A.: Cat litter, desiccant, moisture absorber, etc.
WHY THEY DON’T WORK: They’re made for small spaces (storage box, small closet) where no moisture sources are present. They can absorb between 10% and 40% of their weight, depending on the type. Best case scenario, 1kg will absorb 400g (i.e. 400ml) of water. One would need to use a few kilos each day to control moisture and condensation in a van. It’s just not sustainable! (unless it’s being used for a storage box or a small un-vented drawer, for example)
candles
Candles create a zen mood and warm your heart, but that’s about it.
WHY THEY DON’T WORK: Water vapor is a product of combustion, so a burning candle actually adds water to the air (but nothing substantial to worry about). At 100 BTU/h, it won’t increase the temperature in the van either (so no effect on RH).
Ventilation
Ventilation is critical to control moisture and condensation. It replaces the “polluted” inside air (charged with moisture, CO2, carbon monoxide, cooking smells, etc.) with “new” fresh outside air. A functional ventilation system must have exhaust(s) and intake(s).

EXHAUST
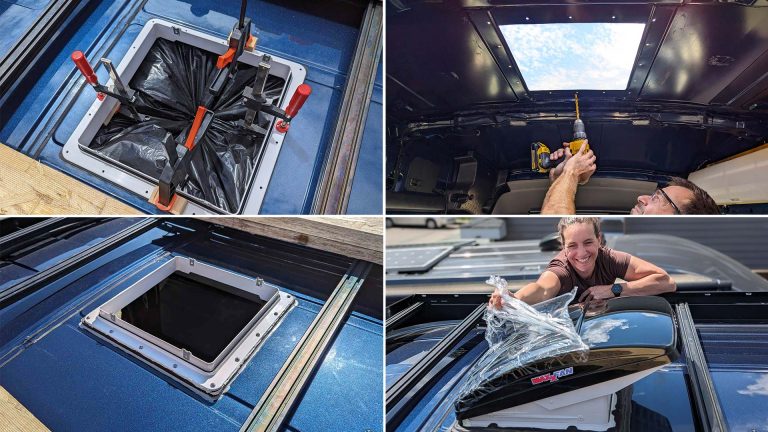
ROOF FAN
EXHAUST OR INTAKE?
Hot air rises towards the ceiling. Remember that hot air is able to contain far more water vapor than cold air? While the hot air near the ceiling might be at an acceptable relative humidity (RH), it contains more water vapor by weight. By having the fan in exhaust mode (catching the ceiling’s hot air and pulling it outside), more water is thrown out of the van (as well as other pollutants)! Therefore, we always run the roof fan in exhaust mode.
MAXXFAN OR FANTASTIC?
The Maxxfan has an integrated cover that prevents rain from entering the van, even when the fan is running. On the other hand, the Fantastic is basically like a big hole-in-the-roof: its cover must be closed when raining. To compensate, the Fantastic has a sensor and will automatically close when it detects water. But it’s when it rains that controlling moisture and condensation is critical! From our experience, not being able to ventilate when it rains doesn’t make sense. For this reason, we highly recommend the Maxxfan.
INTAKE(S)
The volume of air “removed” by the roof fan must be replaced by the same volume of fresh air, otherwise the ventilation system doesn’t work. In most cases, there is no fan to push the air inside: as the exhaust fan creates a negative pressure inside the van, air is “sucked” into the van by any intake available (windows, holes, cracks, etc.) This is referred to as passive intakes.
Keep in mind that a passive intake offers resistance to air flow; too small and your intake won’t be effective (so your ventilation system)! Try it: close all intakes (windows, holes, etc.) and you will hear the roof fan “force” as it cannot pull air outside.
Think of surface area: ideally the intake should have a similar area to the exhaust. For example, the Maxxfan exhaust is 12in diameter; that’s 113in2 surface area. It’s quite large, so a window is ideal as a passive intake. In comparison, a hole of 4″ diameter has 12.5in2 and a 4″ square has 16in2…


It’s also important to note that several small intakes won’t be as efficient as one larger intake (even if the total surface area equals the same), as each one of them offers more air flow restriction. Same with a pipe: this adds restriction too.
WINDOW
If the roof fan is located in the back of the van, cracking the driver and passenger windows open is a good passive intake as the air circulates throughout almost the entire length of the van. Consider adding Rain Guards to prevent rain from entering through the windows:

VAN FACTORY VENT
Not a sustainable ventilation method when parked, but when driving it is an excellent way of venting the interior of the van!
FLOOR VENTS
Adding floor vents helps optimize air circulation, as fresh air enters through the floor and exits through the roof. That’s the strategy we chose for our van conversion, and it’s doing what it’s supposed to (to a certain extent; read “On Second Thought” in each article respectively for our long-term review):


Heat
While ventilation is the most important moisture-control system, dry heat takes it to the next level: by adding dry heat, we’re pretty much creating a drying machine out of our van!

MOIST HEAT (NON-VENTED HEATERS)
Like it or not, combustion adds water vapor to air. Here’s the propane combustion equation (H2O means water…):
C3H8 + 5O2 –> 3CO2 + 4H2O
Burning propane at a rate of 10,000 BTU per hour adds 450 mL of water per hour to the air; that’s a LOT!
Portable propane heaters are not vented, meaning the combustion is internal to the van:
- 👎 They burn oxygen and release carbon monoxide inside the van (which is potentially deadly if the concentration gets too high. Because of that they’re not meant to be used inside; KEEP A WINDOW OPEN AT ALL TIMES IF USING ONE, OR YOU MIGHT NEVER WAKE UP).
- 👎 They add a lot of water inside the van, promoting moisture and condensation (could lead to mold issues).
- 👎 Thermal comfort is lowered as moist heat feels damp and heavy; it’s not as comfortable as dry heat.
- 👎 They don’t have a fan to circulate ambient air, so you can’t really feel the heat a few feet away from the heater.
- 👍 They are cheap and easy to install.

NON-VENTED HEATERS:

Mr Heater Buddy
9,000 BTU/h of heat =
405 mL/h of water!

Olympian Wave 8
8,000 BTU/h of heat =
360 mL/h of water!
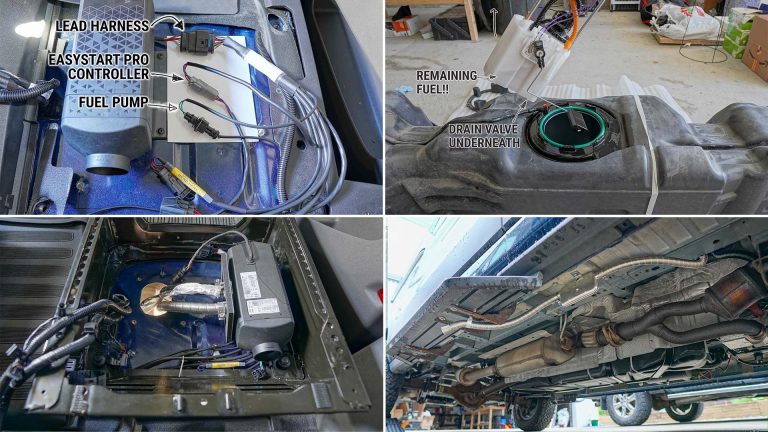
DRY HEAT (VENTED HEATERS)
If combustion produces water, how can we achieve dry heat then? With vented heaters!
Vented heaters are physically located inside the van (or outside sometimes), but combustion is external: air for combustion is taken from outside, burnt, then rejected outside. The heat from the combustion is transferred inside via a heat exchanger. Air from outside / inside is never mixed together. Vented heaters:
- 👍 Don’t add carbon monoxide inside.
- 👍 Don’t add water vapor inside; furthermore, by heating the ambient air, the Relative Humidity (RH) is lowered!
- 👍 They have a powerful fan to circulate ambient air, therefore heat in the van is uniform.
- 👎 They are more expensive and installation is more complex.

VENTED HEATERS:


Thermal Insulation
We’ve seen that surfaces below dew point temperature generate condensation. That is generally the case with windows (worst), metal (bad) and beer mugs (very good).
Thermal insulation helps control condensation by keeping interior surfaces above dew point temperature. We could easily achieve the perfect insulation with our theoretical box (from “theory” section), but achieving perfect insulation with a van is a bit like chasing unicorns…

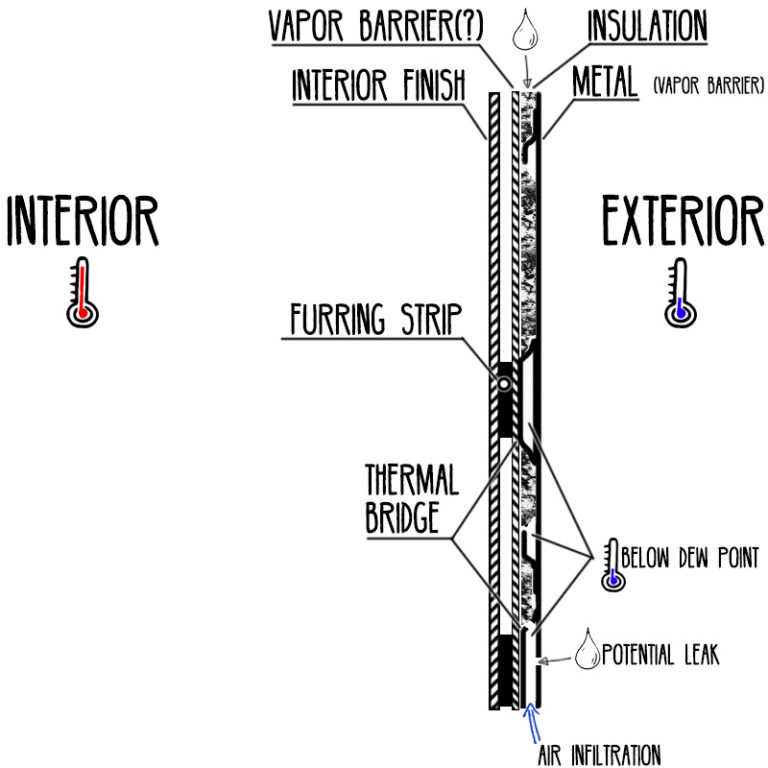
THE PERFECT VAN INSULATION
- Temperature varies through the walls (interior finish, insulation, metal). It gets colder as it’s getting closer to the exterior.
- Therefore, relative humidity (RH) varies through the walls as well. The colder the air gets, the higher the RH.
- Condensation happens at the dew point (RH: 100%). Here, in our “perfect insulation”, the dew point is located inside the impermeable insulation; moist air from inside the van cannot reach the location where the dew point is. In fact, moist air is in contact with the interior finish which is above the dew point; there is no condensation!
Note that metal is totally impermeable to water vapor: it’s a vapor barrier. Moisture cannot migrate through the metal.

Soooo, here’s the bad news: nothing’s perfect in this life. And as a reminder:
Because moist air will inevitably come in contact with cold structure, condensation cannot be eliminated. As a result, Boeing chose to evaluate potential moisture-control systems that can help […] minimize condensation, minimize dripping onto equipment and into the passenger cabin, maximize liquid drainage, optimize evaporative drying from wet surfaces and insulation blankets.
THE PROBLEM WITH INSULATING A VAN
So why is it that “moist air will inevitably come in contact with cold structure”?
Looking at how a van structure is made, we get our answer…

We’re dealing with surfaces that are far less than ideal:
- Hollow regions are impossible to insulate perfectly (even with expanding foam). Frames and structures create thermal bridges (thermal bridges are defined in the Thermal Bridges section below). As a result, air is cooled down below dew point locally, and condensation happens in isolated places.
- Uneven geometry creates air gaps where condensation could form and remain trapped.
- Drain holes and openings in frames/pillars allow moist air from outside to infiltrate the insulation layers.
- Minor leaks (from roof and side plastic trims) are a reality. As a result, liquid water can penetrate the insulation layers. (we had reports of small leaks on all platforms: Transit, Sprinter, ProMaster)
REAL-WORLD VAN INSULATION
There’s no doubt in our mind: moist air will inevitably come in contact with cold structure. Denying that fact could lead us to make wrong decisions about insulation. Condensation cannot be totally eliminated, so our approach is to mitigate it (just like in that Boeing article we keep talking about!). Before deciding on an insulation strategy, let’s look at our options:
INSULATION TYPES
- R-value denotes the capacity of an insulating material to resist heat flow. The higher the R-value, the greater the insulating power. It is normally noted “6.5 per inch”; it means applying one inch thickness of the material will provide 6.5 R-value; applying two inches will provide 13.0 R-value; and so on.
Closed Cell Foam Insulation
Closed cell foam insulation has an excellent R-value.

Spray Foam
- ℹ️ R-Value: 6.5 per inch.
PROS
- 👍 Conforms to curved surfaces.
- 👍 Impermeable to water vapor.
CONS
- 👎 Can distort the van panels if applied in a thick layer.
- 👎 Messy to apply.
- 👎 Will block mechanisms if no precautions are taken (e.g. doors).

Polyiso Rigid Board
- ℹ️ R-Value: 5.6 per inch at 75F, 5.0 per inch at 15F.
PROS
- 👍 Impermeable to water vapor.
CONS
- ⚠️ R-value decreases substantially at cold temperatures.
- 👎 Creates air gaps on funky surfaces (which is mostly the case in vans) = water traps.

XPS Rigid Board
- ℹ️ R-Value: 5.0 per inch at 75F, 6.0 per inch at 15F.
PROS
- 👍 Provides more reliable thermal performance than Polyiso.
- 👍 Impermeable to water vapor.
CONS
- 👎 Creates air gaps on funky surfaces (which is mostly the case in vans) = water traps.
- 👎 Maximum service temperature: 165F. (a dark painted roof will get hotter than that in the sun! source: phys.org)
NRCA’s most recent recommendations are to assume that polyisocyanurate has R-5.6 / in. when designing for warm climates and R-5.0 / in. when designing for cold climates.

The graph above shows the effect of temperature on apparent R-value of different polyiso products for 4″ thickness (expected R-22.4)
Hydrophobic Insulation (doesn’t absorb water)
Hydrophobic material doesn’t absorb and retain moisture. Try it: soak it in water. It does get wet, but water or moisture doesn’t get absorbed into the material, and, therefore, it dries out quite fast.

Thinsulate
- ℹ️ R-Value: 3.3 per inch.
PROS
- 👍 Very easy to install
- 👍 Doesn’t off-gas
- 👍 Doesn’t lose fibers and isn’t itchy
- 👍 Good noise insulation
- 👍 Can be stuffed in hard-to-reach places
CONS
- 👎 More expensive
Bottom line: it’s a tried-and-true product that gives an added value to higher-end builds.

Rockwool
- ℹ️ R-Value: 3.0 per inch.
PROS
- 👍 Easy to install
- 👍 Doesn’t off-gas
CONS
- 👎 Itchy
- 👎 Can release fibers

Sheep Wool
- ℹ️ R-Value: 3.6 per inch.
Sheep wool is the new kid on the block, so long term data is not really available except for what the manufacturer claims:
“A chemical-free passive filtration insulating material that manages moisture and reduces sound”
It’s not exactly hydrophobic as it “manages” moisture: it absorbs moisture when ambient air is above 65% RH and releases it below that. The manufacturer claims it prevents condensation on cold surfaces.
Hydrophilic Insulation (absorbs and retains moisture)
No need to say hydrophilic materials are a big NO NO! Some people choose hydrophilic insulation and package it in trash bags to prevent moisture, only to find years later that the trash bags were damaged during installation or after (due to vibration on a metal edge, for example)…
- ❌ Recycled Denim
- ❌ Fiberglass
Radiant Barrier
A radiant barrier’s purpose is exactly like the name suggests: a radiant barrier! By itself and without any air gap between the metal surface (in other words, if applied directly against the metal), it has pretty much no R-value. That being said, it’s a good material for window covers as it will prevent your van from turning into an oven in summer (but it won’t do much in sub-freezing temperatures).
- ❌ Reflectix
Thermal Bridges
Metal is an excellent heat (or cold, same thing) conductor. You can choose the insulation with the best R-value, but leaving any surface of metal exposed to interior ambient air (with no insulation) will create a path for cold (or heat) to sneak inside the van; it’s called a thermal bridge.
Why would one leave exposed metal then? Covering some areas with insulation would reduce the living space too much; frames are a good example. To minimize the effect of thermal bridges, we covered any exposed metal with LOW-E EZ COOL. LOW-E EZ COOL insulation has a flexible foam core sandwiched between aluminum faces. It’s primarily a radiant barrier, but the foam core provides some R-value too. As opposed to Reflectix, it can withstand some pressure without damage and is more silent.

LOW-E EZ COOL
Bottom line: while it shouldn’t be used as the main insulation type, LOW-E EZ COOL is a good way of covering thermal bridges.
Vapor Barrier or Not?
The purpose of a vapor barrier is to prevent moist air (from inside the van) from migrating towards cold surfaces. The idea is that moist air from respiration, cooking, drying gear, etc. won’t reach cold surfaces and, therefore, that eliminates condensation issues. However, if, for any reason, moist air makes its way past the vapor barrier, it would be very hard to dry that moist air because it would be sandwiched between two vapor barrier layers (remember that metal is a vapor barrier, too).
Even if one could achieve the perfect vapor barrier (which is unlikely, sorry), we’ve seen that there are paths for outside air to infiltrate, and there are potential leak points as well. Therefore, we believe that moist air will inevitably come in contact with cold structure, so our approach is to let the insulation layers “breathe”.
OUR INSULATION STRATEGY
Here is our take on insulating a van: let it breathe. It doesn’t have the highest R-value, and it doesn’t completely eliminate condensation issues, but nothing’s perfect: the best solution is the best compromise!
- THINSULATE covers most large surfaces.
- LOW-E EZ COOL covers frames and protruding structure to prevent thermal bridges. Since it’s a good radiant barrier we partially covered the Thinsulate, but not completely because it’s also a vapor barrier!
- Vapor Barrier: nope.
Don’t get us wrong:
It’s titled “Our Insulation Strategy”. It means we believe there are other ways to obtain good results by using different materials and techniques!


WINDOWS
Windows ARE the weakest link. One can spend a fortune on getting the highest R-value in the walls, but something has to be done about the windows as well!
NOTE: when using the window covers and it’s cold outside, you WILL get condensation on the windows. Indeed, window covers minimize the heat transfer from inside the van to outside; but the small air gap between the window and the cover gets very cold; way below the dew point. So condensation or frost is inevitable. We normally remove the window covers 15-20 minutes before driving and dry them off with a chamois cloth: Buy on Amazon.

Window Shades
Building your window shades from a radiant material is a cheap and good solution for summer or mild cool temps. Reflectix is the material everyone uses out there, but having worked with both LOW-E (EZ-COOL) and Reflectix, we would use LOW-E as it is more resistant, and it doesn’t make that annoying “foil” sound.

Insulated Window Covers
If you are snowchasers like us, insulated window covers are a game changer. They make the interior of the van more comfortable by reducing heat loss significantly (no more cold drafts near the windows!). We made our own from Thinsulate and LOW-E (EZ-COOL); we documented their fabrication in detail!
Dehumidifier
A dehumidifier catches water vapor present in the air, turns it into liquid and collects it into a container for easy disposal. In other words, it removes moisture from the air.
Are dehumidifiers the holy grail of condensation and moisture control for vans? Keep reading!

How Dehumidifiers Work
By now, we know for a fact that a cold surface condenses water. A dehumidifier is nothing more than an air conditioning unit designed and optimized for collecting water: instead of focusing on blowing cold air into the room, it focuses on refrigerating the surfaces located within the unit, so water condenses on them.
There are two types of dehumidifiers: Compressor and Thermo-Electric.
Compressor Dehumidifier
(Commonly found in houses)
Same principle as a refrigerator (including the 12V NovaKool fridge we have in our van!) and an air conditioning system: this type of dehumidifier uses a compressor to “pump” heat.
- 👍 Powerful and ideal for when plugged into shore power.
- 👎 Generally works on 120V and draws a LOT of power. Forget it for off-the-grid applications.
- 👎 Won’t work near freezing temperatures.
Thermo-Electric Dehumidifier
(a.k.a. Peltier)
A Peltier dehumidifier uses the thermo-electric principle to convert electricity into a temperature difference.
- 👍 Draws much less power, and is suitable for 12V operation.
- 👍 No moving parts.
- 👎 Not as powerful as a compressor dehumidifier.
- 👎 Won’t work near freezing temperatures.

Compact Peltier dehumidifier (no compressor) with 16 oz. capacity water tank. Make sure to buy the 12V adapter too as it’s more efficient than using your inverter. CURRENT DRAW = 2A (at 12V).
Dehumidifiers Help with Moisture, but Are Not the Ultimate Solution to Condensation
If you’ve flown in an aircraft before, you know that the air is so dry it’s very uncomfortable. Yet the Boeing article above confirms aircraft have condensation issues… what the? Remember that condensation issues are mostly because of cold surfaces. At 36,000ft the outside air is around -70F, so the fuselage skin is very, very cold; the dry air is cooled down so much that condensation happens no matter what.
Now, our van doesn’t experience -70F outside temperatures, but it does get cold out there during winter – cold enough to lower windows and metal temperatures below dew point even if RH is very low.
Let’s play with parameters.
We start with 40% RH and 71F interior temp (which is typical). Condensation happens if windows (or metal) reach 46 F (or lower); that’s relatively high.
Interior RH 40%, Interior Temperature 71F = Dew Point 46F
With the help of a dehumidifier, let’s bring the RH down to 30%, which is the lowest RH that humans are comfortable with. And still 71F interior temp: condensation happens if windows (or metal) reach 38 F (or lower). An outside temperature of 32F will most likely bring a window down to 38F. We still have condensation…
Interior RH 30%, Interior Temperature 71F = Dew Point 38F
If we lower the RH down to 15% (which is not really possible in the real world if people live in it), we still have condensation if windows (or any other surface) get down to 21F (which you will most likely encounter if you are skiers like us!).
Interior RH 15%, Interior Temperature 71F = Dew Point 21F
Bottom word:
A dehumidifier helps with moisture, but won’t completely eliminate condensation. It’s a good idea to use one when parked and plugged into shore power, but it draws a substantial amount of power for those who are off-the-grid (knowing that condensation is most likely to happen when solar power is at its lowest)…
Real-World Check:
We observe the most condensation (on the windows) during winter when it’s cold outside (sub-freezing); because we heat with a vented heater (Webasto), our RH is normally in the 30-35% range. Our ambient air is already dry, a dehumidifier wouldn’t help much; the issue really is with the cold surfaces.
Life After the Conversion
MOISTURE AND CONDENSATION CONTROL IN THE DAY-TO-DAY
We did it! The van conversion is over. We chose the best insulation strategy and materials to our knowledge. But the fight is not over! We’ve been living in our van full-time since August 2017, and we’re still controlling the moisture and condensation in our day-to-day life:
Cooking
Cooking during winter is far from ideal: it adds a lot of moisture (from food and from propane combustion, especially the oven) and since it’s so cold outside, ventilation means a lot of heat loss. It is what it is: whatever the temperature outside, ventilation is the key! When we cook, we usually keep our side window open and run the roof fan.
- Above 35F outside, it’s no big deal.
- Below 25F outside, it gets chilly in the van for a short while. But the Webasto keeps us comfy anyway.
- Down to -15F, the cold draft between the open window and the roof fan can be pretty brutal. The Webasto runs full speed! But when we’re done cooking, we close the window and the floor vent is the only passive intake. After the meal, we normally close all intakes.
Climate
Here’s the worst possible scenario that we’ve encountered: after a day skiing at Crystal Resort (3900 ft at the base) during a relatively warm (28F) and very wet day, we hung our gear to dry and we drove down immediately to a lower elevation so it would be warmer. It was snowing at the resort, but raining at lower elevation. We cooked, and we rested for the night.
Let’s think about it for a second:
- 👎 Gear drying (adding moisture)
- 👎 Cooking meal (adding moisture)
- 👎 Driving down to a warmer place
- 👎 Driving down to a more humid place (it was raining full-on)
Nothing wrong with cooking and drying our gear, but we definitely should have stayed at a higher elevation where it was colder (more heat from the Webasto = lower RH) and where outside air was drier (less moisture coming in from the air intake). Now we know!
Activities
The main reason we live in our van is for riding our mountain bikes and our snowboards more often.
We were very concerned with drying our ski gear in the van at first, but we’re happy to report that our gear is fully dry in about 2 hours (a little more for the 2 pairs of boots). With the Webasto working hard when it’s cold outside, the air inside is dry and comfortable. Nice!

Location
Oh, we probably should have mentioned this at the start of this essay… but look, if you use your van mostly in any of the yellow-ish places below, don’t overthink this moisture and condensation thing! You’re fine, it’s dry enough there…
If, on the other hand, you plan on spending extended time during fall/winter in the Pacific Northwest (Coast of British Columbia, Washington, Oregon) then this article is definitely for you! Actually, we got the idea and wrote this article while we were here during the rainy months… This amount of water in California would probably create a supra-landslide and make the whole state totally flat 😛

On Second Thought
WHAT WOULD WE DO DIFFERENTLY IF WE HAD TO START OVER
We completed our van conversion in August 2017, and we have been living full-time in the van since then. While we feel confident about our material choices, and we would do exactly the same if we had to start over, time will tell if we nailed it or not. It will be interesting to strip down the van after 10-15 years of usage…
That’s it folks, hope that helps!
Thanks For Reading.


Hi! I’m in the early stages of my van conversion and have a question about condensation/insulation of the frame. In my van the interior of the ceiling frame pieces has no connection to the interior of the walls, so as far as I can tell, if I put insulation over them (I’m using armaflex) there would be no ventilation at all for the air inside the ceiling frame. Would/could this cause issues down the road with condensation inside the frame?
We did fill our frames with Thinsulate (you can push it inside with a rod or something).
I’d leave a few holes exposed for venting it’s possible, otherwise it’ll probably be fine!
I know I’m not the only one who would love to see this updated – or a new version published alongside it. For one, that Boeing article referenced so often is now a broken link. But secondly, you mention you insulated in 2017 and would like to see how things hold up over the years – surely seven years later you have some updated knowledge and experience, right? Personally I’m also very interested in how Lizard Skin coating would affect the approach to further insulation after its application. THank you for everything you do for us, and all the info you share!
Hi Antoine,
What are your thoughts on getting rid of the furry strips and putting the wall panel directly on the metal with some thermal breakers? Or do you think adding that extra gap of air will give better insulation?
The furring strip’s role are to hold the tongue-and-groove planks (for all the screws).
If you’re going with large panels instead of planks, you can probably skip the furring strips!
I am planning a transit conversion and will include maxxifan and Eberspacher heater.
I will use thinsulute and ez cool, but am concern my cell phone wont work while driving. With all that foil, am I doomed to live in a faraday cage?
It’ll be fine when driving, the windows let the signal through the cabin.
But at night with insulated window covers, it can indeed be an issue. That’s one of the reasons we installed a WeBoost with an exterior antenna: https://faroutride.com/motorized-antenna-tilt/
Hi, thank you for all this information. I did my best to research before building my van with no experience, but I insinuated with fiberglass loft insulation as I ran out of money for the recycled plastic bottles I started with. After reading your article I am now honestly quite scared about the consequences!.. I have the fibreglass insulation, then a reflectix vapor barrier, and then wood cladding… Do you think it will be ok? Or would you have any additional advice? I am honestly quite worried at this moment…
Thank you x
Thank you so much for all this great information. Water is going to move from hot to cold. Since there is an impervious barrier (the van) the moisture isn’t allowed to pass. That means the drying will have to take place from within. Adding insulation, including closed cell foam which doesn’t absorb water could potentially still allow moisture to accumulate between the foam and the van where mold could potentially grow. I think a blown in closed foam would solve the problem. The foam would adhere to the van and prevent any moisture between the insulation and the van. If a gap is allowed between the closed cell and the interior framing with some sort of airflow. The environment should dry. It seems the biggest issue is when the van is not in use. Driving with the windows open will dry things out in summer. Running the heat in winter will dry things out. The problem is when the van is sitting with no airflow or heat. I think the simplest thing would be a smell test. If you can smell the air, there is too much moisture. Maybe driving the van periodically to dry it out before the smell starts to change would solve it completely. This can’t be done on a Boeing 747, but a van has windows.
I’m not a scientist or expert. Everything I just said could be wrong but based on my knowledge and experience. I think there is some merit.
At last,someone who agrees pretty much with me, regarding managing humidity and condensation.Every man and his dog is obsessed with vapour barriers.But it is well known that the key to reducing and managing(not eliminating) condensation is insulation and ventilation.You’ve went into it in serious detail.Maybe now all the copycats will stop obsessing over vapour barriers and apply proper logic.Thanks for confirming what I already knew.Excellent article
Hello both of you !!
Thank you for sharing this awesome experience:)
I am looking for your advice on managing humidity in our Westfalia. We are in the restoration process but have been using the Webasto. We find it is very powerful but using the windows for ventilation, it is manageable .
I am wondering if getting the outside air into the Webasto to create a positive pressure in the Westfalia can help to reduce the humidity inside instead of recirculating the internal air all the time ?
The Pop-top is canvas and can breathe the air out while fresh air comes in. Also, we are not travelling during the cold winter so this is an April to October issue 😉
Thank you for your help!
I just got my Ford Transit cargo van (totally empty), and after a rainy day, I noticed the van was very damp and small amounts of water collected in a drain area at the bottom of the wall. This water is coming in from holes the black plastic body panels on the outside are attached to. Did you address this in some way before insulating and paneling your walls? It seems like the walls would get unwanted moisture from the outside if this is not addressed.
Hi!
We did two things:
1- Seal the roof: https://faroutride.com/leaking-roof/
2- Seal (from inside) the pins holding the black trim (we used Silicone if I recall properly). There are some pins we couldn’t access I think, but we didn’t go crazy with this. Keep in mind these vans are not designed to be 100% waterproof, so it’s “normal” for some water to pool in these areas. Make sure to leave drain holes untouched so they can do what they’re supposed to do 🙂
Cheers,
Antoine
Hi! Thx for all your help. Do you have any suggestions or resources on determining where the drain holes are? Is there a Ford resource for this that you know of or another way to know where they are to make sure they aren’t obstructed?
I don’t think it is documented unfortunately.
I’m near Seattle, and not full time in my van, mostly weekend warrior good weather use. So it’s parked outside in the driveway much of the winter. Today is the day after Thanksgiving, raining, the temp in the van is 44 degrees and 66% humidity with one roof van vent open. I’ve tried desiccants, and like your article says, they do nothing. I have an Amazon Basics 500W ceramic heater used with a thermostat set just above 50 (I used that last year and will put it in today) to try to keep the van interior temp up and humidity down when it’s parked; I just ordered a dehumidifier after reading this article, so hopefully that will help lower the humidity this winter.
My build is an Adventure Wagon kit installed by Out and Up Fitters; they say Thinsulate and “Reflectix Low E”, so a little confusing. But the walls are insulated, the back and side doors are mostly exposed metal and windows. I like to keep the windows covered when parked to keep people from looking inside, I use magnets to loosely hold Reflectix over them and use WeatherTech sunshades for the front windows and windshield.
I’m asking for advice if the window covers might cause more condensation issues than if I leave the windows clear. Or if an insulated window cover would be better or worse than the loose coverings I use now. I’m just thinking about window covers might help increase the temp but cause additional condensation on the windows. I’m also undecided about leaving a fan vent open or to keep them shut when its rainy.
Thanks for the great informative website!
Window covers keeps the temperature of the glass LOWER and block warm inside air from getting in contact with the glass, so they increase the condensation in the windows. Personally that was not an issue, because the moisture level in our van was under control (Thanks to the dry heat from the Webasto).
If you’re off-grid, heating the van with dry air (webasto or similar) AND ventilation is the key. If you’re parked and have access to 120V, then a dehumidifier is best.
Cheers! antoine
Antoine and Isabelle,
Can you share your detailed vent fan and passive intake settings for a normal day of full time use? Do you always run the vent fan when you are inside the van? Do you run the vent fan at night while you sleep and on what setting?
I tend to always run our vent fan on the 1/10 or 2/10 speed setting when we are inside the van, regardless of outside temperature or conditions. I especially always run the vent fan while we sleep but it can make it pretty cold in the van and makes our heater work pretty hard.
When we cook I run the fan on 3-5/10 depending on details.
Is running the vent fan all the time overkill?
Thanks for your insight.
This is a good question!
We’re pretty aggressive with our fan schedule! We run it almost all the time.
In SUMMER, during the day, it normally runs at around 3/10 if we’re in the van OR NOT. Faster if it’s really hot. At night, we run it at 2/10 (or faster if it’s really hot). The cover is opened at ALL TIME.
In WINTER, we run it almost all the time even if it means heat loss. We’d rather keep the moisture low and heat up a little more. So we probably run it 2/10 when we’re in the van, then we shut it off when we’re out (unless we’re drying ski gear). At night, we run it 1/10 generally. Sometime we shut if off if it’s really cold (but we leave the cover open).
That’s about it! 🙂
Can you provide some tips and insight into a reverse scenario? We are in Florida, high humidity and high heat with a portable AC unit for the summer. We are getting a nice low indoor temp, but the exterior is really high temp and we like everyone see condensation happening.
Is ventilation still key here? We have a maxxair fan in the front and a fresair unit in the back. The Fresair unit doesn’t work in Humid climates which is why we are using a portable AC while down here. We also have CRL window with a T vent that we use. While using the AC, should we crack the T vent and have the fresair and fan on to create the circulation? I feel like the T vent and fresair fan defeats the point of the AC if we just replace the air inside. Any thoughts? Love the site!
Hi!
Not an expert on A/C and hot humid climate, so take my opinion with a grain of salt…
I don’t think venting is beneficial in your situation, as you’ll introduce more humidity in the van. I think A/C lowers the humidity somewhat, but if you need to lower the humidity even more a dehumidifier is the way to go. Dehumidifier are energy-hungry, it’s not really a solution off-grid; but if you’re in a serviced campground then you should be good to go.
Good luck! 🙂
Have you considered leaving an air gap between reflective vapor barrier and van skin and continuosly venting outside air into the gap to maintain lower humidity air against the van skin?
Wow, what a great resource and full of science, thank you! With regards to a vapor barrier, check out Membrain (https://www.certainteed.com/building-insulation/products/membrain/). Membrain creates a continuous air seal and it’s vapor permeable especially at high humidity, which allows the inner wall to dry out. The permeability significantly increases at lower humidity and colder temperatures keeping vapor out of the wall. With regards to ventilation, you might want to check out this Heat Recovery Ventilation (HRV) system (https://foursevenfive.com/lunos-ego/). It will set you back $795 but it recovers 85% of the heat!
Antoine – since you have SensorPush sensors, you might even try an experiment to manage moisture within your system. One of the tricks used in curling clubs, which are usually steel skinned pre-fab metal buildings, is to operate the HVAC heating system under positive pressure. So rather than venting the van, have you tried closing your passive vent, pulling air into the van with your fan while heating, rather than venting it? By running fan on suction, you pull cold dry air through the nooks and crannies (at least in a Denver climate). This isn’t nearly as effective as pushing warm dry air out through the nooks and crannies and allowing it to dry out the hidden spaces and exfiltrate from the van. At first you may increase condensation as you displace humid air from the van, but as you heat dry air it will dry things out….. check out this article….. https://www.buildingscience.com/documents/digests/bsd-119-summer-condensation-problems-in-ice-arenas
(my comment was too long, so I split it…)
We had a slow water leak in our van this fall, it went unnoticed for a while because it was so slow but it made the subfloor very very wet. We were lucky that we were able to get it dry without any damage, but it took three weeks and involved a week of running a large industrial dehumidifier. One thing we noticed is the dehumidifier raised the temperature in the closed van quite a lot. So another reason you might not want to run a (smaller) one in your van is if you don’t want excess heat… e.g. you are in Florida
Have you tried drip drying clothes under an awning in damp areas to get the initial dripping water off before drying them inside? I’m considering adding loops to my awning so we can hang stuff.