Free US/CAN shipping over $99 USD!

15A NOCO Shore Power Entry Box for Ford Transit (No Drill / No Screw)

4.67 out of 5
(9 customer reviews)

US$59.95

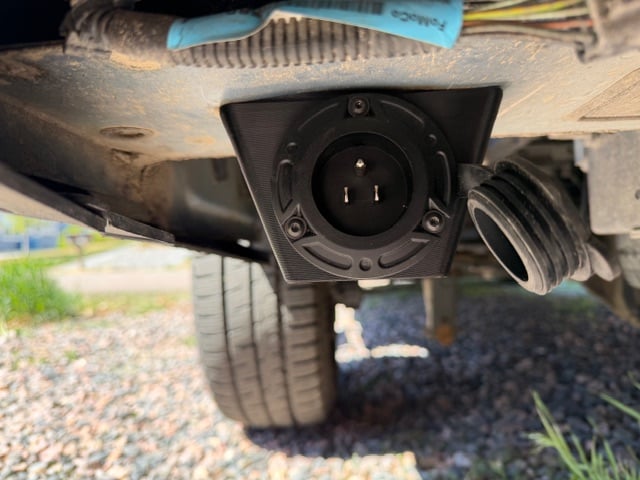
This Entry Box for 15A NOCO Shore Power Inlet installs in seconds into the Ford Transit D-Pillar cutout (driver or passenger side), thanks to the snap-fit design (no drill, no screws!).

INCLUDES:

  • 1 x Entry Box.
  • 3 x M4 Screws (pre-installed).
  • 3 x M4 Square Nuts (pre-installed).
  • 15A NOCO Shore Power Inlet not included.

Scroll down for Installation Instructions.

(Entry Box also available for 30A Furrion Shore Power Inlet)

Get US$8.99 discount if purchased in conjunction with the Builder's Package. log in to apply the discount or see the Builder's Package to learn more.
SKU: FOR011 Categories: , Tag:
MPN: FOR011
Brand: FarOutRide
Ford Transit D-Pillar Shore Power Entry Box (Front View with cover)
Ford Transit D-Pillar Shore Power Entry Box (Side View with cover)
Ford Transit D-Pillar Shore Power Entry Box (Iso 1)
Ford Transit D-Pillar Shore Power Entry Box (wide view)
Ford Transit D-Pillar Shore Power Entry Box

Installation


To complete this DIY project, you will also need:

1. Install The Plug into the Entry Box


Route the Noco power cord through the hole:

Ford Transit D-Pillar Shore Power Entry Box Installation-1 (Pass Extension Through Hole)

Rotate the rubber cover to 6 o’clock and install the screws provided with your entry box:

Ford Transit D-Pillar Shore Power Entry Box Installation-2 (Tighten Screws)

2. Remove The D-Pillar Cutout Cover


This can be done on the driver or passenger side. Driver side is shown below.

Grab an edge of the rubber cover:

Ford Transit D-Pillar Shore Power Entry Box Installation-3 (Grab an edge of the cover)

Pull down to completely remove the cover:

Ford Transit D-Pillar Shore Power Entry Box Installation-4 (Remove the D-Pillar cover completely)

3. Route the Extension Cord Inside the Van


Route the power cord through the D-Pillar cutout:

Ford Transit D-Pillar Shore Power Entry Box Installation-5 (Pass cord through d-pillar cutout)

Grab and pull the power cord from inside the van:

Ford Transit D-Pillar Shore Power Entry Box Installation-6 (Pull cord from inside the van)

4. Install the Entry Box into the D-Pillar


Start with the back side of the entry box:

Ford Transit D-Pillar Shore Power Entry Box Installation-7 (Insert Back Edge of Box First)

Press on the front (squeeze) and push up to snap into place:

Ford Transit D-Pillar Shore Power Entry Box Installation-8 (Insert front edge, press, and push up)

(To remove the entry box press on the front side first, then pull down.)

That’s it!


The power cord can be routed in the wall and come out farther as needed:

Ford Transit D-Pillar Shore Power Entry Box Installation-9 (Route Cord Inside Van)

Doesn’t reduce ground clearance:

Ford Transit D-Pillar Shore Power Entry Box-2
Ford Transit D-Pillar Shore Power Entry Box (wide view)

Electrical System Wiring


For years we routed the charger/converter’s power cord through the doors or through the D-Pillar cutout… It worked OK, but the Entry Box is definitely more convenient! We keep our charger/converter plugged to the entry box extension cord, then connect to the shore when needed:


Compatibility


Specifications


  • Outside Dimensions: 5in x 3.5in x 3.5in (127mm x 89mm x 89mm).
  • Material: Polycarbonate/PETG.
  • Temperature Resistance: Up to 221F (105°C).
  • Hardware Included: M4 Flanged Button Head Screws with Square Nuts (3 of each)
Ford Transit D-Pillar Shore Power Entry Box (Dimensions)

Shipping


  • Ships From:  British Columbia, Canada.
  • Carrier: Canada Post / USPS.
  • Cost: Actual carrier shipping rate calculated at checkout. You can combine other items from our Store to save on shipping.

wARRANTY, rETURNs & Refund


Warranty:

  • If there is an issue or manufacturing defect, we’ll be happy to send you another one free of charge! 🙂
  • “Crash” replacement: if the Entry Box breaks during normal usage (rock, snow bank, etc.), we can offer 70% discount on a new one (plus shipping). All we ask is a photo of the damaged box. We still think the box should be the weakest link to prevent damage to the van structure.

Returns & Refund: You are responsible of shipping the product back to us (including the shipping fees associated with it) for the following reasons:

  • Ordered by mistake or if you changed your mind.
  • Incompatibility (please check “Compatibility” section before ordering).

ABOUT THIS PRODUCT


Do It Yourself.

We wanted a better shore power entry box for the Ford Transit, so we made one.

This is an homemade product.

Each part is individually 3D printed and assembled by us. This is not a mass-produced product. This is a crafted, hand-made product.

Low Volume.

We created this product for our own needs, to make just a few units. There is no way for us to ramp up the production and lower the price, unless we take it to injection molding manufacturing but that’s a whole another level we’re not considering at the moment.


Also Available


9 reviews for 15A NOCO Shore Power Entry Box for Ford Transit (No Drill / No Screw)

4.7
Based on 9 reviews
5 star
66
66%
4 star
33
33%
3 star
0%
2 star
0%
1 star
0%

Customer Images

Image #1 from Jason Giebenrath
Image #2 from Jason Giebenrath
Image #3 from Martha J.
Image #4 from Martha J.
Image #5 from Kenneth S.
Image #1 from Jason Giebenrath
5 out of 5

Jason Giebenrath

Fits perfectly, no more extension cord hanging out of the door to top off the batteries.

Image #2 from Jason Giebenrath
5 out of 5

Jason Giebenrath

Fits perfectly, no more extension cord hanging out of the door to top off the batteries.

Image #3 from Martha J.
5 out of 5

Martha J.

The entry box fit perfectly and it was easy to install. We ran our NOCO cord up the D pillar in the rear of our Ford Transit, now we’re ready to plug in our heater for some winter camping. Thanks so much!

Image #4 from Martha J.
5 out of 5

Martha J.

The entry box fit perfectly and it was easy to install. We ran our NOCO cord up the D pillar in the rear of our Ford Transit, now we’re ready to plug in our heater for some winter camping. Thanks so much!

Image #5 from Kenneth S.
4 out of 5

Kenneth S.

It fit very solidly (You must buy the Noco plug separately). Routing the wires was the tricky part and I had to do it before clicking the part into place so my arm still fit into the pillars. I routed up into the D-pillar, then toward the front of the cabin through another hole that goes into the gap in the lower rear side panel (The picture helps see where). The wires were "just" long enough to have some slack after I mounted this into the frame. I had bought the NOCO plug months ago and was going to put it into the plastic bumper cover, but never got around to that. So I had been running a power cord into the van and closing the van door on the cord. That was dangerous. Two downsides - 1) It is pricey. But it's very unique, nothing like it, and saved me from drilling any holes in the van at all. 2) After a test fit, I had trouble removing it so I could route the wires. When squeezing in the edge, I ended up cracking it a little and had to use some plastic repair epoxy. I don't expect to ever remove it again. The idea of putting a bead of silicone around it may be a good idea.

Image #6 from Kenneth S.
4 out of 5

Kenneth S.

It fit very solidly (You must buy the Noco plug separately). Routing the wires was the tricky part and I had to do it before clicking the part into place so my arm still fit into the pillars. I routed up into the D-pillar, then toward the front of the cabin through another hole that goes into the gap in the lower rear side panel (The picture helps see where). The wires were "just" long enough to have some slack after I mounted this into the frame. I had bought the NOCO plug months ago and was going to put it into the plastic bumper cover, but never got around to that. So I had been running a power cord into the van and closing the van door on the cord. That was dangerous. Two downsides - 1) It is pricey. But it's very unique, nothing like it, and saved me from drilling any holes in the van at all. 2) After a test fit, I had trouble removing it so I could route the wires. When squeezing in the edge, I ended up cracking it a little and had to use some plastic repair epoxy. I don't expect to ever remove it again. The idea of putting a bead of silicone around it may be a good idea.

Image #7 from Sean Smith
5 out of 5

Sean Smith

Easy install! We had to replace our previous shore power port after we accidentally drove off with the van plugged in. This facing backwards is a huge advantage since it means if we pull forward it’ll just pull itself out.

Image #8 from Kathleen R.
4 out of 5

Kathleen R.

Looked up installation instructions online, didn’t understand that the screws were the hex head in the entry box, tried to use the Phillips head that came with the power cord. Oops! The click when the box snaps in place is very satisfying. Looking forward to easy shore power.

Image #9 from Kathleen R.
4 out of 5

Kathleen R.

Looked up installation instructions online, didn’t understand that the screws were the hex head in the entry box, tried to use the Phillips head that came with the power cord. Oops! The click when the box snaps in place is very satisfying. Looking forward to easy shore power.

Image #10 from David
5 out of 5

David

Awesome product and super fast shipping. I was really impressed that there were threaded nuts embedded in the product so that bolts were used which last much longer if you have to remove the Noco plug. Since the Noco plug installs upside down, I drilled a drain hole in the opposite side and plugged the original one with silicone. Additionally, I put a bead of silicone around the shore power box on 3 sides to make it water tight. I am really impressed by the product and swift shipping and will be looking for other products to purchase from you.

Image #1 from Jason Giebenrath
Image #2 from Jason Giebenrath
Image #3 from Martha J.
Image #4 from Martha J.
Image #5 from Kenneth S.
Image #6 from Kenneth S.
Image #7 from Sean Smith
Image #8 from Kathleen R.
Image #9 from Kathleen R.
Image #10 from David
1-9 of 9 reviews
  1. Fits perfectly, no more extension cord hanging out of the door to top off the batteries.

    Image #1 from Jason Giebenrath
    Image #2 from Jason Giebenrath
    • Awesome thanks for the photos 🙂

  2. The entry box fit perfectly and it was easy to install. We ran our NOCO cord up the D pillar in the rear of our Ford Transit, now we’re ready to plug in our heater for some winter camping. Thanks so much!

    Image #1 from Martha J.
    Image #2 from Martha J.
    • Thank you for the feedback and photos!
      Glad we could help 🙂

  3. It fit very solidly (You must buy the Noco plug separately). Routing the wires was the tricky part and I had to do it before clicking the part into place so my arm still fit into the pillars. I routed up into the D-pillar, then toward the front of the cabin through another hole that goes into the gap in the lower rear side panel (The picture helps see where). The wires were “just” long enough to have some slack after I mounted this into the frame. I had bought the NOCO plug months ago and was going to put it into the plastic bumper cover, but never got around to that. So I had been running a power cord into the van and closing the van door on the cord. That was dangerous. Two downsides – 1) It is pricey. But it’s very unique, nothing like it, and saved me from drilling any holes in the van at all. 2) After a test fit, I had trouble removing it so I could route the wires. When squeezing in the edge, I ended up cracking it a little and had to use some plastic repair epoxy. I don’t expect to ever remove it again. The idea of putting a bead of silicone around it may be a good idea.

    Image #1 from Kenneth S.
    Image #2 from Kenneth S.
  4. Just what I needed!

  5. Easy install! We had to replace our previous shore power port after we accidentally drove off with the van plugged in. This facing backwards is a huge advantage since it means if we pull forward it’ll just pull itself out.

    Image #1 from Sean Smith
  6. Looked up installation instructions online, didn’t understand that the screws were the hex head in the entry box, tried to use the Phillips head that came with the power cord. Oops!
    The click when the box snaps in place is very satisfying. Looking forward to easy shore power.

    Image #1 from Kathleen R.
    Image #2 from Kathleen R.
  7. Awesome product and super fast shipping. I was really impressed that there were threaded nuts embedded in the product so that bolts were used which last much longer if you have to remove the Noco plug. Since the Noco plug installs upside down, I drilled a drain hole in the opposite side and plugged the original one with silicone. Additionally, I put a bead of silicone around the shore power box on 3 sides to make it water tight. I am really impressed by the product and swift shipping and will be looking for other products to purchase from you.

    Image #1 from David
    • Thank you for the kind words, glad you like it 🙂

  8. I haven’t installed it yet. I didn’t read the fine print – was too excited. So I thought the chord came with it. Which makes me think $70 seems a little expensive for this part alone if I’m being completely honest. However, I understand what goes into it and fully appreciate you guys designing it. If it goes the distance, then the price is justified (hopefully you have a better 3D printer than I do). Thank you again for all of these van solutions! Have a great rest of the summer.

Add a review

Cancel

Want More?


WE’RE JUST GETTING STARTED.

Stay in touch!


JOIN 40,000+ FOLLOWERS VIA FACEBOOK, INSTAGRAM OR YOUTUBE:

About us


NICE TO MEET YOU.

About-Us-Narrow

Hello! We’re Isabelle and Antoine 🙂 In 2017, we sold our house (and everything in it), quit our engineering careers, and moved into our self-built campervan. Every day is an opportunity for a new adventure... We’re chasing our dreams, and hopefully it inspires others to do the same!

Heads Up: Exclusive Deals!


Thanks to all of you, we managed to negociate group discount on these. Strength in numbers!

Ford Transit D-Pillar Shore Power Entry Box (Iso 1)
15A NOCO Shore Power Entry Box for Ford Transit (No Drill / No Screw)
US$59.95