Welcome to our Propane System Design Guide! We personally decided to go with propane in our van because propane packs WAY more energy than a battery: for example, our BBQ tank gives us two months of cooking and hot showers before we have to refill it, while a battery would have to be recharged after only a few hours and would require costly upgrades just to make it work… For full-time vanlife like we’re doing, it’s a no-brainer. In the following guide, we will build our knowledge so we can design and build a safe propane system. Keep reading!
Campervan Propane System In A Nutshell
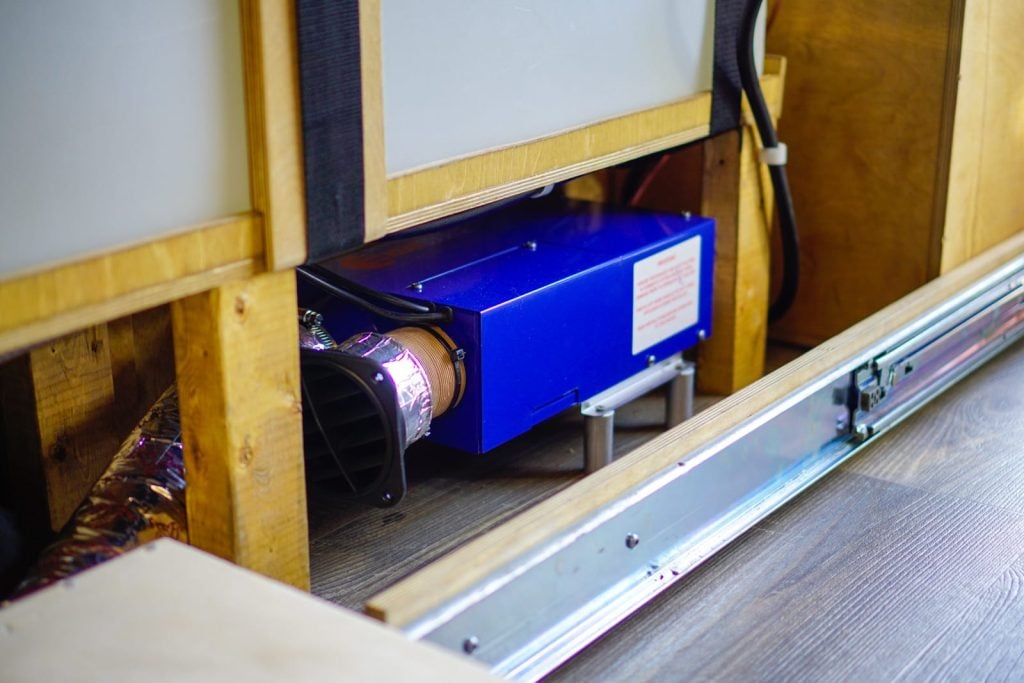
The Atwood range, hot shower, and Propex heater are appliances that run on propane in FarOutVan 1:


Propane System Diagram

Items List
| Component | Description | Quantity | Buy Link |
| MAIN | |||
| Propane Tank | See “Propane Tank” section | 1 | Amazon |
| Hose: Acme x 1/4″ Male NPT (1 feet) | Propane tank to regulator | 1 | Amazon |
| Regulator: Two Stage, 11″ W.C. | It’s a horizontal regulator, so it should be horizontal! | 1 | Amazon |
| Elbow: 3/8″ Flare Male x 3/8″ MPT | We used an elbow so the regulator fits into the vented locker. | 1 | Amazon |
| Hose: 3/8″ Flare Female (both sides) | Regulator to Bulkhead Union | 1 | Amazon |
| Bulkhead Union Fitting: 3/8″ Flare Male (both sides) | This is to go through the vented locker while keeping a tight seal. | 1 | Amazon |
| Swivel: 3/8″ Female Flare (both sides) | This is to connect the bulkhead fitting to a cross (or a tee). | 1 | Amazon |
| Cross: 3/8″ Male Flare (all sides) | Use this if you have 3 appliances to connect. | As Required | Amazon |
| Tee: 3/8″ Male Flare (all sides) | Use this if you have 2 appliances to connect. | Amazon | |
| None | Use none if you only have 1 appliance to connect. (and delete the Swivel 3/8″ Female Flare as well). | N/A | |
| Solenoid Shut Off Valve 12V | |||
| Solenoid, 12V | To open/close the propane remotely | 1 | Amazon |
| Push-Button Switch | To energize the solenoid | 1 | Amazon |
| Pigtail | To wire the push-button switch | 1 | Amazon |
| 90 Degree Fitting | So the regulator / solenoid assembly fits in the locker | 1 | Amazon |
| MISC: wire, terminal rings, closed end terminals, quick disconnects, silicone… | |||
| Low Pressure Gauge | |||
| Low Pressure Gauge 15″ WC | Our system nominal pressure is 11″ WC, so we chose a gauge that goes up to 15″ WC. | 1 | Amazon |
| Tee, 1/4″ x 1/4″ x 1/4″ NPT Female | To add a new port for the gauge… | 1 | Amazon |
| 3/8″ Flare Female to 1/4″ MPT | To connect to the 3/8″ flared cross and bulkhead fitting | 2 | Amazon |
| 1 lb Bottle Adapter (High-Pressure) -Optional- | |||
| Tee: 1/4″ FPT x 1/4″ FPT x 1/4″ MPT | This is to split the line coming from the tank into two lines: one going to the regulator (low pressure), one going to the 1 lb bottle adapter (high-pressure). | 1 | Amazon |
| Adapter: 1/4 MPT x 1″-20 Male | 1 | Amazon | |
| Extension Hose: 1″-20 Female to 1″-20 Male | 1 | Amazon | |
| Eccotemp Hot Shower (Buy on Amazon) | |||
| Gas Valve: 1/2 NPT to 3/8 Flare Male | This valve connects directly to the Eccotemp. | 1 | Amazon |
| Flexible Copper Tubing: 3/8″ O.D. | Length As Required | Amazon | |
| Flare Nut: 3/8″ O.D. | 1 side connected to the gas valve, 1 side to the cross. | 2 | Amazon |
| Propex HS2000 Heater (dealer locator) | |||
| Flexible Copper Tubing: 1/4″ O.D. | The Propex requires 1/4″ O.D. per manual! | Length As Required | Amazon |
| Flare Nut: 1/4″ O.D. | 1 | Amazon | |
| Reducer: 3/8″ Female Flare to 1/4″ Male Flare | This is to connect the 1/4″ copper tubing to the cross. | 1 | Amazon |
| Note that the Propex HS2000 includes a compression nut to connect the 1/4″ line to it. | |||
| Atwood Range (Buy on Amazon) | |||
| Flexible Copper Tubing: 3/8″ O.D. | Length As Required | Amazon | |
| Flare Nut: 3/8″ O.D. | 4 | Amazon | |
| Gas Valve: 3/8″ Flare Male (both sides) | 1 | Amazon | |
Propane Tank
What size?
Choosing the right propane tank size totally depends on what appliances you run and what autonomy you want (days/months with no refill). As a rough guideline, and to help you make a decision, here is our usage living full-time in the van:
- We don’t know the exact consumption of each appliance, but we know that using our Atwood Range every day (oven & stove) and using our Eccotemp shower every other day or so, our 20 pound propane tank lasts roughly 2 months.
- We don’t use our Propex heater much (we prefer to use our Webasto Air Top 2000), but the consumption is 1 pound of propane every 3 hours (remember it cycles though, it’s not running full-time). Our autonomy definitely shrinks a lot if we use the Propex.
Tank Types
3.2.1- Disposable bottle
The 1 pound disposable bottles are OK for occasional camping trips, but expensive and not environmentally friendly in the long run…

Here’s a tip: Any appliance that normally requires small camping propane bottles (camp stove, Mr. Heater Buddy, etc.) can be used with a larger tank (5, 11, 20 pound), thanks to the following adapter. One side connects directly to the propane tank, the other side connects directly to the appliance. No regulator needed. It’s much more economical!

3.2.2- Steel Propane Tank
Also known as a “BBQ Tank”… no explanation needed! OK, here’s a picture just in case…

They’re easy to find in 5, 11 or 20 pound (or more). Here are some common specifications:
* Note that tanks are not filled to their max capacity; this is to leave room for vapor expansion. For example, a 20 pound tank will generally be filled to approx 18 pounds.
** Vertical tanks must not be installed horizontally. If the orientation is not correct liquid propane will be collected instead of vapor (LP gas).
3.2.3- Aluminum Propane Tank
“BBQ Tanks” are also available in aluminum with the following characteristics:
- Lighter than steel (approximately 3 pounds lighter for 2.6 gallon capacity, 5 pounds lighter for 4.6 gallon capacity)
- Does not rust
- Does not spark if ruptured
- Does not have to be painted
- More expensive

They’re easy to find in 10 or 20 pound. Here are some common specifications:
* Vertical tanks must not be installed horizontally. If the orientation is not correct liquid propane will be collected instead of vapor (LP gas).
3.2.4- Composite (Fiberglass) Propane Tank
Here’s a fancy option to impress your neighbors:
- Lighter than steel and aluminum
- See-through (no guesswork to know when to refill)
- Does not rust
- DOT approved for US and Canada
- Must be re-certified every 5 years (from the date of manufacture, not from the purchase date)
- Because it’s not common, some people reported that it makes it harder to refill or re-certify.

They’re easy to find in 11, 17, or 22 pound. Here are some common specifications:
* Vertical tanks must not be installed horizontally. If the orientation is not correct liquid propane will be collected instead of vapor (LP gas).
| Description | Capacity (lb) | Capacity (gal) | Diameter (in) | Height (in) | Empty Weight (lb) | Full Weight (lb) | Buy Link |
| 22 Pound Vertical | 22 | 5.24 | 12 | 22.5 | 12 | 33 | Amazon |
3.2.5- Underbody Propane Tank
- Underbody tanks are either built to the ASME or DOT standard. Tanks built to ASME specification don’t require re-certification, as opposed to DOT specs that require re-certification after 10 years initially and then every 5 years. Therefore, if we were to install an underbody tank, we would choose a tank built to the ASME standard…
- On a side note: portable tanks (such as BBQ tanks) are all built to the DOT standard because the ASME tanks are designed to be stationary and cannot be transported when full.
- Make sure to choose a size that will fit into an underbody cavity. Sorry we can’t help with that because we haven’t installed one ourselves, but here is a legit installation write-up on a Ford Transit: www.fordtransitusaforum.com/170338-post42.html

* ASME tanks don’t require to be re-certified (permanent).
| Description | Capacity (gal) | Diameter (in) | Length (in) | Empty Weight (lb) | Buy Link |
| 7.9 gallon ASME | 7.9 | 10 | 32 | 52 | Campervan-HQ |
| 11.2 gallon ASME | 11.28 | 12 | 32 | 72 | Campervan-HQ |
Vented Tank Locker
The pressure inside a tank increases with higher temperature and/or elevation. Too much pressure can also be the result of overfilling the tank. If the pressure becomes too high for the tank’s capacity, excessive pressure will be released through the pressure relief valve. Note that even if the tank’s main valve is completely shut, the pressure relief valve can still release pressure.
Because of the greenhouse effect and because of the change in elevation (when driving), a tank located inside a van is subject to large pressure variation. That’s why we built a vented propane locker to store our propane tank in our van. If the tank was to release pressure, it would be evacuated outside the van!
What about the laws? When transporting a propane tank inside a vehicle, Canadian laws mention that it must be vented (cracked windows or partially opened trunk). We couldn’t find such mention in the USA laws, but there are rumors California laws mention it, too (please tell us if you know where to find such a mention). Law or not, for us it just made sense to build a vented propane locker!
A quick word about the locker access door:
- Propane is heavier than air and will “pool” (sink) to the bottom of the locker.
- It is REALLY HARD to make an access door that’s 100% sealed.
Because of A+B, the propane locker should be top loading. It’s an extra safety measure to minimize the risk. Indeed, if the access door leaks, propane will leak through the door instead of being evacuated through the vent! We see more and more side-loading propane lockers on YouTube and social networks, and that makes us a bit nervous. Even if it is more convenient, a side-loading propane locker is not ABYC compliant. Vans don’t actually need to comply with ABYC, but we see them as having THE highest safety standards; therefore, we like to stick to them.

Regulator
A tank delivers the propane at high pressure (from 100 up to 315 psi depending on temperature and elevation). However, most appliances require low pressure: 11″ Water Column (or 11″ W.C.) pressure is the norm in RV systems (11″ W.C. = 0.4 PSI). The role of the regulator is to deliver a stable 11″ W.C. pressure to the appliances.
Single Stage Regulator
A single stage regulator reduces the pressure to 11″ W.C. in one step. They’re more compact than two stage regulators, but not as accurate and usually not approved for use in RVs.

Two Stage Regulator
A two stage regulator reduces the pressure in two steps. Compared to one stage regulators, they are better at delivering constant 11″ W.C. pressure with temperature changes and as the tank pressure declines. Two stage regulators are not significantly more expensive than one stage and are approved for use in RVs, so that’s what we recommend:
- Marshall Excelsior MEGR-291 (vertical): Buy on Amazon
- Marshall Excelsior MEGR-295 (horizontal with removable POL adapter): Buy on Amazon
- Marshall Excelsior MEGR-298 (horizontal): Buy on Amazon
- Please AVOID Camco regulators, we had a lot of issues with them (and many people reported that as well)

High Pressure (No Regulator)
Appliances that use small 1 pound bottles have their own built-in regulator. Camping stoves, Mr. Heater Buddy heaters, Mr. Heater BOSS showers, among others, work with high pressure. They can be hooked to a full-size propane tank (5#, 11#, 20#, etc.) with an adapter:
Tubing
Tubing Material
Using flexible (rubber) hoses is not recommended as they are not approved for permanent interior installation (they are approved for marine applications, but that’s a different story). Don’t use them outside either as critters like to chew on them!
Use flexible copper tubing with flared fittings. It’s resistant to vibration and sharp edges, and it doesn’t deteriorate with time (as opposed to rubber hose).

Tubing Size
It’s important to select the correct tubing diameter to prevent pressure drop. The correct diameter depends on:
- Max Pressure Drop Acceptable (1/2 W.C. drop is the norm)
- System Pressure (hint: it’s 11″ W.C. for most RV appliances such as the Atwood Range, Propex Heater, Eccotemp Hot Shower, etc)
- Length of tubing (varies according to your installation)
- Capacity (BTU/hr)
Capacity (BTU/hr) as a function of Tubing Length and Outside Diameter for Flexible Copper Tubing at a pressure of 11 W.C:
| Copper Tubing O.D. (in) | Length of tubing between the regulator and the appliance (feet) | ||
| 10 | 20 | 30 | |
| 3/8 | 49,000 BTU/hr | 34,000 BTU/hr | 27,000 BTU/hr |
| 1/2 | 110,000 BTU/hr | 76,000 BTU/hr | 61,000 BTU/hr |
- The Atwood Range has a max of 32,000 BTU/hr (all 3 burners and oven working simultaneously), so we’re allowed 20 feet of 3/8″ O.D. copper tubing.
- The Eccotemp shower is rated 37,000 BTU/hr, so we’re allowed about 15 feet of 3/8″ O.D. copper tubing.
- Bottom line: we will use 3/8″ O.D. copper tubing all over! It should be alright for most van installations…
Bending Tubing
Bending the tubing by hand is “OK” (but not ideal) for light bends, but it will most likely create “kinks” for anything more than 45 degrees (kinks are bad because they restrict the flow of gas). It can be prevented, you guessed it, by using the proper tool for the job:

Leak-Free Connections
Flared connections
Flared connections are the preferred type, and they are standard in North America. Flared fittings have a 45 degree chamfer (male or female) that seals the deal. They do not require thread sealant or tape.

To make a flared connection with copper tubing:
1- Cut the copper tubing with a Tubing Cutter:

2- Insert the Flare Nut into the tubing:

Note: Select the appropriate flare nut according to the tubing O.D.; for example, use 3/8″ O.D. flare nut with 3/8″ O.D. copper tubing.
3- Form the flange using a Flaring Tool:

Note: First make sure the cut is deburred; any burrs that become compressed will leak.
4- Voilà!

It should look like this!
Pipe (NPT) connections
Some appliances or regulators come with NPT connections. NPT fittings don’t have a 45 degree chamfer (see “Not Flared” picture). They require thread sealant (aka “DOPE”, Buy on Amazon) or yellow tape (Buy on Amazon). Do NOT use white Teflon tape! It’s made for water systems, so it will leak gas as it’s not thick enough.
Compression fittings with olive
These are NOT common in North America and should be avoided! They’re mostly designed for liquid or compressed air (not gas). Note that the Propex HS2000 comes with this type of connection; that’s the only place we have one in our system…

Valve
Manual valve
For safety’s sake, we recommended installing a valve (easily accessible) every place the propane line splits to connect to an appliance.

Solenoid valve
A solenoid shut off valve can be added to the propane system, near the tank, to easily shut the propane OFF when not in use. The solenoid valve is OFF at all times (“normally closed”), but turns ON (open) when it’s energized with 12V. As soon as the 12V is removed, the valve shuts OFF. When energized (ON), a solenoid draws a current of about 1 amp (depending on brand/model). It’s the main inconvenience of the solenoid valve: you need constant electrical power to get propane. But it’s actually meant to be like that; in case of an accident, the electrical power would probably go OFF. It’s a safety feature.
Most solenoid valves are meant to be installed on the low pressure side of the propane system; that is after the regulator. We like Century Fuel’s AFC-151R solenoid shut off valve because it can take up to 312 PSI, so it can be installed on the high pressure side (before the regulator) as well, and its 1/4″ MPT port fits directly into the inlet of our propane regulator.
READ THIS:
- Solenoids need constant power to remain ON (open), and, therefore, they get really hot to the touch. They rely on propane flow to cool down, so leaving it ON without using propane will make them even hotter. We get a lot of emails about that… So yeah, it is normal for the solenoid to get very hot!
- Wiring: there is no polarity. In other words, you can connect the positive (+) and negative (-) to any wire of the solenoid.

Pressure Gauge
It’s not mandatory by any means, but a pressure gauge installed on the low pressure side(after the regulator) of the system can be a useful thing: you can quickly tell if your regulator is delivering the correct pressure. Indeed, we had a regulator that failed one day (Camco brand), and we spent hours and hours troubleshooting our Propex heater thinking it was faulty… we have installed that gauge since then:
Note:Always take a reading when at least one appliance is running (dynamic pressure)! Static pressure (no appliance running) will always read higher than 11 WC…

Safety
Checking for leaks
Propane manufacturers add a distinctive skunk or rotten egg smell to propane so you are able to detect right away if there is a major leak. That being said, after installing your propane system, you MUST validate that there are no leaks. To do so, pressurize your system (turn all the valves/solenoid ON) and apply soapy water to each fitting; in other words, on every connection in your system. If there is a leak, you will see bubbles forming.

Gas Detector
Because we turn ON our propane only temporarily for short periods of time (using our solenoid), we personally don’t have a gas detector. However, here’s an option if it makes you feel better:
- This is to detect un-burned gas/propane; in other words, to detect leaks in your system.
- Mount it near the floor (because gas/propane is heavier than air, it will collect near the floor).

Carbon monoxide alarm
We initially had a carbon monoxide alarm without a digital reading, so nothing was telling us that it actually worked… We upgraded to this one for peace of mind:
- This is to detect carbon monoxide (CO), resulting from propane combustion.
- Mount it near the ceiling or floor (because carbon monoxide is almost the same density as air, it will disperse evenly throughout the air in a room).

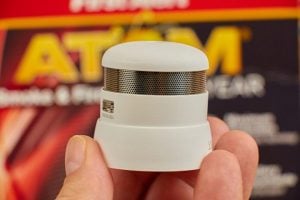
Smoke Detector
The First Alert P1010 smoke detector is tiny and blends perfectly with the decor in our van:
- Mount it near the ceiling.
Tank Level Monitoring
Wireless sensor for smartphone
Our propane tank is located inside the locker, so it’s not exactly convenient to check the propane level. Fortunately, we stumbled upon the Mopeka TankCheck Sensor (Buy on Amazon): this neat device allows us to monitor the level of propane from our smartphone. Nice!

Tank monitoring for Simarine Pico
We personally use the Simarine Pico to monitor the battery bank (%, solar input, etc.), tank level (fresh, grey, Nature’s Head) & temperatures (in, out, fridge, battery, etc.). It is possible to add the propane tank level with the appropriate sensors.

Sensor for vertical tank
Vertical tanks don’t have a provision to add a sensor, but this sensor attaches magnetically to the bottom of a steel tank and makes it possible to read the level of the tank. Note that you must purchase the sensor AND the pre-processor:

Sensor for underbody tank
The ASME Manchester tanks that we recommend have a provision for a level sensor. The sensor output is resistance (not voltage), which can be read by a Simarine module:

Installation
Vented Propane Locker Build
We mentioned earlier that propane might escape from the propane tank from the safety relief valve. This propane has to go somewhere: outside the van sounds about right. To achieve that, we built a sealed box that is vented through the floor with the lid on top (propane is heavier than air). We did not come up with this, this is what marine regulation calls for (some info here).
A quick word about the locker access door:
- Propane is heavier than air and will “pool” (sink) at the bottom of the locker.
- It is REALLY HARD to make an access door that’s 100% sealed.
Because of A+B, the propane locker should be top loading. It’s an extra safety measure to minimize the risk. Indeed, if the access door leaks, propane will leak through the door instead of being evacuated through the vent! We see more and more side-loading propane lockers on YouTube and social networks, and that makes us a bit nervous. Even if it is more convenient, a side-loading propane locker is not ABYC compliant. Vans don’t actually need to comply with ABYC, but we see them as having THE highest safety standards; therefore, we like to stick to them.
First of all, here are the dimensions for a few common propane tanks:
Propane Tank Dimensions
| DESCRIPTION | SIZE | DIAMETER | HEIGHT |
| WORTHINGTON TANK | |||
| Steel, Vertical | 20 lbs | 12.25in | 17.75in |
| Aluminum, Vertical | 20 lbs | 12.25in | 20.6in |
| MANCHESTER TANK | |||
| Steel, Vertical | 20 lbs | 12.16in | 17.56in |
| Aluminum, Vertical | 20 lbs | 12.28in | 20.7in |
And here are the interior dimensions of our propane locker:

We won’t go into the box fabrication details, but let’s just say that the cuts should be perfectly straight to have a good seal! All the edges of the box are glued together; this should seal the deal, but just to make sure, we also applied silicone on all edges inside the box:

We first checked that the propane locker would fit. To clear the aluminum nose stair, we raised the locker with 1/8″ thick MLV leftover we had handy:

We now have to make a hole in the floor. We want that hole to be sealed; if we ever have a water spill, we don’t want water to ingress in between the layers of our floor.
We drilled it using a 1″-5/8 diameter hole saw (Buy on Amazon):


As usual, we must now sand the bare metal edges and apply primer + paint + clearcoat; this is to prevent rust (we went to an auto parts shop, and they prepared paint that matches the color of our van). No picture sorry, so here is a dancing banana instead:

We then inserted a 1″ (inside diameter) PVC pipe in the hole:

And we applied Silicone II (Buy on Amazon) around the pipe inside and outside the van to ensure that no water can ingress in between the floor layers (do not use Silicone I on metal because it’s acidic and might promote rust, while Silicone II, on the other hand, is neutral and safe for metal)!


Marine regulations call for a minimum of ¾” (inside diameter) pipe to ensure proper venting, so we will use that. The ¾” PVC pipe fits very tightly into the locker; we had to use a hammer to put it in place, so it’s not moving from there.

Inside the locker, the ¾” PVC pipe protrude from above the surface (about ¼”) and silicone was applied to ensure a proper seal:

Here is the oddly satisfying part: the ¾” PVC Pipe (fixed to the locker) fit nicely inside the 1″ PVC pipe (fixed to the floor), so the propane locker can be removed/re-installed as needed!

We added a ¾” PVC elbow to prevent crap from entering the locker. It is simply press-fitted into the ¾” PVC pipe:


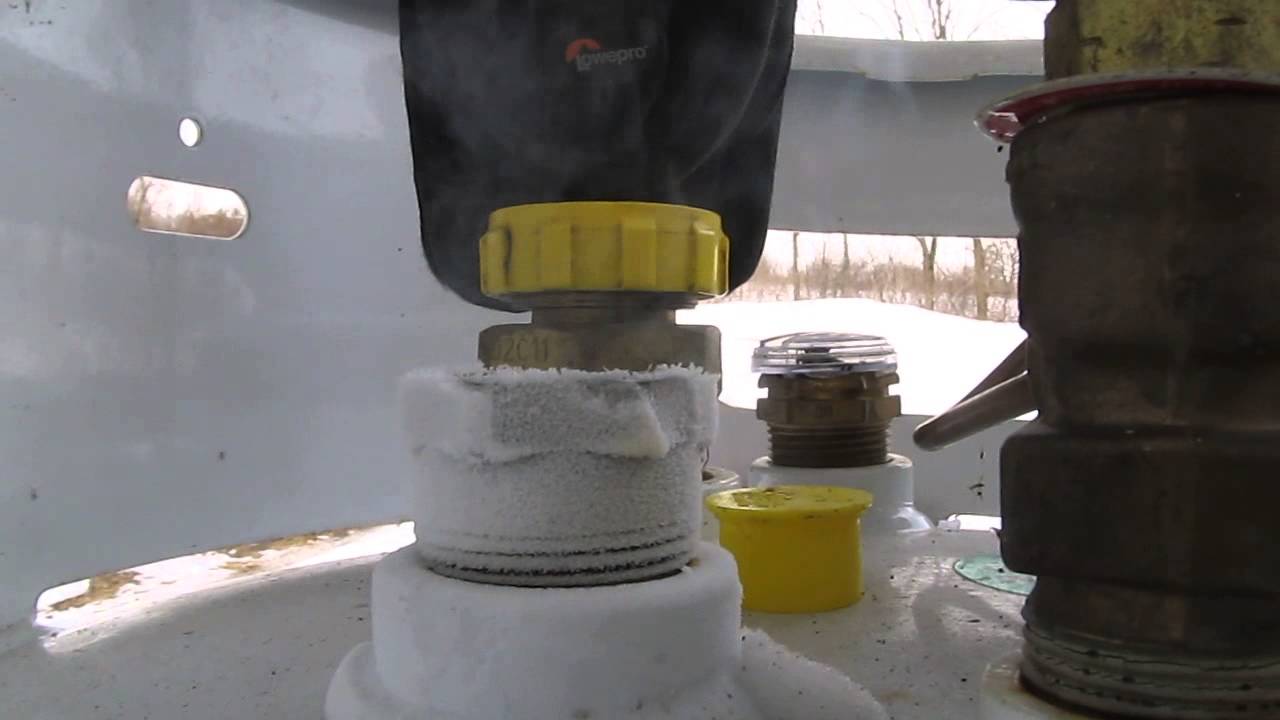
We’re not done with that box yet. We now have to add the bulkhead union fitting. As extra safety, the fitting should be installed near the TOP of the locker! Propane is heavier than air and will “sink” to the bottom…

Oops… we installed the fitting towards the center, and it’s in the way when we remove the tank! We relocated the bulkhead fitting towards the outside shortly after (not shown in the picture).

A rubber washer was installed outside & inside to ensure a good seal:

A self-adhesive neoprene seal (Buy on Amazon) was added on the cover to ensure sealing:

And finally, we added latches (Buy on Amazon) so the cover can be easily taken off:
Be aware that screwing parallel through the plywood’s layers is not ideal (the layers could separate under tension); but with the adjustable latches, we can fine-tune the tension to the minimum required. We also pre-drilled the screw holes to minimize the tension in the holes.

This is the assembly that’s inside the propane locker:


Solenoid Valve Installation
There is some propane and electrical work to do. It’s quite simple, let’s do it!

Propane.
The solenoid is installed directly into the regulator outlet; we installed a 90° fitting so our assembly fits into the propane locker. (Don’t forget to use yellow tape on the threads!)
Electrical.
We went for a push-button that illuminates when ON; this way, we can’t forget to turn the propane OFF when we’re not using it:

We located the push-button switch at a visible place and where it’s easy to turn it ON:

This is how to wire the switch in a way that the LED illuminates only when it’s ON:

We wish we could find a nice bulkhead fitting to go through the 1/2″ plywood, but we couldn’t, so we just routed the wire and added silicone to seal it…

We used quick-disconnects (Buy on Amazon) for when we need to refill the tank:

When the propane is OPEN, it draws 1.2A (solenoid and switch’s LED combined). For cooking or showering, the electrical power consumption is pretty negligible (around 1-2 Ah per day we’re guessing). When using the Propex heater, it’s a different story: if we ran the Propex all day, it would draw 29Ah daily (1.2A x 24h). That’s not negligible anymore, especially in winter when power is more scarce. In our case, we don’t use the Propex much as it is our backup plan (we prefer to use the gasoline Webasto).

On Second Thought…
- Overall: The design we came up with works as intended, awesome!
- Tank size: Our 20lb tank lasts 2 months on average (without using the Propex), that’s plenty!
- Regulator: We went through 2 Camco regulators, and after some research, we discovered others are having the same issue. This thing doesn’t last more than a year… So we switched to the Marshall regulator (amzn.to/2U2btBK), and it’s all good now 🙂
- That’s it for now.


Hi, I’m looking to do the optional portable stove adapter setup on your diagram. Is it a permanent installation, because it need to go thru the propane tank cabinet wall? I can’t figure out how to get the large hose fitting thru and have a good gas seal.
Do you have a picture of this?
You have the nicest DIY van website for technical info.
Thanks,
We don’t actually have it in our van, so no photos sorry.
Can you clarify if your intention is to use small 1 lb propane bottles (“camping” bottles), or to use a portable stove?
I’ll install the propane setup like in you van1 (for stove range inside). Plus, I want to use the same 20lbs propane tank via the “option” to feed my coleman stove outside. I will install a propane connector under the back of sliding door.
I bought a motorized ball valve (aka solenoid) from US Solid that is closed when not energized and DOES NOT heat up at all when I run power to it. Per the specs, the max pressure is 1.0 Mpa which is about 145 psi, which is too low for a safe propane system so it would have to be installed after the regulator. It seems the trade off is a solenoid before the regulator that can handle higher pressure but gets hot vs. a ball valve or solenoid after the regulator that doesn’t. I asked US Solid if this ball valve could be used with propane and they said yes. It also doesn’t require pressure to operate so whatever pressure comes in one end will go out the other. I guess I don’t see a downside to installing this product, that won’t get hot, in a propane locker vs. one that apparently gets too hot to touch. Why did you opt for the one that heats up so much?
Because I wanted the valve right after the tank (before the regulator) in case the regulator fails.
What valve exactly are you talking about?
thanks
I bought model USS-MSV00010. If you visit their website, USSolid.com, either directly or through Amazon, you can see the variety of products they offer. The fitting can be brass or stainless steel and various sizes, from 1/4” to one inch. They cost roughly $40.
(PS – I bought your sliding door stop, among other things, and LOVE IT. Great product!)
Thank you for reporting back 🙂
I have to correct myself. My idea of putting the valve after the regulator is a BAD IDEA! I didn’t appreciate that the regulator can fail and then leak. I wrongly thought a failed regulator would just stop allowing flow. WRONG. It would be dangerous to put the valve or solenoid after the regulator. Thanks for build ideas. You and Isabelle run a GREAT website.
That was our thoughts too; a regulator is also a point of failure, so having the valve before isolates it too.
Thank you for the kind words,
Antoine
Hello Antoine,
Have you ever noticed any leak on the inlet side (female) of the AFC 151 solenoid valve?
I connected the valve to the 1/4 NPT fitting of the pigtail hose (with teflon tape) and noticed there is a leak. The specifications do say it’s a 1/4 NPT female port, but from the inside of the female port of the valve, it looks like it would actually take a male “flare” fitting… but the corner you used isn’t flared either. I wonder if I got a different kind or if I am doing things wrong? I can’t find a 1/4 NPT female to 1/4 NPT flare male fitting.
Thank you 🙂
No leak here.
Both ports on the valve are NPT (not flared), so this fitting should work: https://amzn.to/4nJNl3O
Make sure to use Teflon tape (yellow, not blue).
Have you found a solution since then?
this is so helpful, thanks! what size hole saw did you use for the box pipe? It seems 1″ is too small and 1 1/8″ is too big??? any suggestions is appreciated!
This is so helpful, THANK YOU
🙂
Hi. I’m working on a propane locker now. Am having difficulties getting a vent pipe through the floor of the locker and secured. Haven’t figured out what to do yet. From everything I’ve read you’re not supposed to use pvc pipe. If you wanted to keep to code…why the pvc? That definitely simplifies things…but it’s not recommended.
PVC is chemically resistant to propane (https://ipexna.com/wp-content/uploads/2022/08/chemical-guide-caen-ipex-pvc.pdf), may I ask what’s the concern with it?