

Here’s the situation: the Ford Transit has several mounting points to install a roof rack and accessories. Each mounting point is an M8 threaded hole, with a painted rubber plug on top of it to prevent water infiltration. Unfortunately, it is not uncommon for the threaded holes to develop slow leaks over time. We know, it shouldn’t be like that. But no van is perfect; the Transit, Sprinter and ProMaster each have their own little problems… So instead of getting mad about it, we’d rather take a few minutes to fix the problem at the source and keep our energy and a positive attitude for the next steps of our van conversion 🙂 Let’s do it!
Disclosure: This post contains affiliate links, which means that if you click a product link and buy anything from the merchant (Amazon, eBay, etc.) we will receive a commission fee. The price you pay remains the same, affiliate link or not.

Why Slow Leaks Matter
Slow leaks are evil and have the potential to create quite a lot of damage. A slow leak can go on for a long time (days, weeks, or months) without being noticed. During that time, moisture is trapped (e.g. in insulation or in the ceiling cavities) and mold can develop. Both of our Transits had one: the 2016 after six months on the road, the 2021 a few weeks after we picked it up.
Leak Causes & How to Fix Them
Roof Plugs
The Ford Transit has plugs at each of the mounting points for a roof rack and accessories, as well as pass-through holes to run electrical wires (or similar):
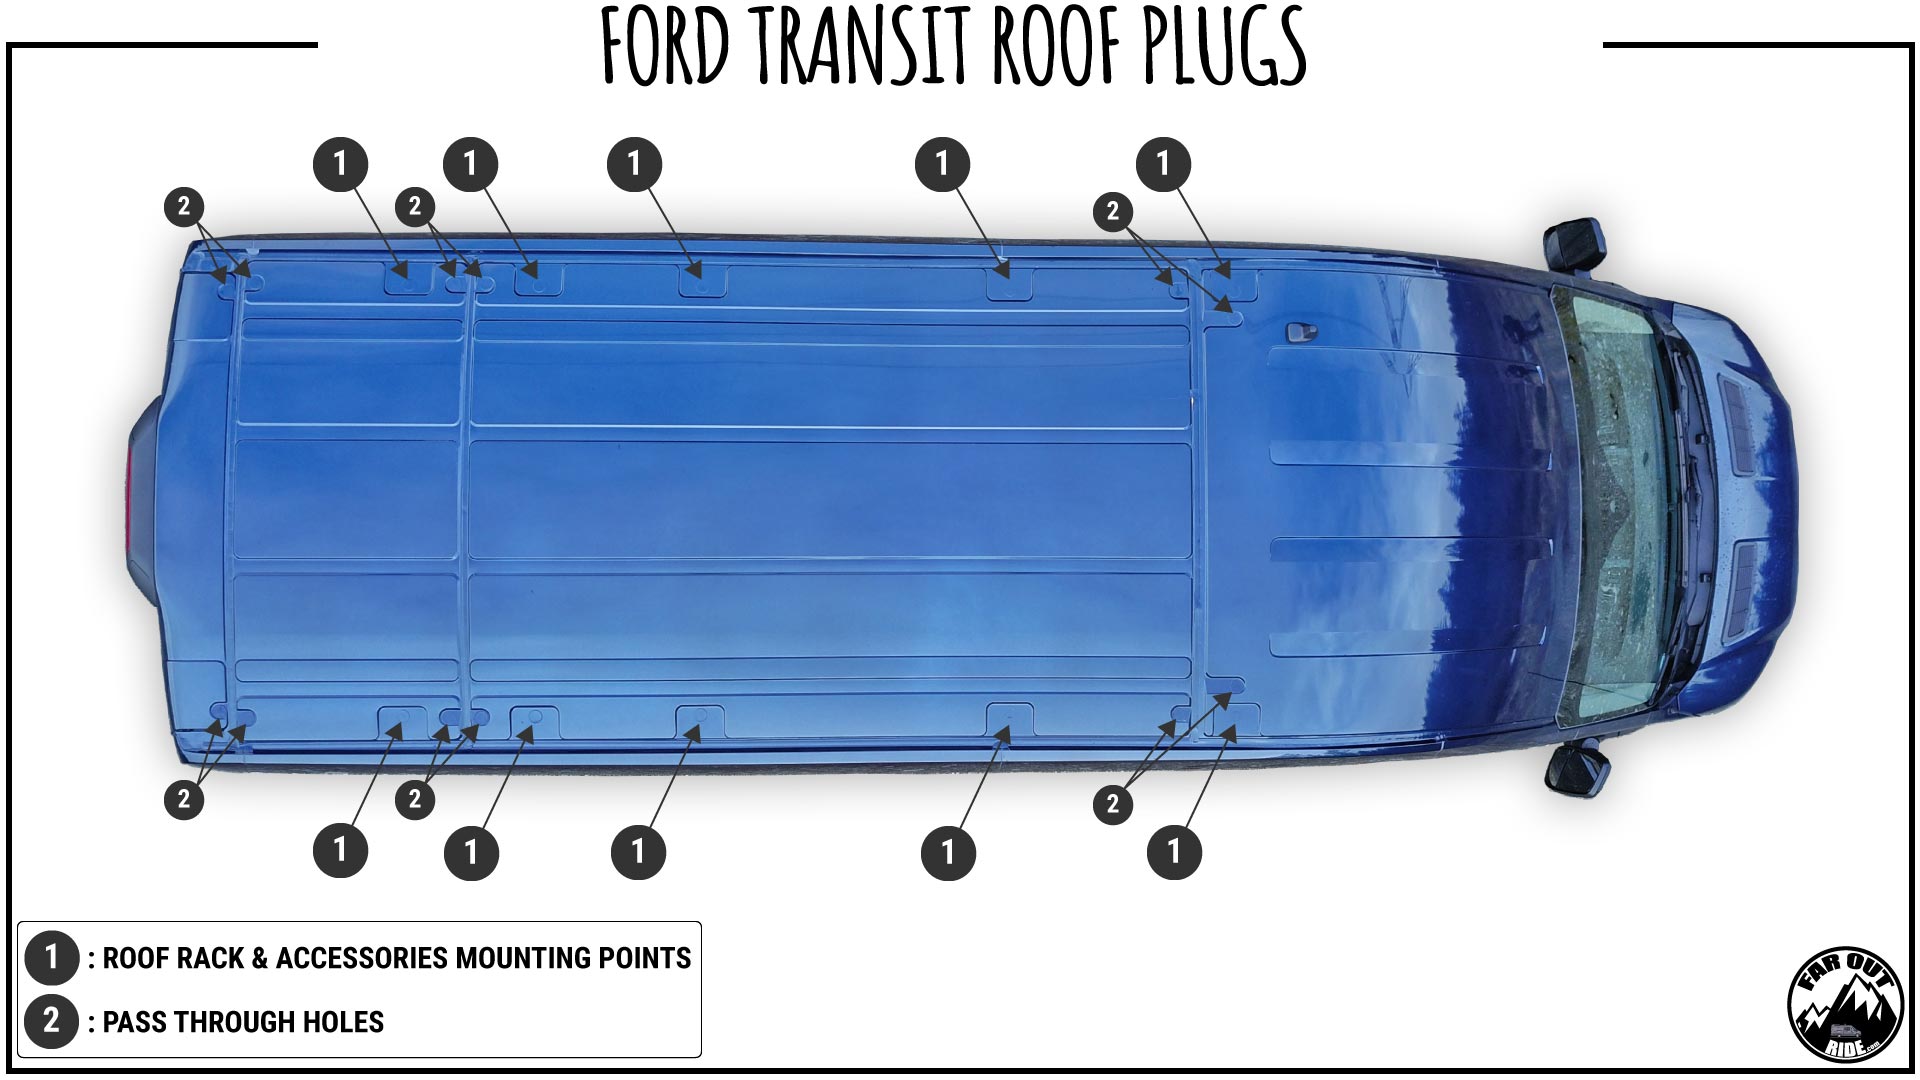
The paint over the plug may crack over time and allow slow leaks:


On our 2016 Transit, after 6 months of full-time vanlife, we noticed dripping water coming out of the wall over the sliding door; because our ceiling is insulated and finished, we could not pinpoint the leak. But we assumed it came from one of the threaded holes, so we climbed onto the roof and we found that the paint was slightly cracked around the plugs (see previous picture).
It is worth mentioning that not everyone has a water leak issue on their Transit. Many people didn’t do anything about it and are doing just fine. You may or may not encounter this. That being said, the fix is so easy that we’d do it anyway for peace of mind. On our 2021 Transit, the plugs came out for the roof rack install, and we sealed around the rack’s landing pads instead.
The fix for leaking roof plugs is pretty simple: seal the plugs with sealant! Because you, or the next owner, might eventually need to remove the plugs, we’d recommend using a non-permanent sealant, such as Dicor Lap Sealant (see on Amazon).
We were in Montana, in the middle of winter, when we noticed the leak, and we had to solve the issue on the spot. Silicone II is all we could find locally at the hardware store, so we went ahead and sealed the plugs. No issues since then! It worked, but silicone has a catch: most sealants won’t bond to its residue, so re-sealing those plugs later means scrubbing it all off first. That’s why we’d still pick Dicor.

Roof Panel Joints
The Ford Transit roof is made of several sheet metal panels, joined and sealed together:

Unfortunately, in some spots, the factory sealant may be poorly applied and allow slow leaks:

A few weeks after getting our 2021 Transit, we noticed a tiny spot of water on the cargo floor:

We climbed onto the roof and we located where the sealant wasn’t properly applied (see “Gap In Sealant” in the earlier picture). To prevent future leaks, we decided to seal all the panel joints on the roof (marked with a red line in the first picture of this section) as follows:
Material:
- Mineral Spirits
- Soapy Water
- Sikaflex-521 UV (white or grey, paintable) or 3M 4000 UV if you want black
- Caulking Gun
- Shop Towels (or a lint free cloth)
- Nitrile Gloves (we pre-cut a bunch of fingers, see step 3)
Remember to keep soapy water nearby at all times; this stuff is pretty sticky!
1. Clean the surfaces to be sealed (we used mineral spirits; isopropyl alcohol works too. Skip soapy water for this step: soap residue weakens the bond):

2. Apply sealant (we used Sikaflex-221, same sealant as for the roof rack install. For a joint in full sun, Sikaflex-521 UV is the better pick: Sika doesn’t rate 221 for UV exposure):

3. To smooth out the seam, wet your finger in soapy water and run it along the sealant:

4. Final result (with roof plugs removed for the roof rack installation). Looking good and clean!

Sealant ages, so give the seams, plugs, and anything you’ve added through the roof (like a roof fan) a quick look once a year; a crack caught early is a five-minute fix.
Why Thinsulate Helped Us Catch the Leak
Because we insulated our van using Thinsulate, water from the slow leak found its way down; we noticed the leak quickly and we could fix the issue at the source. If we had used foam board or spray foam (or whatever), water would probably have been trapped and pooled somewhere (remember some of the threaded holes are hidden within frames), causing rust over time or draining all at once while driving and making a huge mess. Also, as opposed to denim or fiberglass insulation, Thinsulate is hydrophobic: its fibers don’t absorb water, so it dries out on its own. We think that’s another good reason right there to choose Thinsulate for insulation…




Apparently Sikaflex 221 is not UV resistant. Have you seen any signs of breakdown?
No signs of deterioration whatsoever. But I changed the recommendation: Sika’s current data sheet only lists 221 as “resistant to aging” and doesn’t claim UV resistance. For any bead exposed to the sun, I now recommend Sikaflex-521 UV (white or grey, paintable), or 3M 4000 UV if you want black. 221 is still fine where it’s covered, like under the roof rack landing pads or under Dicor around a roof fan. Thanks for the heads-up!
Thanks for the quick reply. Did you paint yours? I’ve already applied a lot, and I’m considering painting it to block UV.
Didn’t paint, and it still looks good, and flexible to the touch. I’m not worried, to be honest.
And the sealant is the “fallback” safety feature (just in case, proactive prevention), I doubt it will ever leak…
Last week, I had a leak source around the corner of my RV door, and I used Butyl MS Caulk to repair the water damage. I have my best experience with this caulking agent and highly recommend it to every RV owner out there. It has been around for a while as a unique hybrid polymer designed to withstand severe climate, weathering, and environmental conditions. Butyl MS Caulk adheres to a wide variety of substrates and gives best caulking results on expansion joints, windows, sidings, and roofing. It can be used in low temperatures also.
hey dudes! thank you so much for such an incredible depth and well structured blog!! I got a LWB high top Mk6 transit and have absolutely plastered the roof in fibre glass and filler lol but will check out all those mounting plugs and factory seams, thankyouthankyouthankyou
Helpful. I have caulked all areas of solar attachments and around roof vents. I then placed the butyl tape still had a small seal so Tx is to do the seams
Another helpful post, thanks. I climbed a ladder up to the roof on my 2023. There is a lot more caulk on the newer models it seems. About a 3/4″ swath all the way around. Roof rack caps are flat and well sealed as well.
thanks guys, I’ve a 2015 mk8 transit, we have water leaking down the inner B pillar into 1 of the large hole areas, stopping us build further with insulation etc.
so getting the ladders out when the rain stops.
thanks for your advice.
Hey guys. Just sharing that I believe the Pass Through Holes are 0.75 inch in diameter. Hope this helps some folks.
R/Mike
Thanks!
hi folks
your site is great and we are excited to start our build within the next year or so. Quick question, will you by chance be doing a “build-series” video on you new build? Would be great for sure and something I’d gladly pay. I have purchased all the help tools/downloads from your site and slowly digging into everything. The video you did on the “swivel seat’ was prefect and would love a similar one on the wiring, perhaps within a few videos given the scope on wiring being so large.
Thanks again
Greg
Hi Greg, I just answered your email! 🙂
Have you experienced any water leaks from the side panels? Sprinter vans are known to have this problem, and some Transit owners report the same problem. Would lining the inside top edge of the side panels do the trick?
To our kwowledge our side panels don’t leak. It’s a bit hard to check on the old van (with the walls), but we’ll monitor this on the new van during the upcoming rain season!
Thanks. I appreciate this a lot – perfect timing. My Transit was supposed to be here first week of April, then got pushed back 3x to July, now possibly this coming week.
I want to design my own roof rack, do you know where I can find the schematics/dimensions for the roof rack attachment points?
We do have a schematic here: https://faroutride.com/roof-rack/#transit-install
But the shown dimensions might not be precise enough to design a rack though… I’d wait until you get your van (to account for the roof curvature and all).
Just found loads of water in my transit today which I’m currently converting and filming for my youtube channel “Mispronounced Adventures”, I guessed this was issue, went up on the roof. turned out it was the same. thanks for the article on it!