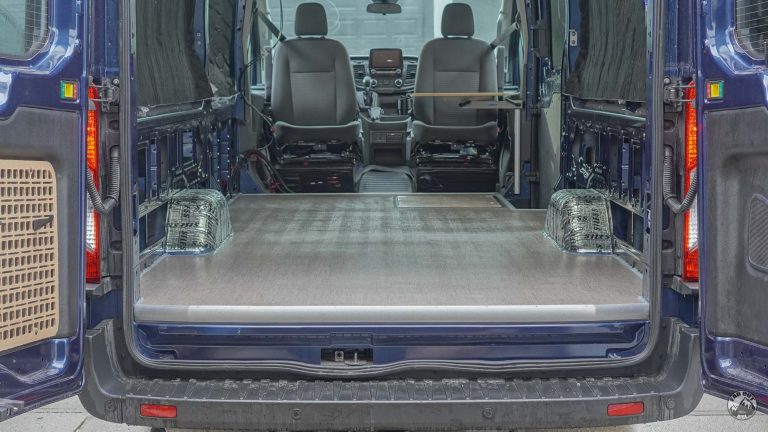
And now is the time to install a floor in our van conversion! A floor has many other critical functions than just supporting our feet. Indeed, a proper floor installation prevents water infiltration (= rust), provides thermal and noise insulation, and serves as an anchor for the cabinets. In addition, it should be resistant to wear, be able to withstand enough weight, not produce any squeak, and … look good (yep, that counts!). There are many ways to install a floor in a van, but keep reading to learn our take on it!
Pre-requisites
Time Spent
25 HOURS
Total Cost
$ 650 USD
Related
Material: 3 Seasons
Good for occasional sub-freezing temperatures.

| LAYER | ITEM | QUANTITY | LINK |
|---|---|---|---|
| 1 & 2 | Minicell Foam | 7 sheets | eBay |
| 3 | Preferred: Baltic Birch Plywood (½”, 4’x8′) | 3 sheets | Cheaper to source locally |
| Alternative: Exterior Plywood (¾”, 4’x8′) | |||
| 4 | Vinyl Floor | 13′ wide x 8′ long | Cheaper to source locally |
| 0/1 | 3M 90 Spray Adhesive | 1 | Amazon |
| 3/4 | Vinyl Floor Adhesive | 1 | Amazon |
| Wood Filler (only if using exterior plywood) | 1 | Amazon | |
| Silicone II (for caulking the vinyl floor periphery, step 7.6) | 1 | Amazon | |
| Great Stuff “Gaps & Cracks” | 1 | Amazon | |
| Vinyl Floor Seam Sealer | 1 | Amazon | |
| Stair Edging (1-1/8″) | 1 | Amazon |
Material: Snow Chasing
1″ thick XPS for Full-On Snow Chasing!

| LAYER | ITEM | QUANTITY | LINK |
|---|---|---|---|
| 1 | Minicell foam | 3 sheets | eBay |
| 2 | XPS foam (1″ thick, 4’x8′) | 3 sheets | Cheaper to buy locally (product example: Insulation4us) |
| 3 | Preferred: Baltic Birch Plywood (½”, 4’x8′) | 3 sheets | Cheaper to source locally |
| Alternative: Exterior Plywood (¾”, 4’x8′) | |||
| 4 | Vinyl floor | 13′ wide x 8′ long | Cheaper to source locally |
| 0/1 | 3M 90 Spray Adhesive | 1 | Amazon |
| 1/2 | Silicone II | 3 | Amazon |
| 2/3 | PL300 Foam Board Adhesive | 2 | Amazon |
| 3/4 | Vinyl Floor Adhesive | 1 | Amazon |
| Wood Filler (only if using exterior plywood) | 1 | Amazon | |
| Great Stuff “Gaps & Cracks” | 1 | Amazon | |
| Vinyl Floor Seam Sealer | 1 | Amazon | |
| Stair Edging (1-1/8″) | 1 | Amazon |
NOTES:
- Minicell thickness: Transit = 0.40″, Sprinter & ProMaster = 0.30″. Choose thickness in eBay store.
- Quantities shown are for our van (Transit extended-length) and may vary according to your van model. For Minicell quantities, follow recommendations in product description (eBay store).
- We used ½” XPS (in pink) to fill the corrugations, but we would use Minicell if we had to start over. Read our “Second Thoughts” at the bottom of this page for more info!
Tools
| Item | Description | QTY | Link |
|---|---|---|---|
| Snap-Off Utility Knife | Stanley 18mm. | 1 | Amazon |
| Caulking Gun | For 10 oz cartridge. | 1 | Amazon |
| Jig Saw | DEWALT Cordless Lithium-ion 20V. | 1 | Amazon |
| Blade Set for Jig Saw | 14 Pieces. | 1 | Amazon |
| Circular Saw | DEWALT Cordless Lithium-ion 20V, 7¼ with brake. | 1 | Amazon |
| Circular Saw Blade | DEWALT Precision Finish Blade 60 tooth. | 1 | Amazon |
| Trowel | 1/16″ x 1/16″ x 1/16″ Square Notch. | 1 | Amazon |
| Rolling Pin | To roll tasty vinyl pies. | 1 | Amazon |
| Painters Tape | To protect the van walls when working with Great Stuff Foam. | 1 | Amazon |
Resources
- Loctite PL 300 Technical Data Sheet
- Silicone II Technical Data Sheet
- 3M 90 Technical Data Sheet
- Vinyl Adhesive (Robert 6300) Technical Data Sheet
- Great Stuff Gaps & Cracks Technical Data Sheet
Good To Know
Floor Layers In A Nutshell

Layer 1: To Fill corrugations
- Provides thermal insulation (and sound insulation to a certain extent).
Layer 2: Top of corrugations
- Provides thermal insulation (and sound insulation to a certain extent).
Layer 3: Underlayment
- Provides a smooth and level surface for good adhesion of the finish layer.
- Supports and distributes weight.
- Serves as an anchor for cabinets.
Layer 4: Finish
- Looking good!
- Protects against liquid infiltration (and therefore, rust). Trust us, spills WILL happen! That’s why we went for large vinyl sheets (2), instead of multiple vinyl tiles (to minimize seams).
- Shall be wear resistant.
Choosing A Plywood
Baltic Birch
The plywood underlayment shall be moisture resistant, exempt of any warp, and the surface common with vinyl flooring shall be nice and smooth. That’s why we prefer Baltic Birch. It is laminated with exterior grade adhesive, it’s straight, the surfaces are smooth (no wood filler needed) and it’s very dense (screws grip better in it). As a result, ½” should work well. Note that we wouldn’t treat the entire plywood sheet: just the edges. Indeed, it is sandwiched between the vinyl floor and the foam (XPS or Minicell), so it’s not exposed to high level of moisture or condensation.
Exterior Plywood
Exterior plywood commonly found in hardware stores is glued using exterior grade adhesive and some of it is also treated for protection against fungal decay, rot, and termites. Compared to Baltic birch, it is made of thicker plies, so fewer plies are needed to obtain the same thickness. Therefore, the resulting plywood is less dense and warps more easily. We’ll go ahead and say that even if the underlayment is exposed to some moisture, it’s not a requirement to use treated plywood because it is “protected” by the vinyl floor and the foam (XPS or Minicell). If using plywood to fill the corrugations, that’s another story…
Choosing the XPS foam
You’ll find XPS branded as “Foamular” 150, 200, and 250. This number is relative to its compressive strength. 150 is capable of supporting 15 PSI, 200 can support 20 PSI and 250 is capable of 25 PSI. Knowing that a human footprint is equal to approximately 16 PSI, it’s a good idea to choose XPS higher than 150 (15 PSI). Note that the plywood underlayment will take care of distributing the weight to a larger surface, so any foam should be OK. That being said, there’s a pretty good chance you walk on the foam during the van build (before installing the underlayment); you’ll appreciate if the foam doesn’t collapse under you 🙂
Attaching The Floor
Believe it or not, there’s no need to secure anything; the floor isn’t going anywhere! The large plywood sheets, combined with the weight of the cabinets (and others) will ensure the floor stays where it belongs. Doubt it? We completed our conversion in 2017 and our floor hasn’t moved at all. And many people have used this technique with the same results.
So, why are we recommending to use adhesive anyway? The adhesive doesn’t provide any kind of “structural” bond: its role is to keep everything where it belongs during the floor assembly & to prevent squeaks, especially with XPS. We repeat, XPS squeaks if not attached properly! Keep reading for recommended adhesives.
All of that being said, we see a scenario where we would attach the floor to the van: if no cabinets are added to the van and a slide-out-bike-rack is installed. Then, it might be a good idea to attach it (because of the long lever when the bike rack is out).
Adhesive Compatibility
| Minicell | XPS | Metal | Wood | |
|---|---|---|---|---|
| 3M 90 | Yes | NO! | Yes | Yes |
| 3M 78 | Yes | Yes | Yes | Yes |
| 3M 77 | Yes | Maybe | Yes | Yes |
| Great Stuff (Gaps & Cracks) | Yes | Yes | Yes | Yes |
| Silicone II | Yes | Yes | Yes | Yes |
| PL 300 | No | Yes | Weak | Yes |
Choosing the right adhesive
Like it or not, there’s no perfect “universal” adhesive (because CHEMISTRY). The “best” adhesive depends on materials, application context, use context, availability, and cost. Based on the previous table, here are some options:
- 3M 90: This is the stuff we used to glue Thinsulate to the walls and ceiling. Works great, except it WILL attack XPS. Bond time = 15 minutes.
- 3M 78: Designed specifically for foam, it’s probably the best option (technically speaking). However, it’s costly and more difficult to find. Bond time = 30 minutes (it means you have 30 minutes to put everything together and apply pressure).
- 3M 77: It used to be safe for XPS (polystyrene), but 3M had to change the ingredients recently. We’d recommend testing it before using it with XPS. Bond time = 15 to 30 minutes.
- Great Stuff Gaps & Cracks: Not technically an adhesive, but people use it successfully to glue foam. It’s very cheap and easy to find, but it can be messy if not careful. Bond time = less than 10 minutes? (test it, not sure exactly).
- Silicone II (not acrylic): Not technically an adhesive, but it works great for the current application (prevent squeaks). Quite cheap and easy to find. Bond time approximately 15 minutes.
- PL 300: That’s what we recommend for bonding XPS to wood. Won’t work on metal or with Minicell. Bond time = 20 minutes.
Joining the plywood (to get an even seam)
Some people are getting uneven seams where the plywood joins together. We personally didn’t get this issue, but we would highly recommend looking into joining techniques to increase your chances of success, such as:
Lap Joint

Biscuit Joint

Some don’ts
Framing
We often see people framing their floor, the justification being that it “stabilizes” the floor. Unless you are using compressible insulation (Thinsulate, wool), there’s just no need to do this. The van’s floor is stable enough. Good reasons not to do it: 1- frames are thick and vertical space in a van is precious. 2- Wood is a good heat conductor, so the frames create thermal bridges (in other words, it’s bad for insulation. Check out our “Insulation Guide” for more.).
Metal screws
Each screw added to the metal of your van is a potential ignition point for rust. Knowing that the floor is a very sensitive zone for rust, we really recommend not screwing liberally through it. There can be some exceptions to this (we personally drilled a few holes for the Webasto & Propex heaters, composting toilet exhaust, grey water drain, propane locker vent and floor vent), but the bare metal of each added hole/cutout should be primed + painted to prevent corrosion.
Saving Time and Hassle
We recently stumbled on the Bedrug Cargo Mat. It’s a 1/2″ thick closed cell foam mat (polypropylene = resistant to chemicals & weight) that is custom-made for various vans (Transit, Sprinter, ProMaster, etc.) & wheelbases (short, long, extended). The mat fills the corrugations (neat!), the custom fit means there is no trimming involved (which can literally saves you HOURS!), and as a bonus the mat can be used as a floor template (for the plywood or else). We think it would make a great alternative for the minicell insulation in the “3 seasons” floor layout (layers 1 & 2), or it could be used as a standalone floor for simpler builds.


(choose your van & model from the search result)
And now let’s get to work!
Clean Everything:
Cleaning is NO FUN.

Fill the corrugations with the Minicell (Floor Layer 1):
NOTE: We used ½” XPS for this step (as shown in the pictures), which is too thick, so we would use Minicell if we had to start over.
2.1- Cut the XPS (Minicell) using the utility knife.

2.2- Install on the van floor using adhesive (3M 90 adhesive with Minicell).

The XPS Shake:
Put some of the leftover C-200 XPS strips in the blender with vanilla, protein powder, ice cubes, and decorate with mint. Enjoy!

Install the XPS or Minicell (Floor Layer 2):
3 Seasons = 0.25″ thick Minicell.
4 Seasons = 1″ thick XPS.
1. Isabelle crafted a template from some random brown left overs. It helped making clean cuts on the insulation.

2. Add the XPS or Minicell and secure in place using the adequate adhesive (XPS = Silicone II, Minicell = NONE).
We left a gap of about ½” all around the van wall to account for installation variations and to ensure there would be no squeaking noise. This gap will be filled later with Great Stuff.

Install the plywood underlayment (Floor Layer 3):
TIP: Use the foam (from layer 2) as a template, it’ll save you some time! And don’t forget to take your shirt off when using a circular saw.

Isabelle approves the result and the shirtless display.


Secure the plywood to the XPS using PL300 (remember, this is to prevent squeaks) and apply weight. If using Minicell, no adhesive is required (Minicell doesn’t squeak).
Cannot find any weight? Leaving a bowl of food on top of the surface to be glued will inevitably attract heavy weight.

Before adding the finish layer…
Cavities on the plywood were filled with wood filler and then sanded flush. If using baltic birch, this step is not required as it is already smooth.

To seal the gap and make a nice & flat surface for the vinyl floor, we overfilled the gap with Great Stuff (Gap & Cracks), let it dry, and then trimmed it flush with the plywood sheet (using a utility knife).

Install the vinyl sheet (Floor Layer 4):
We bought a sheet of 8’x13′ vinyl and trimmed it as follows:

The goal is to have the “planks” oriented lengthwise and to have the seam “hidden” under the bed:

Something like this:

TIP: We were told not to trim the vinyl to its final dimensions right from the start, and that was a GOOD TIP! Work with extra length, and do the final trim AFTER it’s glued. Indeed, it’s almost impossible for the vinyl to return to the same exact location after the glue is applied (because it will slightly move and stretch). That’s why we initially trimmed the vinyl to 6.5′, which is slightly larger than its final dimension (~6′).
Follow the instructions on the vinyl floor adhesive: use the appropriate trowel and the right amount of adhesive (not more).

The vinyl was stretched and bubbles removed using a rolling pin. Notice the extra material around the periphery: that will be trimmed to its final dimensions later.

Then we proceeded with the second vinyl sheet. To make a nice seam between the two sheets, we slightly overlapped them and trimmed both sheets (simultaneously) so they have the same exact trim. No picture of the seam, sorry 🙁

We caulked the vinyl floor periphery with GE Silicone II. Unlike acrylic, Silicone is permanent: it doesn’t dry and doesn’t crack, it’s very flexible and it remains elastic from -55F to 400F.

Install stair edging:
As a final touch, we added an aluminum stair edging at the sliding door, passenger/driver seats, and at the back of the van (garage).

Because the stair edging is only 1-1/8″ and our floor is thicker (we went for the “snow chasing” mode!), we added a wood trim that we painted grey to match the van’s magnetic grey. The wood trim is screwed into the plywood layer of the floor (the screws are hidden by the aluminum edging).

OMG WE HAVE A FLOOR!

On Second Thought…
Things we would do differently
- We initially went for ½” XPS to fill the corrugations and we would now go for Minicell (because it has exactly the right thickness).
- We initially installed a layer of MLV (mass loaded vinyl) for soundproofing, but we feel it was superfluous. This thing is HEAVY and sandwiching it among the floor layers is not how it’s meant to be installed to be effective. So save yourself the trouble!
- We used exterior plywood and left it in the sun for some time… It warped the plywood big time. Next time we’ll use Baltic birch and keep it away from the sun!
- This page was updated to reflect how we would do things next time!
How cold is the floor in winter?
Heat rises, right? So we expected our floor to be constantly cold. Turns out the Webasto placement is perfect as it blows hot air parallel to the floor. As a result, our floor is nice and warm even when it’s way below freezing temperatures outside. Neat!
That being said, it might not be the case for different layouts… If your “living area” is in the back and your Webasto in the front, the floor might be cold in your living area.
Any change over time?
Nope! The floor is still level and doesn’t squeak 🙂


Hey guys, just a quick question. Honestly not sure if this falls under consult or not, but I don’t think so. We just removed the existing floor on a Ford Transit 250 that was screwed in with a billion screws ( yes, through the metal. Before beginning installation the CORRECT way, I’d like your suggestion on repairing holes. I was thinking about using JBWeld to fill the holes. Is that what you guys recommend to fill holes?
Weld the holes shut. Easy enough to do. If you can’t weld, have a muffler shop do it.
Another product (or products) worth considering is Forbo Marmoleum. Comes in sheets and click tile, including waterproof click tiles. The tiles are cork, then high density fiberboard, then marmoleum (linoleum) with a sealant. The top layer’s main ingredient is linseed oil and it’s VERY durable and anti-microbial. I put the tiles in my house, including kithen and baths, and I’m definitely going to use in van. It’s very well made and, if using the click tiles, the seams basically disappear. It’s a little pricey as it’s imported from Germany but you only need a very tiny amount and comes in cool colors. Just search Forbo Marmoleum to see it.
We are going to add a two person bench seat to a Transit. Should we install it diectly to the metal floor of the van or to the floor after installed?
I have no experience adding a bench, but it should probably be attached to the metal floor with reinforcement plates to distribute the load.
I’d recommend searching the Transit-related groups (https://www.fordtransitusaforum.com/, https://www.facebook.com/groups/transitcamper) to find out!
There is a special glue for gluing the panels to each other as well as to the metal: https://www.homedepot.ca/product/great-stuff-pro-construction-adhesive-26-5-oz-751-g/1000683845
Where did you cut out a section for your heater? Or did you install it on to of the floor
Hi, we documented the heater installation here: https://faroutride.com/espar-install/
It is located under the passenger seat, as shown in the link 🙂
Thoughts on using a roll of neoprene self-adhesive weatherstripping to the valleys like: https://www.amazon.com/dp/B07LB2NNZ8?ref_=ppx_hzsearch_conn_dt_b_fed_asin_title_4&th=1 instead of minicell? I worry about the permanence of construction adhesive and figure this will come off easier if it ever needs to be removed. If I went this route, I would put a sheet of minicell on-top before the baltic birch layer. Appreciate your thoughts on this!
Minicell tip: We found that the factory edge of minicell does squeak (a lot) when used to fill in the floor valleys. Fortunately this was easily fixed – just cut off a sliver from all the factory edges, and now the floor is perfectly quiet. Also we were able to do our whole promaster extended cargo floor (valleys plus top layer) with 5 sheets rather than 7. We used the same thickness for both layers.
Thanks for all the knowledge you have shared!
I’m not quite understanding. “Factory Edge of minicell…” Cut off a silver from the edge? can you explain
You mention sealing the edges of the birch plywood. How did you do this? Did you use polyurethane around the edges?
You can use an epoxy, varnish, paint or oil 🙂
Thanks much for the great info. A few questions:
1. Did you fasten the plywood sheets together? Pocket screws? Biscuits? Nothing? Why or why not?
2. Any further info on the BedRug? Looks like a great idea. Have you or anyone you know tried it?
Gracias!
1. We didn’t attach them together, it worked fine by not lining-up the joints between the foam boards and the plywood (in other words, the joints in the foam boards are not directly under the joints in the plywood). We will probably use biscuits (or similar) on the upcoming build, just to ensure it lays flat.
2. Many people are using it, you can look it up on fordtransitusasforum.
cheers!
The one problem I recognize, first hand, with the finer points on this floor system is that it breaks your own prime directive rule. Water will get in. It always does. The tight sealing process of this floor will only trap any water that makes its way under. Doing things like caulk sealing the wheel wells to the floor, or expando foaming the edges, is ensuring a water trap. Top rule of home design: either figure out a way to 100,000% guarantee water can never ever get in, or, design in a way for it to get out. I’ve been burned by this rule several times. It’s sooo tempting, and it looks so great and finished, to seal it all off.
Hang out studying commercial window fenestration design, shower floor design, automotive sunroof design, they’re all made to gracefully leak and route water to an exit point, and or dry out.
I think you’ve got it pretty much perfect, but I plan on drilling drain holes in my van floor (sealed edges of course), and leaving a mini-trough around the perimeter of the floor, with rabbited in powder coated alum trim that allows for evacuating water.
Great comments on not doing joist strips and not drilling into the floor. Its not needed, and as you point out, introduces rust points. Id like to recommend a silcone adhesive
; DOW 795. It’s an amazing building adhesive. Used to bond in window glass units, any other building material, crazy wide temp range for flexibility, and can be removed/ demolished if needed. Its the miracle baby adhesive. I built my house using it.
You guys are great by sharing your experience !
I am about to start my new and first Ford Transit Van and your explanations and experience sharing will be more than useful.
Thank you so much !
Hi. Long time reader, first time question asker. I’m converting a Promaster and wondered what you think of this idea for the floor insulation. …
I was thinking of using the “great stuff” as double purpose : one to fill the cavities and let it puff higher then two it will glue to the one inch XPS that’ll be weighted down with heavy stuff while it dries…
Appreciate all the efforts you put into making valuable information available to others. After using Silicone II between the metal van floor and XPS, how long should I wait before adhering the plywood to XPS using PL300?
Do you still recommend using the Bedrug vantred under the plywood. It seems to only come in 1/4 inch thick, that’s all I can find. Also what glue if any should I use in adhering the Bedrug to the van floor, and also the Bedrug to the plywood. Thanks.
We’re going to use 3M-90 to adhere the bedrug to the metal floor. We confirmed on the 3M-90 product specs sheet that these materials will work with it. 3M-90 will attack XPS – don’t use near it
I had contacted the Bedbug mfg and asked them about what glue I could use – they replied they could not recommend any glue. I am thinking about silicone II to adhere the Bedbug to the floor and to the XPS….
Any updates on what type of glue to use on the Bedrug, if any? I have had no solid direction on this and am using XPS layer as well. Any advice would be most appreciated. Thanks!
We are using the bedrug and don’t plan on using any type of glue. The only thing we are gluing is the xps to the plywood and the linoleum to the plywood. I don’t think we need to glue the vantread to anything.