The floor is the foundation for our entire van build; it provides thermal and sound insulation, protects against water infiltration, and anchors the cabinets. This is our second van, and while we stuck with many of the same ideas from the first one, we made some tweaks to make things simpler and better. In this guide, we’ll show you precisely what we did and why. Hope you enjoy it!
Disclosure: This post contains affiliate links, which means that if you click a product link and buy anything from the merchant (Amazon, eBay, etc.) we will receive a commission fee. The price you pay remains the same, affiliate link or not.

Theory
Floor Layers and their roles

Covering:
Protects against liquid infiltration, mould (subfloor) and corrosion (van). Aesthetic finish. Shall be durable and wear resistant.
Subfloor:
Structural support for covering and anchor for components (cabinets, etc.).
Insulation:
Thermal and acoustic insulation.
To frame or not?
The factory floor of Transit, Sprinter, and ProMaster vans offers a solid foundation for your insulation/subfloor/covering. Unless you are using compressible insulation (e.g., Thinsulate or wool, which we don’t recommend for the floor), or if you need to install some fancy in-floor systems, there is no reason to frame, and there are a few downsides:
Framing:
- Reduces headspace.
- Reduces insulation (the frames act as thermal bridges because wood is a better heat conductor than insulation).
- More work…

Filling the ribs or not?
This is a polarizing question, and here are the typical opinions you’ll find online:
Fill the ribs
- PROS:
- More thermal/sound insulation.
- More support surface for the next layer.
- CONS:
- Prevents water from evacuating and could potentially promote corrosion.
- Return on investment not worthwhile.

Don’t fill the ribs
- PROS:
- Allows condensation/spill water to evacuate.
- Less work, cheaper.
- CONS:
- Less thermal/sound insulation.
- Less support surface. Concerns about insulation compressing under weight.

We did fill the ribs on FarOutVan #1, it worked great, and the factory metal floor is doing just fine after all these years!
So why not fill the ribs on FarOutVan #2, then..?
We’re only human, and we can’t help but question everything! Building another van is an opportunity to improve, and we see simplification as an improvement when it’s appropriate. We believe that 1″ XPS, 1/2″ plywood, and vinyl covering will provide enough thermal/sound insulation, even for winter vanlife. We understand the concern about the insulation compressing, but we chose XPS with high compressive strength; we’re not worried about that.
Choosing the right materials
Insulation
Recommended:
Foam Boards
XPS, Polyiso, etc.
Low-cost, high-performance, easy to get.

- R-Value: ~ R-5 per inch.
- Thickness: 0.75″, 1″, 1.5″, 2″, 2.5″ and more.
- Pros:
- Available at local hardware stores.
- Low cost.
- High compressive strength.
- Cons:
- Must be trimmed to match contour (time consuming).
- Can potentially squeak if no care is taken.
Minicell
Crosslinked polyethylene
If squeaks are a concern for you.

- R-Value: ~ R-3.5 per inch.
- Thickness: 1/4″, 3/8″, 1/2″, 3/4″, 1″, 1.5″, 2″ and more.
- Pros:
- Doesn’t squeak.
- Cons:
- Must be trimmed to match contour (time consuming).
Bedrug
Drop-in solution to save time.

- R-Value: ~ R-3 (final).
- Thickness: ~1/2″.
- Pros:
- Drop-in solution (already trimmed to match contour and ribs)
- Doesn’t squeak.
- Cons:
- Low R-Value compared to foam boards.
Not Recommended:
Thinsulate
We love Thinsulate for our walls and ceiling but not for our floor:

- R-Value: ~ R-3.3 per inch.
- Thickness: 1/2″, 1″, 1.75″.
- Pros:
- Mold and mildew resistant.
- Acoustic absorption.
- Light weight.
- Very easy to install.
- Doesn’t squeak.
- Cons:
- It is compressible and therefore not recommended for the floor (must be framed).
OEM Floor
The Ford Transit van can be ordered with floor protection, but the denim backing retains water:

- R-Value: ~R-1.5 (final).
- Thickness: ~3/8″.
- Pros:
- Pre-installed!
- Offers temporary protection before conversion.
- Cons:
- Backed with denim, which is not hydrophobic. Therefore not recommended as permanent insulation.
Subfloor
As you’ll see, we chose Baltic Birch for our subfloor, because we love it and were able to source some locally at a very decent price. There are other alternatives, too!
Baltic Birch Plywood

What’s the point of using Baltic Birch, a cabinet-grade plywood, for our subfloor, you may ask?
- More thin plies (~1.5mm thick): less prone to warping.
- Very few voids: more stable and uniform characteristics.
- Higher strength and better grip for screws: better anchor for cabinets (and else).
With all of the above, our choice is made. 1/2″ thick Baltic Birch will do!
Standard Plywood

- Less thick plies (~3mm thick): more prone to warping.
- More voids: less stable and uniform characteristics.
- Grip for screws: not as strong.
We think it’s fine to use “standard” plywood too, but we’d recommend 3/4″ thick (compared to 1/2″ with Baltic Birch).
Others
There are DOZENS of alternatives, it’s fine if you use them, but price and availability are always in the equation!
- Coosa composite boards.
- Marine plywood.
- Exterior plywood.
- etc., etc., etc.
Covering
We had great luck with vinyl covering in FarOutVan #1. With vinyl, the entire floor can be made of a single sheet of vinyl; there are no seams or planks, so liquid can’t pass through. Also, planks tend to develop uneven gaps with vans’ constant expansion/contraction. After years of full-time usage and freeze-unfreeze cycles, our vinyl floor still looks great, doesn’t squeak, and has no bulges or anything. So, we are going to stick with that!
For FarOutVan #2, we’re investing in Lonseal vinyl flooring, a heavy-duty vinyl designed for marine environments. It’s not the cheapest, but it is the most durable and highest-quality we know of! It can be purchased per linear foot in a 72″ wide sheet. It’s even possible to get it pre-cut specifically for your van, but it’ll cost you.

Adhesives
We recommend:
- PL Premium 3X: for metal, XPS foam insulation, and plywood subfloor (works better than PL300!).
- Lonseal #650 Two-Part Epoxy Adhesive: for Lonseal vinyl flooring.
- 3M 90 Spray Adhesive: for Minicell/metal.
Floor Contour
There are a few options to create your floor contour:
Tape measure and cardboard templates
For FarOutVan #1, we used a tape measure for the square sections and made cardboard templates for the wheel wells, frames, etc.:

OEM or Aftermarket floor covering
If you already have an OEM or Aftermarket Floor Covering, you can transfer the contour to your insulation/subfloor:

Paper Templates
We created the paper templates for the Lonseal vinyl flooring, but we also added the insulation/subfloor contour:

CNC
For FarOutVan #2, we used Rapid3D’s Ford Transit 3D Model to create the floor contour. We then CNC-cut our insulation/subfloor and installed everything in our van to validate the data. After a few rectifications, we’re left with a super-accurate CAD model of the floor, which allowed us to create a DXF file for CNCs:

Prevent Squeaking
XPS foam squeaks. We didn’t get any squeaks between the plywood and XPS, because of the large surface area. We did get a little squeak (that we later fixed) between the van’s ribs (top of corrugations) and XPS. To prevent this, apply a generous amount of adhesive in a zig-zag pattern over the top of the corrugation (instead of a straight line like we did).
Minicell foam, on the other hand, does not squeak.

Piecing the puzzle together
Our floor is comprised of 4 panels. Each panel is made from a 4’x8′ XPS foam board and a 4’x8′ plywood sheet. The joints are East-West, for uniform support from the ribs underneath (which run North-South).

In-Floor Shower Pan
TecVan In-Floor Shower Pan is listed as 1.5″ total thickness, but we found out the hard way that it is actually more than that, especially near the drain (makes sense). If we had to start over, we would use 1.5″ thick XPS (instead of 1″) to give more room for the pan!
The shower pan installation is documented here: faroutride.com/hidden-shower

Material and Resources
Time
25 hours
Cost
$1,225 USD
Weight
200 lbs
Material
| ITEM | DESCRIPTION | QUANTITY | BUY |
|---|---|---|---|
| XPS Rigid Foam Board (4’x8′) | Insulation | 4 | Home Depot |
| Minicell | As required | VAR | FoamForYou |
| Russian Birch Plywood (4’x8′) | Subfloor | 4 | |
| Lonseal Vinyl Flooring | Covering We used “Lonstrand Gray Wolf” and ordered an extra foot to make the transition with the cab. | 15ft | Campervan-HQ |
| PL Premium 3x | Adhesive for metal, foam, and plywood. (Sold under the “Loctite” brand in the USA, “LePage” in Canada) | 6 | Amazon |
| Great Stuff “Gaps & Cracks” | To fill the gap between the floor contour and the van | 1 | Amazon |
| Lonseal #650 Two-Part Epoxy Adhesive | Adhesive for Lonseal vinyl flooring | Half-Gallon | Campervan-HQ |
| Silicone II | For caulking the vinyl floor contour | 2 | Amazon |
| Aluminum Stair Edging | Step trim for sliding door and rear doors | 2 | Home Depot |
| #4 x 1″ Flat Head Screws Stainless | To fasten the stair edging | VAR | Amazon |
Tools
| ITEM | DESCRIPTION | LINK |
|---|---|---|
| Track Saw | Quick and easy way to make precise cuts. The Wen track saw works fine for hobbyists, but we like to pair it with the PowerTec rails. | Amazon |
| Jigsaw | To cut wheel well & frame contours. | Amazon |
| Snap-Off Knife | To cut and touch up foam | Amazon |
| Caulking Gun | Amazon | |
| Biscuit Joiner | To make plywood perfectly even at joints. | Amazon |
| Trowel | 1/16″ x 1/32″ x 1/32″ U-Notches. | Campervan-HQ |
| Roller for Vinyl Flooring | Vinyl floor installation. | Amazon |
| Painter’s Tape | To protect the van walls when working with Great Stuff Foam. | Amazon |


Installation
Cut the foam insulation and plywood subfloor
So we already decided on our floor contour (Floor Contour section above) and our foam/plywood layout (Piecing The Puzzle Together section above). Now is the time to cut! A track saw works wonders for long/straight cuts, and a jigsaw is ideal for curved contours. You should know that XPS foam responds very well to machining: you will get clean edges with a track saw (or circular saw), jigsaw, router, CNC, etc.
The entire surface of our floor is comprised of 4 panels. Below is panel #1 (most forward), which features a cutout for the in-floor hidden shower pan (optional):


Here are sections 1, 2, and 3 (the fourth section was not made yet):

Bond the foam to the plywood
Apply the PL Premium 3X adhesive to the foam board:

We had a pretty large gap between the foam and the plywood in our first panel and found that squishing the adhesive with a putty knife helps to reduce that gap:

Install the plywood on top of the foam board and apply weight uniformly. The plywood will move a bit, so readjust it as needed during the first 10 minutes or so. Let cure per the adhesive’s instructions:

Tip!
After curing, you can use a handheld router with a flush trim bit and/or a knife to trim the foam flush with the plywood (as required).
Make the slots for the biscuits
We used biscuits to make the floor even between the panels (at the joints, between the sections). It’s easy, quick, and repeatable. And at the time of writing, the Wen Biscuit Joiner sells for about $50… so that’s a no-brainer!
Join the plywood panels and trace a short line at each biscuit’s location. We installed a biscuit at every 6-inch or so:

Align the biscuit joiner with the line and make a slot:
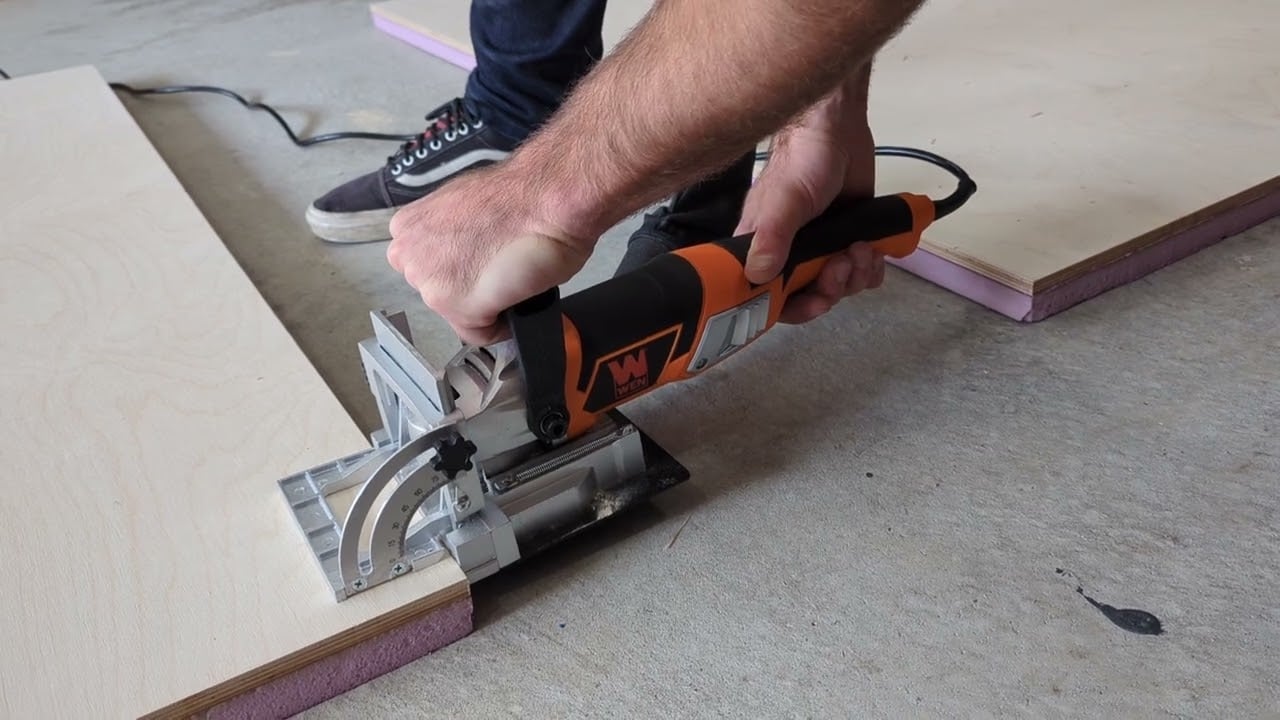
Don’t install the biscuit just yet! But here is a preview of things to come:


Prepare the van
Go have a look at the floor in your van. You will notice big bulges of sealant in most corners and at random locations around the contour. If they ever come in contact with the XPS foam boards, they will squeak like crazy! Remember that the boards will flex a bit with weight/vibration, so trim more than less… You will have the chance to fine-tune the trimming during/after the dry fit.
We found that trimming the bulges is easy and fast with an Oscillating Multitool:

Dry-fit all the pieces
We’re almost at the point where we can install the floor in the van! But before doing so, we recommend doing a “dry-fit”. Practice installing the floor but without adhesive. By doing so, you will identify and solve a few challenges:
- How to handle/install the panels without walking on adhesive.
- In which order to install the panels.
- Make sure you have enough play between the panels to install the biscuit.
- Make sure you trimmed enough of the sealant’s bulges.
- Where to apply sealant, and where not to apply sealant.
- etc.

Bond the panels to the van
Panel #2
Note: During our dry-fit installation (above), we found that we should install the second panel first. Indeed, this panel is more challenging to move around because of the frame cutouts (less free play). Also, this panel is a good reference as it is easier to adjust because we can insert wood in the gaps to make it even on each side:

Make sure the floor is free of dust, grease, etc.:

Apply PL Premium 3X adhesive in a zig-zag pattern (instead of a straight line, like we did):
Install panel #2, add weight, and let cure per adhesive instructions:

Panel #1
Start by inserting the biscuits in panel #2 (previously installed):
NOTE: We used #20 biscuits, except for the last two biscuits (driver side), which are #10; otherwise, we wouldn’t have had enough free play to install the panel.
Make sure the surfaces are clean, apply adhesive to the top of the corrugations and at the joint of panel #1 and #2 (apply to foam and plywood). We used a hammer to slide the panel in place (because of the tight fit with the biscuits):

Add weight and watch it cure the entire time (or not):

Repeat for panels #3 and #4: clean surfaces, install biscuits, apply adhesive to floor and joint, add weight, and let cure:
Panel #3


Panel #4
Before installing panel #4, we filled the holes with rubber plugs that we 3D printed:

Oh my, it’s starting to look like we’re having a floor!
Note: we didn’t add an access hole for the spare tire mechanism because we have a Rear Door Spare Tire Carrier.

Fill the contour’s gap with Great Stuff Foam
Apply painter’s tape around the contour (same height as the subfloor, not lower):

Fill the gap with Great Stuff foam, but keep in mind that this stuff expands while curing! We avoided adding foam under the floor to prevent it from rising while curing. It’s a good idea to practice before 🙂

Let the Great Stuff foam cure…

Trim the foam flush with the subfloor:

Remove the painter’s tape:


Install the floor covering
For FarOutVan #1, we trimmed our vinyl floor simultaneously during the glue-up, and it worked quite well (that’s how it’s done in residential). For FarOutVan #2, we are using the Lonseal 650 epoxy which has the following specifications:
- Pot life: 30min.
(time to use the adhesive after mixing Part A and B) - Open time: 15 minutes.
(waiting time before placing the flooring into the adhesive) - Working time: 15 minutes.
(time for the adhesive to accept the flooring after being applied)
There is no way we can pull this off so quickly without pre-cutting the vinyl, so that’s why we are pre-cutting this time!

Unroll the Lonseal and let it rest overnight so that it is as flat as possible:

Trim the paper templates along the lines with a craft knife and a 48″ straight edge, and place it over the Lonseal flooring. It’s not as easy as it sounds… these LARGE sheets are difficult to straighten and align properly, but we made it work with some patience!

Trace the contour of the paper templates onto the Lonseal vinyl with a sharpie, and then cut using a utility knife and a long straight edge:

Dry-fit and adjust as required:

A few tips on Epoxying the Lonseal
The epoxy’s open time is very short, so we didn’t really take the time to take photos… So here are a few tips from our experience:
- It’s a two-person job. One person spreads the epoxy with a trowel, and the other pours the epoxy and helps with a trowel as well (we bought two trowels by mistake, but it turned out to be a good thing!).
- We bought a half-gallon of epoxy and that was enough, but barely! We really had to make an effort to leave only a thin layer.
- Use gloves, it’s messy!
- We folded the Lonseal in half and started with the back, then did the front (doesn’t really matter which side first to be honest).
The Lonseal #650 Kit contains Part A and Part B; mix them together per instructions:

Fold the Lonseal in half and apply the epoxy (per tips above!):

Repeat for the other half, and roll the vinyl flooring with a 3-section roller to remove the bubbles and ripples:

Large surfaces bonded well, but corners tend to deform and rise up with time; we recommend adding an object at every corner (and edges if you can) to prevent that:

Let cure for at least 24 hours and trim the remaining edges as needed. We trimmed the in-floor shower pan cutout, the side-step, and the front edge (we intentionally left more vinyl with the intention of trimming it after the glue-up operation):

Seal the floor contour
Spills WILL happen! Add caulking (polyurethane or silicone) to seal the gap around the floor contour. It’s not my finest work, but most of the caulking will be hidden…

Make the sliding door Side step
If you are using our Paper Templates or CNC Files, use and modify the slider’s factory step as follows. This will ensure a good match between the side step and the floor. This is also the cheaper option, and the one that looks the most “OEM”. We like it!
The Slider Door Scuff Plate OEM part number is CK4Z-6113228-AG (MSRP $292.43). Or you can get the aftermarket equivalent for less than half the price:

Our goal is to remove the top lip, marked below:

View from under:

I used an oscillating tool to trim the lip flush with the back:

She gone:

The edges are a bit rough at this point, but an orbital sander works great to smooth them out and to remove more material as needed:

Side step before…

You can add some insulation in there. 1/8″ Minicell and Thinsulate (we didn’t glue it):

Add the sliding door side step:

Install the edge trims
Sliding Door and Front
Before adding a trim to the front edge, we added a transition between our floor and the cab. We made it from extra Lonseal vinyl we ordered:

Transition in place, but we still have to add the edge trim:

Edge trims in place and fastened with #4 stainless screws! It was a bit of a struggle to make everything fit perfectly, but with some patience, we did it!

Pretty happy with how well the step and the floor blend together!

Rear Doors
To prevent water from entering, we used self-adhesive weatherstripping on the van floor:

We then bonded a strip of Minicell for a better seal and look:

The trim is made of four pieces because the rear edge is not straight:

The cuts are not perfect, so the joints between the trims are visible, but that’s what it is!
(We used #4 Stainless flat head screws to fasten the trims)

Install the in-floor shower pan
The following guide covers the installation of the hidden shower system:

On Second Thought…
Well, we did it! A few notes while this is still fresh in our heads:
Squeaking
The only downside of XPS is the squeaking. If you are mindful of that, it’ll be fine. But we did have to (successfully) chase a few squeaks (resolved by adding more adhesive). A few things to watch for:
- Don’t cheap out on glue at the metal/XPS interface (top of grooves); use lots of it to achieve uniform coverage.
- We still wouldn’t fill the valleys on the floor, but we’d strategically add XPS or Minicell mini-strips where there is no support over large surfaces, especially near the edges where the floor is more prone to bend under weight. For example, near the sliding door edge (you know, that sharp corner), around the shower pan cutout, and near the front edge (near the cabin).
Lonseal installation
Very happy with the Lonseal flooring, except maybe the #650 Epoxy. The final result is great and it looks super solid, but the installation was the opposite of zen! We would consider an adhesive with a longer work time, to ease things off a bit!
In-Floor Shower Pan
As mentioned, we would use 1.5″ XPS instead of 1″ to account for the thickness of the shower pan and the insulation underneath.
Inspiration of the moment…


Thanks for the detailed info! I have a couple follow-up questions and a suggestion after reading this guide.
1. Did you adhere or nail down the aluminum trim? The materials list doesn’t mention any nails and the guide doesn’t say either way.
2. With respect to your build journal order of steps, could the floor install technically be done before any of the previous steps? I don’t see any *hard* blockers, but wanted to ask in case I’m overlooking something.
If going with 1.5″ XPS foam instead of 1″, the aluminum stair edging would need to be of greater height in order to avoid a noticeable gap between the edging and the factory floor due to the extra 1/2″ of foam material being installed. I’d suggest calling this edging difference out in the sections mentioning the 1.5″ XPS (sections 1.8 and 4).
Cheers,
Scott
Hi!
1. We used #4 stainless flat head screws (I just updated the material table following your comment!)
2. The only things it’d impact is the air lift’s compressor installation; we did install bolts from the top inside the van: https://faroutride.com/air-lift-install/
Other than that, the risk is damaging the floor during the build. That’s something we learned doing FarOutVan 1; most of the damage was done DURING the build, not after! So make sure to protect it if you build it early 🙂
antoine
Thanks for the great guide! I wanted to drop another tidbit in case it helps others. The XPS F-150 foam is likely rigid enough, but if you’re concerned, they make a F-250 variant as well. The rigidity comparison is 15psi versus 25psi. In my area, the F-250 has to be special ordered on Home Depot, however.