Below is everything about our hidden shower. It’s still a work in progress at this time, we will update as we progress!
Disclosure: This post contains affiliate links, which means that if you click a product link and buy anything from the merchant (Amazon, eBay, etc.) we will receive a commission fee. The price you pay remains the same, affiliate link or not.

Theory
Hidden vs Wet Permanent Shower
Deciding between a hidden shower and a wet bath may be one of the hardest decisions for this van. A permanent shower has potentially more benefits and may be a better choice for most people. But from our experience, the reality of living full-time in a van often means spending time inside for various reasons. So, maximizing living space is at the top of our list, as long as the hidden shower is super easy/fast to set up and stow.
Honestly, we’re not even sure if we’re making the right choice and if we may regret it. But we’ve got to at least try and experience it!
Hidden Shower
PROS
- Much smaller footprint.
CONS
- More steps to set up/stow.
- Curtain must be dried before stowing away.
- More complex to build?
Wet Bath
PROS
- Always ready to go (unless used as storage).
- No dry time after use.
- Can be used as a mud/dry room.
- Easier to build?
CONS
- Occupy living space permanently.
- Must be emptied before showering (if used as storage).
In-Floor Recessed Shower Pan
We considered the Modern Times Van Co Hidden Shower Pan but ultimately went with TecVan because of its dimensions, drain location, depth, and the included bamboo walkable cover. Both are solid options; it just depends on your needs. On a side note, we would love a plastic option for more comfort (warmer to the touch).
The TecVan shower pan is listed at a total depth of 1.5″, but be aware that it’s a bit more than that! We recommend a total floor thickness (insulation + subfloor + covering) of at least 2 inches.


Installation
Time
TBD
Cost
TBD
Weight
TBD
Recessed In-Floor Shower Pan
Material
| ITEM | DESCRIPTION | QTY | BUY |
|---|---|---|---|
| TecVan In-Floor Shower Pan | 28″ x 23.6″ x 1.5″ (1-1/4″ drain). Stainless. | 1 | TecVan |
| Magnets | 50mm x 10mm x 4mm Neodymium. | 14 | BuyNeoMagnets |
| Insulation Pad | We used Minicell, but XPS or Thinsulate could work as well. | VAR | FoamForYou |
Resources
The included bamboo cover features a metal flange. The idea is to shower WITH the bamboo mat, and use the flange to attract the magnets. But as you’ll see below, we decided to shower WITHOUT the bamboo mat, and so we removed the metal flange. Your choice 🙂

To secure the curtain, we bonded neodymium magnets around the outside of the shower pan (with ca-glue):
Lesson learned: Use another magnet to ensure the orientation is identical for all (to ensure polarity is oriented to attract, not repulse!)

To prevent squeaking, we bonded some black scrim around the pan (the black scrim was taken off some Thinsulate leftovers we had):

Insert the drain from the top:

And secure it with the brass nut underneath. The threads in the drain didn’t go all the way up, so we added a spacer (we 3D printed it, but maybe we could have found one at the hardware store):
Using an oscillating tool, we made “clearance slots” to add some room for the magnets:
All the clearance slots. Seal the bare wood edges with the product of your choice (we used Spar Varnish because we had it handy):
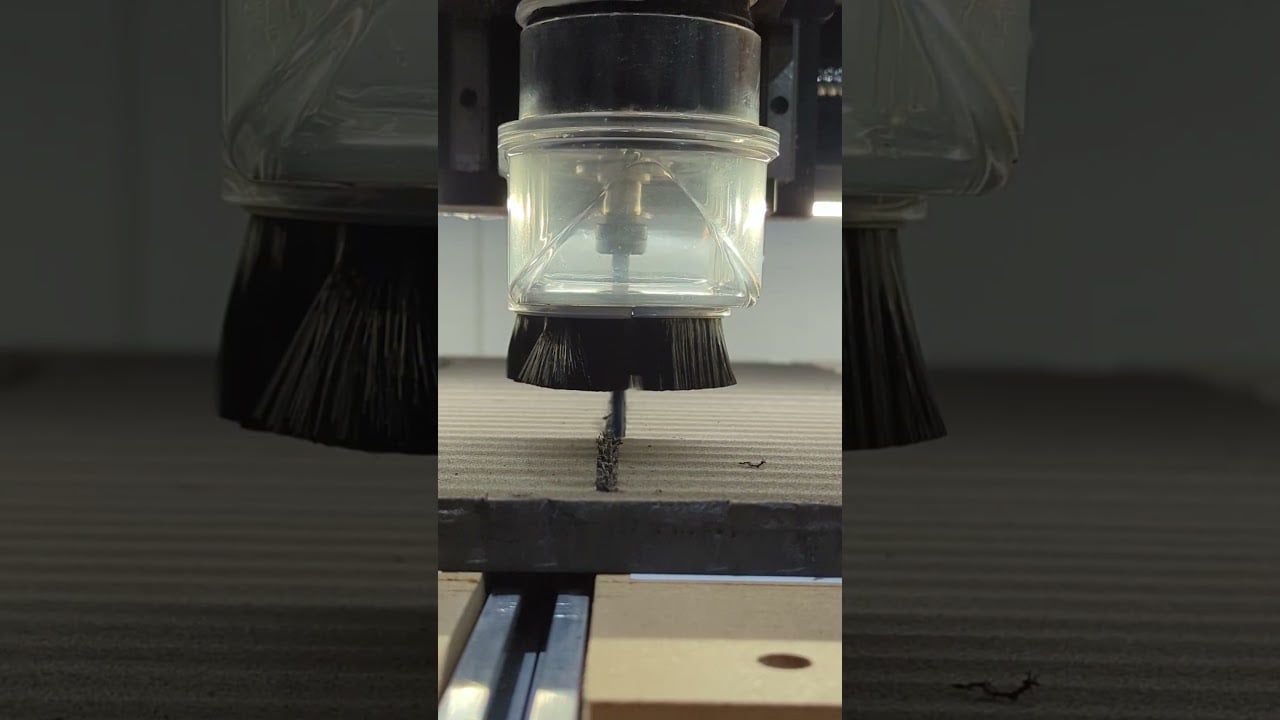
We CNC’d some Minicell on the Shapeoko to add as much insulation as possible between the shower pan and the van floor. We chose Minicell instead of XPS to prevent any squeak. Alternatively, you can use Thinsulate (no need to CNC anything 😉 ):

I could watch this all day 🙂
Insulation pad in place:

Add painter’s tape to protect the floor and the pan from oozing. Better safe than sorry!

Add Silicone II on the mating surfaces:

Drop the shower pan:

Here, I’m adding wood scraps to ensure the weight is concentrated at the edges of the pan, to make it as flush as possible with the floor:

And let gravity do its work for about 24 hours:

In retrospect, I would use Adjustable Support Poles instead of weights for better control and results. The forward edge is not perfectly seated, and I feel like a support pole would have worked better…
The next day…

With the bamboo cover:

We couldn’t find a drain adapter small enough that would fit between the frame and the grey tank, so we designed and 3D printed one (Shower Drain Elbow Adapter | 1-1/4″ BSP to 1″ Barb):

At this point, we’re getting into plumbing territory… it’s time to pass the torch to Super Antonio Bros!

Shower Cabinet
Material
| ITEM | DESCRIPTION | QTY | BUY |
|---|---|---|---|
| Shower Mixer | This is the more compact mixer we could find! | 1 | Amazon |
| Shower Head | Compact and looks good! | 1 | Amazon |
| Flush Pull Latch (aka Slam Latch) | Select a latch for the correct door thickness (1/2″ in our case). | 1 | Amazon |
| Friction Hinges (36mm x 28mm) | Friction hinges prevent the curtain bar from moving around during showering. We also use one for the flippable shower head holder. | 7 | Amazon |
| Frog Hinges | Because of the tight space, it’s the only type of hinge that would work (a gas spring wouldn’t fit). We had to trim the rear hinge slightly so it wouldn’t clash with the mixer enclosure. | 2 | Amazon |
| Aluminum Flat Bar | 1-1/2″ x 1/8″ x 96″. | 1 | Amazon |
| 1/4″ and 1/2″ Baltic Birch | For the cabinet itself. | ||
| M6 x 20mm Flange Button Head Screw (Stainless) | To attach the shower cabinet to the van. ** You may need a different length depending on your installation | 4 | Amazon |
| M3 x 10mm Button Head Screws and Nuts (Stainless) | To fasten the friction hinges to the aluminum bar. | 24 | Screw Nut |
| #4 x 3/4″ Flat Head Wood Screw (Stainless) | To fasten the friction hinges to the structure. | 4 | Amazon |
| #6 x 5/8″ Flat Head Wood Screw (Stainless) | To fasten the alu bar supports and the shower head holder bracket to the structure. | 4 | Amazon |
| #4 x 1/2″ Flat Head Wood Screw (Stainless) | To fasten the curtain hooks to the structure. | 4 | Amazon |
| #6 x 1/2″ Pan Head Wood Screw (Stainless) | To fasten the latch bracket and shower hose retainer to the structure. | 4 | Amazon |
| #4 x 1″ Flat Head Wood Screw (Stainless) | To fasten the mixer enclosure’s front plate. | 4 | Amazon |
Resources


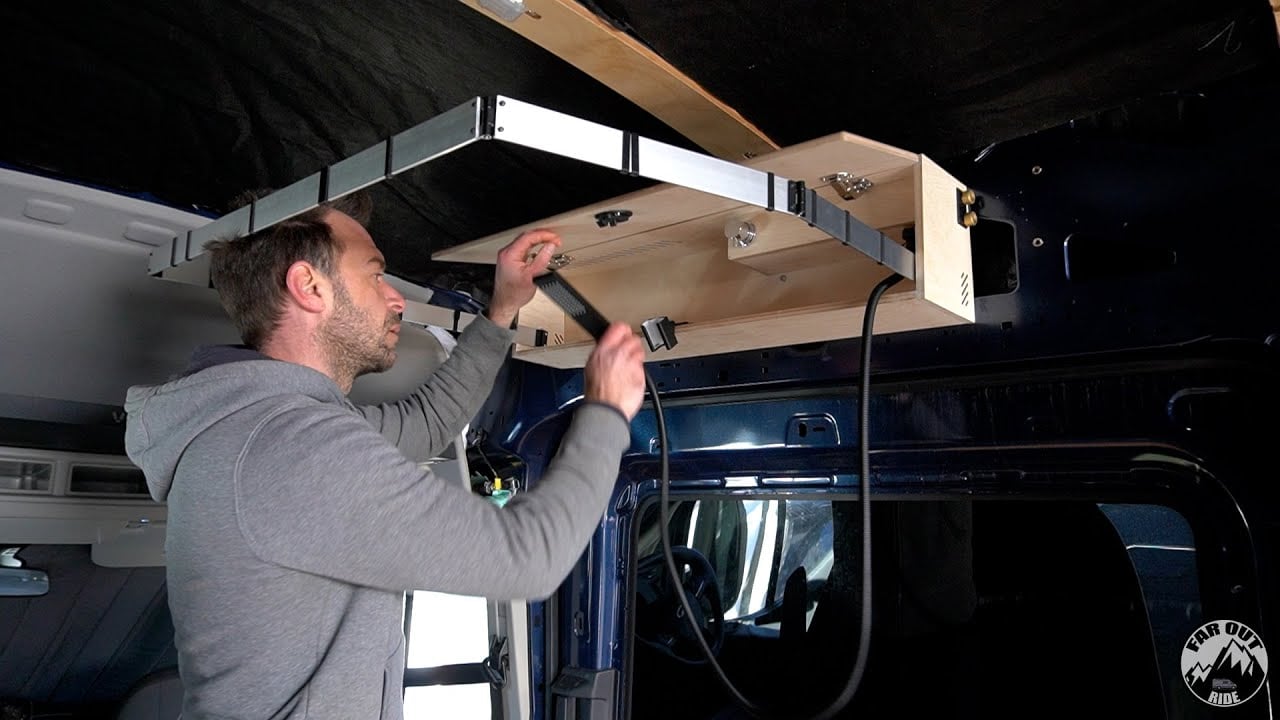
We have a saying: if it’s too complicated to use, we won’t use it. So we HAD to come up with a shower system that’s easy to deploy and stow away.
Here’s the idea:


Here’s our idea coming to reality:
Making the Cabinet
First, we made all the parts on the Shapeoko. Our CNC File or Paper Template are available:

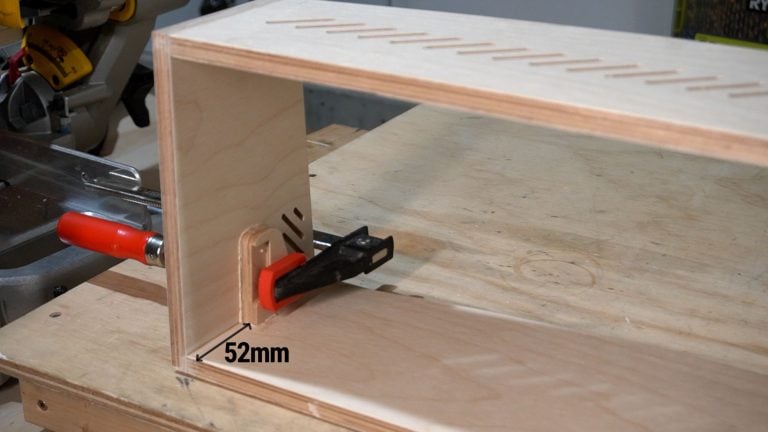
We glued the bottom, top, rear, and front panels together. We used brad nails to hold the parts while the glue dries (clamps would work too!):

Here is what we have so far:

We then glued the hinge holders to the front and rear panels:

Because the frog hinges don’t have any adjustment, it’s easier to install the hinge before gluing the back panel! We located the door and secured it with clamps, then piloted the holes:

We installed the screws to get the location of the door dialed in, then removed the hinges from the carcass for the next steps:
It’s essential to install the hinges with the mechanism pointing down (see photos); otherwise, you won’t be able to install the rear hinge due to the mixer enclosure!

We glued the back panel to the assembly. Start with the front side (it’s chamfered), then work the rear side:

We used at least a dozen clamps to ensure a uniform and strong bond all along the edges (important!):

We glued the bottom & side panels of the mixer enclosure together (and let dry), then glued the mixer enclosure assembly to the cabinet:
The front panel is included for stability/integrity during the glue op, but do NOT glue it. This is a removable part!

The front panel is removed to continue:

We then installed the 3D printed hose retainer using a right-angle drill adapter (it would be easier to install it BEFORE gluing the enclosure to the cabinet! Next time…):

We installed the mixer to the front panel, and clipped the hose to the retainer:

Then we clipped the hot/cold hoses to the 3D printed retainer:

And pushed it into place (it snaps into the cutout):

We reinstalled the mixer enclosure’s front panel with the four screws:
- We didn’t glue the screw attachment (upper-right corner), but it should be done at this point!!
- Pre-drill the screw holes. Otherwise, the plywood will expand and delaminate while inserting the screws. Finish tightening the screws gently by hand to prevent damaging the fragile threads (screwing parallel to the plywood’s layers is not ideal…)

Making the Curtain Folding Bar
The curtain folding bar is made of 1.5″ x 1/8″ aluminum bar (available in big box stores). The front is 31.3in long, and the sides are 13in long (x4). The friction hinges are fastened with M3 x 10mm Button Head Screws and Nyloc Nuts:

More coming soon!

|
On Second Thought…
Too soon!
Inspiration of the moment…
If you’ve been following us since the start, you probably remember Eric (BCPOV) and Yuka (VanGirlYuka), right? We spent a few months with them, traveling in our van and exploring new trails on our mountain bikes. Well, at the time of writing, Eric just started a two-year, round-the-world trip on a motorbike. It’s an entirely new chapter for him; it’s VERY inspiring, and I bet it will be epic!


Have you hit your head on the shower cab when going into the van?
I can see it happens some day! hehe
You are to be congratulated. I was just mesmerised by the whole process, from abstract thought and design to the precision of component manufacturing, construction, and installation. Thank you very much for sharing so much information to help others.
Did you end up installing the 3D Aluminum Bar Support? I see it in your 3D model but didn’t see it in the video. The 3D part has a small lip so I’m thinking everytime you collapse the bars to put it back inside, it’s going to pull the 3D part out overtime. I could be wrong.
Do you mean this?
It’s actually CNC’d out of wood.
Or maybe you meant something different?
No I meant something different. In your 3d model you have a black piece that goes where the 52mm is written.
QUESTION:
How did you deal with backflow prevention. I ordered a HEPVO valve however there’s not enough clearance between the floor and the top of the tank to install it.
Thanks,
Chad
We didn’t have a valve in our first van, and didn’t have issue with smell (inside the grey tank it smells terrible, bot does not backflow into sink). Most likely because we had an “S” curve in the hose between the sink and the grey tank (aquatainer).
We’ll try to do the same in FarOutVan 2 (no valve). Will keep you in the loop!
Bonjour Antoine,
Est-ce que la pan est retenu en place en étant seulement collé sur le linoléum et le linoleum collé sur le contre-plaqué?
Je suis rendu à cette étape et j’ai un peu d’hésitation 🙂
Exactement. Jusqu’à maintenant ça tient le coup!
I so appreciate your knowledge and expertise. We ended up buying a stainless steel dog crate pan to make our shower pan. We then used 1/4 inch birch play with a pop out handle for the shower pan cover. This is finished with vinyl flooring that we used for the rest of the van floor. We are finishing up the cabinet. I’m wondering how you ended up attaching the curtain to the fold out holder? Thanks so much.
I designed and 3D Printed hooks that slide over the aluminum bar (look for “curtain hook (alu bar)”):
https://faroutride.com/product/shower-cabinet-3d-print-files/
We still haven’t fabricated our curtain; we’ll post photos when we get there!
Hi! I love the shower pan idea and bought your CNC file! The only drawback for me was that it takes up the space of the doorway and we have to push the kitchen galley back quite a bit… I notice there are about 9″ of space between the front side of the pan and the edge of the floor in your layout, so given all the restrains underneath the van, do you think there is room for us to move the pan closer to the passenger seat?
The pan could be moved forward, yeah, but then it wouldn’t center with the shower curtain, which cannot be brought forward… Maybe that would work, but we wanted to be centered with the curtain!
Hope that makes sense,
antoine
Hi,
I like this concept very much. Thanks for sharing this. I read 3 times all Your building progress on 2 vans
I assume You tested this layout already. Can You share the thouts?
Regards
Radek
What size hole did you drill for the drain? I have looked through you’re right up and I didn’t see anything about the size of the hole.I printed the elbow adapter from your 3-D print library but the drain that came with It is smooth pipe no threads so I need to buy a new one with threads.? I didn’t see a link
I don’t remember the hole size, and now it is covered by the underfloor tank, so I can’t measure it. Sorry…
You can eyeball it here: https://faroutride.com/wp-content/uploads/2024/11/Hidden-Shower-with-Recessed-In-Floor-Shower-Pan-13-Drain-Adapter-1024×682.jpg
I did buy a new drain from my local home depot… Again, I forgot exactly which one, I’ll look for it next time I go to home depot and report back!
I’m installing this shower Tech van Life replaced the bamboo cover because it cracked , they are aware of the issue and have been very responsive . With the new one they are sending I will put some support underneath it
What size hole do I drill in the bottom of the van, I just had your valve 3-D printed and I’m getting ready to connect the whole thing
Thank you
Thanks for the info on the bamboo cover, mine cracked too. I planned on making one myself with the Bamboo leftovers from my countertop, but I’ll reach out to them instead!
They are sending me one too. This is my 3rd replacement. They should just use the deck/composite material. This is what they replied back “We have already reinforced the bamboo lid to improve its strength and durability”
Are the gaps in the bamboo tray 1/4″ ? Does the water drain ok? I am thinking of getting the same shower pan but worried about water pooling and splashing. Thanks!
the shower contain will be wet after shower. If you are going to roll it up, how do you prevent water dripping?
We will dry it out first.
It’s just beside our Espar Heater (https://faroutride.com/espar-install/).
Hello Antoine, I am trying to determine if the same shower pan will fit on the driver’s side, right up against the C pillar bumpout… and a bit to the rear of it. Appears it will be very close to the support for the leaf spring mount.
What diameter hole did you drill for the 1-1/4″ drain? I read that the outer dia for 1-1/4″ BSP is 1.65″.
Thank you
I ended up having a custom stainless shower pan made and drilled the hole through the floor at 2-3/8 inches dia. so I could access the nut on the drain tailpiece beneath the pan if needed (hopefully not!).
I am copying your idea with the magnets for keeping the shower curtain in place… brilliant!
Thank you 🙂
Thanks for sharing this! They are definitely leaning on you all for install instructions as there isn’t much out there on it.
Plumbing this shower drain is a real head scratcher! I’m burning up far too much time on it. The drain assembly we received is 1-1/4″ IPS which is pretty common for pop up sink drain assemblies. But like you said, impossible to find a 90 degree component for ANY 1-1/4″ IPS in plastic/nylon/pvc as most all of them are designed to go into a P trap, smooth pipe, etc.
I emailed Tec Vanlife a few times with no response. Trying to get a 90, low profile, into a Hepvo waterless valve. If it helps anyone, I think the easiest route is to use the shortest length of the included 1-1/4″ smooth pipe (cut the metal down), with an adapter 1-1/4 to 1-1/2 gasket for 1-1/2″ lock ring elbow.
Also the bamboo floor insert you’ve (wisely) removed will crack under 150lb person like myself [upside down smiley emoji here]
Yeah plumbing that thing is a real challenge! Thanks for the insights.
FYI we are keeping the bamboo insert, but we removed the metal contour. We’ll add support under it (probably a minicell block), to prevent damage (it is definitely bending under our weight!).
Curious about your saying you would do 1.5” xps foam board next time? We’re also installing this shower pan but having a hard time finding 1.5” foam board but 1” is easy to find. Can you provide more detail about the challenges with doing 1” foam board and 1/2” plywood? Thanks!
The shower pan is listed at 1.5″ depth, but it’s actually a bit more than that.
So with 1.5″ floor thickness (1″ foam + 1/2″ plywood), the pan can’t properly sit flush with the floor.
Hope this makes sense,
Antoine
Thanks again! Just curious, what was the order of the gaskets when you installed the drain?
Ditto what Chris said. Thank you for sharing!
🙂
That is the slickest hidden shower I have EVER seen. Was thinking of something similar but this is next level. Thanks for all of the tips.
Thanks! 🙂
Very cool hidden shower. I’ve thought about doing something similar to that for my Ford Transit. I have been using a rear door outdoor shower, with cold water until now when I can, and the weather is warm enough. Have you used the Isotemp water heater before? You have it shown in your drawing as lying down, but does it need to be upright to use the hot water from the bottom of the tank? How much energy does it use, for example how much of your battery capacity (Amp-hrs) do you use for one shower?