This write-up covers the water system installation in FarOutVan2, our second Ford Transit campervan conversion.
For a deep dive into the theory of designing a Water System, you can refer to our Water System Guide.
This is still a work in progress; we will add relevant sections as we progress!
Disclosure: This post contains affiliate links, which means that if you click a product link and buy anything from the merchant (Amazon, eBay, etc.) we will receive a commission fee. The price you pay remains the same, affiliate link or not.

Water System Overview

(click on the pulsating dots for more)
Fresh Water System
- Wheel Well Fresh Tank (33 Gallon).
Main 4-season tank (active at all times). Features the fill port, vent port, and water pump port. - Spare Tire Fresh Tank (24 Gallon).
Auxiliary 3-season tank (inactive during winter). This is not a standalone tank, it always acts as an extension of the main tank. It is filled and vented via the main tank. When active, water is pumped from this tank. - Shurflo Pump and Accumulator.
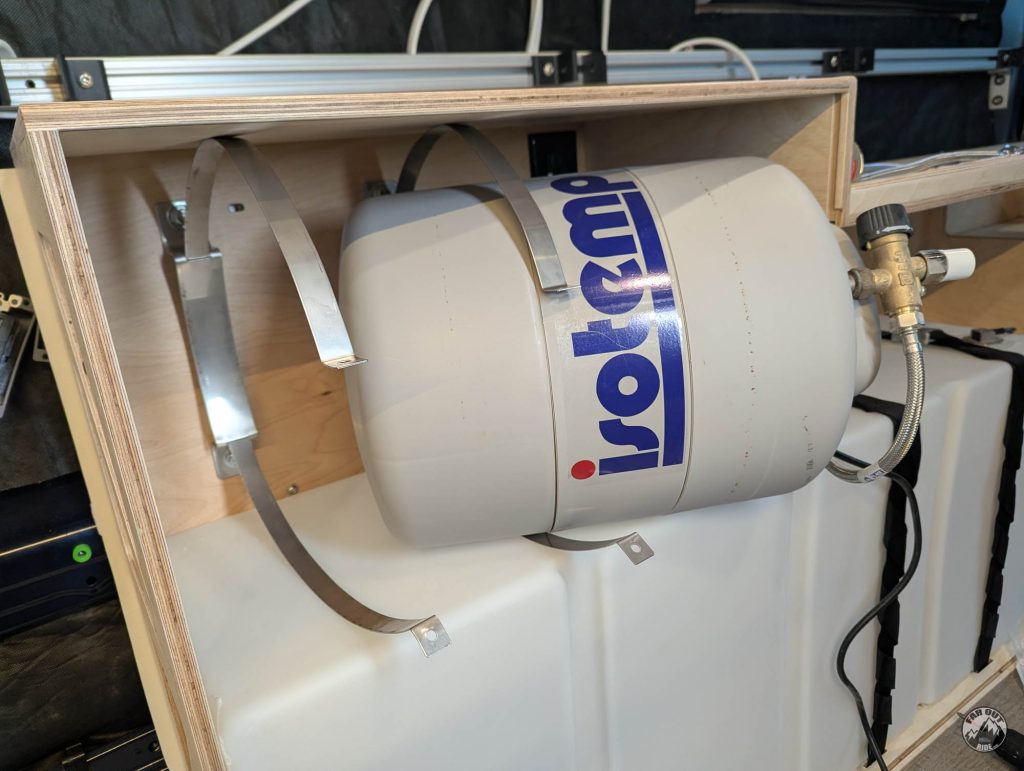
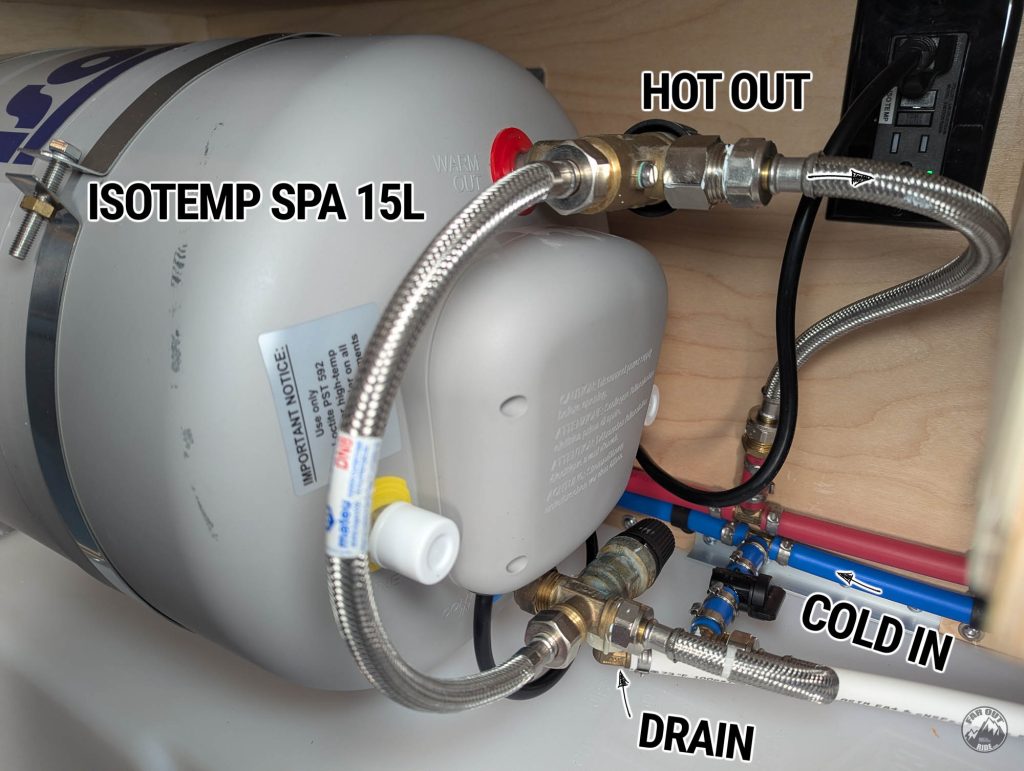
3 Gallon Per Minute. The pump keeps the fresh system pressurized at all times. The optional accumulator creates a pressure buffer and reduces the pump’s cycling. - Water Heater (Isotemp Spa 15L).
Can be connected to the vehicle’s coolant system for “free” hot water, and also features a 750W electrical heating element. It has an adjustable thermostatic valve, so the very hot water in the tank is mixed with cool water, resulting in “more” hot water than the tank contains. Also features a low-point drain valve (to empty the heater for winter and storage). - Sink (TecVan).
With 52″ pull-out faucet (can be used as a shower, or “spray gun”) and bamboo cover. - Hidden Shower with In-Floor Pan.
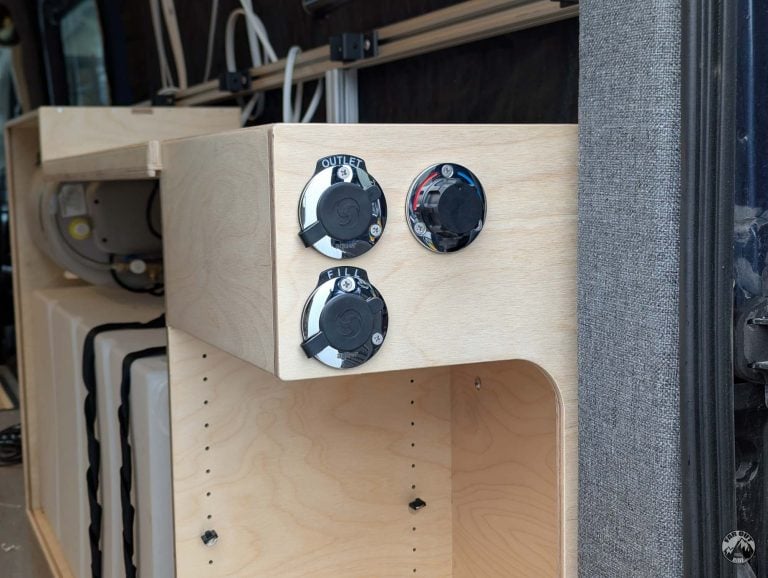
We have a separate write-up for the installation: faroutride.com/hidden-shower - Fresh Tank Fill: Aquor RV City Water Inlet/Outlet.
- Exterior Shower / Bike Wash: Aquor RV City Water Inlet/Outlet.
- Hot/Cold Mixer: Aquor Mixing Valve.
Gray Water System
- Passenger-Side Undermount Gray Tank (10 Gallon).
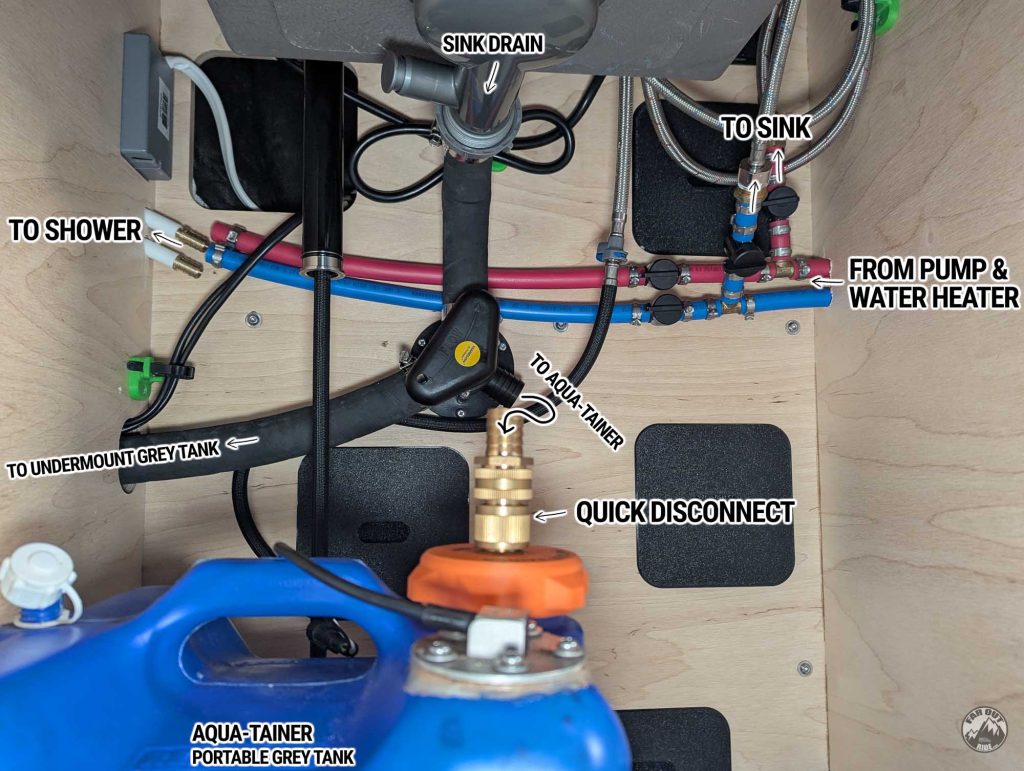
It collects gray water from the sink and shower. A motorized valve controlled remotely from inside the van activates the drain. - Aqua-Tainer Under-Sink Gray Tank (4 Gallon).
In winter, we can divert the gray water from the sink to this Aqua-Tainer, which is protected from freezing.
We are currently working on a more detailed diagram and tutorial!
Wait for it!
🙂
Fresh Water System
We’ll start by installing the main components, and then connect them together in the Plumbing section.
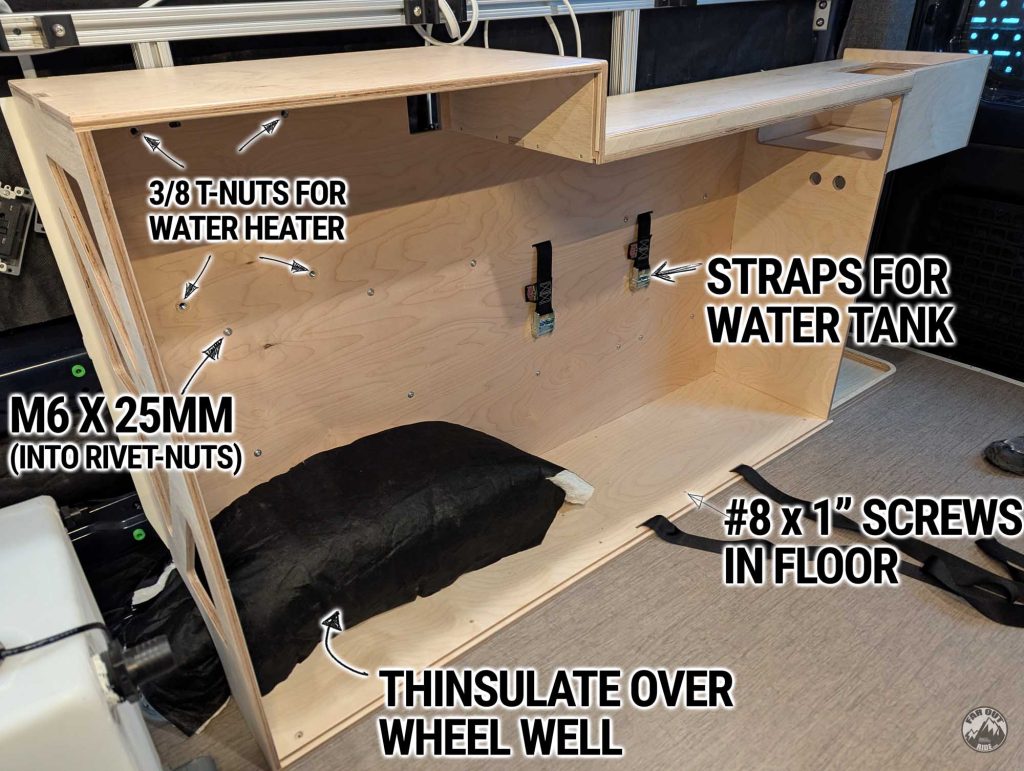
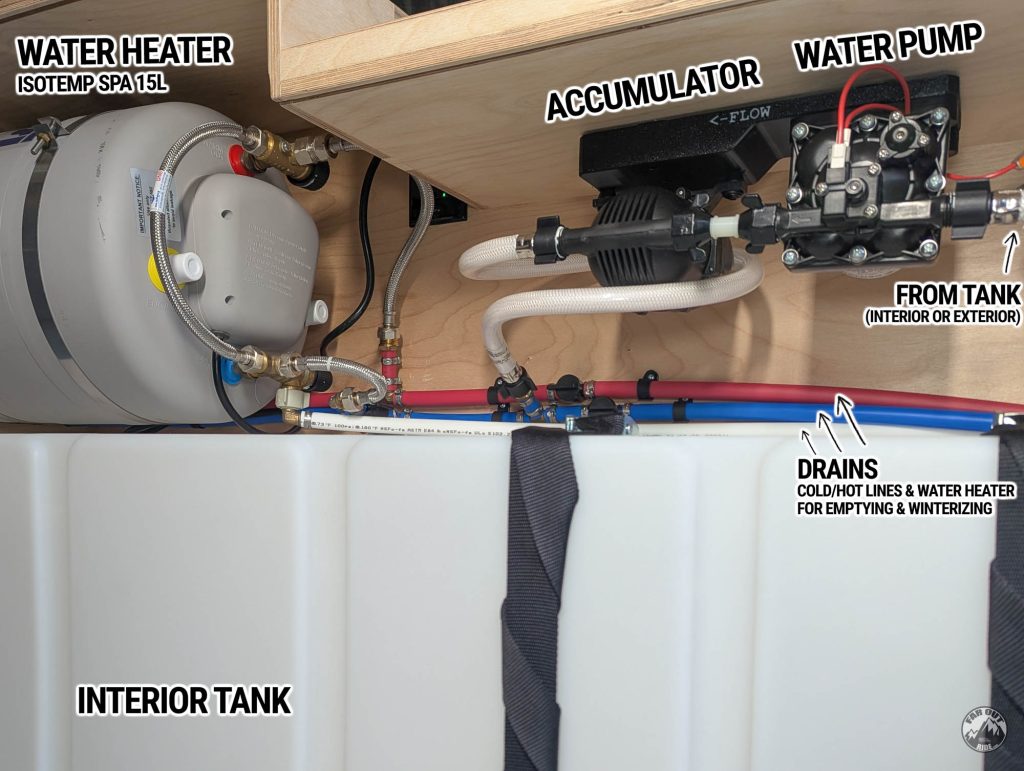
Wheel Well Interior Fresh Tank
The wheel well tank, water heater, pump, accumulator, etc., all live inside the Water Cabinet we built:
Here’s a BEFORE photo, for the archives. We preinstalled rivet-nuts (faroutride.com/threaded-inserts) into the van’s walls and fastened the cabinet with M6 screws. It’s also fastened to the floor with #8 screws. We preinstalled two 1.5in x 8ft Straps to hold the water tank, as well as 3/8″ T-Nuts for the Isotemp Spa 15L water heater:
At this point, we installed the level sensor and fittings (fill, vent, pump, and drain):
We marked the exact location of the drain, removed the tank, and used a 1-1/4″ hole saw to cut through the water cabinet and the floor:
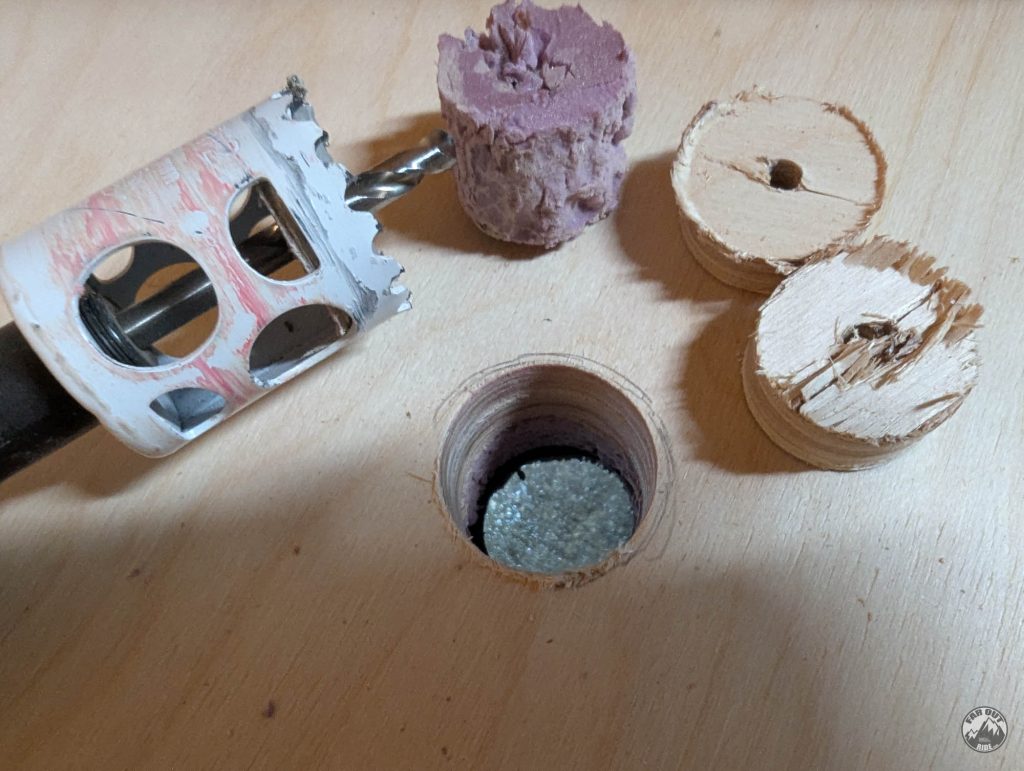
To seal things out, we 3D printed a Rubber Pass-Through:

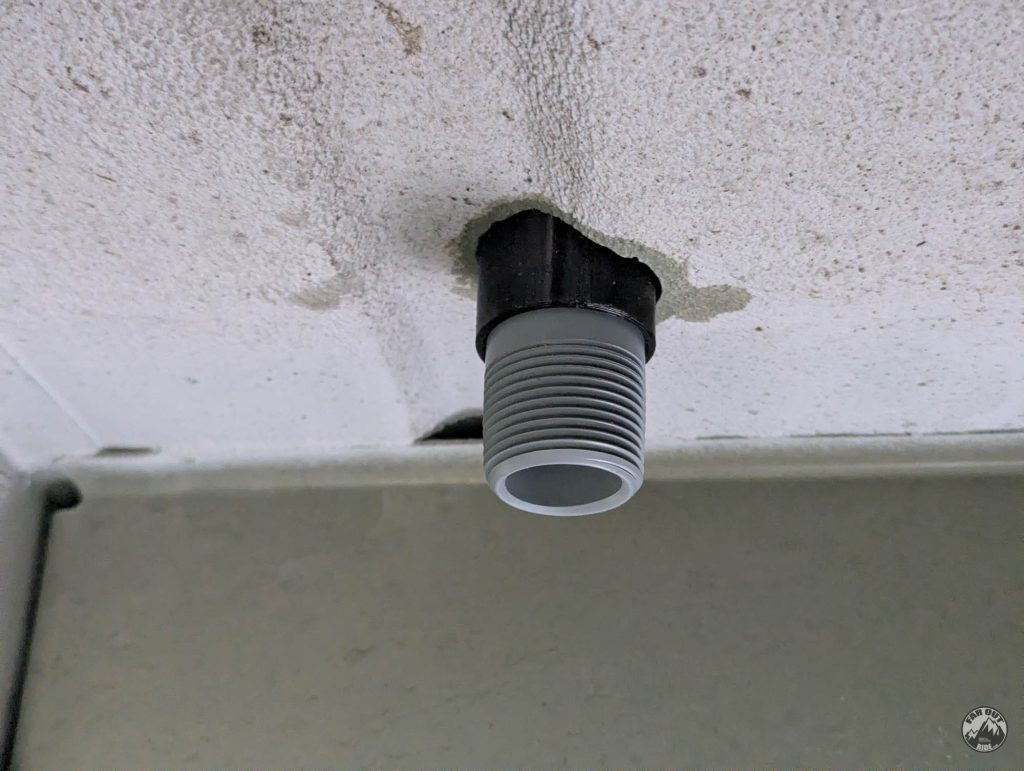
We installed a 1″ x 5″ CPVC pipe into the valve (using thread sealant as usual) and reinstalled the tank to its final location (with the CPVC pire going through the 3D printed Pass-Through):

Under the van, the threads of the pipe are showing (you can see the Rubber pass-through, too). Success! Note that we primed the bare metal edges after making the hole:
We can now install the barbed adapter, and then connect the spare tire tank to the wheel well tank (see Plumbing Section):
Spare Tire Exterior Fresh Tank
Tank:
Fill Port:
- Straight Fitting (1.5″ MNPT x 1″ Barb).
- We couldn’t find this fitting initially, but we’d use it if we had to start over!
- 1″ Hose (NSF/ANSI 61).
Pump Port:
Drain Port:
- Reducer (1.5″ MNPT x 1.0″ MNPT).
- We couldn’t find this fitting initially, so we used a reducer + nipple instead (photo)!
- PVC Ball Valve (1″ FNPT).
- Elbow Fitting (1″ MNPT).
Level Sensor:
1. Remove and relocate the spare tire:

2. Remove the winch cable and tether of the spare tire carrier mechanism, or relocate them so that they’re out of the way:
3. We’re in luck! There is a threaded stud, on the driver-side, onto which the tether can be screwed, so that it’s out of the way:
4. Here is another angle. Note that we zip-tied the winch cable to the tether:
5. Remove the two rubber plugs circled in the previous photo; the L-Bolt will be secured in these holes. There is no easy way, you can poke through them and pull hard with pliers:
6. Here are the two holes without the rubber plugs (circled):
7. It’s easier to install the fittings before installing the tank. Here are ours (yours may be different):
8. We crimped the level sensor to 18/2 cable (exterior rated):
9. And sealed the deal with glue-lined heat shrink for a waterproof and permanent connection:
10. Raise the van with ramps (always use the parking brake AND wheel chocks), and we’re ready for action!
11. Side-view:
12. Raise the tank to its approximate final location using the precision-tools:
13. The L-bolts are steel, so we painted them to prevent corrosion:
14. Secure the tank with the included aluminum plates, L-bolts, washers, and nuts:
15. Protect the level sensor cable with split-loom tubing and route it inside the van (as marked in red):
16. Front view of the level sensor routing, with the 15A Noco D-Pillar Entry Box in the foreground:
Final Result:
(note: we cut the L-bolt shorter with a Dremel, so it doesn’t protrude as much)
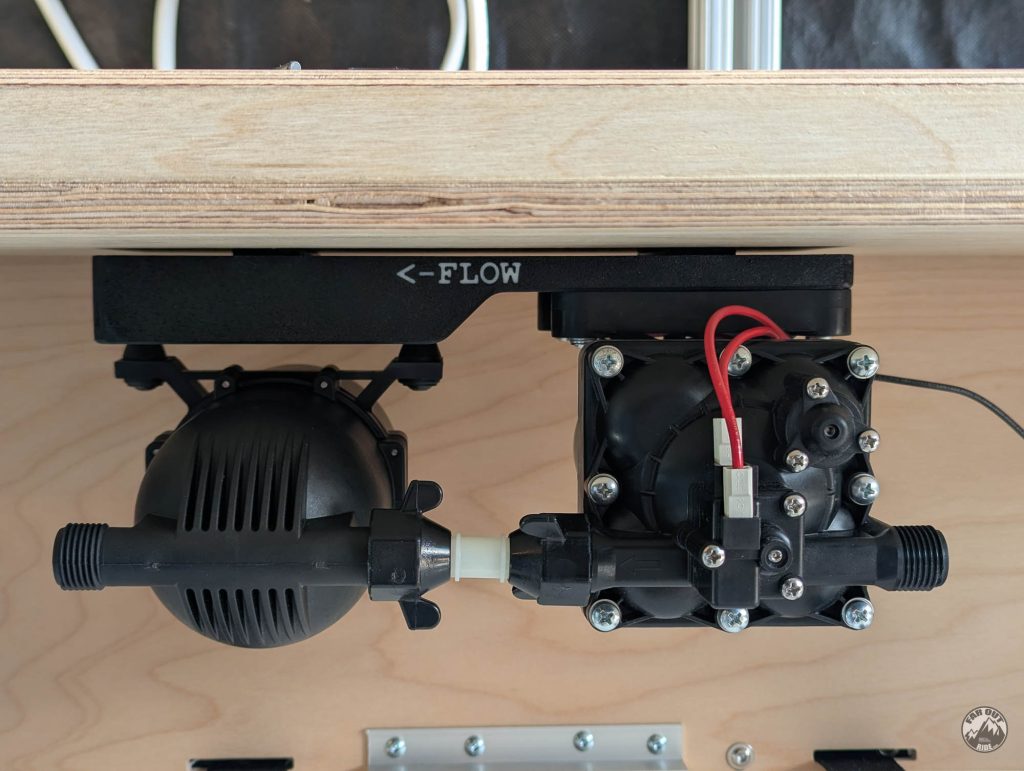
Water Pump and Accumulator
The pump and accumulator are mounted in the cabinet with a 3D Printed Shurflo Pump & Accumulator Mount Pad we designed/made. The goal is to allow the removal of the pump & accumulator easily, for winterizing (remove before freezing).
The brackets are in TPU (rubber) in an attempt to isolate the vibration. The nyloc nuts holding the pump & accumulator are embeded into the back face:
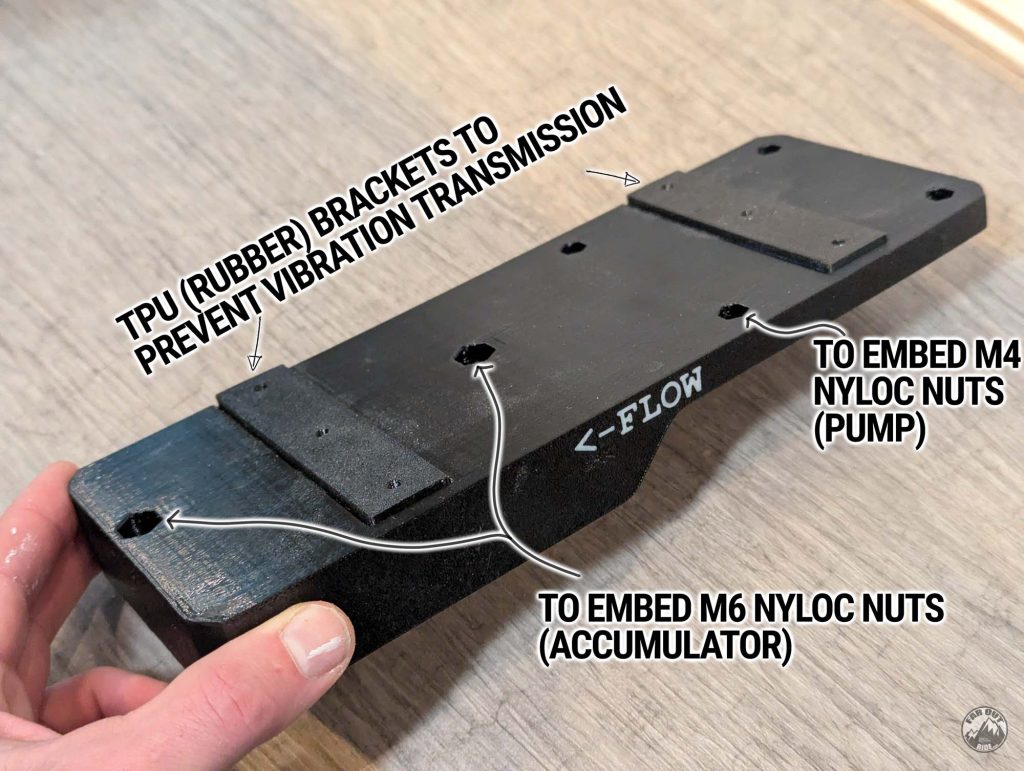
To help align the bracket perfectly, I included pass-through holes. Leave the brackets into the plate, then screw through the pass-through holes:

After screwing the brackets, slide the plate out, and voilà!

The nyloc nuts for the accumulator & pump are embeded into the back of the plate:

The pump is fastened with M4 screws, the accumulator with M6 screws:

The pump & accumulator mounting plate slides into the feet:

Nice!
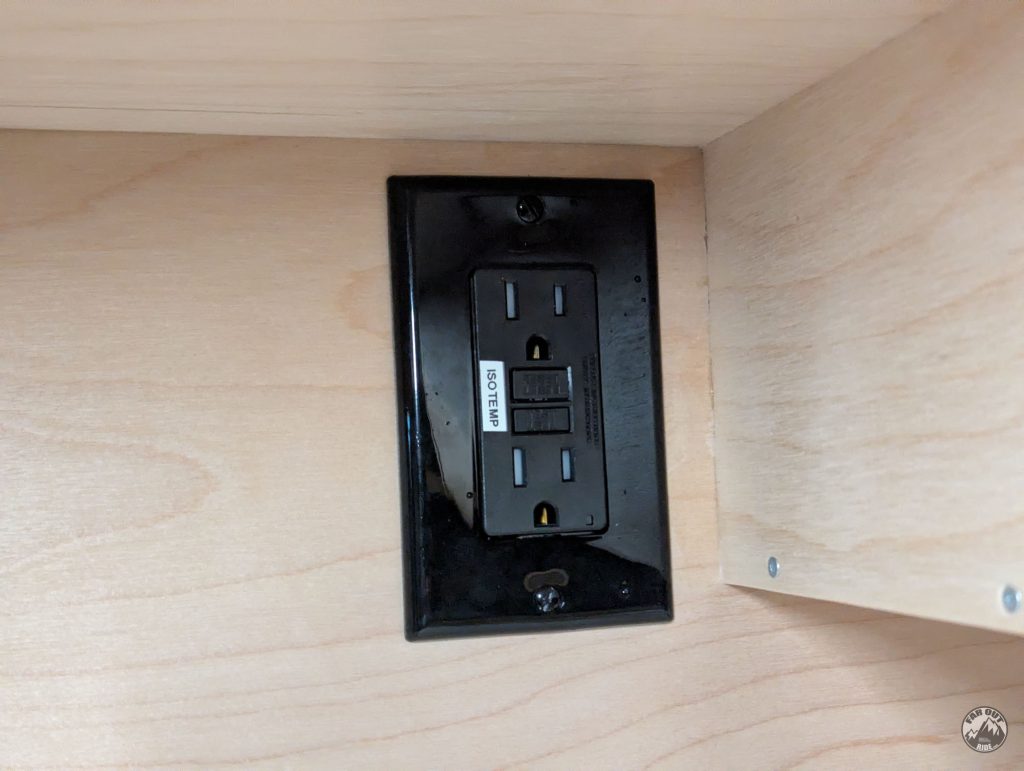
Water Heater
We pre-wired the 120V outlet and connected it to the EcoFlow Power Kit (as documented in faroutride.com/ecoflow-install). We can now bring it inside the cabinet and screw it in place:

I. Label. Everything.
The Isotemp Spa Water Heater brackets can be mounted first. We used the following hardware:
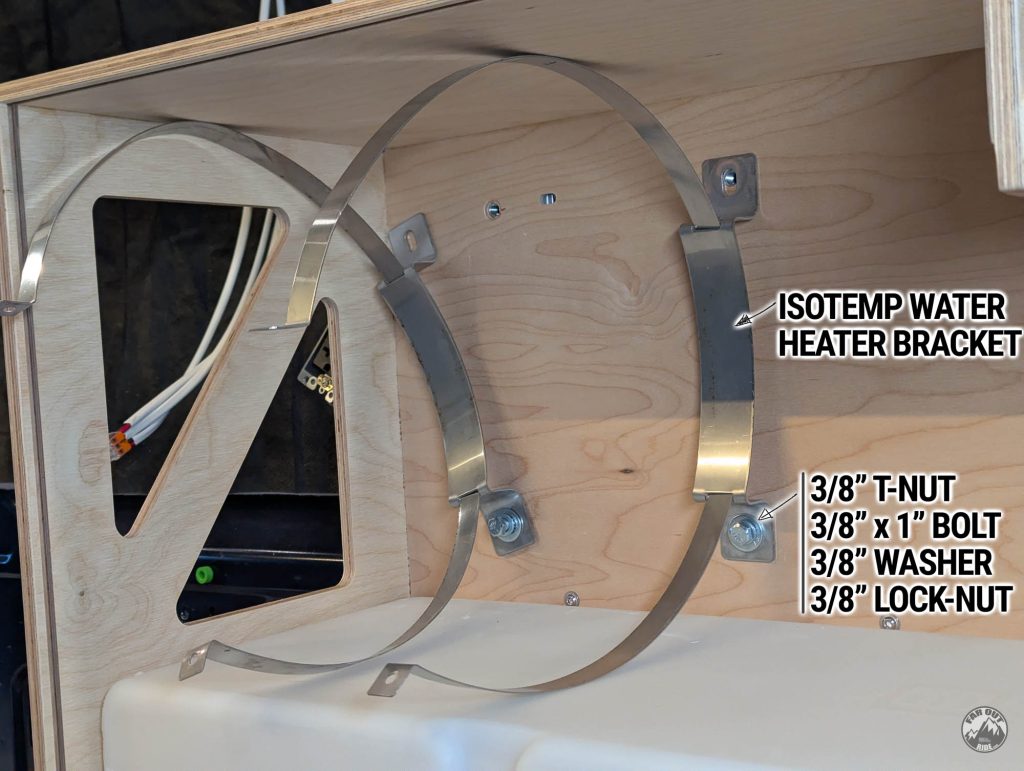
Once the brackets are in place, the Isotemp Spa water heater can be slide-in:
And then tighten the included screws to secure the heater in place:

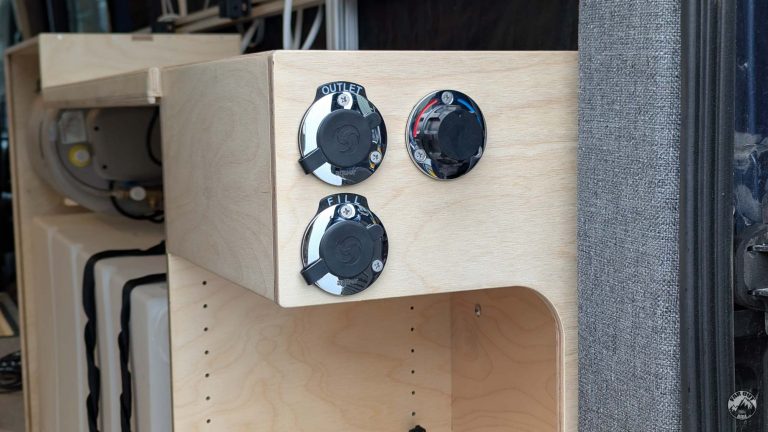
Inlet/Outlet/Mixing Valve
Like many of you, we’ll use Aquor inlets and outlets. We’re also using Aquor’s mixing valve to control the shower/bike-wash. Here are the hole diameters for the Aquor’s fittings:

Below, I temporarily installed the Aquor fittings, and I’m marking the location of the screw holes. I then piloted the holes with a 1/8″ drill bit:
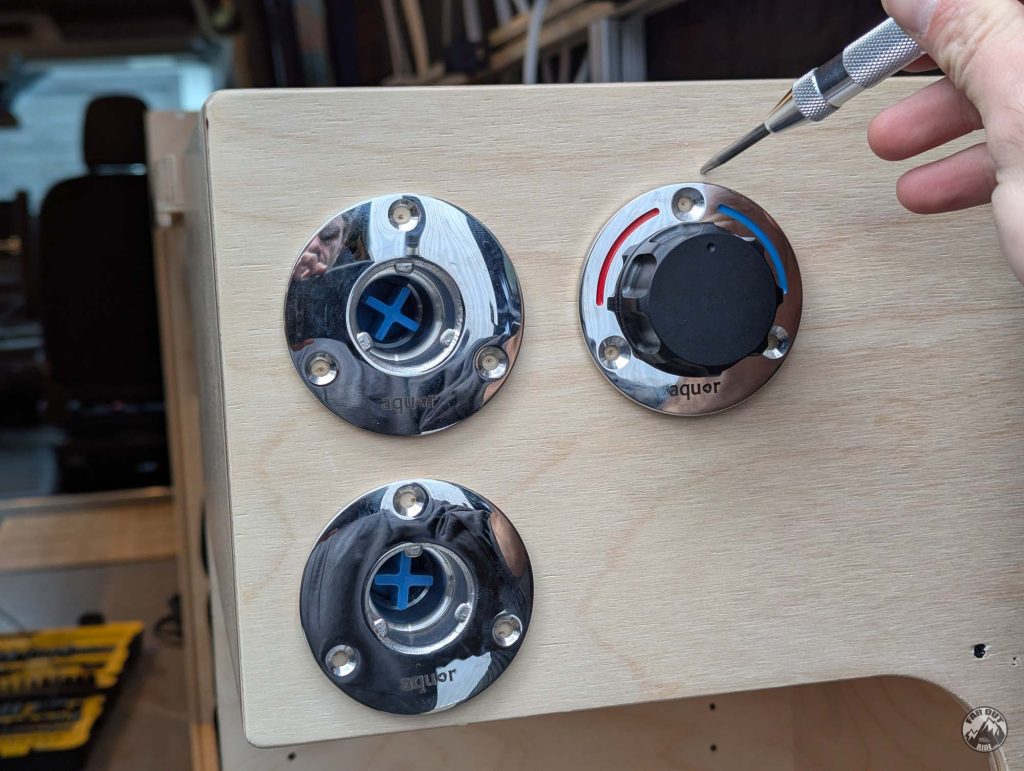
I designed and 3D printed labels to identify the fill port and the outlet (shower & bike wash):

All the Aquor fittings installed with the included screws:
Sink
We first fabricated our “Sink Cabinet” and installed the sink into it:
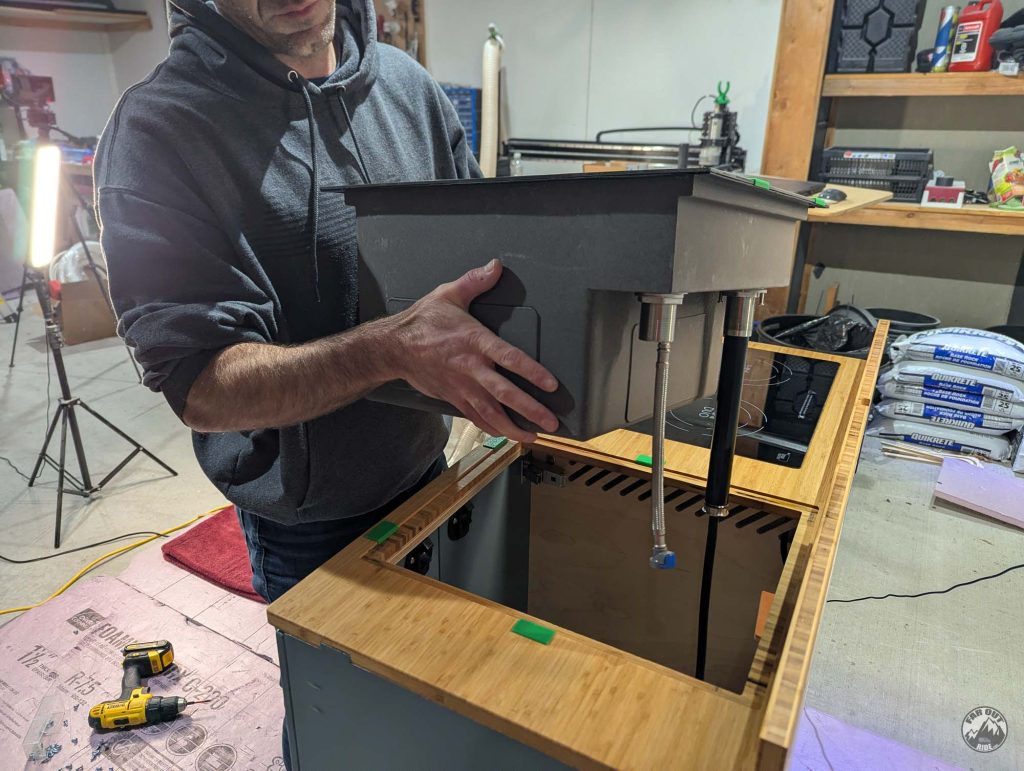
The cabinet fabrication and sink installation are documented here:

Hidden Shower
Our hidden shower features an in-floor shower pan and an overhead shower cabinet. We do have a separate write-up for these components:

Plumbing Fresh Water

Interior Fresh Tank

Exterior Fresh Tank
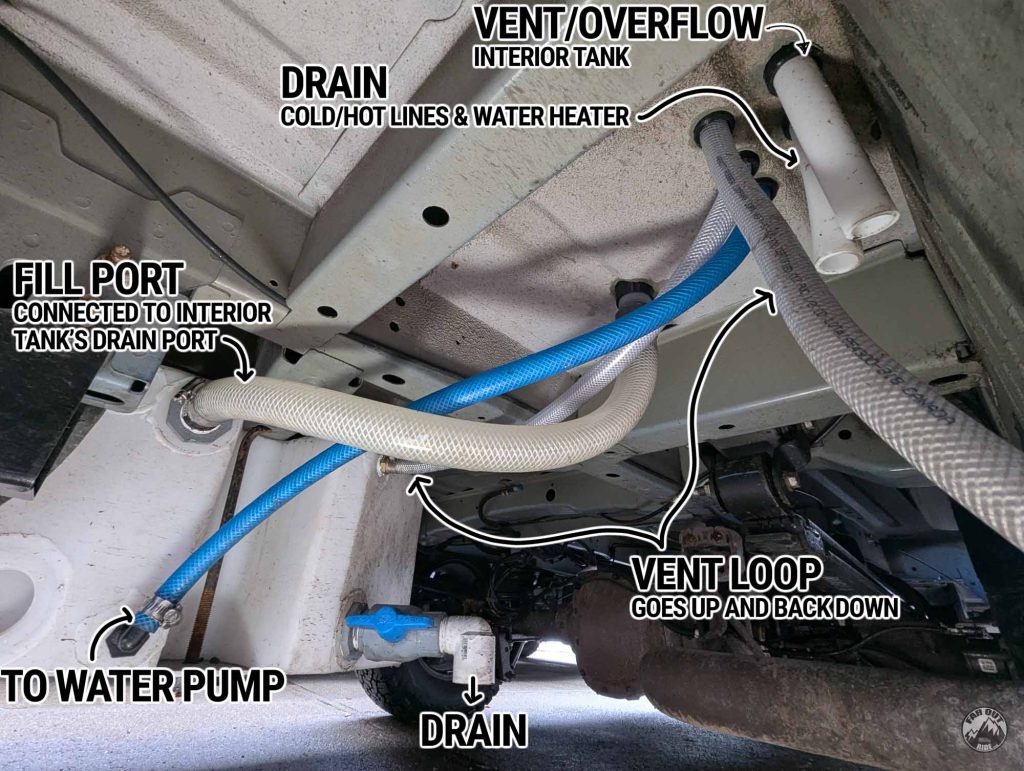
water Pump, Accumulator, Hot Water
Bike Wash, Exterior Shower and Tanks Fill Port
The bike wash / exterior shower, and the tanks fill port both utilize an Aquor RV City Water Inlet, and the temperature is controlled with an Aquor Mixing Valve. There’s an access cutout (removable panel) on top of our water cabinet to facilitate the plumbing:


Gray Water System
Undermount Gray Tank
Tank:
Fill Port:
- Elbow Fitting (1.25″ MNPT x 1″ Barb).
- Tee Fitting (1″ Barb).
- 1″ Hose (Trident #100 Flex).
- 1″ Stainless Steel Worm Gear Clamps.
Vent Port:
- Straight Fitting (1/2″ MNPT x 1/2″ Barb).
- We used an elbow fitting initially, but had to swap for a straight fitting later for space considerations!
- 1/2″ PVC Hose.
Drain Port:
- Straight Nipple (3/4″ MNPT).
- Motorized Ball Valve (3/4″ FNPT).
- Elbow Fitting (3/4″ MNPT).
- 18/3 AWG Wire (Outdoor Rated).
Level Sensor:
We unfortunately don’t have the same level of details for this tank, I guess it was hard to focus with this guy hanging around…
1. Pre-install your fittings and get your straps/hardware ready:
2. We spent HOURS searching for a 1-1/4 BSP to 1″ Barb Elbow, but we couldn’t find one that fit in this tight space. So we went ahead and designed then 3D printed one:
3. Attach the 1″ hose to the shower drain fitting:
4. Put the tank in place and install the straps. It’s VERY tight, so having a flexible hose cut to the proper length is a MUST. It took us a few iterations to get it right!
+
5. The rear strap is attached to the running board stud (we reused the nut already present):
6. Near the exhaust, we added a rivet-nut (included with the tank) in an existing hole, and used a stainless bolt and washer (also included):
7. The front strap is attached to the running board stud (we reused the nut already present):
8. Near the exhaust, we reused a fastener already present:
9. Final result (the cables were routed a bit later, wait for it!):
Plumbing Gray Water
Under the Sink
Behind sink cabinet’s drawer…

Underfloor

On Second Thought…
Too soon!


I was wondering where you got the “fill” and “outlet” labels for the aquor fittings. I can’t find them anywhere. Thanks!!
I designed and 3D printed them. Do you have a 3d printer?
I just made the file available here: https://faroutride.com/product/aquor-rv-city-inlet-name-labels-3d-print/
If not let me know, I could make them for you!
antoine
That’s amazing, thanks!!! I do have a printer!
Perfect!!
A high-temp + UV-resistant filament would work best in the long run (in order of preference: ASA, ABS, PETG).
Cheers,
Antoine
What is the name of the valve you use to direct sink waste water to either the aqua-tainer tank or external grey water tank? Thanks.
It’s a Forespar Y-Valve 1-inch.
Not cheap, but it works great!
Hi Antoine,
Will the 3D bracket for the Shurflo units also fit Seafflo 42 Series (base mount holes are spaced 73mm each side, square array with 4 holes) and a Seaflo Accumulator Tank (has two base mount holes spaced 105mm apart)? The difference in height of the pipe connections from base bottom of each unit is 25mm.
I honestly don’t know, sorry. There are many brands/models out there, I can’t possible track all configurations… Thanks for your comprehension! 🙂
Great install. I was wondering though, isn’t the tank really close to your espar exhaust? Are you not worried about melting?
Good observation.
Maybe it’s the angle of the photo, but the exhaust is not that close actually 🙂
AI is telling me that you installed a Fogatti tankless hot water heater in your van. Is this true or is AI mistaken.
Thank you.
AI is hallucinating 🙂
We don’t. We have an EcoTemp L5 in van 1, and Isotemp SPA 15L in van 2.
Which AI if you don’t mind me asking?
Hi Antoine. Interested in whether you think the NW Conversions spare tire water tank would work as a primary gray water tank. I have a shower on drivers side (front) and a kitchen sink in a similar location as you have. Many thanks and nice work!!
Hi Antoine,
Could you please add 3D printed a Rubber Pass-Through to the shop? Would like to buy some.
Question:I saw you made a loop vent for exterior water tank, can we connect the exterior vent to interior vent together?this way we can save one hole on floor.
Thanks,
Jack
I love the TPU bracket for the water pump and accumulator. I am in the early stages of my build and would love to print one myself. Will you be adding that file to the 3D print section of your store?
Done!
https://faroutride.com/product/shurflo-mount-pad-3d-print/
Let me know how it goes 🙂
Thanks. What material do you suggest? ABS? Infill percentage? And are the dovetail brackets actually printed TPU rubber??
Have you connected one of the water level sensors to your EcoFlow power link yet? If so could you share those steps?
Not yet! Will do when we get there 🙂
Thank you for sharing this journey it has been motivation and inspiration for my build. I know it’s discussed a little bit but I was hoping for some feedback on the below:
Is there any way to go with an under mounted tank/piping and have it insulated enough to not freeze over in the winter. Primarily when I park at the slopes in the Rockys for a couple days.
I would love to save the space inside the van if possible but im thinking I will have to mount the tank inside to be 4 seasons maybe there’s no way around it. Ideally I would like to mount the tank on the spare tire carrier and have it insulated enough to survive the winter…
Let me know what anyone thinks! Thanks.
I don’t think insulation alone will be sufficient over a couple of days. Maybe the tank wouldn’t freeze due to the large volume of water, but I suspect your pipes and/or fittings could (= cracks).
You would need to install heating pads to prevent that (I have no experience with this at the moment).
antoine
Hi Antoine! Since the drain doesn’t have a typical p trap you would normally install in a house, do you have any concerns that the gases from the gray water tank would come into the van?
Hi!
Our plan is to close the shower drain between showers (it’s a push-to-close drain), and hopefully that’s enough to block the smell.
If not, we’ll look into a p-trap (or else)!
antoine
A hepvo valve might work great here!
Love this shower system design!
I have a pretty similar system: https://youtu.be/NlBaQjh8M9Y?si=9MkS3wxD_5N42Ojr
My next iteration (burnt out from building for now) is to add a shower pan and exterior grey water tank.
I was considering using the NW conversions spare tire tank as a grey water tank, but I do like how close in proximity your design locates the gray water tank with the drains.
How would you rate the overall install difficulty of the 10 gallon tank in that location? Your post mentions VERY tight clearances.
Also, would you mind sharing a bit more info on how you chose the different tank capacities?
As always, love reading your guides – thank you for sharing 🙂
Hi!
The 10 gallon is fine to install, as long as you use flexible tubing and a small-enough fitting (like the one we 3D printed). We listed all the hardware we used in this post.
The tank capacities are based on our experience, simple as that. We had a single 25 gal fresh tank in FarOutVan1 and while it was fine, we sometimes wish we had a bit more for more autonomy!
Cheers,
Antoine
I didn’t notice an overflow and the main fresh water tank. Are you risking it 🙂
I am excited to see the progress on this!
Are you thinking of connecting the hot water to the van radiator or do you think it is not worth it or necessary?
We don’t plan on connecting it to the radiator.
Everyone that done it LOVES it, but I’m too chicken and want to leave the van cooling system alone. I will revisit as needed down the road!
DARN!! Haha was hoping for a detailed explanation. If you’re not about it no way I am haha.
Is the external grey water tank the only one you’ll use? Any concern over it freezing in winter?
We will also have an Aqua-Tainer under the sink, for that purpose. It’s the blue thingy you can see in our Diagram.
But we still hope to use the shower during winter, we will either use antifreeze (preferred) or use a heat pad (if we really have to).
What about the pipes from the shower pan? Won’t they freeze? Or will you put in anti freeze in the shower after everytime you shower?
We’ll most likely do anti-freeze yeah!
Pipe are short and there are not flat section, so hopefully no stagnant water in the pipe to freeze.
Nice! I’ve bought & hooked up the shurflo pump & accumulator just to see what it’d be like to plumb up a system like that. The accumulator makes a huge difference! Almost can’t tell the difference to regular household plumping. It was trivial to install, too. Pretty much just hook it up at nearly any place after the pump, does all the magic for you automagically.
Having a sprayer style faucet would seem to make a lot of sense for a van, easier to save water? Even for rinsing dishes and stuff, every second you don’t need water you just briefly let go of the trigger.
Slightly unrelated question: all the van folks seem to love Thinsulate SM600L for the walls but many use XPS for the floor. Is this just cause van walls are so weirdly shaped and Thinsulate adheres more easily?
If one were to insulate a box truck or other super boxy/easy to work with surface, it seems that on paper XPS has nearly 2x the insulation value per thickness. Are there any other reasons I’m missing to use Thinsulate on the walls?
Hey!
If I was to insulate a box with perfectly square and even surfaces, I’d use XPS. But for curved surfaces, with bumps, etc., Thinsulate is SO much easier. XPS would leave gaps here and there, and I’d be worried about squeaks.
For the floor, XPS provides a flat surface for the next layer (plywood) and has high compressive strength, so no need to frame!
Hope that makes sense,
Antoine
Great, thank you! Looking forward to the next post.