Today we are making the fridge cabinet, designed to fit our 5.8 cubic foot Nova Kool R5810 12V Fridge and featuring four large drawers to store kitchen stuff. This is a frameless construction made out of 12mm (1/2″) Baltic birch and 19mm (3/4″) bamboo ply for the countertop. Let’s dig in!

For reference, this is how we built the fridge cabinet in FarOutVan 1. We used basic tools and materials, so it’s a bit more DIY-friendly 🙂
A few differences on the new build:
- Frameless construction (instead of using 2×3’s to build the frame);
- Bamboo countertop (instead of Ikea);
- FarOutVan 1’s fridge cabinet housed the electrical system (200Ah Lithium Battery Bank).

Material & Resources
Time
TBD
Cost
TBD
Weight
TBD
Material
| ITEM | DESCRIPTION | QTY | BUY |
|---|---|---|---|
| 12mm (1/2″) Baltic Birch Plywood 4×8′ Sheets | For all parts except the countertop. | 3 | Locally |
| 19mm (3/4″) Bamboo Plywood | For the countertop. | 1 | Locally |
| Wood Glue | Titebond III Ultimate Wood Glue. | 1 | Amazon |
| #4 x 1″ Wood Screws | To fasten the back drawer separators. | 12 | Amazon |
| Pull Latch, Round | Fits into a 51mm round cutout. | 4 | Amazon |
| 20″ Drawer Slides | Repon NJ35D65-20 Soft-Close 100LB. For drawer 1, 2, and 3. | 3 | Woodstocksupply |
| 16″ Drawer Slide | Knape and Vogt 8850FMB 16″ 200LB. For drawer 4. | 1 | WoodworkerExpress |
| Piano Hinge 1 ft | For bed step (installs in drawer 4). | 1 | McMaster-Carr |
| Noctua 92x14mm Fan | For exhaust (required) and intake (optional). | 2 | Amazon |
| Noctua Fan Speed Controller | To reduce the noise produced by the intake/exhaust fans. | 1 | Amazon |
| Wood Grain Filler Gel | To get a smooth surface before applying primer and paint. | 1 | Amazon |
| Polyurethane Sealant | For the cabinet interior surfaces. | 1 | Amazon |
| Primer and Paint | |||
| Tung Oil | To seal and protect the Bamboo countertop. | 1 | Amazon |
| ITEM | DESCRIPTION | QTY | BUY |
|---|---|---|---|
| M6 Rivet Nuts | For a strong and reusable fastening point. | 8 | Amazon |
| Rivet Nut Setter Tool | Many types of tools are available, but we use this one personally. | 1 | Amazon |
| M6 x 30mm Flange Button Head Screws (Stainless) | To fasten the upper cabinet into the rivet nuts. | 1 | Amazon |
| Spacers | To add space between the wall and the cabinet, and to account for the van recessed surfaces. (Amazon Kit | Parametric 3D Print Model) | 6mm 8mm 10mm |
| ITEM | DESCRIPTION | QTY | BUY |
|---|---|---|---|
| Nova Kool R5810 Fridge | 12V fridge with Danfoss compressor. Same as FarOutVan1, you can’t go wrong! | 1 | Campervan-HQ |
| ITEM | DESCRIPTION | QTY | BUY |
|---|---|---|---|
| ITEM | DESCRIPTION | QTY | BUY |
|---|---|---|---|
Resources
- Nova Kool Fridges Specifications (dimensions)


What’s up with the CNC?
We only used basic tools and materials for FarOutVan1, making it this van conversion very beginner-friendly.
FarOutVan2 is a new opportunity to stay up-to-date with van builds, and it’s also an opportunity to learn new skills and techniques. We certainly don’t expect anyone to have a CNC in their corner of their garage, so we won’t get into too many details about the CNC work. But you should know that there is most likely CNC Routing service near you, so you can duplicate our work with our CNC files. Just Google “CNC Service near me” or look for a maker space where you can learn how to operate a CNC yourself!
Creating content is very time-consuming, and in our case, it does not pay the bills. So we like to stay as concise as possible and focus on the technical aspects. As such, we won’t make a video for the fridge cabinet, but we did make a video for the Shower Cabinet. The process is very similar:
Here are all the parts of the fridge cabinet after they were cut on the CNC:

Box
For all joints, a good amount of glue is applied to the mating surfaces; just enough so there is some oozing, but ideally no dripping:

I first assemble the divider panel to the wall panel. There are three finger joints along the edge for strength and to align the parts perfectly:

The brad nails (gauge 18, 1-1/4″ length) don’t provide any structural strength; they’re used to align, hold the parts together, and keep some pressure while the glue dries (back of wall panel shown):

I then assemble the floor panel. A hammer or a mallet helps insert the finger joints into the cutout:

And add the FWD panel:

It’s dinner time! I’ll leave the glue to cure and continue tomorrow. Here is what we have so far:

The back drawer separators must be added now (they’re recessed into the panels, so they won’t fit after assembly):

I add them to the divider panel with glue and #4 x 1″ screws (holes were predrilled during CNC operations):

I can now add the RWD panel (with glue and brad nails, the usual) and screw the drawer separators:

Next, I add the front drawer separators (they slide in from the front) and clamp them. I also add the countertop support, and then leave the cabinet alone while the glue cures:

The cabinet box is almost completed!

Drawers
I got carried away and forgot to take photos during the assembly… no big deal, it’s very straightforward!
The three top drawers are made of 1/2″ plywood bottom, sides, front, and rear. Finger joints help with alignment and add strength to the assembly:

I used glue and brad nails for joining. I installed the sides first, then the rear and front. The face will be added later:

The bottom drawer’s funky shape is to avoid the wheel well:

The slides are screwed to the drawer. I’m using only two screws for now, because I’ll remove them for painting! All holes were piloted during CNC:

I am also screwing the slides to the cabinet box (holes piloted during CNC):

Ready for testing!

Perfect 🙂

I added the spacers for the fridge, at the front (I could have done this before the drawers, doesn’t matter!):

The faces are added after the cabinet is assembled (and the fridge installed) to ensure everything looks straight. I 3D printed 4mm shims for an even gap, some glue is added:

The faces are brad nailed from the back to lock them into place:

And then screwed from the back to clamp them:

Latches are added in the front:

The latch holds with a lock ring screwed from the back:

Countertop
The bamboo countertop is cut and then sanded with an orbital sander (220 grit sandpaper):

We chose Tung Oil to seal the bamboo. It is food safe, water-resistant, and non-yellowing. The countertop surface can be restored down the road by sanding and re-applying another coat:

The bamboo countertop is looking GOOD after the Tung Oil is applied (to all top/bottom surfaces, except the finger joints)!

After the tung oil was fully cured, I made the backsplash (cut, sand, finish) and bonded it to the countertop (I could have made it before adding any finish, but we still weren’t sure about the backsplash at that time yet). Also, the painter’s tape wasn’t a great idea after all; some of it got pinched between the countertop and backsplash. It would be easier NOT to use tape and clean the oozing with a damp cloth…

Showing off the clamps collection:

The male fingers in the cabinet index into the countertop’s female counterparts, blocking the X-Y movement. And then there are 19 screws to blocking the Z movement, via metal brackets and through the front frame:

To glue or not
At this point, I’m really debating whether I should glue the countertop or not… Glue would add strength and prevent squeaking (I can’t stand squeaking and cracking). No glue would allow easier access in the future (wiring, etc.). I won’t use glue at first, but I can always change my mind as required!
Finish
Here is how we finished the fridge cabinet:
Visible Surfaces
To get a smooth aesthetic finish
- Sand to 220 grit with an orbital sander.
- Apply Grain Filler Gel. Optional to get a very smooth surface, because it’s difficult to completely sand the grains away on Baltic birch.
- Apply 2 coats of primer.
- Apply 3 coats of paint.
Other Surfaces
To seal and protect against moisture and stains
- We sanded the interior of the drawers to get a smooth surface, but didn’t sand hidden surfaces.
- Apply 2 coats of water-based polyurethane (Everywhere, even in the back of the cabinet and where the fridge lives).
Cooling Fans
A refrigerator is a heat pump. It pumps heat from the fridge and expels it into the cabinet, via the coils located at the back of the fridge. Warmer ambient air around the coils means the fridge has to work harder, requiring more power. FarOutVan 1 featured a floor vent for ventilation, but this time we are opting for active ventilation:
Exhaust Fan
Located at the top (warm air rises).
Intake Fan
Blows directly onto the fridge compressor.
Intake Cutouts
Located inline with the fridge coils.
Temperature Controller
Monitors the temperature inside the cabinet.
3D Printed Covers for Access Cutouts
Those soft TPU covers prevent warm air from entering through the access cutouts, forcing the air flow over the compressor and coils.


We wired the cabinet’s intake and exhaust fans parallel to the OEM fridge fan, so they all run at the same time.
Before adding fans in parallel to your fridge, ensure the control board can take the extra load. The fan output in the Secop control board (Novakool R518 fridge) is designed to accept up to 5W, including the OEM fan. So we’re OK!
We used 16 AWG wire to split to positive (“+” on the Secop controller) and negative (“F” on the Secop controller). This allows us to connect the OEM fan, while the other end of the wires is connected to the Noctua RPM Controller
(fridge -> RPM controller -> 3-way splitter (included with controller) -> fans):

This photo shows all the connections to the Novakool Secop controller (to the battery bank and auxiliary fans):

We installed the Fan Speed Controller inside the top drawer, so it’s not really visible but can be easily dialed as required:

The fan cables are not long enough and we couldn’t find extension cables more than 1 ft, so we had to make our own. We used 20/4 AWG cable with 4-pin female connectors and 4-pin male connector:

Here’s the female connector:

And the male connector:

Access Cutout Covers
We added several access cutouts to the wall panel. This allows for routing electrical wires into the van walls after the cabinet is installed (you never know!). To prevent air exchange between the walls (hot in summer) and the cabinet, we 3D printed covers out of TPU (rubber).
The cutouts allow access to the wall behind the cabinet (e.g. to route electrical wires) and hopefully we can route/reroute wires without removing the cabinet in the future:

The covers snap into the cutouts, and there’s a grab handle on them to easily pull them out. They’re soft, light-weight, don’t rattle, and with 8% infill they isolate pretty well:

Cable Management
We usually use nylon cable clamps and/or zip-ties. But turns out when you think you’re done, there are always more cables to add… So we designed and 3D printed Wall Mount for Reusable Cable Zip-Tie, love it!
The mount is fastened to the wall with a pan head #6 screw, then the reusable zip-tie slides into the mount:

Ready to strap:

There’s a buckle to manage the extra length of the unused strap 😇

The reusable zip-ties are… reusable! They can be unstrapped to adjust the cables or add new cables to the bunch. Here’s the 3D Print Model:

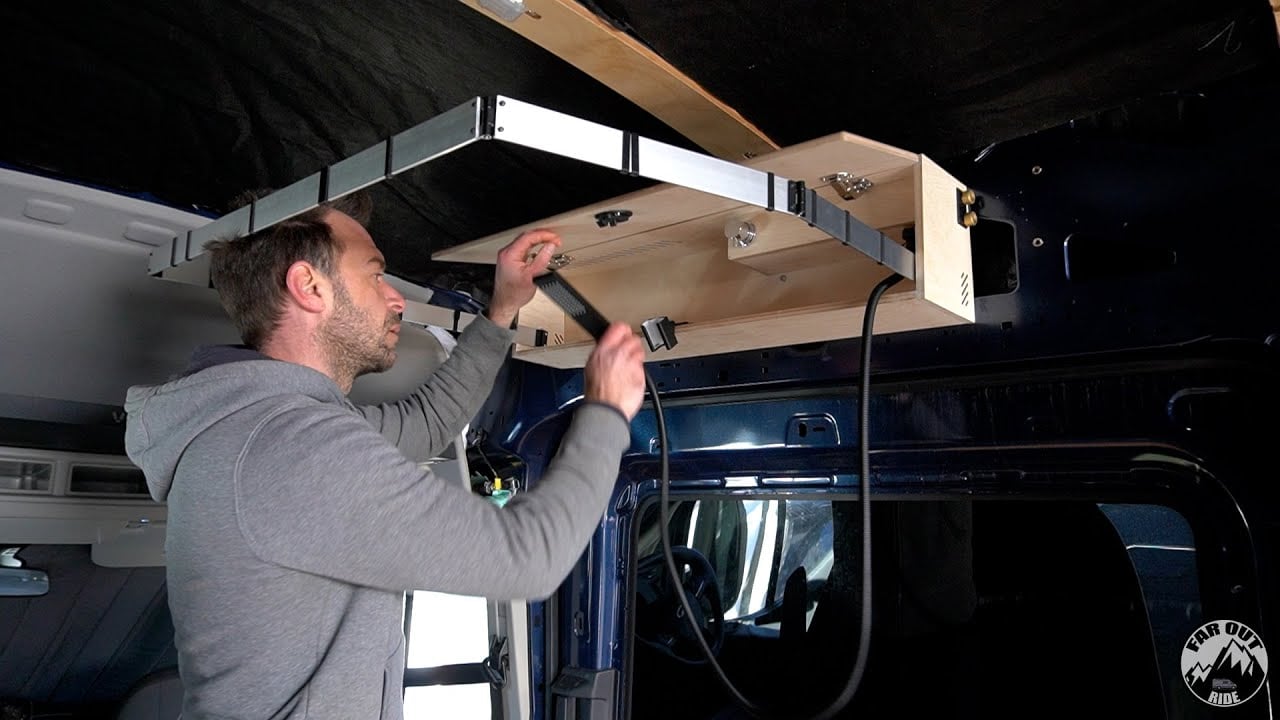
Cabinet Installation
Resources


The fridge cabinet is fastened with M6 Flanged Button Head Stainless Steel screws.
M6 rivet nuts are added to the van’s existing holes, and 3D printed spacers are added where there’s a gap between the cabinet and the van (to prevent pulling the rivet-nut out when fastening the cabinet):
The 3D printed spacers are bonded with a drop of CA glue. This is so that they hold in place until we fasten the cabinet. Once the cabinet is fastened, they can’t go anywhere!

A look at what’s behind the cabinet, for the archives:

Fridge cabinet in place, with M6 screws in the wall and #8 screws in the floor:

Fridge Installation
Slide the fridge inside the cabinet gracefully:

The fridge is fastened to the cabinet with #8 x1/2″ Pan Head Stainless Steel Screw (not included with the fridge), but we Truss Head SS Screws may look better:
And just when I thought I was done, I noticed a lot of squeaking coming from the fridge flange/cabinet interface… I pulled the fridge back and fitted some black scrim I took from Thinsulate leftovers. That did it. I definitely recommend adding black scrim all around the fridge’s flanges!

Electrical
We used a 3-Port Wago connector to splice the power from the EcoFlow Distribution Panel to the fridge and the fans (we used an inline fuse holder to step-down the fuse size to the fans):

The EcoFlow Distribution Panel utilizes lever-nut terminals (Wago-like) for the DC Loads:

We’ve got detailed write-ups about FarOutVan 1 (DIY) and FarOutVan 2 (Power Kit) electrical systems:


Temperature Sensor Inside the Fridge
We’re adding a sensor to monitor the temperature inside the fridge from the console of the EcoFlow Power Kit:

The temperature sensor will be installed near the fridge’s thermostat (right of photo):
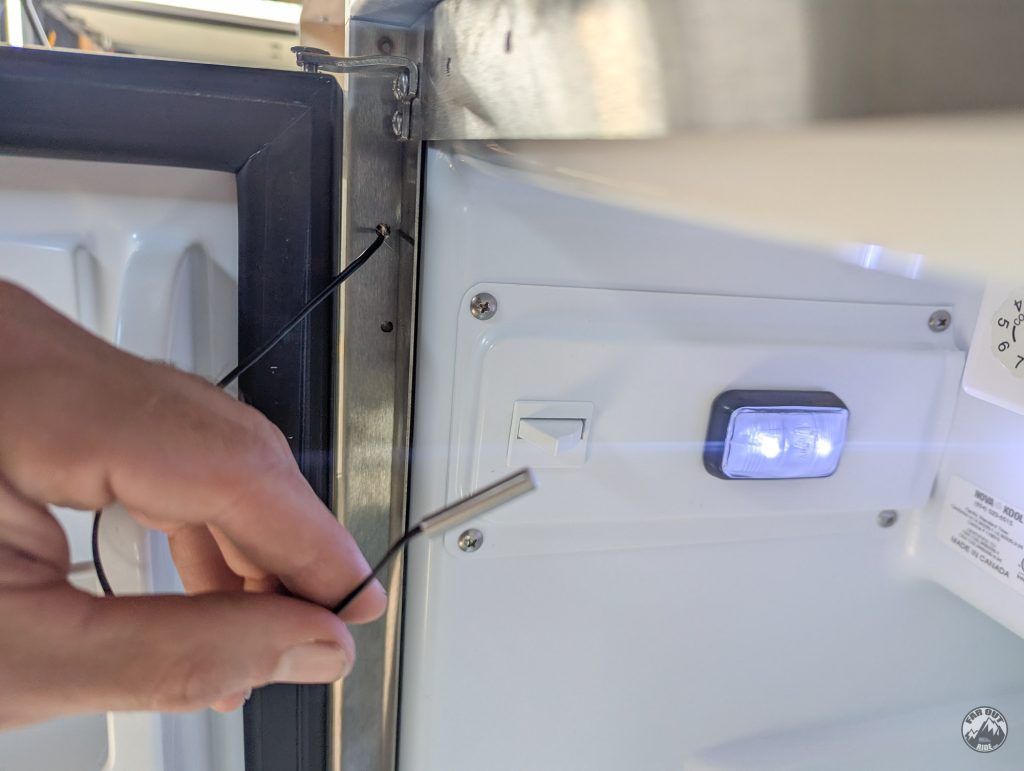
It’s connected the the EcoFlow Power Link:

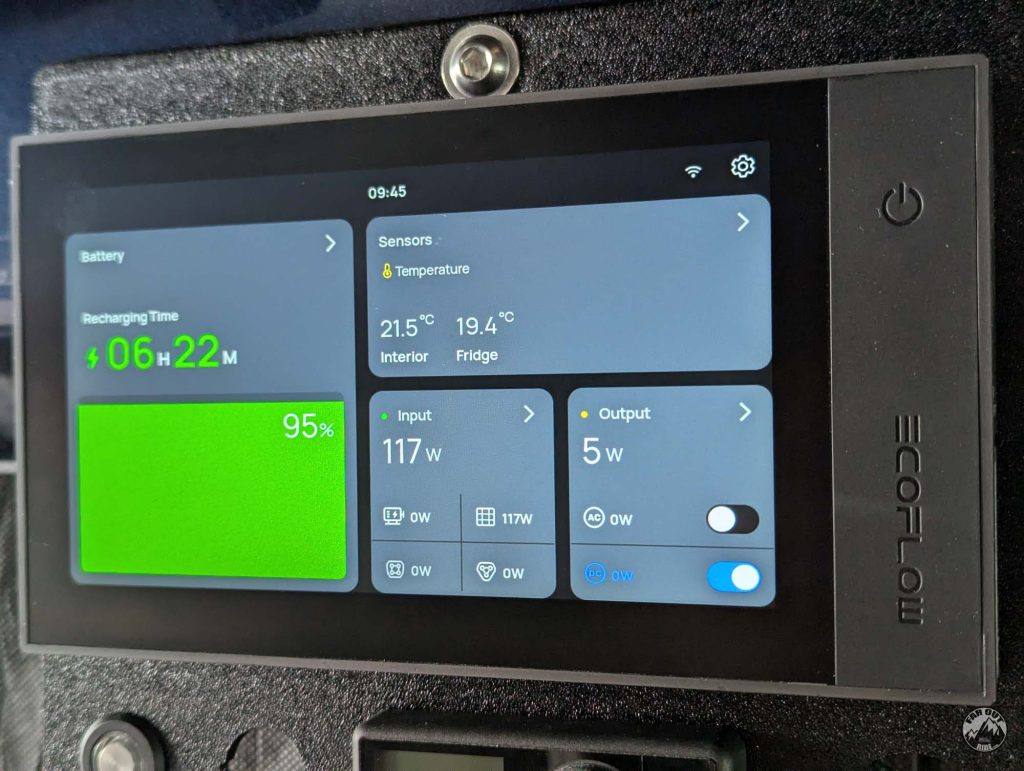
The temperature can be monitor on the EcoFlow Console or on the SmartPhone app:
Final Result
Cabinet with the fridge, drawers, and everything!
(when is it ok to remove the fridge’s front door protective film??)
On Second Thought…
- Add black scrim all around the fridge’s flange to prevent squeaking.
- Use Truss Head Stainless Steel Screws on the flange’s face instead of pan head, for aesthetics!
- Wired in parallel with the fridge compressor, instead of temperature-controlled independently.


Do you have a rough estimate of the number of minutes / hours required on a CNC machine to cut this cabinet? If I recall correctly, you have a shapeoko 5 4×4?
I’m trying to get a rough sense of how much CNC time I’ll need to rent from a local service house versus is it worth purchasing a machine myself due to cost difference. Any insights you can give would help!
Thanks!
Shapeoko 5 4×4, yes.
Unfortunately I deleted all the CAM operations from my past file, but roughly I’d say 1.5-2h-ish.
I’m using a 1/8″ bit, so it’s slow.
In a shop, using a 1/4″ or 1/2″ bit would most likely be more cost-effective (more waste, but much faster).
To be honest, the cut time is not the bottleneck. Preparing the CAM operations, setting up the machine (especially on a 4×4 machine), and post-processing are.
Once the machine is up and running, I can work on something else in the garage while keeping an eye on the machine.
So owning a machine is great for testing, learning, experimenting, and working on small one-off projects.
If was was re-doing an EXACT copy of FarOutVan2, I might consider renting service to save time (no 4×4 tiling).
If I was doing a FarOutVan 3 (different parts, layouts, etc), I’d use my own machine.
Hope this makes sense!
P.S. If I had to buy a new 4×4 machine now, I’d go for the Altmill!
Nothing wrong with the Shapeoko, but the Altmill is much rigid and much faster.
I’ve never done any electrical work. All my electrical stuff in my van was done by a professional. That being said, do you think I should let someone who is more inclined to do the parallel fans?
Honestly, only you can make that call.
I laid out every step with photos, so you know what to expect!
cheers,
antoine
What is the finished depth of these 3D wall spacers you made? Dont have a 3D printer so looking to replicate something similar. Thanks.
Hey! It’s been awesome following along with the build.
Regarding upholstery, currently building out 2023 transit and debating framing it out prior to furniture inserts… but you have made me re-think order of events!
I see the upholstery fabric in the curved bare metal portions, are you also planning on cutting 1/4″ baltic and wrapping it to fill the large voids of space between furniture build outs?? This is awesome. Keep up the work (and expect some future shop purchases from my wife and I haha)
Yeah correct!
We are making panels. Still a work in progress, but we documented a few so far: https://faroutride.com/upholstery/#garage
cheers!
How much would you estimate you save on electricity by having the cooling fans?
It’s not all about electricity saving, but more about knowing the fridge is not overworked (cycles less) and will run smoothly for years to come.
It’s what mainly drove the decision! Didn’t do the maths about electricity savings 😉
You can ignore my previous comment on the piece I was confused about. I used the explode model in your 3d rendition and found where it was located!
Was there an extra piece to your CNC files? I got a piece that look exactly like the front of the drawer but it did not have any notches. I thought the shop must’ve did it by accident but I can see it in your picture where you have it all laid out on the foam. It’s on the top right. What is that piece used for?
What are those silver round washer things on the bottom of the fridge cab and those three countersunk holes?
I’m assuming the silver rubber washers are for the fridge?
They’re just spacers to raise the fridge a few millimeters!
3D printed, but really anything could do 🙂
Hello,
Based on your experience, do you believe securing only to the van through rivnuts in the metal would be sufficient? For my van build I am aiming for an ultra-modular build and like the idea of using rivnuts and some rubber dampers on the bottom to avoid squeaks and floor damage.
Thanks!
I think it’s a case of technique here… if your cabinets are well designed (strong & fastener locations), it could probably work.
But personally, I’m definitely more comfortable screwing through the floor in addition to the walls.
What are the dimension of the cabinet? Thanks
You can view the dimensions of it on their 3D model.
Which CNC machine do you have? I may buy one for our van build.
Hi,
I have the 4×4 Shapeoko 5 Pro: https://shop.carbide3d.com/products/shapeoko5?variant=40249287671869
The Altmill is worth considering too! https://sienci.com/product/altmill/