This is how we installed a Maxxfan roof fan in FarOutVan 1. We are currently converting our second campervan, FarOutVan 2, so you’ll find our latest and greatest installation guide here:
Van 1 vs Van 2
After 5 years of full-time living and 10 years of ownership with FarOutVan 1, FarOutVan 2 is an opportunity to improve. Here are the key changes:
| Van 1 | Van 2 | Note | |
|---|---|---|---|
| Location | Front of van | Front of van | No change, because our cooktop is still at the front. |
| Brand/Model | Maxxfan Deluxe 6200K | Maxxfan Deluxe 6200K | We had no issues with the Maxxfan, so we’re using it again. |
| Installation method | From inside | From roof | We found it easier and less messy to install if from the top! |
| Use of adapter? | Outside/inside | Outside only | We think outside only is sufficient. |
| Success celebration | Beer | Sushis | We highly recommend BOTH! |
| Installation Guides | Roof Fan Install | FarOutVan 1 | Roof Fan Install | FarOutVan 2 |
No issue with FarOutVan 1, so we didn’t change much with FarOutVan 2. But we would recommend following FarOutVan 2 Maxxfan Installation Guide instead as it is way more detailed!
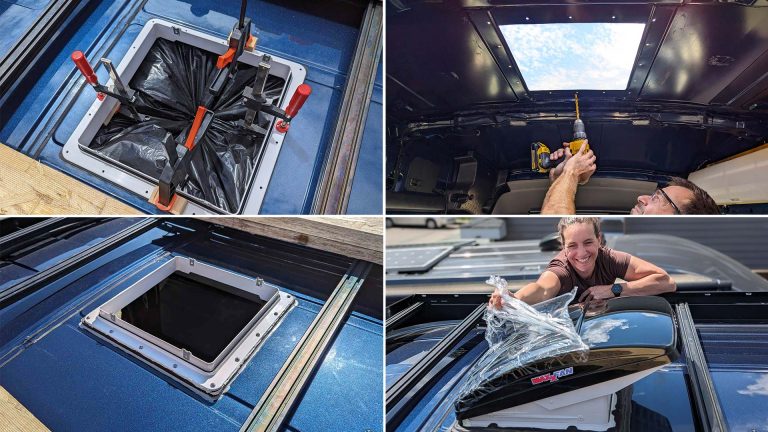
Mark the cutout
Install the painter’s tape and mark the fan cutout.
To mark the fan cutout, we used the inside of the roof vent adapter.

Practice makes perfect…
We “simulated” 2 holes and a straight line to practice drilling & cutting on the panel we were getting rid of. It’s a good thing we did it! We learned that it’s better to make the corner holes a bit outside of the cutting line (the fan flange allows some over cut) AND that a storm of hot-burning metal chips will blow on your face and into your hair. WEAR PROTECTIVE GLASSES AND A SEXY BANDANA ON YOUR HEAD. You’ve been warned.

Lion’s face: you own the tools, the tools don’t own you!
Or: we’re scared, but let’s pretend we’re not.

Drill the corner holes
Drill a hole at each corner, large enough to let the jigsaw blade pass through.

Cut the opening
Cut each side, then apply duct tape to prevent the panel from falling during the last cut.

Smooth the edges
Break the sharp edges with a metal file and smooth the edges with a fine sandpaper.

Drill the mounting holes
Install the roof fan adapter and the fan flange and drill all holes.
We used four C-Clamps to ensure nothing moves during the process.

Surface preparation.
- Remove the roof fan adapter and the flange.
- Break the holes sharp edges and smooth with a sanding paper.
- Clean the surfaces to be touched-up with isopropyl alcohol.
Prime, paint, and clearcoat
Apply Primer, Paint & Clearcoat on all the cuts and holes.
This is an important step to avoid corrosion in the future. Indeed, paint plays a much bigger role than just adding color: paint protects metal from rusting. So take note: adding primer + paint + clearcoat should be performed ANY TIME you make a cut or hole in your van. Get used to it!
TIP: All-in-one products don’t work well; so primer + paint + clearcoat = 3 different products. Go to an Auto Parts Shop and give them your color code (it’s on the driver’s side door sticker), make, model & year, and they’ll prepare paint that matches perfectly the color of your van. Spray paint can work well because you can spray what you need in a small plastic container and re-use the rest later (after use, turn the can upside down and spray for a few seconds; this will clear the tube and prevent clogging).

Clean the fan flange
Clean the fan flange with isopropyl alcohol.
Clean the van’s metal
Clean the van’s metal with isopropyl alcohol.
Apply butyl tape
Apply butyl tape on the fan flange (on the surface that will be mating with the fan adapter).
Apply 3M Window-Weld
Apply 3M Window-Weld on the roof fan adapter and the backing frame (on the surfaces that will be mating with the van).
Install the hardware
Install the roof fan adapter, the fan flange, the backing frame, and the hardware.


Apply Dicor sealant
Apply Dicor self-leveling sealant around the periphery of the flange.
While she’s working, make yourself useful and start cleaning the work area. Or don’t and just be a nuisance by making duck faces for no good reason.


Install the Maxxfan unit
Install the Maxxfan unit through the fan flange and fasten using the 4 provided screws.

Look at our fan.
Just look at it.

Final Test.
We tested our Maxxfan using the wires from an adjacent light that we removed.
(Note: we blew a fuse doing the same thing afterward: no surprise, the 7.5 amp interior lightning fuse located at position F32 is not designed to withstand the load of an additional fan… no big deal, the fuse was replaced and the light is back!)
It works!

Celebrate with a beer
Have a pint of fresh Homebrewed Session I.P.A.
Well deserved!

New and updated article:


Hey guys not sure if this is right place to ask this question but we are working on the wiring diagram and our numbers when it comes to the fan don’t match up with you guys. How did you get 0.3 Amps on your wiring diagram? When looking at the fan you installed it shows the Wattage at 120 which converts (I think) to 4 Amps on a 12V system. Is it a typo or am I missing something? Want to clear it up in case we are missing something critical on our diagram. Thank you! Your site is incredible.
I have re-read this a few times and idk if I am missing it somehow, but was the backing adapter pre drilled? The instructions mention the roof adapter and flange during pre drilling, but not the backing.
Thank you in advance!
Total Cost: 350.00? That’s ridiculous. Our Maxxfan cost $276+ Tax alone. Add to that the Adapter that came with Butyl Tape @ $75, Dicore Sealant @ $12, 3M Window Weld, $17.99 and you have $411.00 That is todays Prices as I bought all this stuff on Amazon and Ebay today. Maybe the prices have gone up a bit? Just goes to show, you are not updating this and reaffirms my decision not to buy your plans, and buy from your links. The more time that goes by, the more it gets out of date…Suggestion. Once a month, take one section of your website, and update it. twelve sections could be updated in one year. I know it’s a lot of work…but C’mon…you can do it…you have a good thing going here.
Using the links from our article:
Maxxfan 5100K: $222.24
Vent adapter: $68.88
Dicor lap sealant: $10.29
Butyl tape: $10.72
Window weld: $23.64
TOTAL: $335.77
(you’ll hit $350 after you buy the hardware)
Keep in mind that Amazon prices vary with geolocation (USA vs Canada, etc.) and through time. That’s why we don’t price the items individually. The total price we mark is what it should cost for most people.
Cheers,
antoine
When considering the insane number of hours they have put into this site, putting a few dollars towards supporting their work & getting some nice plans was some of the easiest money I’ve ever spent… great site <3
Thanks Adam, it means a lot!
how long did you wait in between applying the window weld and clamping the adapter before you finished putting the screws in and then the dicor?
it is only 5-15 degrees C over the weekend, so i would like to be able to install the adapter and flange with the 3m window weld and decor lap sealant in the same day. the instructions that came with the adapter say to wait overnight
We’re getting ready to install our MaxxFan but can’t find Dicor anywhere nearby and it’s going to take several weeks to get it, can we use FlexSeal instead? Thanks!
Ugh. So we spent all day on this and dropped the fan in and the screw holes on the flange are too low to match up with the holes on the fan. Help!
Raise the metal clips on the base of the fan, and use a little bit of force; it’ll work.
Hello!! Your site has been a godsend for navigating the complexity of the van project:) I just went to buy the backing frame with the affiliate link you provide, but it gives 2 options for thickness: 1/2” and 3/4” – Which do you recommend for this installation? (It’s for my HR extended Transit, but hopefully this will help others too!! )
On a side note, I’m curious if you have a take on the two fans vs one fan plus small window deliberation? I’ve been in vans with two Max fans on a hot day and it feels AMAZING. But, your post on passive intake made me wonder if it was the double fan power or if one fan plus small window would do the same thing.
Take care and thanks so much for the site that is a saving grace for this DIY-er!!!!! 🙂
Hey! Thanks so much for the build journal, this has been such a help.”
I loved the idea of the center-cut shears, so I bought the WEN shears you linked to. After using it I have to say I disagree with the recommendation for two reasons:
1. Shears cannot turn while cutting. The design of the shear makes it impossible to turn a corner like you need for a window or fan opening. At the vary least, the recommended product cannot be used to cut a corner. This means you have to use a jigsaw for the corners, which leads me to reason 2
2. The curl of material leftover interferes with the jigsaw you’ll have to use for corners. It’s a minor inconvenience (trim off the curl with the shear and bend it out of the way), but it’s noticeable.
I’m glad I tried the shears, and the way cut metal in a straight line is second to none. But they’re not a good cutting tool for this application.
Could you give more specifics on the wiring of the fan. I am putting mine forward in about the same spot as I live and work on Glacier National Park and an open door in winter is not an option. I have a light in the same vicinity as you do. Did you just wire it in to that light or? The only issue I am trying to resolve is my final wiring.
Hi Chris,
We do have a detailed wiring diagram: https://faroutride.com/store/wiring-diagram/
Hope that helps!
Just finished our fan install today! Your guide was a huuuge help and set us up for success, thank you.
Happy travels!
I thought I would be fancy and buy the shears instead of using a jig saw. I ran into a issue immediately. While they cut very smooth and do not produce metal shavings, they require a much larger entry hole and more importantly do not turn corners at all. This makes them very difficult to use for a window install with rounded corners. They will also not cut through any internal bracing, requiring a jig saw anyway. After a few telling test cuts I gave up and did everything with the saw. With a well placed trash bag you can avoid spraying metal filings everywhere. Don’t buy the shears they are not worth it.
I did the same, thought I could be high-tech and avoid the scalding metal shavings in my eyes but no, the shears were fun to play with but useless to this project.
Just cut the hole out from the top externally. No need to worry about being showered in steel fragments then.
My roof support beams are 10” apart. To fit the max air fan I need 14”. How hard is it to move or remove a support beam?
What van is this?
I would NOT recommend modifying support beam, as this is structural…
We will be getting 2021 Ford mid roof in a week or so. Do we have the 14″ space? Also, do you have a link that gives info on Ford modified wiring, dual alternators, and the up fitters switches how to incorporate into the wiring. Thanks
Could you confirm what length of machine screws you used? It says TBD above. I want to order via your link but IDK if it leads to the right size. 1 inch seems to small. Thanks!
+1 trying to figure this out and also why all the screws extended beyond the skin…I was just going to penetrate the four corners…less holes to chase if leaks ever arise.
Hi. I just updated the article with this note:
*The length of the machine screws required vary with installation (van model, interior adapter or not, etc.), so we can’t possibly make a specific recommendation. It is your responsibility to find out! You can plan ahead by summing up the thickness of all the components (buy various lengths just in case), or you can find out during the installation by actually measuring the total stackup. Any local hardware store will have screws. 🙂
cheers
Would you address the pros and cons of the Maxxair Fan vs a rooftop AC unit? Could an AC unit replace the maxxfan? Seems if the AC unit could do what the maxxfan does AND be an AC when needed, it would be a bonus, especially when traveling is southern climates.
I’m no AC expert, but I believe that AC units cannot act as a fan (exchange air between inside/outside), and that’s why RV have BOTH fans and AC. Fans are still required to exhaust moisture and to evacuate “polluted” air from inside.
Thanks for this detailed post (and entire website!) I’m curious why are the roof vent adapter and backing frames absolutely necessary ? I looks like it ads a bit of height to the fan installation. I though the butyl tape would fill the groves of the roof. Does maxx fan not come with everything necessary to be installed directly on the metal ? (I installed fantastic in my old van and it came with an adapter sleeve thingy) Thanks for your answer !
You can fill the outside groove with butyl tape, but the adapter makes it much easier and reduce the risk of leaks in my opinion. On the interior side (inside the van), the surface is relatively flat so you can buy the backing frame OR you can make your own backing frame with wood or similar…
Good luck!
I have seen on other websites that the fan needs to be wired to the 12V aux source (cigarette lighter) in the van. But on your website you connected the fan to the wire for the lights and upsizing the fuse. What are the drawbacks for this connection? Have you had any issues?
Our fan has a dedicated fuse on the fuse block (per: https://faroutride.com/wiring-diagram/). Where did you see that, I’m curious?
They only tested on the existing car lights
I’m gonna mount max fan soon and wanted to know if having the backing adapter is needed. Was thinking of not adding one and if I do was gonna use flat aluminum
You can probably skip the adapter on the inside if you think you have an alternate solution. 🙂
Hi
Question regarding the #10 screws. I appreciate going with Stainless and using locking nuts and washers. My question is regarding #10s. My Maxxfan came with #8s. Did you size up for a reason or was your fan’s flange cut with #10 sized holes?
Thanks
That’s a good question… can’t remember to be honest, it’s been so long since we installed it!
totally well asked. that is the step i am at now. are the bolts necessary? the screws do not go through all of the backing. Very interesting that they did not come with bolts. hmmm. I am not sure what to do. I bought their bolts too. just thinking out loud
I am as this point too and have the same issue. I am assuming the #10s were to ensure girth to attach both backings. I missed this part and didn’t realize we don’t have the correct screws. I guess I will be heading to the hardware store later today!
Hey! thank you guys for all the good information!
Question about wiring the fan: the wire on the fan is 14 gauge and for my run i am going to use 12 gauge.
What is the best way to make this connection? Use 14 gauge quick disconnects for all connections and just stuff the 12 gauge wire in there?
thanks for your advice
You can use HEAT SHRINK disconnects (https://amzn.to/2J4bvH3) as follow. Use 14AWG disconnect on the fan side, and 12AWG disconnect on the battery side; the tab size is the same so you’ll be able to make the connection 🙂
cheers
Hi there, thanks again for sharing with everyone your knowledge, I am not completely sure if I need a Roof Vent Adapter or not? I am in europe and the website that I am ordering from told me that everything is included in the maxxfan deluxe. have you ever seen a kit where it was included?
Could you please explain the need of an adapter? Thanks