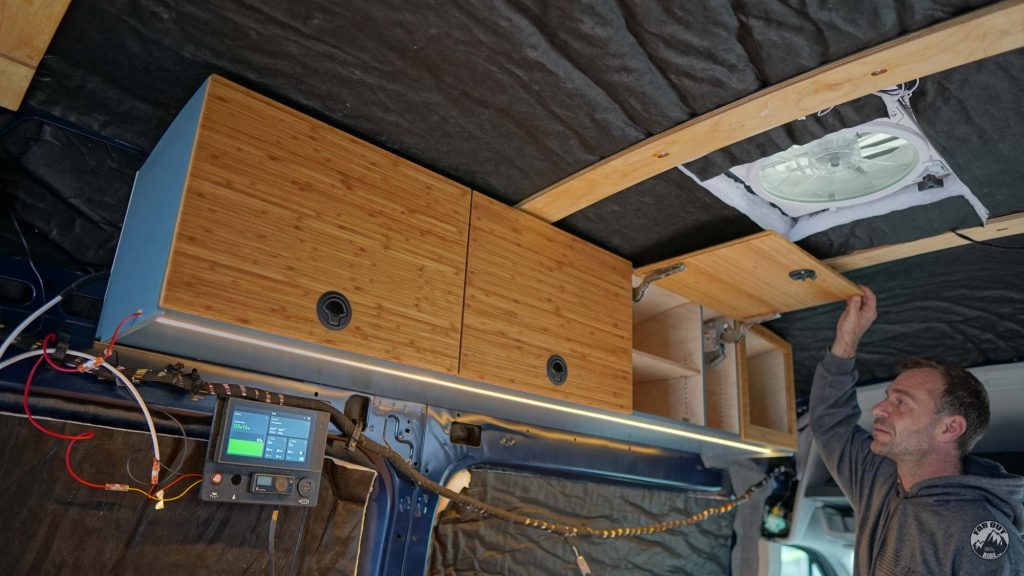
Let’s keep the van conversion going with the Driver-Side Upper Cabinet! It will store the kitchen’s stuff (dishes, pans, coffee maker, etc.). Below is an attempt at documenting the entire DIY fabrication/installation process 🙂
Disclosure: This post contains affiliate links, which means that if you click a product link and buy anything from the merchant (Amazon, eBay, etc.) we will receive a commission fee. The price you pay remains the same, affiliate link or not.

Theory
Upper Cabinet Overview
For reference, this is how we built this cabinet in FarOutVan 1 🙂
A few differences on the new build:
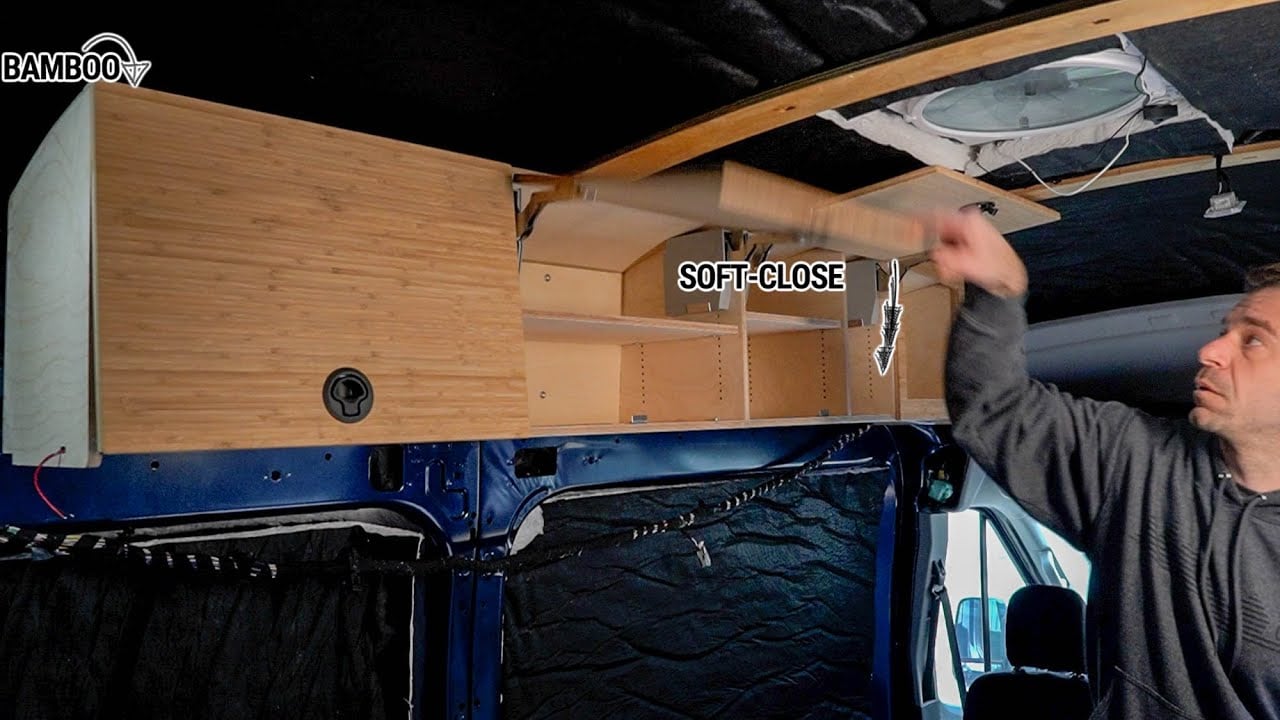
- Blum Aventos HK-S Lift (instead of hinges & gas strut);
- Frameless (instead of frame);
- Bamboo doors (instead of pine).

Soft vs “Hard” Cabinets
We did consider soft cabinets; the weight saving would be considerable. But we decided it’s not what we need for the “kitchen”. We feel a “hard” cabinet is more suitable to store dishes, coffee, gear, food, and such. But soft cabinets would work great in the bedroom, to store clothes and such… Personal preferences!

Fabrication
Time
TBD
Cost
TBD
Weight
TBD
Material
| ITEM | DESCRIPTION | QTY | BUY |
|---|---|---|---|
| 12mm (1/2″) Baltic Birch Plywood | For all parts except the wall panel, top panel, and the doors. | 74″x38″ | Locally |
| 6mm (1/4″) Baltic Birch Plywood | For the wall panel and the top panel. | 74″x25″ | Locally |
| (Optional) 3mm (1/8″) Baltic Birch Plywood | For the top panel, instead of machining the top panel from 6mm Baltic Birch… | 74″x12.5″ | Locally |
| 13mm (1/2″) Bamboo Ply | For the doors, open-bay frame, and wire harness cover. | 75″x20″ | Locally |
| Blum Aventos HK-S Lifts | We used these instead of hinges/gas struts for a simple/elegant installation. | 3 6 | Hinge System Door Clip |
| Pull Latch, Round | Fits into a 51mm round cutout. | 3 | Amazon |
| Shelf Brackets | We used the Powertec ones (pegs), but simple “L” brackets (screws) work too. | 1 | Amazon |
| LED Strip | We chose COB LED strip for a more uniform light (more LEDs per feet). | 1 | Amazon |
| LED Aluminum Channel | To house the LED strip. | 1 | Amazon |
| LED Continuous Cover | The aluminum channel includes covers, but we wanted a continuous cover (no seams). | 1 | Amazon |
| LED Switch/Dimmer | Push-button PWM dimmer (same brand as our ceiling puck lights). | 1 | Amazon |
| 1/8″ Landau Foam | Thermal break (insulation) at the back of the cabinet. | Campervan-HQ | |
| 3M 90 Spray Adhesive | To bond the Landau foam to the cabinet. | 1 | Amazon |
| Tung Oil | To seal and protect the Bamboo. | 1 | Amazon |

Box
Making it Strong
The wall panel is only 6mm (1/4″) thick. By itself, it is a bit flimsy. But we used eight screws to attach it to the wall; it is essentially making “one” with the van’s structure, so it’s super stiff once attached:

Each divider has “male” fingers that fit tightly into the wall panel’s “female” cutout. Even without glue, these fingers block the down/up/forward/back movement:

The bottom panel features slots for each divider which also increases the strength of the joints:

So far we created a super strong box, so we don’t need the top panel to play a significant structural role (especially since we’re using door lifts that are attached to the dividers, not the top):

All these “nice to have” fancy joints are enabled by the Shapeoko CNC, but they are not mandatory at all. We made a similar Upper Cabinet in FarOutVan1, with only basic tools, and it’s still holding strong!
We first cut all the parts (per CNC File or Paper Template). NOW is a good opportunity to sand everything as required (much easier than after assembly). OK, we’ve got 30 minutes working time with the glue, let’s think of a plan:
I first applied glue along the mating edges of the wall panel, bottom panels, and the first/second dividers. 30-minute countdown ON!
I fitted the first and second dividers into the back wall (with glue):
I then flipped the wall panel and the dividers onto the bottom panel (with glue):
I applied glue to the remaining dividers and fitted them in place (it’s important to glue ALL mating surfaces for strength, but also to prevent squeaking):
I used a whole bunch of brad nails to secure the wall panel with the bottom panel and the dividers. The brad nails don’t play a structural role; they allow to precisely and instantly align the parts and hold them in place while the glue cures:
Some of the dividers expanded slightly and wouldn’t fit all the way to the bottom of the slot, but clamps solved the issue (hammering them in did NOT work!). With all the super tight tolerances it wasn’t exactly easy to fit together, but now that it’s assembled it’s never going apart! I let the glue do its thing for 24 hours (don’t stress the joints!).
I came back 24h later to add the top panel. To get a perfect alignment at the front (which is visible), I aligned the top panel and the divider (1) with one brad nail (glue was applied prior). Then, I worked my way along the edge (2 -> 3 -> 4 -> 5 -> 6):
(this photo was taken a bit later… ignore the other nails at this point!)
I then nailed the remaining of the top panel to the dividers. I used about 6 nails per divider:
I added clamps between the dividers, to ensure contact between the top and wall panels (the 1/4″ wall panels is too thin to accept nails):
The mating surfaces between the wall and top panel are very narrow; I was a bit worried it could unglue in the long run, so I added a bead of PL Premium 3X along the edge in the back:
I also added a bead of PL Premium 3X along the edge inside the cabinet (I used painter’s tape to get a clean line). PL Premium has peanut butter consistency and doesn’t drip down:
I came back 24 hours later and removed the clamps. We’re done with the box!
Doors
We routed the doors (per CNC or Paper plan) and installed the latch on each door:
We then installed the hinge’s clips to the back of the doors:
The Blum Aventos HK-S has two indexing pins to locate them precisely without trial and error:
Three screws per hinge (screws are included and are the correct length for 12mm thick plywood):
I couldn’t use screws where there are two adjacent hinges, so I used M4 x 60mm bolts and nuts:
All the hinges installed!
Install the brackets for the latches with #6 x 3/8″ screws:
To install the doors, simply clip them to the hinge arms. Easy! And easy to remove as well:
Shelves
The shelves have about 1/8″ clearance all around and are fastened with these brackets. The “peg” is inserted into a 5mm diameter hole, and is screwed into the shelf (to prevent rattle on the road):
It’s in!
Finish
Painted Surfaces
Exterior visible surfaces
- Sand to 220 grit with an orbital sander.
- Apply Grain Filler Gel. Optional to get a very smooth surface, because it’s difficult to completely sand the grains away on Baltic birch.
- Apply 2 coats of primer.
- Apply 3 coats of paint.
Other Surfaces
Interior and hidden surfaces
- We sanded the interior of the cabinet, but didn’t sand hidden surfaces.
- Apply 2 coats of water-based polyurethane.
Recessed LED
** We recommend finishing the cabinet first, then installing the LED **
The aluminum channel, LED strip, and diffuser are cut to length and inserted into the 17.1mm wide x 6.5mm deep slot in the bottom panel:
I added a #4 x 3/4″ screw into each divider to secure the channel (I can add CA glue later if the channel sags between the dividers…):
There is a cutout on the rear divider to let the wires through:
We actually did the final install after painting:
Thermal Break
At last, to create a thermal break, we used 3M 90 adhesive to bond 1/8″ Landau foam to the back of the cabinet.
Minicell or Low-E are OK too, but we found the thickness of Landau to be more uniform than Minicell, and it’s a bit easier to work with. Landau is a closed-cell foam, very similar to Minicell, that we use as padding under upholstery (see our DIY Van Upholstery Guide).

Why?
Metal and wood are good heat conductors, and heat can easily flow (by conduction) between the two of them; this is called thermal bridging.
Adding a layer of insulation in between reduces the heat flow. This is called a thermal break.
For example, we also used thermal breaks in our 80/20 aluminum bed frame, as a (modest) attempt to prevent the crossbars from getting cold in winter:

That’s quite an interesting topic, and we have more to say about that in our Van Insulation Guide!
Wire Harness Cover
Coming soon!
Installation
Resources


The upper cabinet is secured with eight M6 Flanged Button Head Stainless Steel screws, into M6 rivet nuts:
On Second Thought…
Too soon!


Hi Antoine,
I’m considering building the cabinet from your plans. My plan was to secure a microwave inside the cabinet. The microwave is 13.25 inches deep. What is the depth of the cabinet at the bottom and also at about 10 inches high? Sorry if I missed it– I read the post thoroughly but did not see the depth noted.
Hi! You’re right, depth is not listed… will add soon!
Bottom: 11.5in deep
At 10in height: 10.50in deep
Let me know if you have any other question,
Antoine
Do you think you will ever add 1-2 more points of attachment to the top of the cabinet to the furring strips and add small spacer between, since there is a gap? Maybe even a thread insert to the furring strip. I was just thinking that and it would probably help with the forces of going over bumps, etc over time.
I don’t think that’s necessary, to be honest. We attached FarOutVan 1’s cabinet the same way, and it’s still holding strong to this day 🙂
Yeah you’re right! You guys used 3/8 inch for the wall panel for the cabinet in Van#1. Do you think the 1/4 will be fine? I was just thinking that! I ended up putting fender washers (24mm outer diameter) because I was a bit worried hahah.
1/4 will be fine (we used flanged button head screws, as linked in material).
Hey Antoine,
Instead of gluing the landau to the cabinet, do you think the pressure from the fasteners would be enough and skip the 3M 90?
Technically, the Landau doesn’t have to be glued, because it’s sandwiched between the cabinet and the wall.
I wanted to glue it for convenience… if I ever remove the cabinet (already did a few times, actually…), it’ll be a pain to work with if it’s not glued (align with fastener holes).
That was my thought! Hope that makes sense.
Makes sense! I got around and mounted the upper cab. You mentioned they were all m6 screws. But the bottoms seemed to be m5. Did you find that in your case?
Just double-checked in my van, and yes they’re all M6.
What’s the issue: the rivnuts in the van or the cabinet holes?
The rivenuts in the van. Hmmm that’s so weird. I was able to line all 4 holes towards the top of the cabinet and they are all m6 for me. But the bottom ones aren’t m6. They’re m5. And I think one might be m4. Right now I only have the top fastened(m6) cuz I don’t have any m4 screws yet.
I looked back in my pictures where I circled the holes where the cabinet goes and I even saw some of the bottom ones are m5. You think it’s a US/Canada thing?
Have you tried tapping the M6 rivnut with a hammer? Some holes are tighter.
If not, you could enlarge them with a drill.
I’ll try it out. Worse case do you think 4 m6 screws and 4 m5 screws will still be strong enough?
Personally, I’d go with all M6. For strength, but also because it’s annoying to mix fasteners (more fasteners, more tools)!
Another option is I can drill 4 new holes directly through the cabinet few inches away from the existing ones and then take off the cabinet and install m6 or even m8.
Between your first and second van build, I noticed you chose a thinner wall panel thickness, from 3/8″ to 1/4″. Is this the reason you did not need shims behind the panel for the second build? If not, why does the second build not require shims?
The second didn’t need shims because it conforms perfectly to the van curvatures (CAD + CNC).
The shims in the first one were to account for the fact that our cabinet was not “perfect”.
It’s totally fine to use shims in my opinion 🙂
HI there.
Sorry.. asking the same question as above, as it was a year ago. Just trying to download the paper template for the upper driver side cabinet, but the link is dead. Is it available? or could you just share by email? Thanks a mill!
I love your work! Any chance the paper template comes back up soon? This is my next step in my build. Thanks!
For your thermal breakers between your cabinet and van, are you going to glue the minicel to the van or just glue it to the back of the cabinet so if you ever take off the cabinet you will have access to any additional pre drilled holes or anything else. I’ve been debating this for a while, if I want to glue it to the van or just adhere it to the cabinet. Or even just place it between the two and the force between the cab and van will hold it tight.
I’m gluing it to the cabinet for the reasons you mentioned!
I just added it to the page: #thermal-break
Did you guys get the Cabinet grain gel or the wood grain gel?
We used this one specifically (cabinet grain filler): https://amzn.to/483aPuZ
Thank you! I will let the wife know that she might have to paint hahah
When I give the Cnc file for the cabinet to a local fabricator, does it specify which cost use which material?
I’m not sure I understand the question?
Can you please clarify?
I noticed you don’t include any sort of lip on the floor of the cabinets to keep items from smacking up against the inside of the doors while driving or falling out if parked on a slope and opening the cabinets. I know your latches lock the doors closed and the hinges provide some pressure to keep the doors closed, but is it not a concern that items moving with the swaying and rattling of the van will damage the doors or put stress on the latch?
I don’t believe we had anything in our previous van, and it was fine. But it would be fairly easy to add something (aluminum angle from hardware store?) as required.
The m4 60mm bolts you used for the hinges were too short for me. Weird. I went ahead and ordered 65mm. The end of the bolt barely came from the other side. From your picture it looks like you had 65mm?
I’m curious about why you decided to build them out of wood instead of 80/20 since I see that you used 80/20 in the bedframe.
Sorry to bug but I’m interested in those templates as well. Any chance they’ll be up soon? Thank you!
I just released the CNC files: https://faroutride.com/product/upper-cabinet-driver-cnc/
Getting into the paper templates now (need a few days).
Were you looking at the CNC files or paper templates?
Wow thanks! Ideally both but I’ll start with the CNC files for now! Will the paper templates be included in the CNC bundle eventually?
Very nice. Maybe I am missing something, but the links for the templates are not active. Is that intentional and will they be active at a later time?
ty and stay safe
Indeed. I vastly underestimated the work required to make the files “sharable” (= provide clear instructions). Working on it now! It should be up in the next few days 🙂
Hi Antoine,
Just getting ready to start building my cabinets. Your drivers side upper cabinet looks awesome. exacxtly what I’m looking for!!! The link to the paper template still doesn’t seem to be working. Is there a way I can access the template? Thanks a million! Larry
We still didn’t produce the template unfortunately…
Sorry about that!