

This write-up covers the water system installation in FarOutVan2, our second Ford Transit campervan conversion.
For a deep dive into the theory of designing a Water System, you can refer to our Water System Guide.
This is still a work in progress; we will add relevant sections as we progress!
Disclosure: This post contains affiliate links, which means that if you click a product link and buy anything from the merchant (Amazon, eBay, etc.) we will receive a commission fee. The price you pay remains the same, affiliate link or not.

Overview
Dual Fresh Tank
FarOutVan2 has a dual fresh tank setup: one fresh tank in the garage, above the wheel well (passenger side), and the other fresh tank in the spare tire under the floor (outside).
With both tanks full, that’s about 475 pounds of water! So we don’t really plan on driving around with both tanks full… we’ll use the outside tank only when really necessary. Time will tell how much we really use it. So yeah, the dual tank setup is a bit over-the-top, so you should probably consider a single tank setup (keep reading).
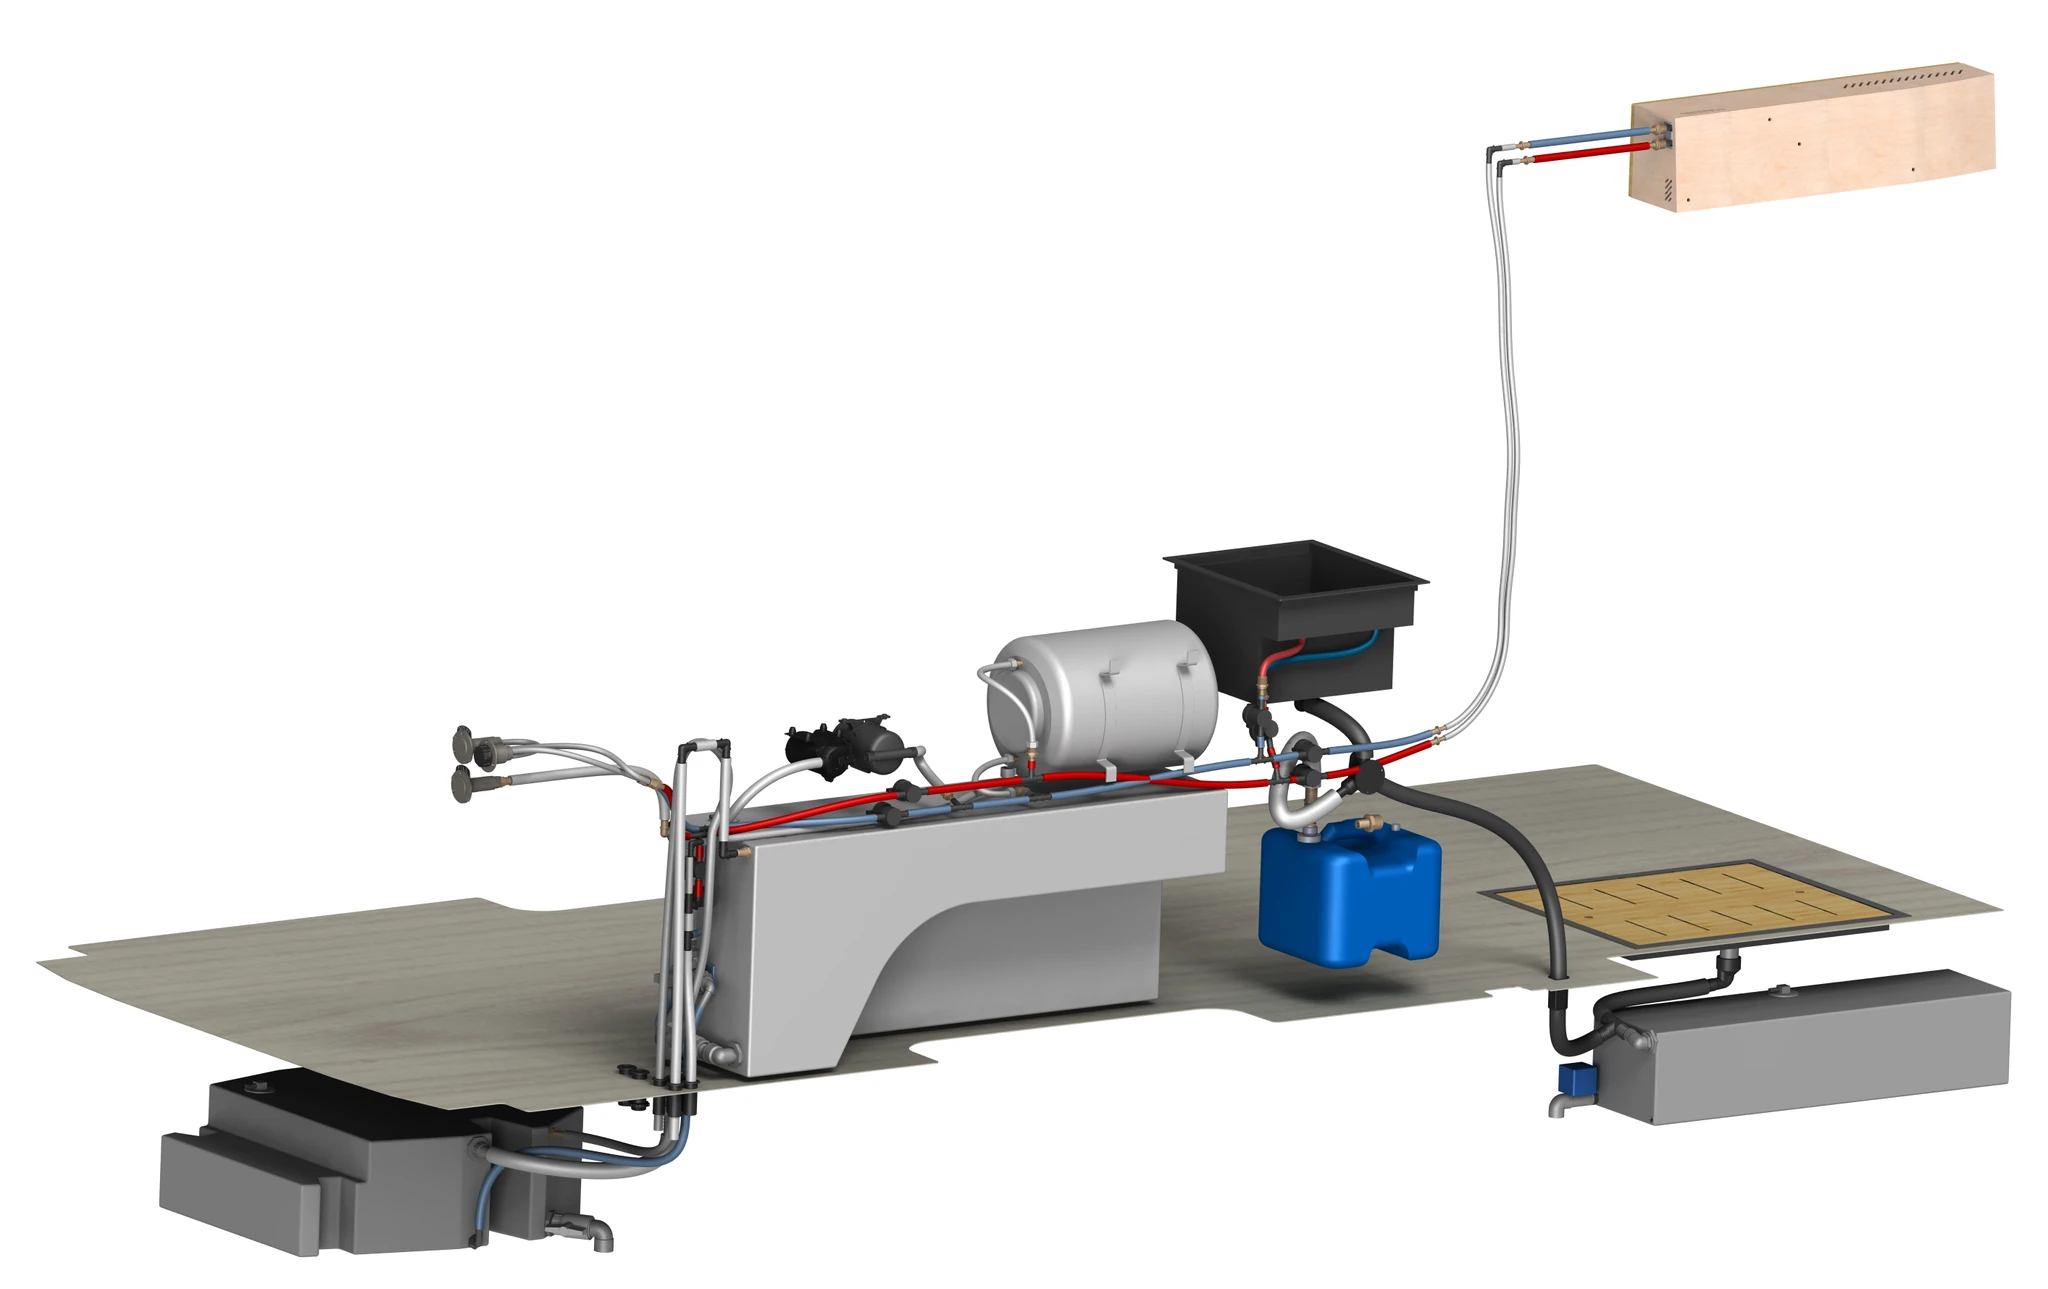
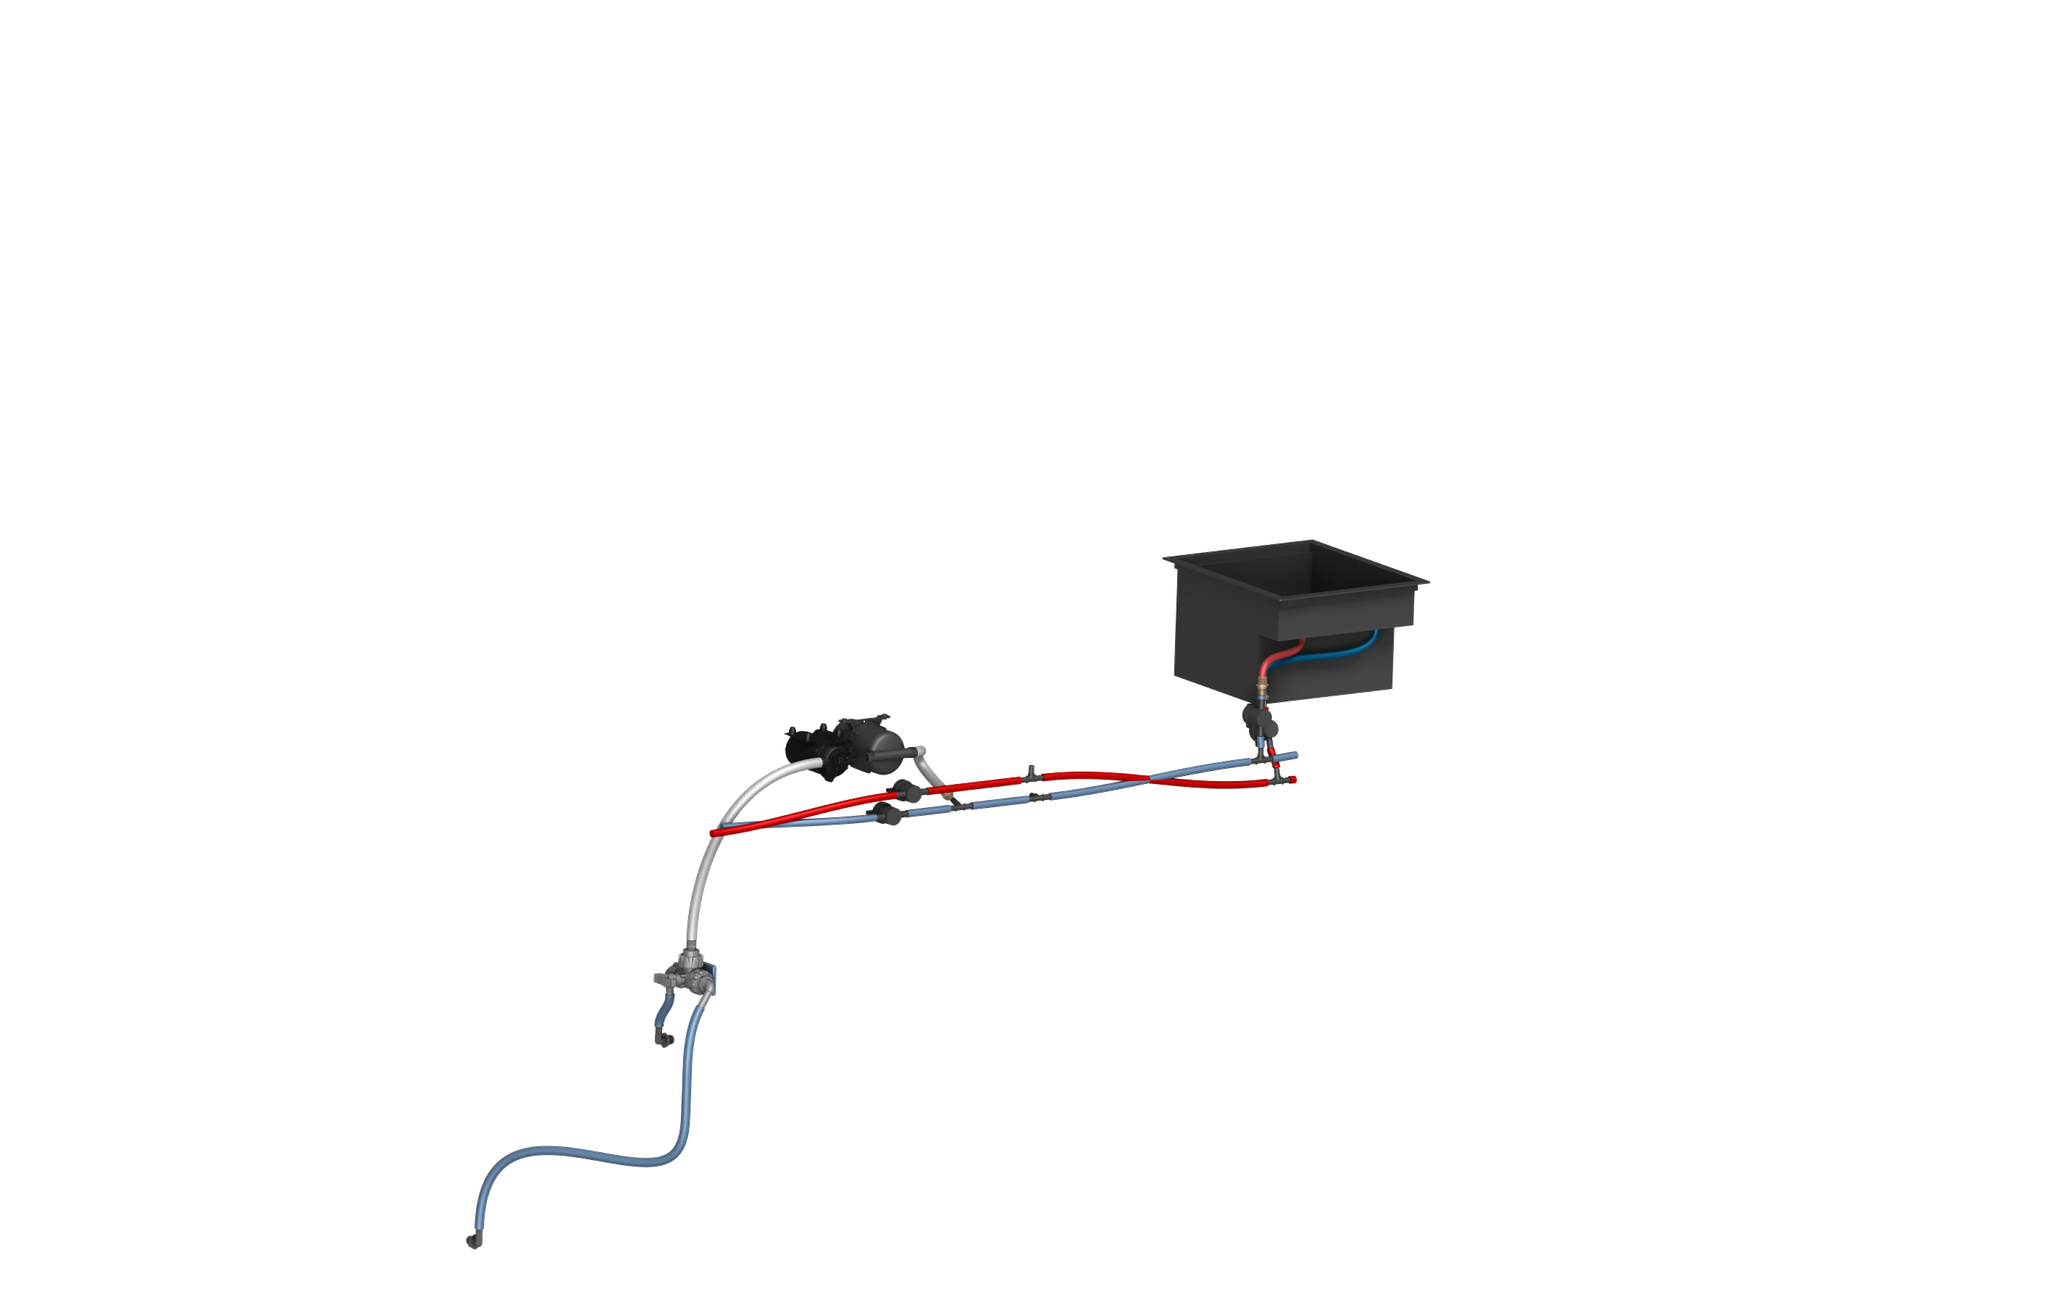
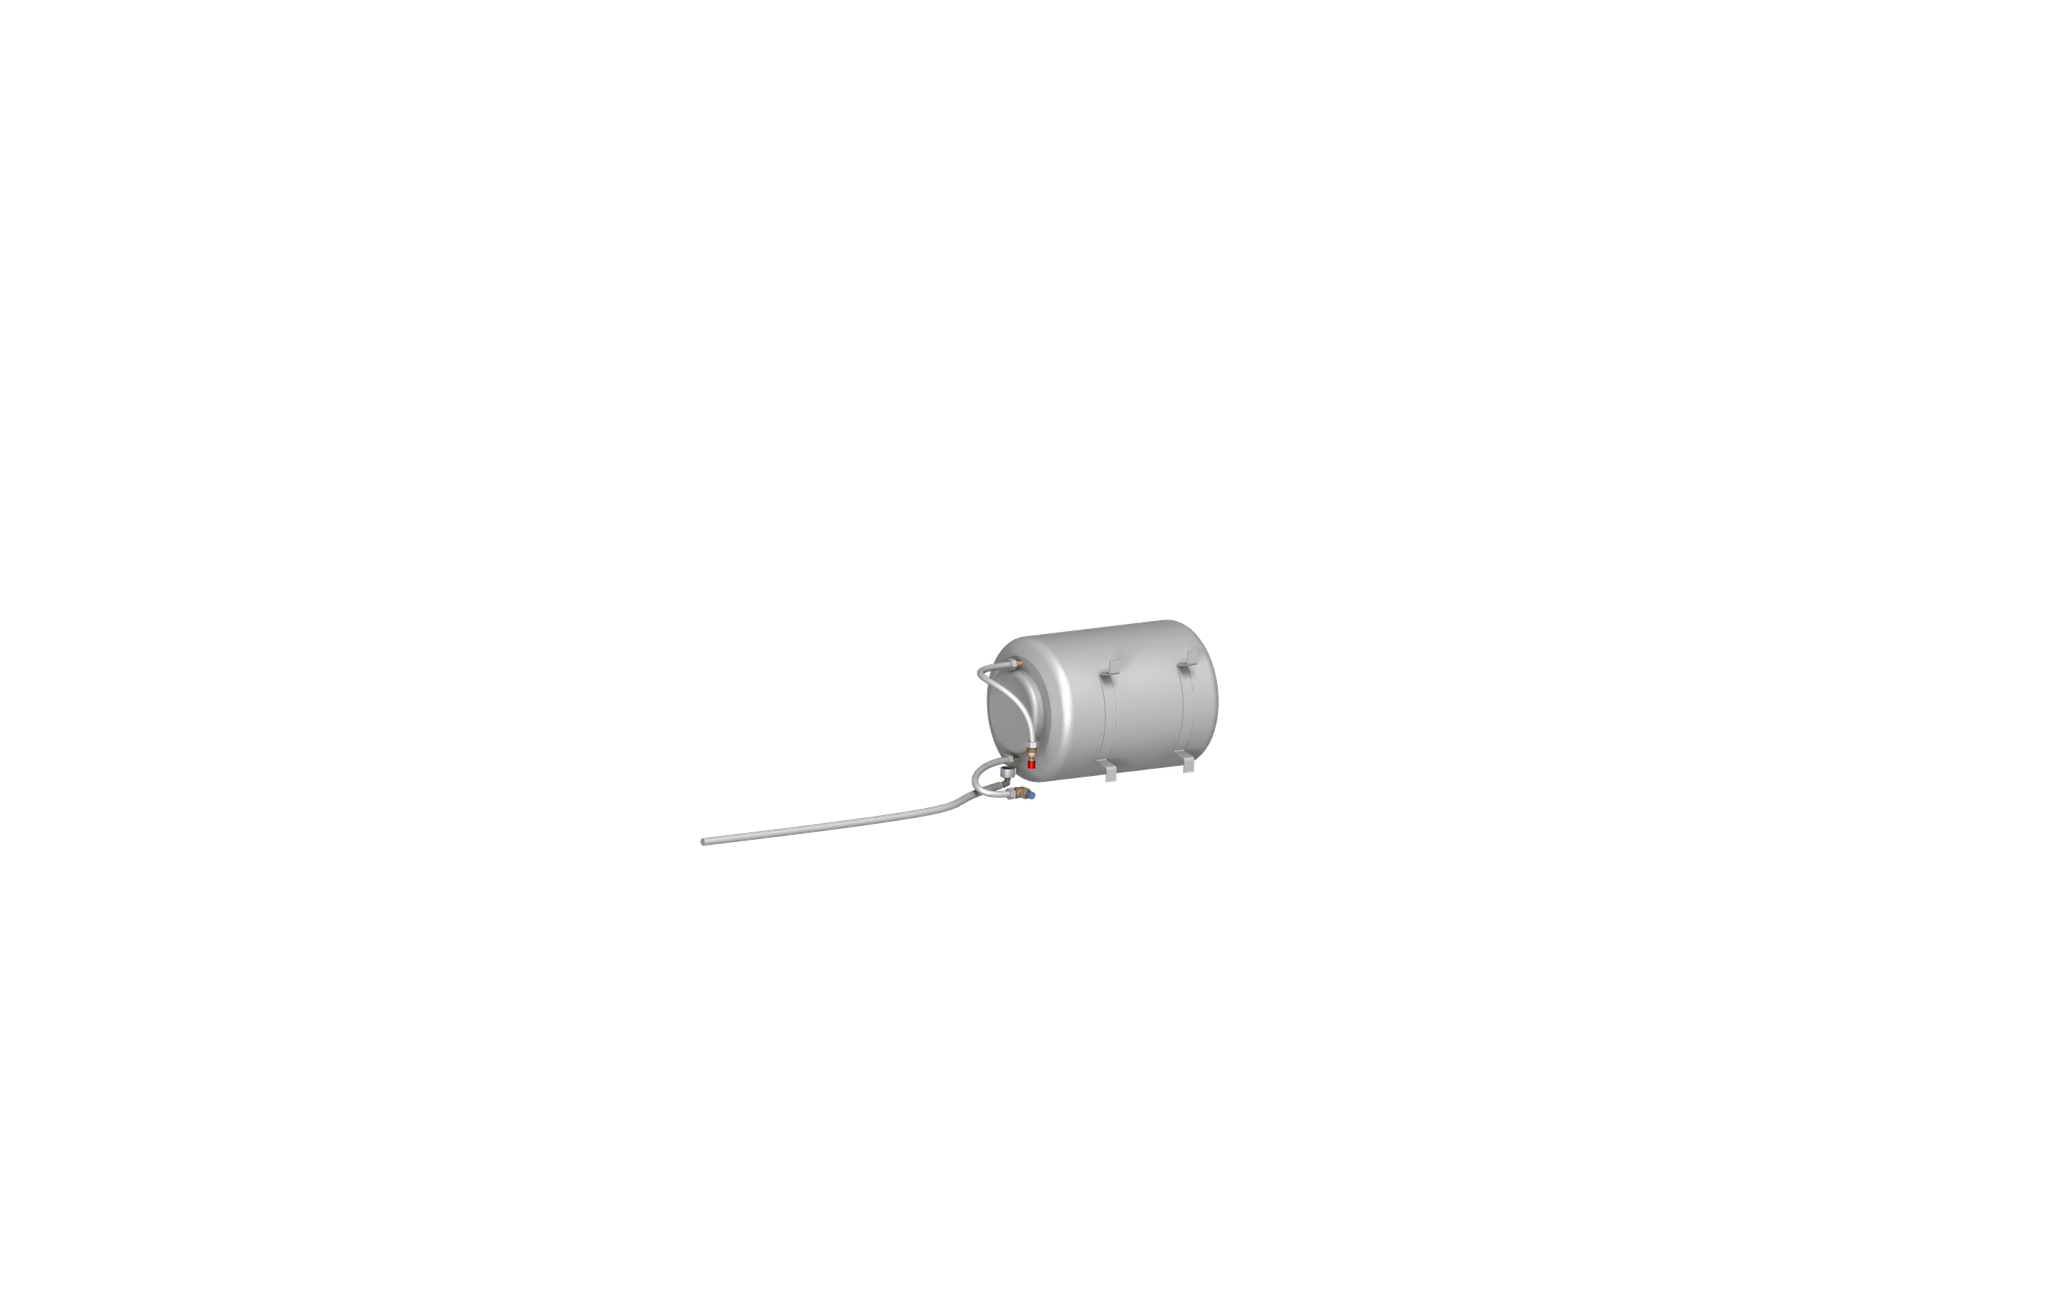




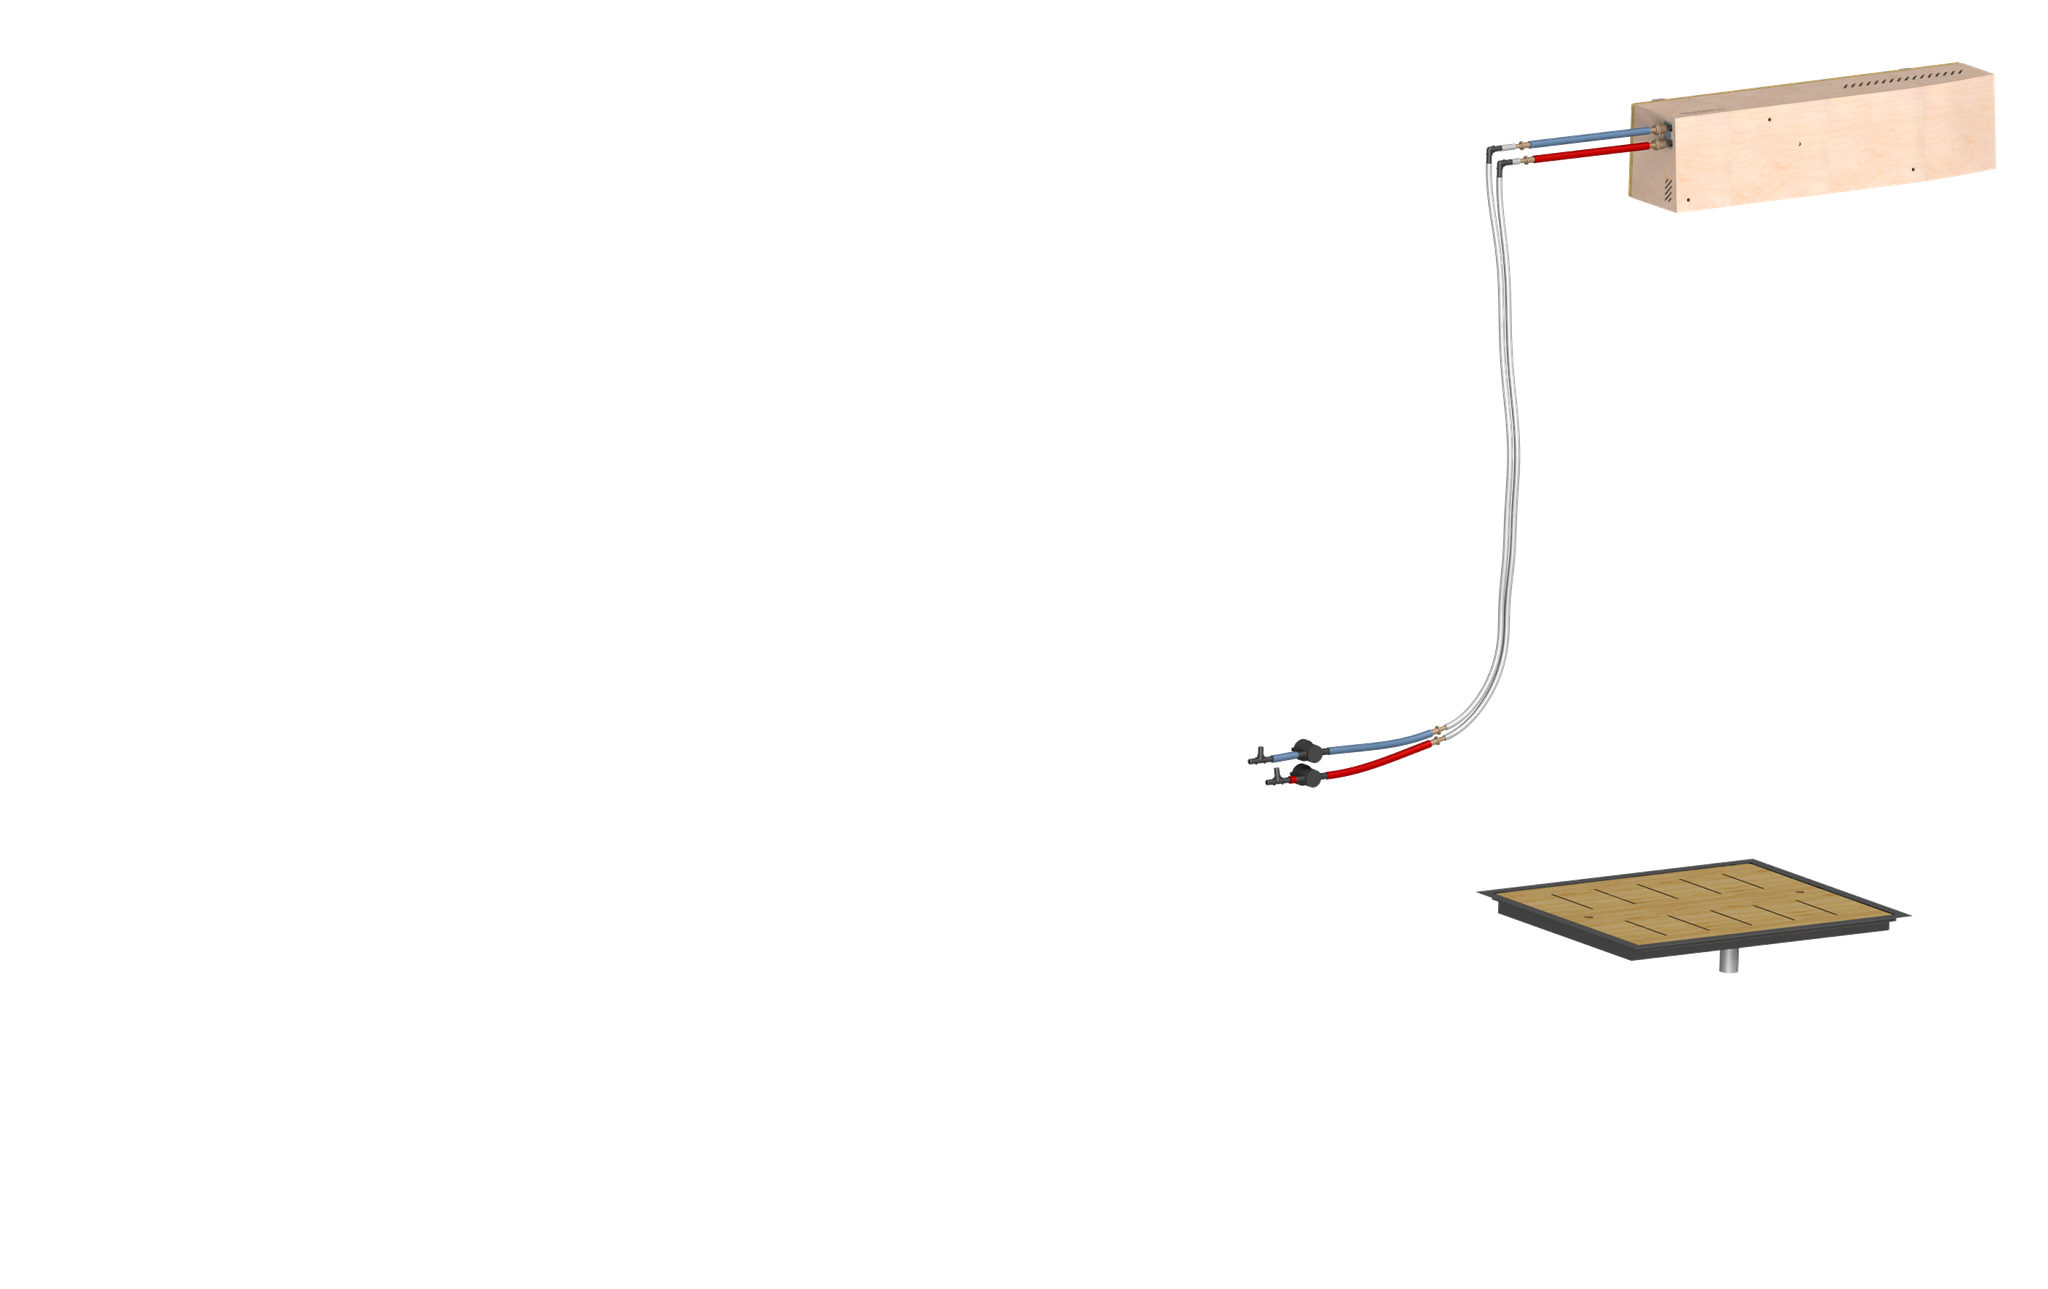

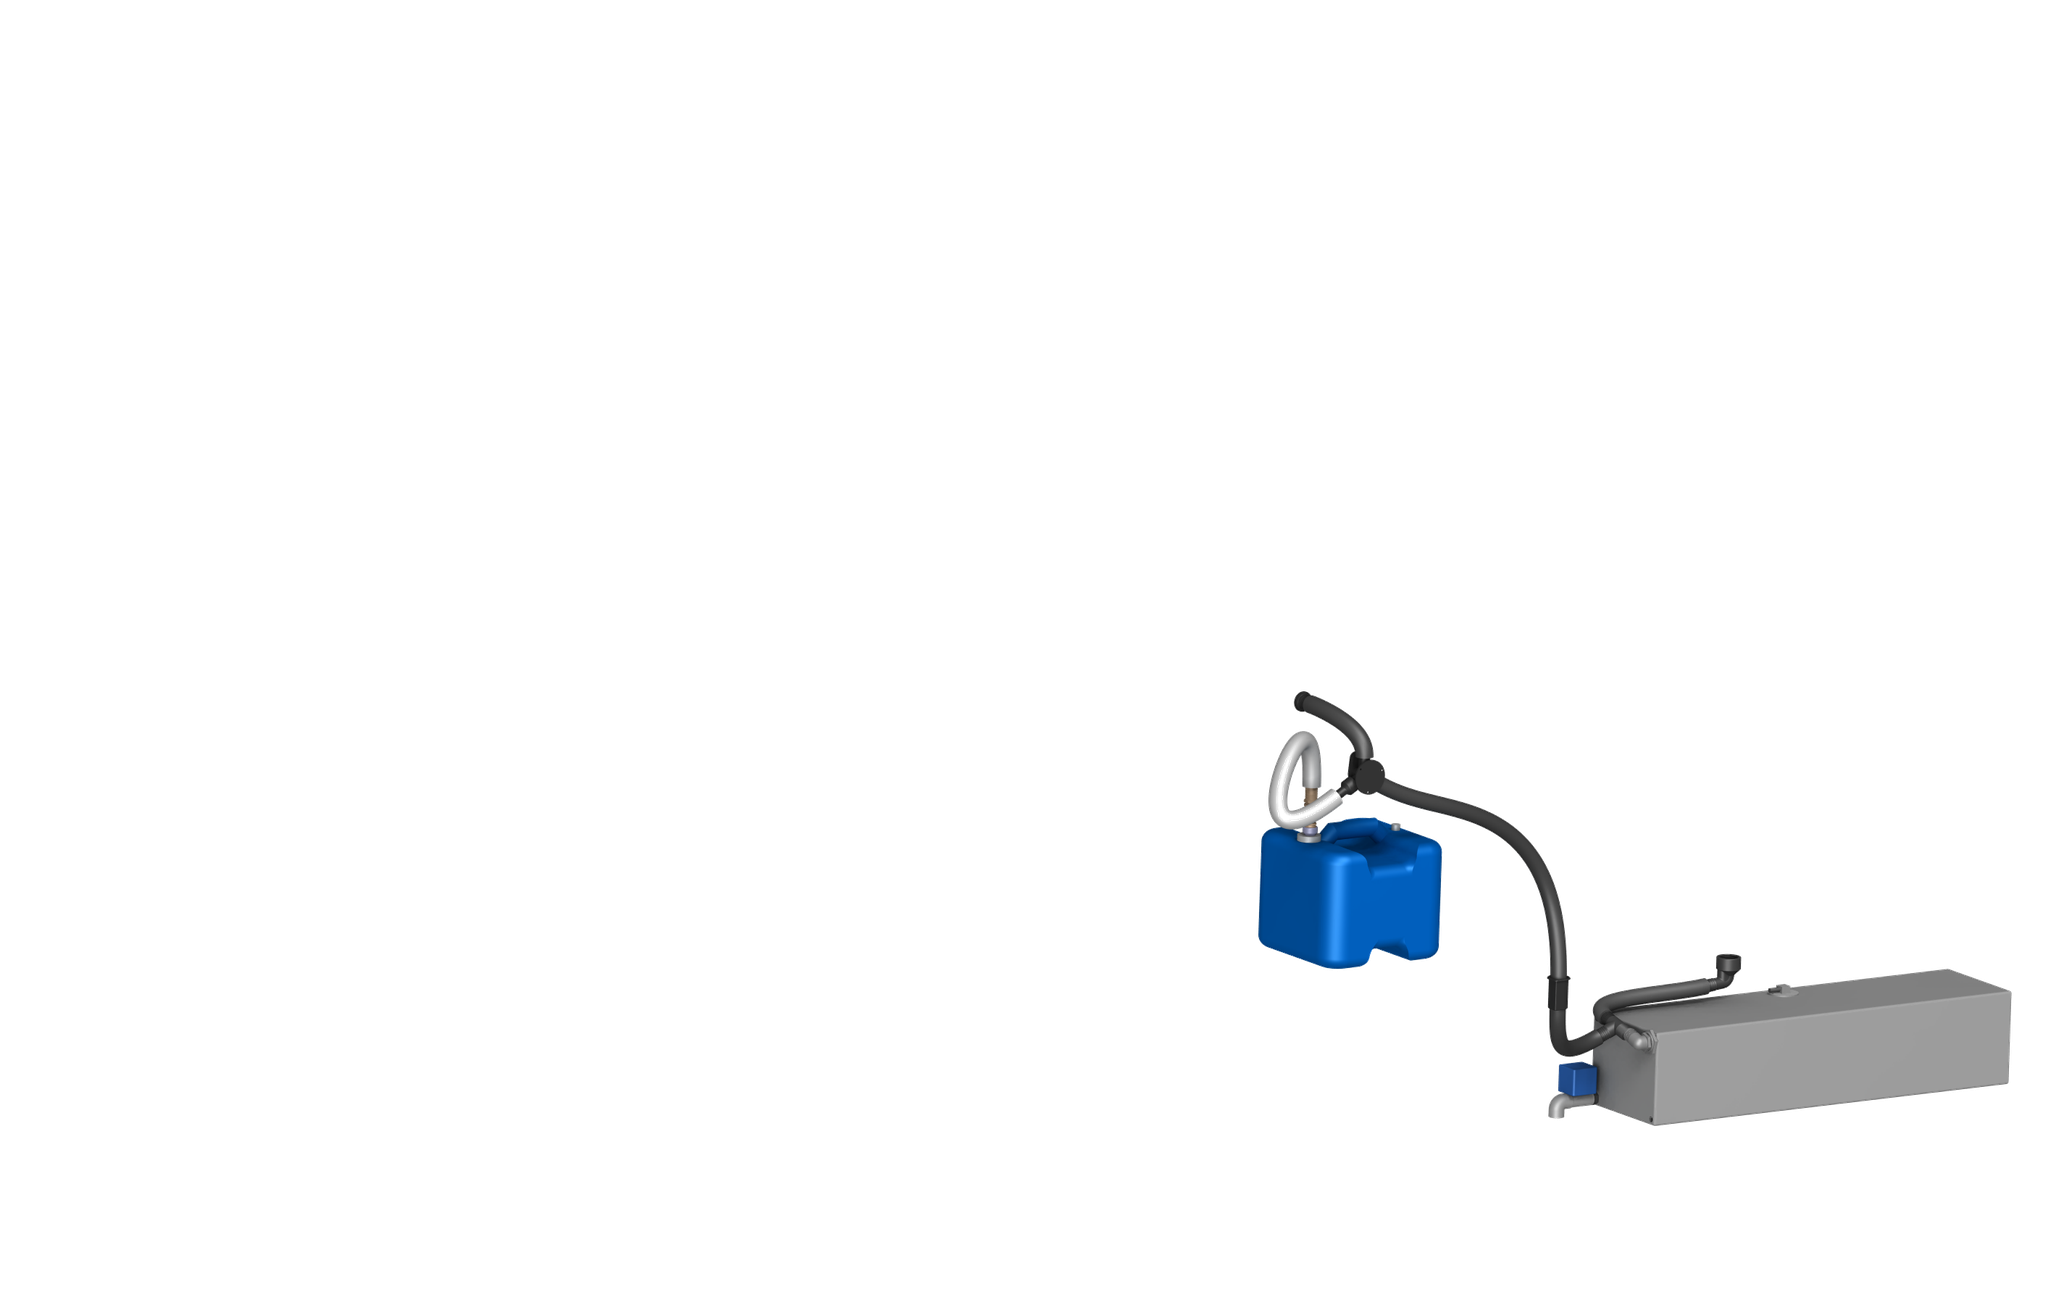
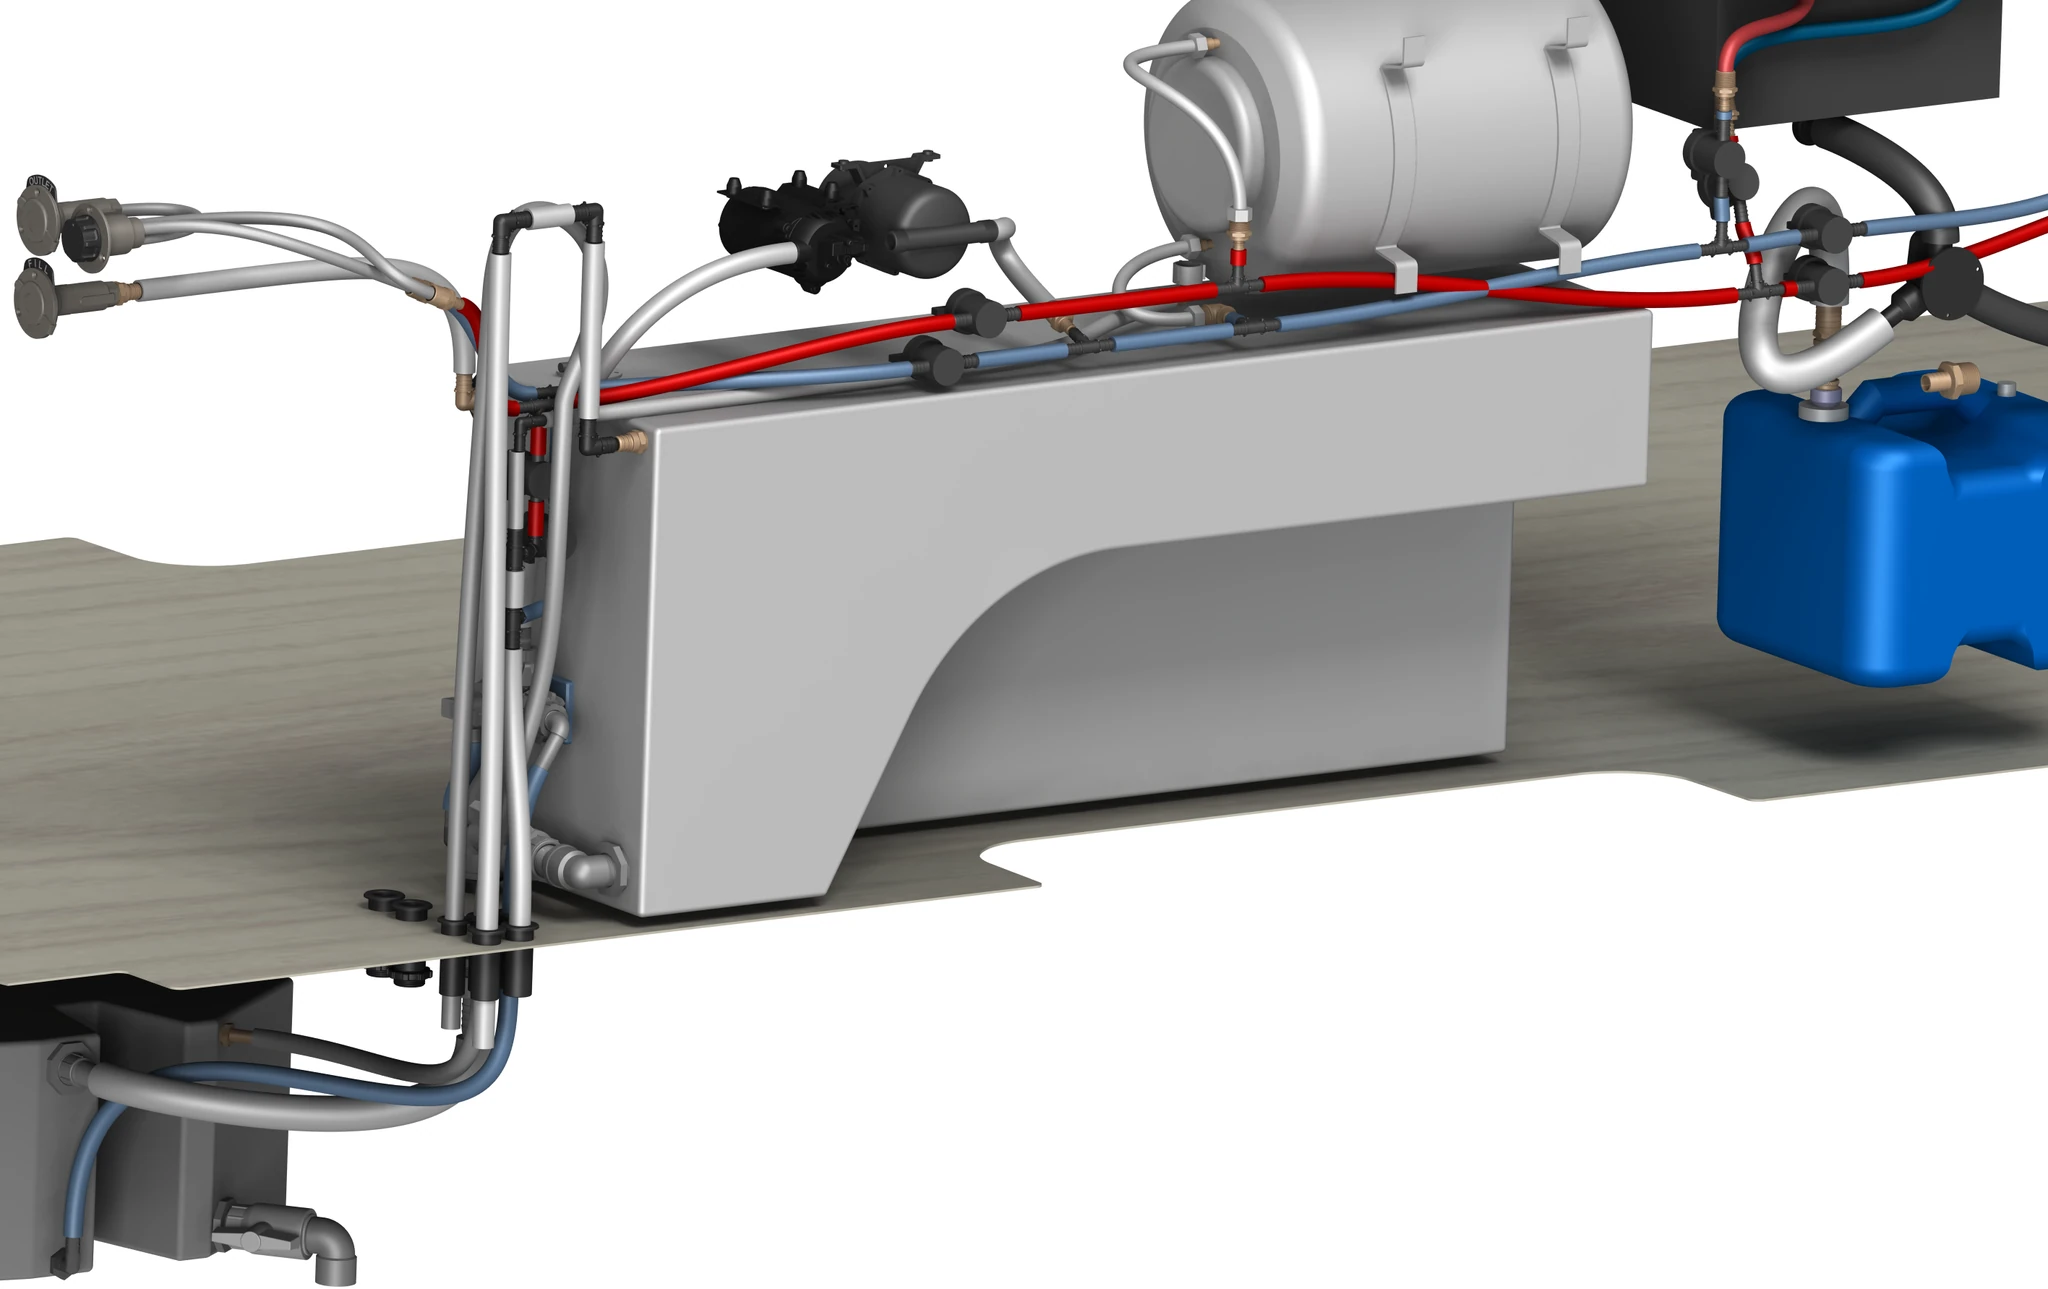
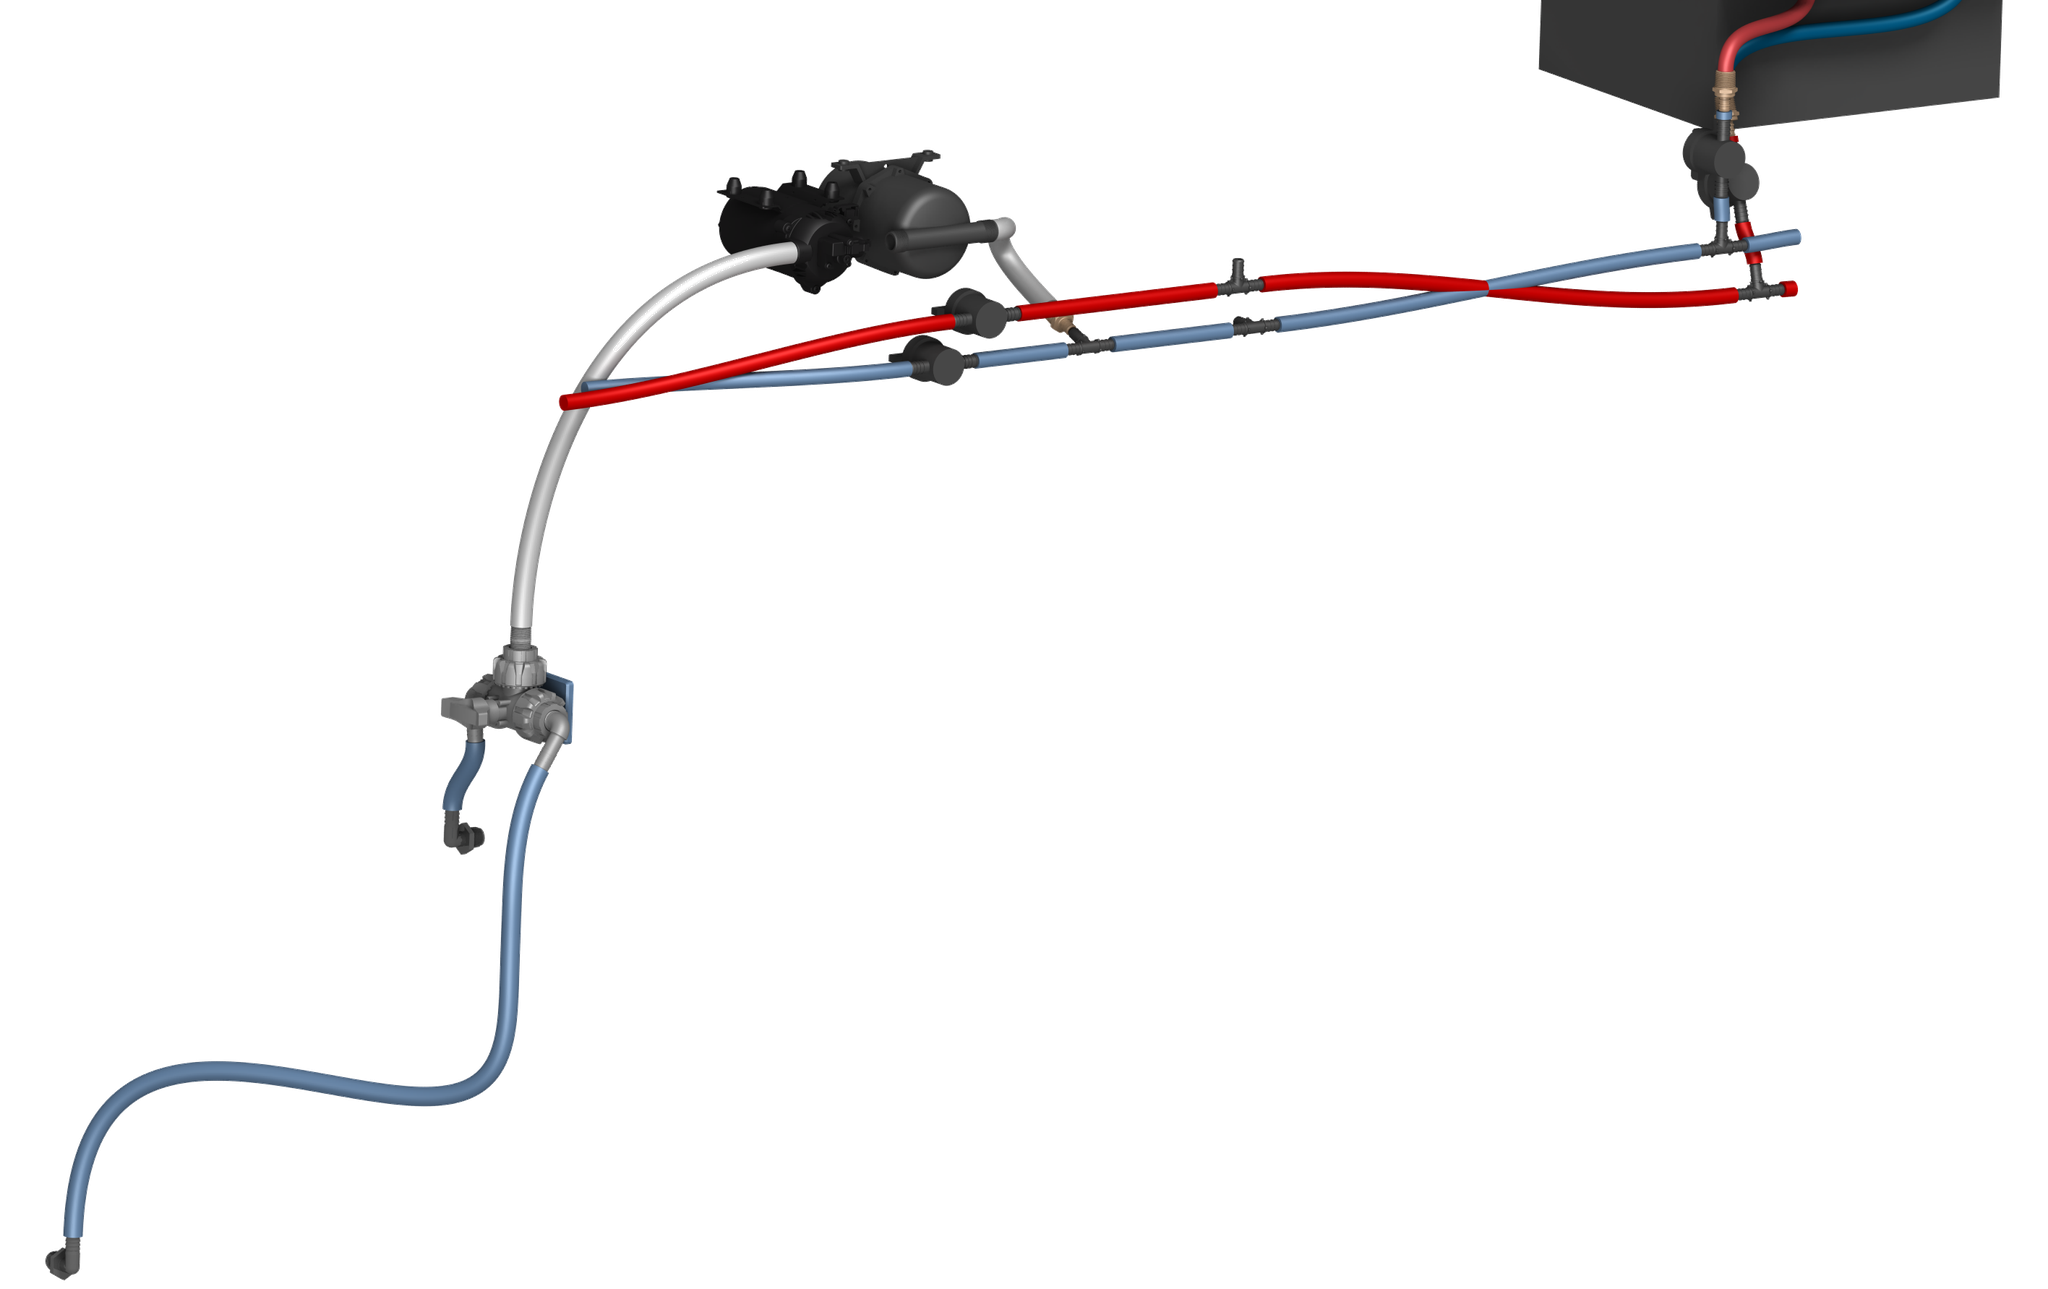

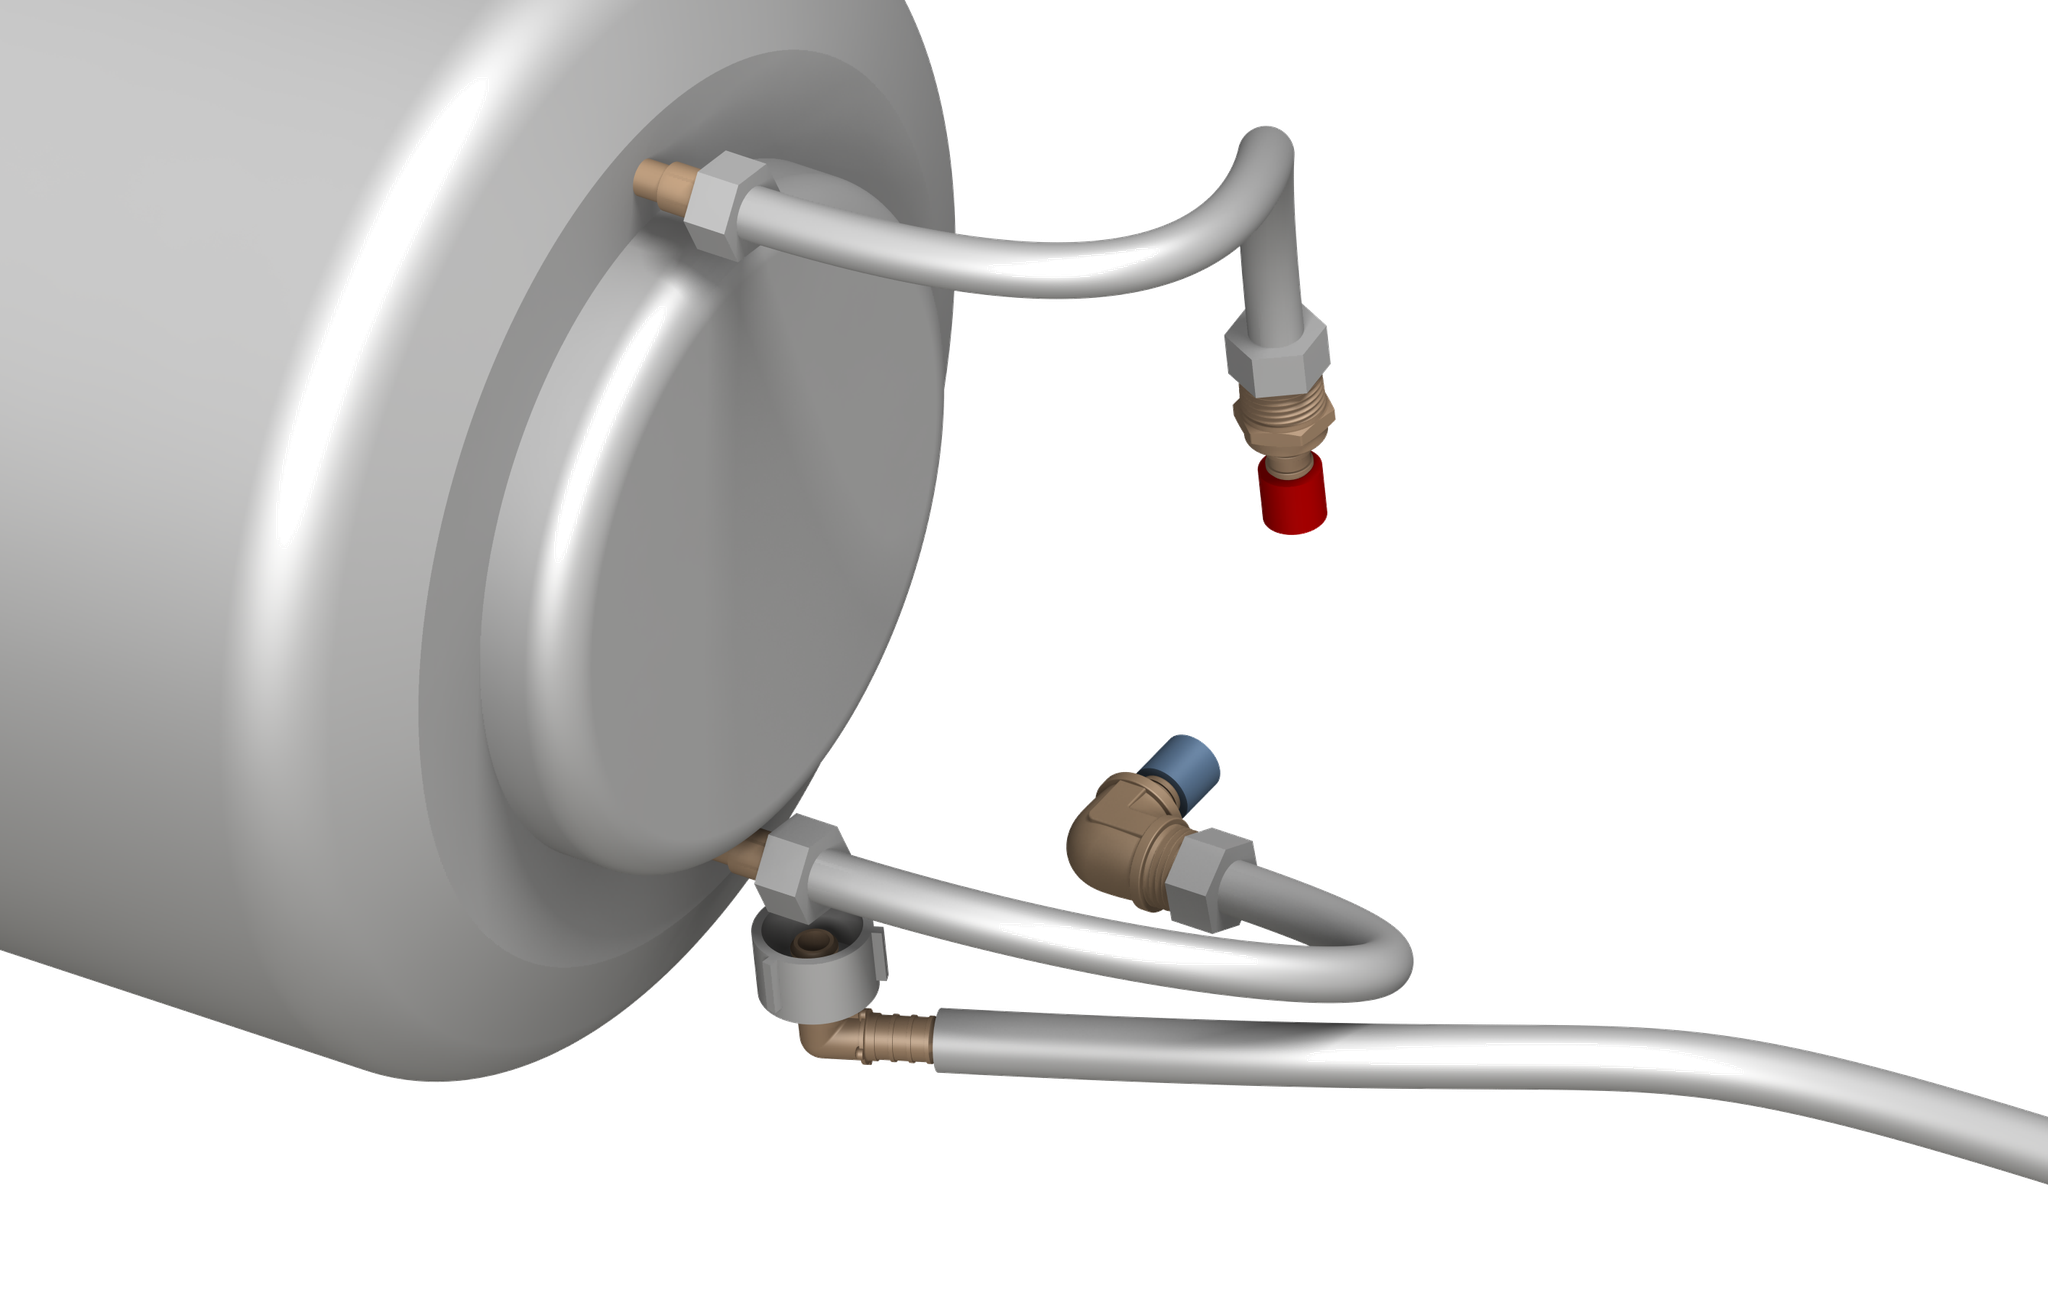


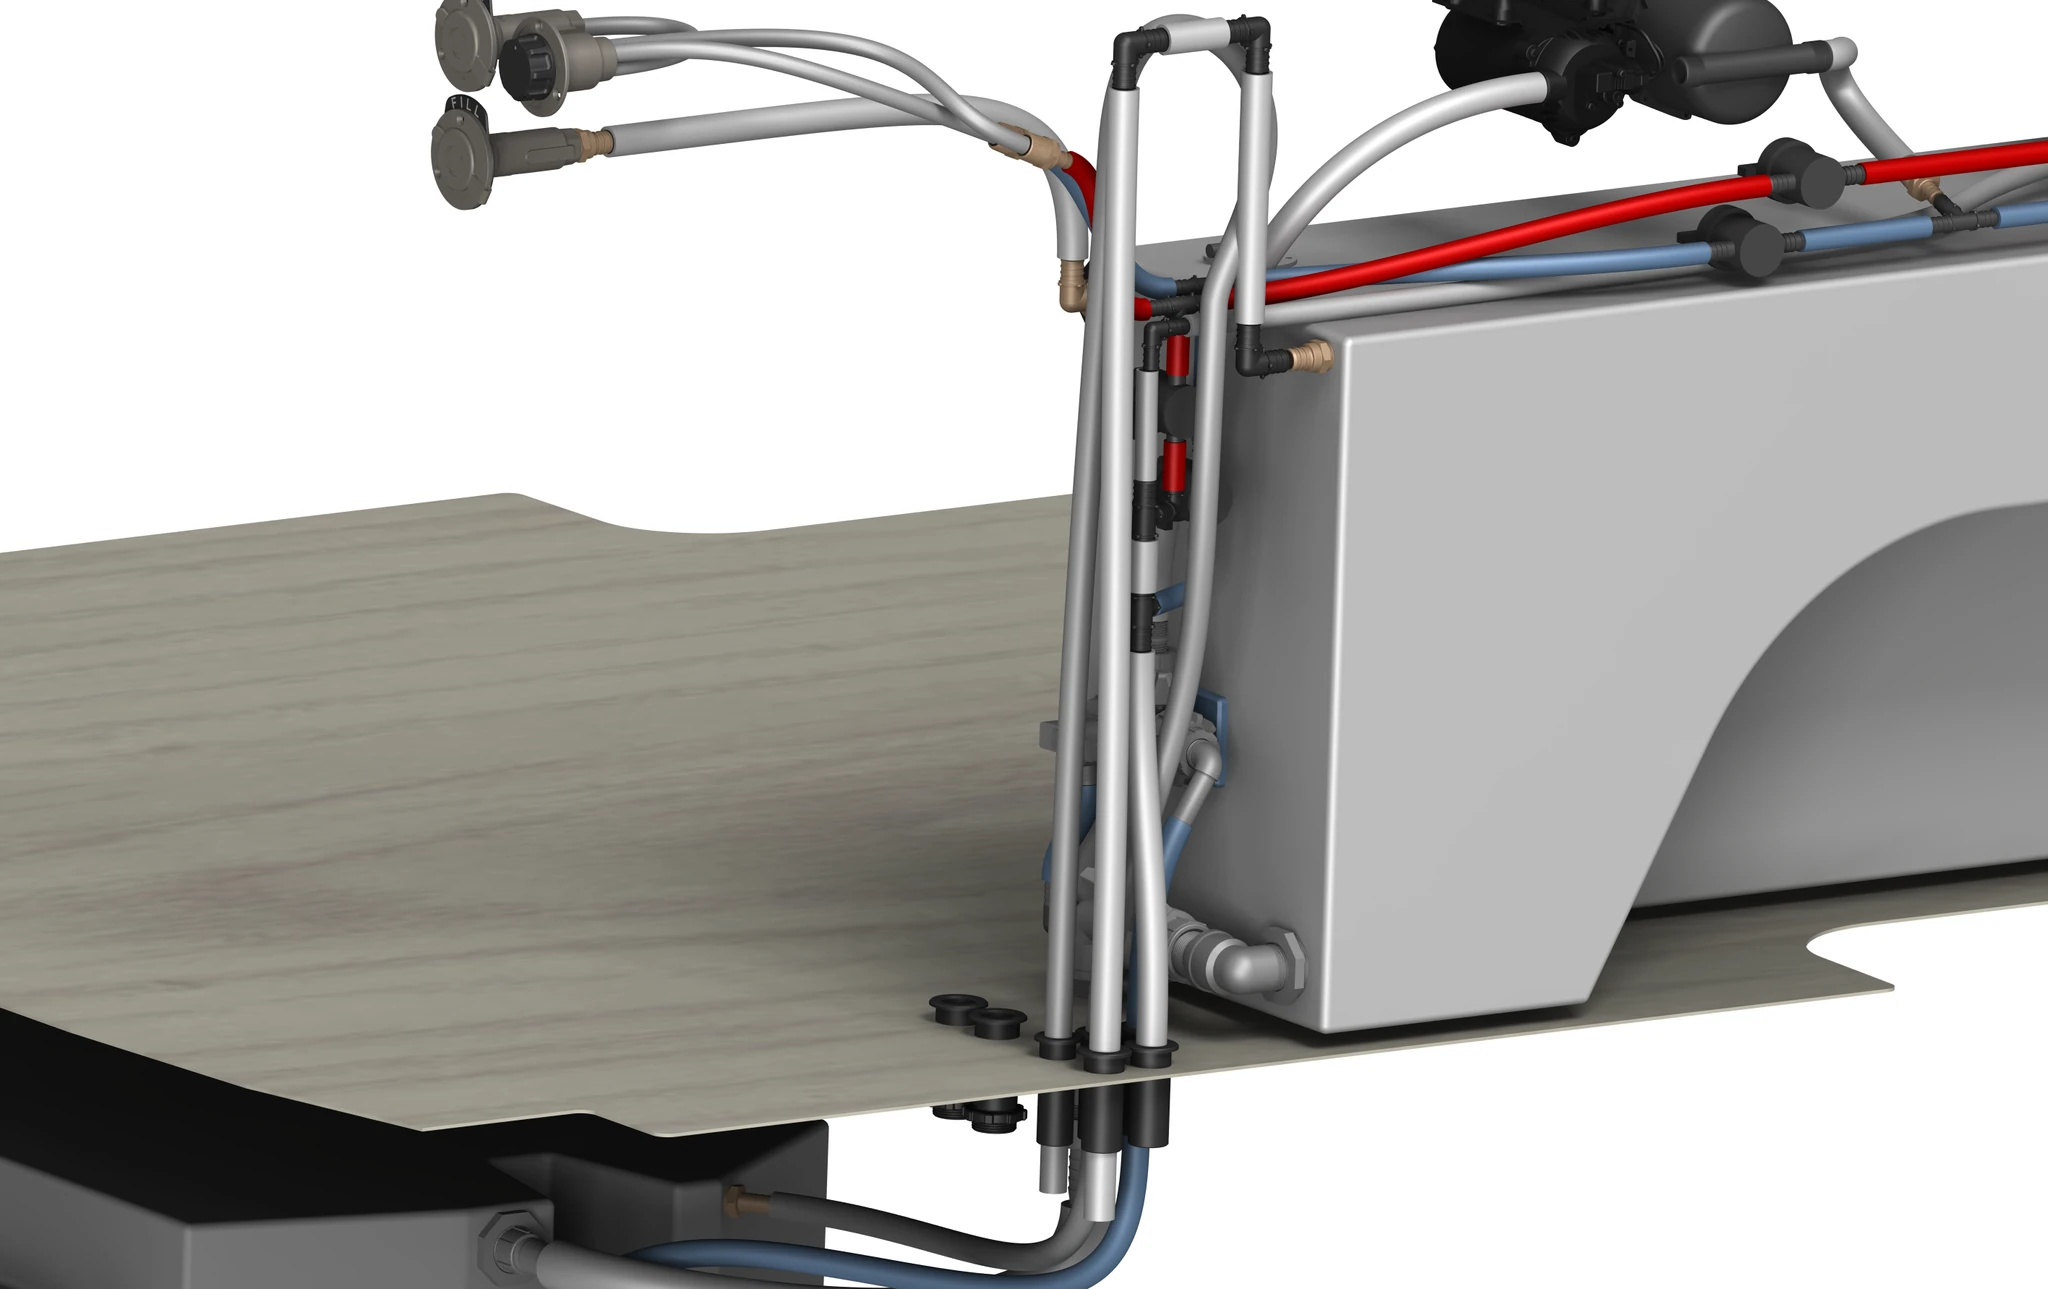


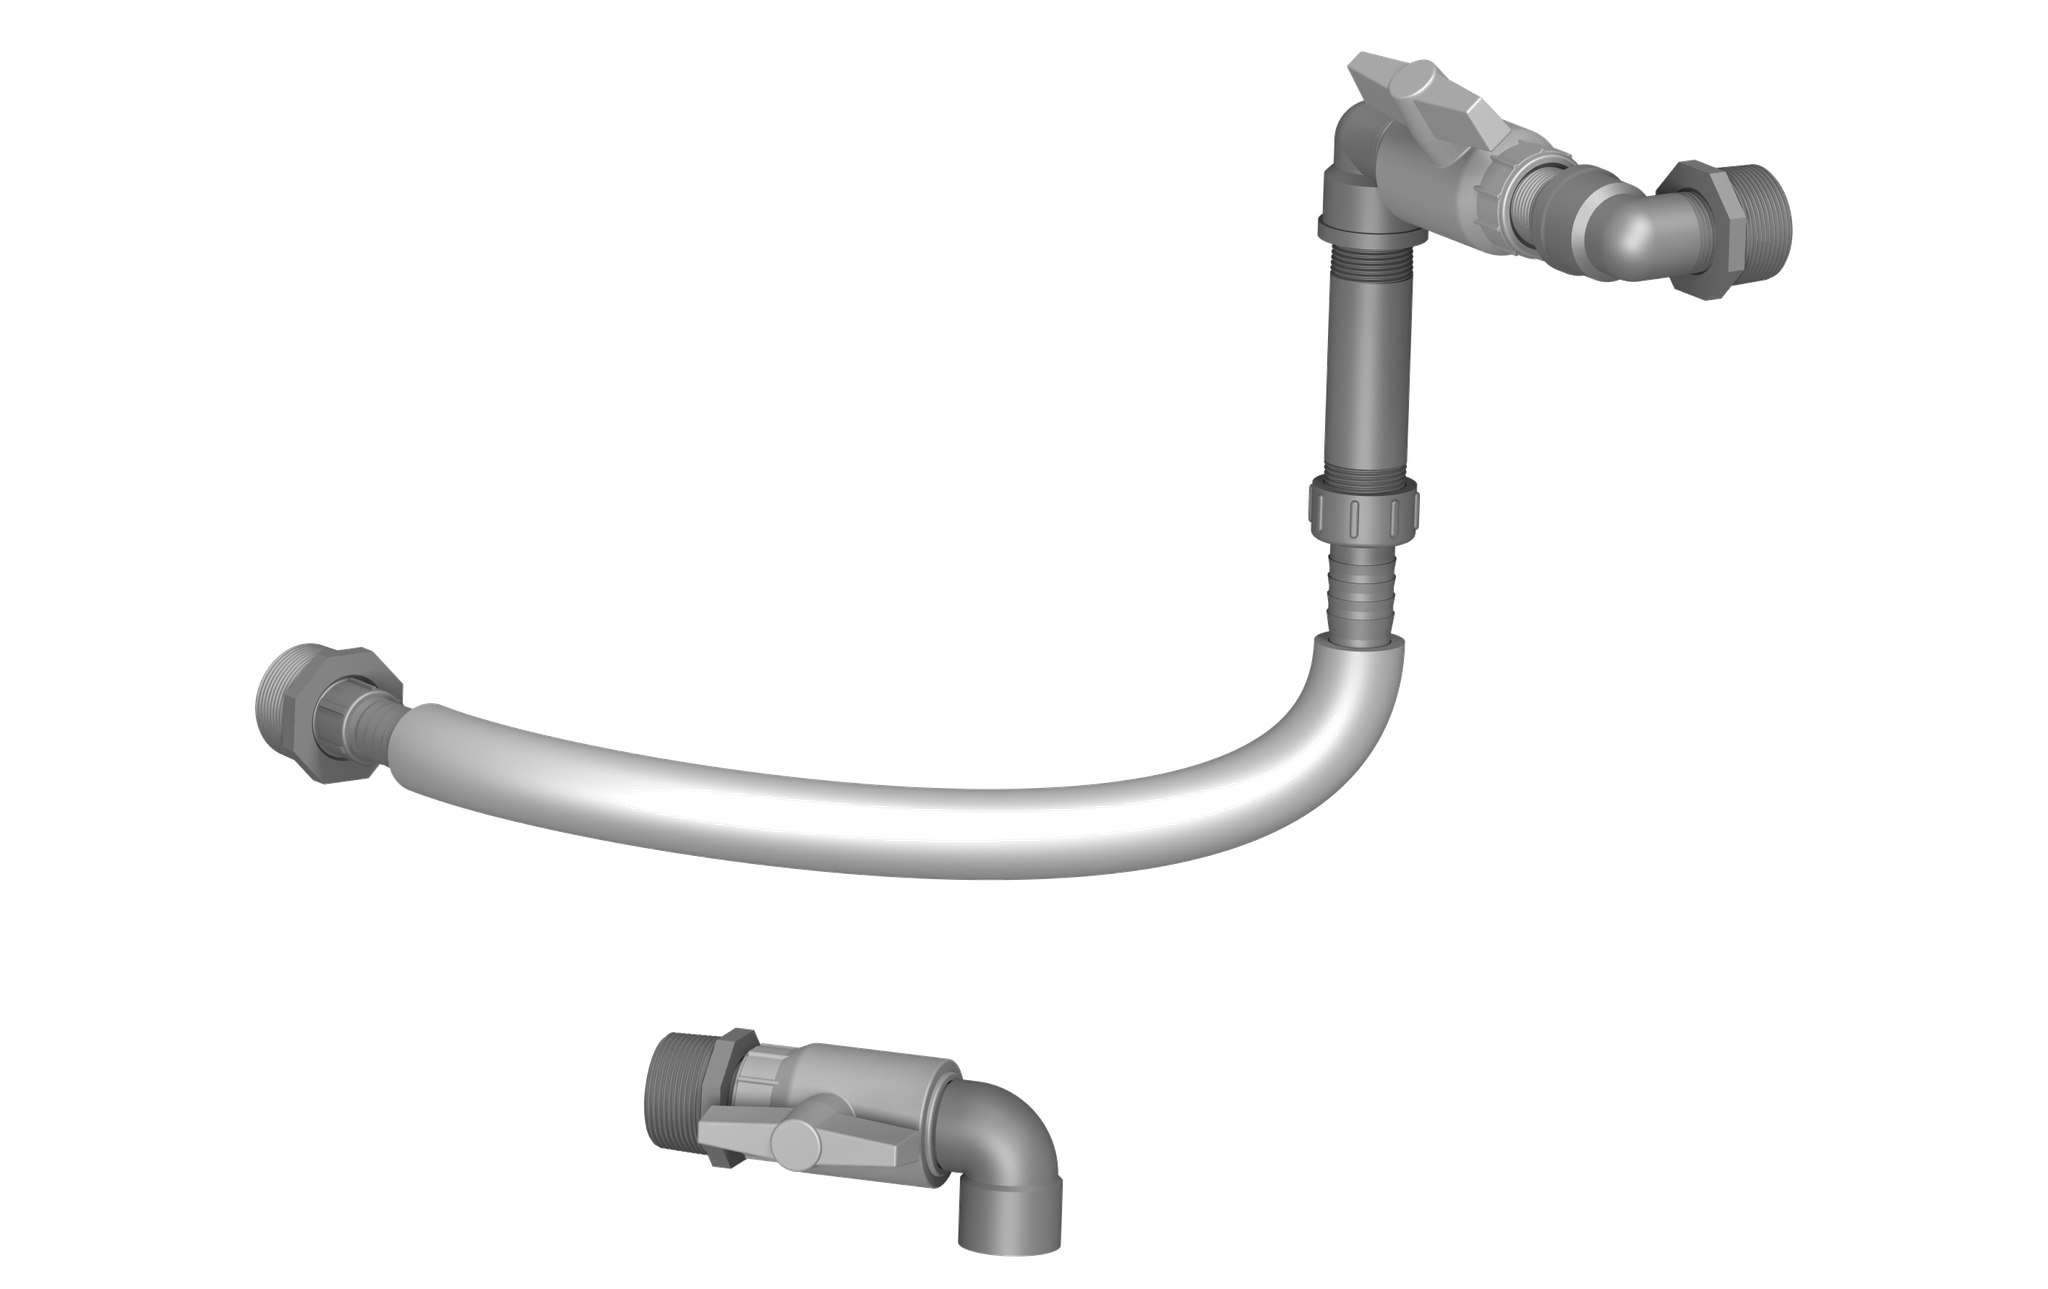


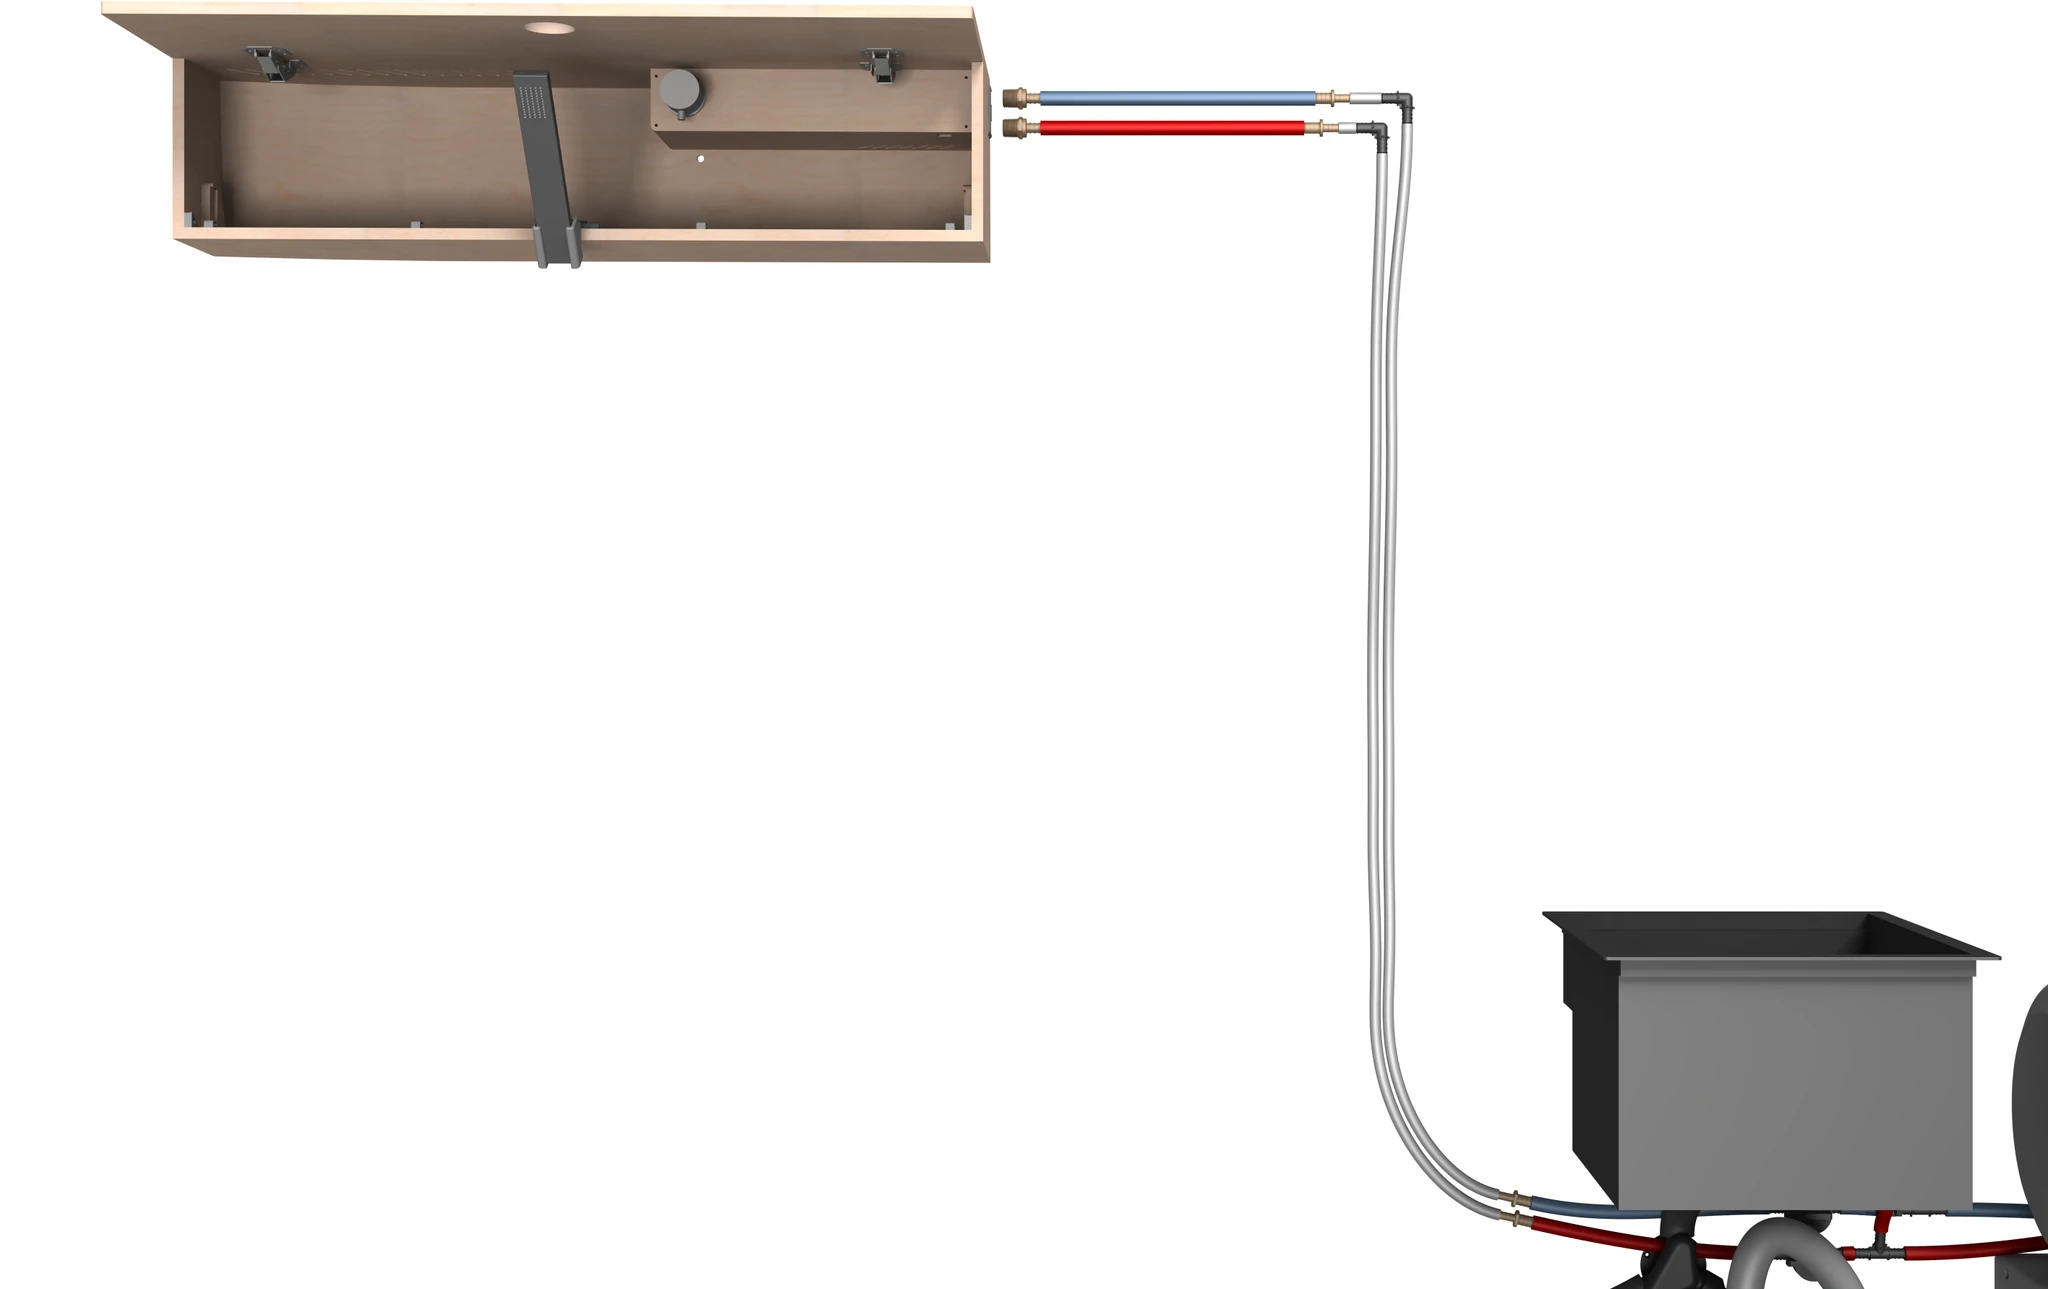

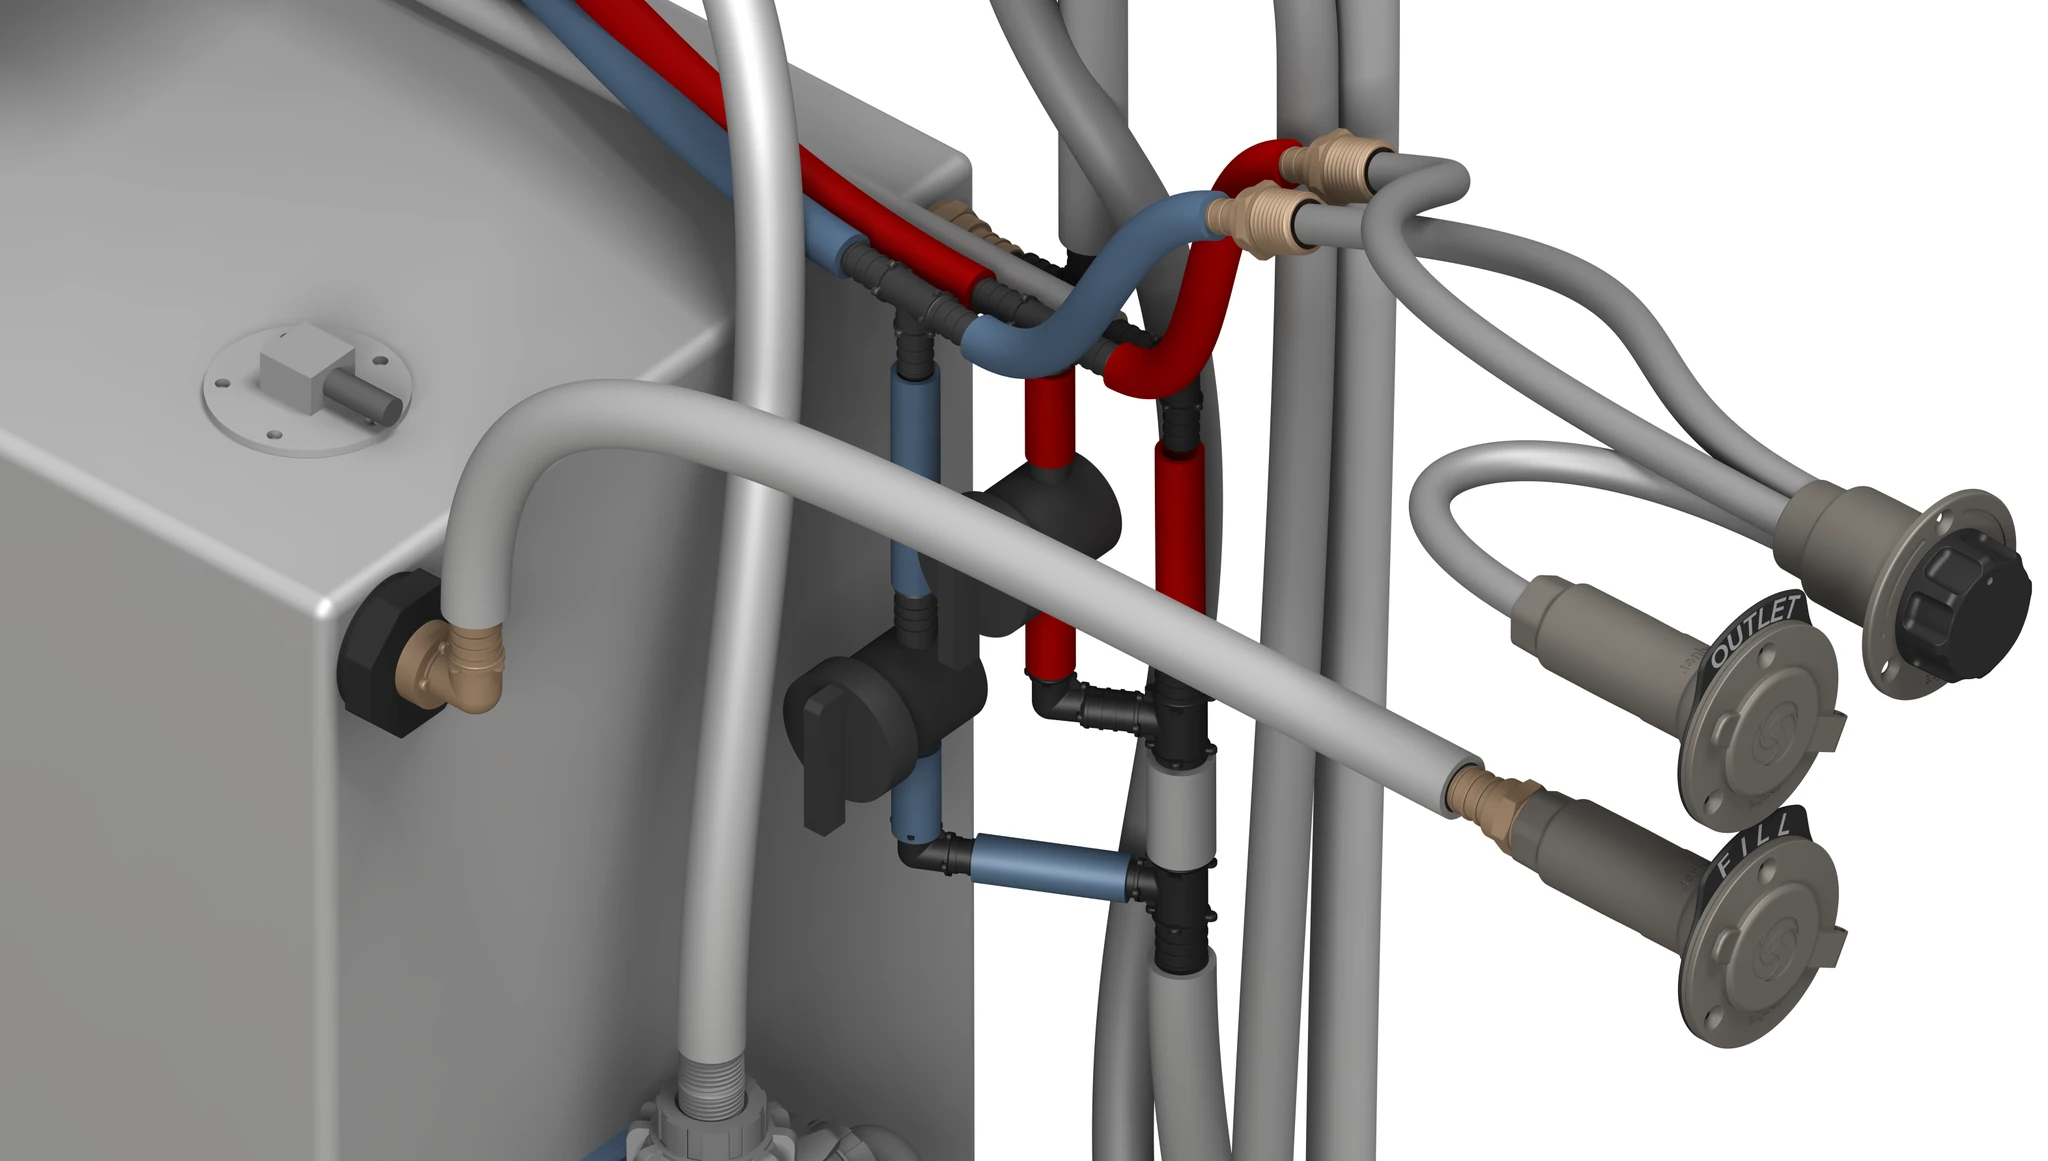
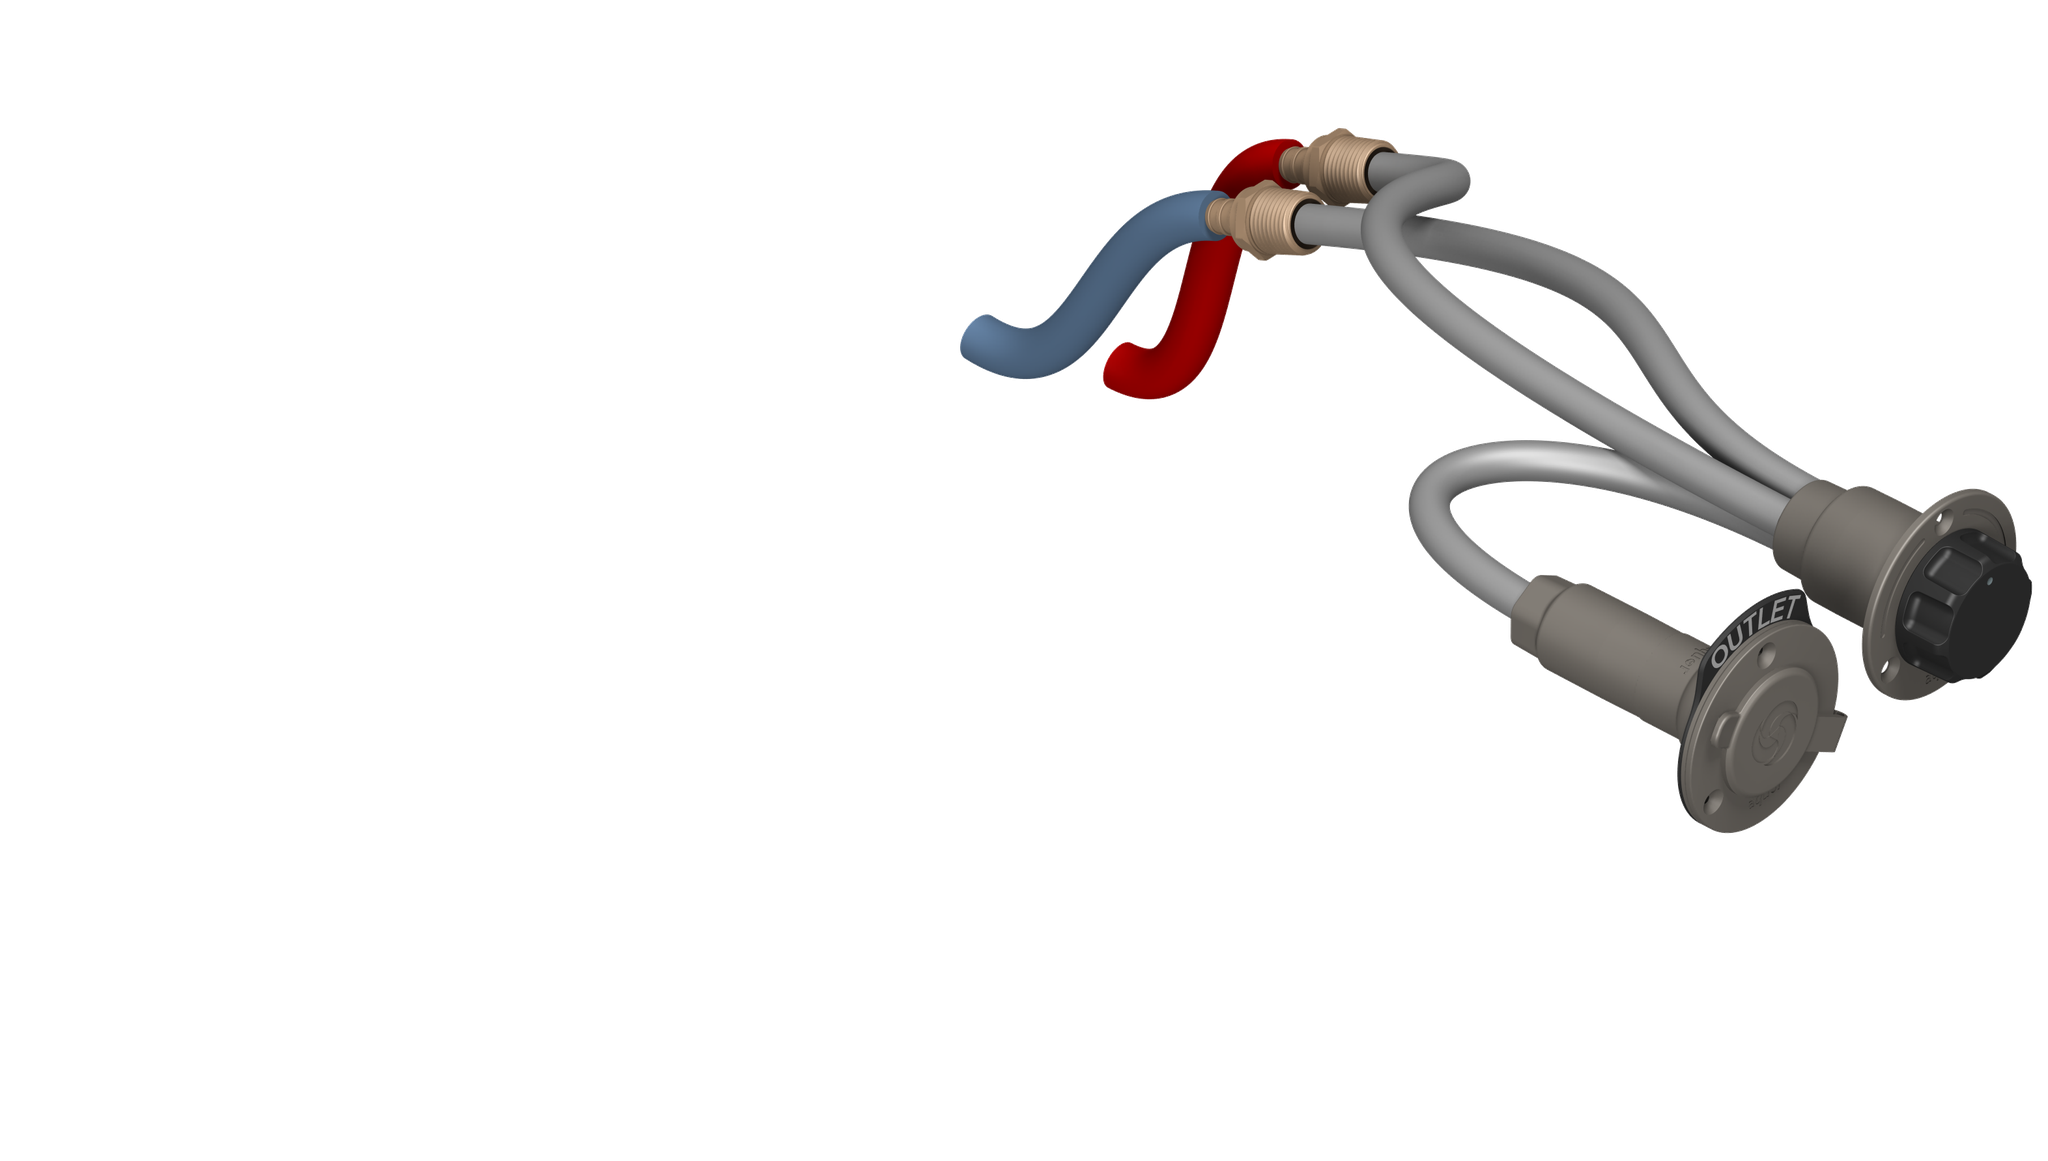


Sub-Systems:
- Main Tank (32 Gal)NW Conversions wheel well tankVanlife Outfitters
- Spare Tire Tank (24 Gal)NW Conversions spare tire tankVanlife Outfitters
- Water PumpShurflo 4008 RevolutionAmazon
- AccumulatorShurflo 182-200Amazon
- Water HeaterIsotemp Spa 15LVanlife Outfitters
- Exterior Gray Tank (10 Gal)Curious Campervans undermountCurious Campervans
- Interior Gray Tank (4 Gal)Reliance Aqua-TainerAmazon
- In-Floor Shower PanTecVan shower panTecVan
- Sink & Pull-Out FaucetTecVan sink, 52″ faucetTecVan
- Fill InletAquor RV city water inletAmazon
- Exterior Shower / Bike WashAquor RV City Inlet/OutletAmazon
- Shower ValveAmbassador hot/cold mixerAmazon
Main:
- Water PumpShurflo 4008 RevolutionAmazon
- AccumulatorShurflo 182-200Amazon
- Sink & Pull-Out FaucetTecVan sink, 52″ faucetTecVan
- 1/2" MPT x 1/2" PEX Adapter×2Amazon
- 1/2" Ball Valve×4Amazon
- 1/2" Tee PEX-B×5Amazon
- Elbow 1/2″ MNPT × 1/2″ barb×4Amazon
- Diverting ValveMcMaster-Carr
- 1/2″ braided PVC hose×2Amazon
- 1/2" MPT NippleAmazon
- 1/2" PEX-B Tubing – RedAmazon
- 1/2" PEX-B Tubing – BlueAmazon
Water Heater:
- Water HeaterIsotemp Spa 15LVanlife Outfitters
- 1/2" MPT x 1/2" PEX AdapterAmazon
- 1/2" MPT x 1/2" PEX ElbowAmazon
- Stainless Steel Supply Line, 6inAmazon
- Stainless Steel Supply Line, 12inAmazon
- See "Drain – System" sub-system
Tank Fill:
- Fill InletAquor RV city water inletAmazon
- 1/2" MPT x 3/4" PEX AdapterAmazon
- 1.5" MPT x 3/4" FPT ReducerAmazon
- 3/4" MPT x 3/4" PEX ElbowAmazon
- 3/4" PEX TubingAmazon
- Label for Aquor RV City Inlet/OutletFarOutRide
Vent/Overflow:
- 1/2" MPT x 3/4" PEX AdapterAmazon
- 3/4 PEX Elbow×3Amazon
- 1/2″ MPT × 1/2″ barbAmazon
- 1/2″ braided PVC hoseAmazon
- 3/4" PEX TubingAmazon
Drain – Tanks:
- Reducer – 1.5" MPT x 1" MPT×3Amazon
- 1" FPT Ball Valve×2Amazon
- 1" MPT x 1" Slip ElbowAmazon
- 1" MPT x 1" Barb AdapterAmazon
- 1" FPT x 1" Barb AdapterAmazon
- Pipe – 1" Dia x 5" LongMcMaster-Carr
- Hose – 1" PolyurethaneMcMaster-Carr
- 1" MPT x 1" FPT Elbow×2McMaster-Carr
Drain – System:
- 1/2" Female Swivel x 1/2" PEX ElbowAmazon
- 1/2" PEX Tubing – White×2Amazon
- 1/2" Tee PEX-B×2Amazon
- 1/2" PEX-B Tubing – BlueAmazon
- 1/2" PEX-B Tubing – RedAmazon
- 3/4" PEX-B Tubing – White×2Amazon
- 1/2" Elbow PEX-B×3Amazon
- 1/2" Ball Valve×2Amazon
- 1/2" x 1/2" x 3/4" Tee PEX-BAmazon
- 3/4" x 3/4" x 1/2" Tee PEX-BAmazon
Interior Shower:
- Shower ValveAmbassador hot/cold mixerAmazon
- 1/2" MPT x 1/2" PEX Adapter×2Amazon
- 1/2" PEX-B Tubing – Red×2Amazon
- 1/2" PEX-B Tubing – Blue×2Amazon
- 3/8" PEX-B Tubing – White×2Amazon
- 3/8" Elbow PEX-B×2Amazon
- 1/2" x 3/8" Reducer PEX×4Amazon
- 1/2" Ball Valve×2Amazon
- 1/2" Tee PEX-B×2Amazon
Exterior Shower:
- Exterior Shower / Bike WashAquor RV City Inlet/OutletAmazon
- Exterior MixerAquor mixing valveAmazon
- 1/2" MPT x 1/2" PEX Adapter×2Amazon
- 1/2" PEX-B Tubing – RedAmazon
- 1/2" PEX-B Tubing – BlueAmazon
- Label for Aquor RV City Inlet/OutletFarOutRide
- 1/2" Tee PEX-B×2Amazon
Gray Water:
- In-Floor Shower PanTecVan shower panTecVan
- Exterior Gray Tank (10 Gal)Curious Campervans undermountCurious Campervans
- Interior Gray Tank (4 Gal)Reliance Aqua-TainerAmazon
- KUS SSS S5U (7″)Marine Parts Source
- Sink Drain DiverterForespar Y-valve, 1″Forespar
- Gray Drain ValveU.S. Solid motorized, 3/4″Amazon
- Shower Drain Elbow Adapter 1.25" BSP x 1" barb3D Print FileFarOutRide
- Adapter for 1" Trident Hose x TecVan Sink Drain3D Print FileFarOutRide
- Elbow 1.25″ MNPT × 1″ barbAmazon
- Tee 1″ barbAmazon
- Elbow 3/4" MPTAmazon
- 1/2″ MPT × 1/2″ barbAmazon
- 1″ hose (Trident #100 Flex)Trident
Shopping list
Single Fresh Tank
Here’s the setup for a single fresh tank, which is more common:
Fresh Water Installation
We’ll start by installing the main components, and then connect them together in the Plumbing section.
Wheel Well Interior Fresh Tank
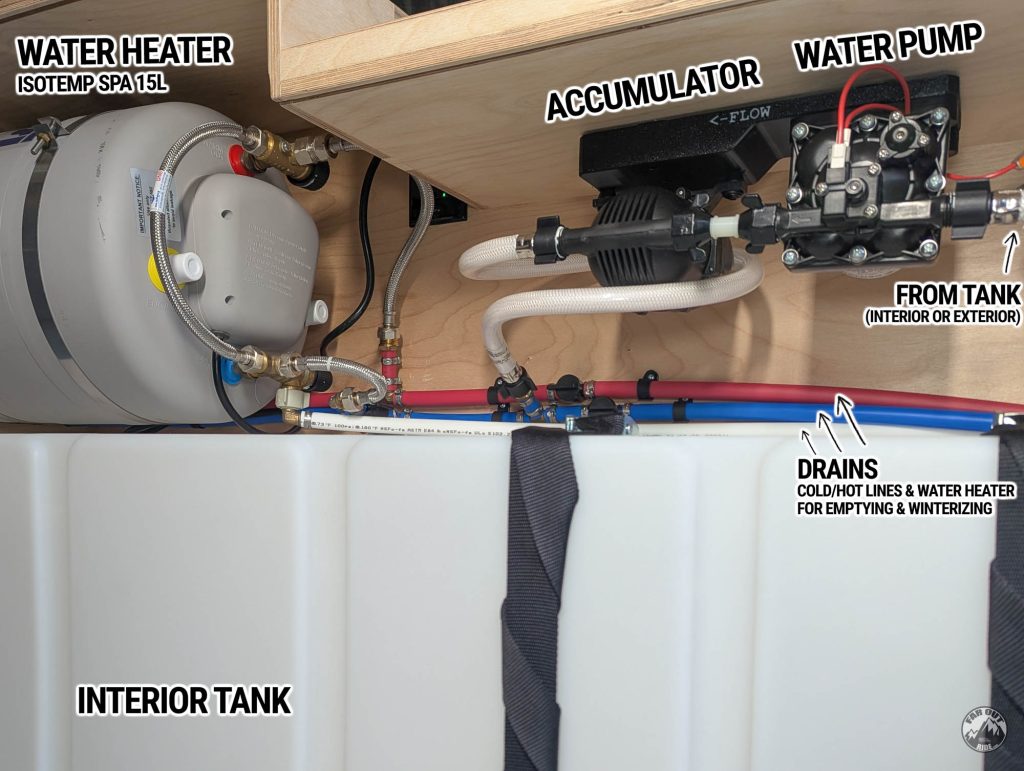
The wheel well tank, water heater, pump, accumulator, etc., all live inside the Water Cabinet we built:
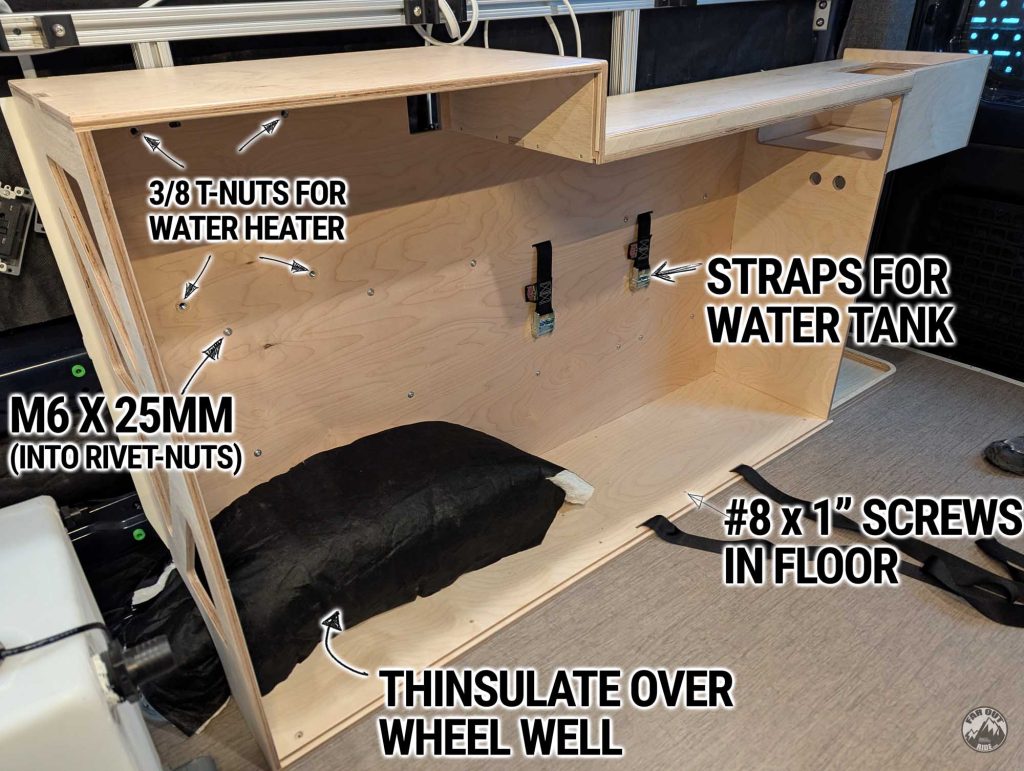
Here’s a BEFORE photo, for the archives. We preinstalled rivet-nuts (faroutride.com/threaded-inserts) into the van’s walls and fastened the cabinet with M6 screws. It’s also fastened to the floor with #8 screws. We preinstalled two 1.5in x 8ft Straps to hold the water tank, as well as 3/8″ T-Nuts for the Isotemp Spa 15L water heater:
At this point, we installed the level sensor and fittings (fill, vent, pump, and drain):

We marked the exact location of the drain, removed the tank, and used a 1-1/4″ hole saw to cut through the water cabinet and the floor:
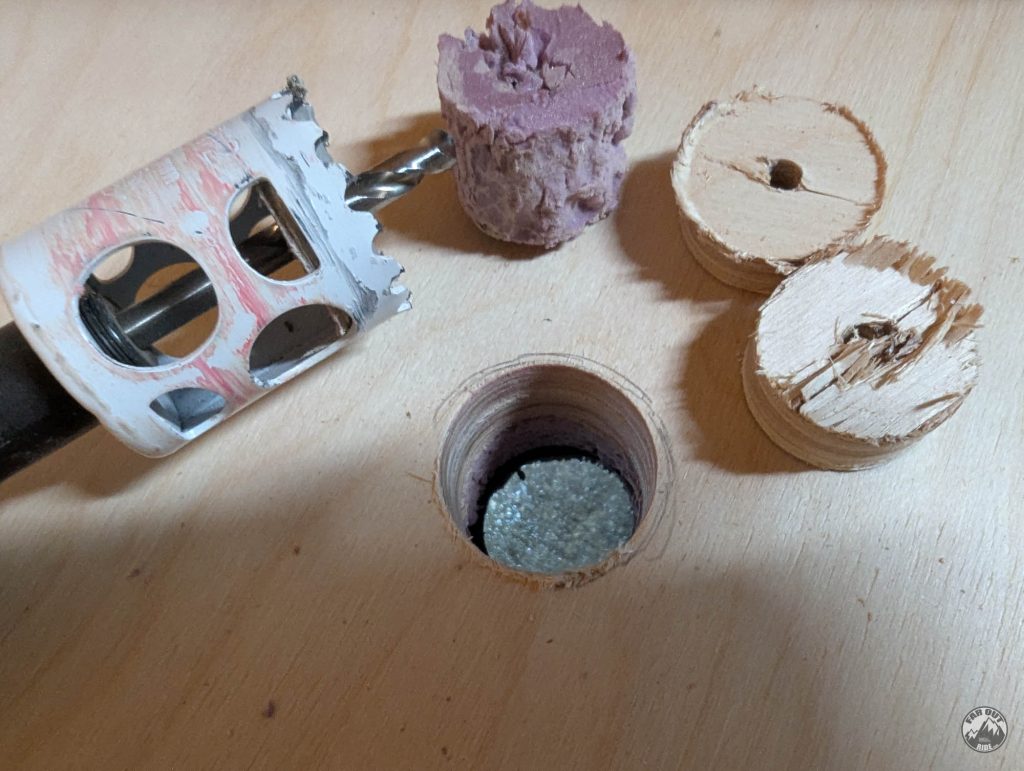
To seal things out, we 3D printed a Rubber Pass-Through:

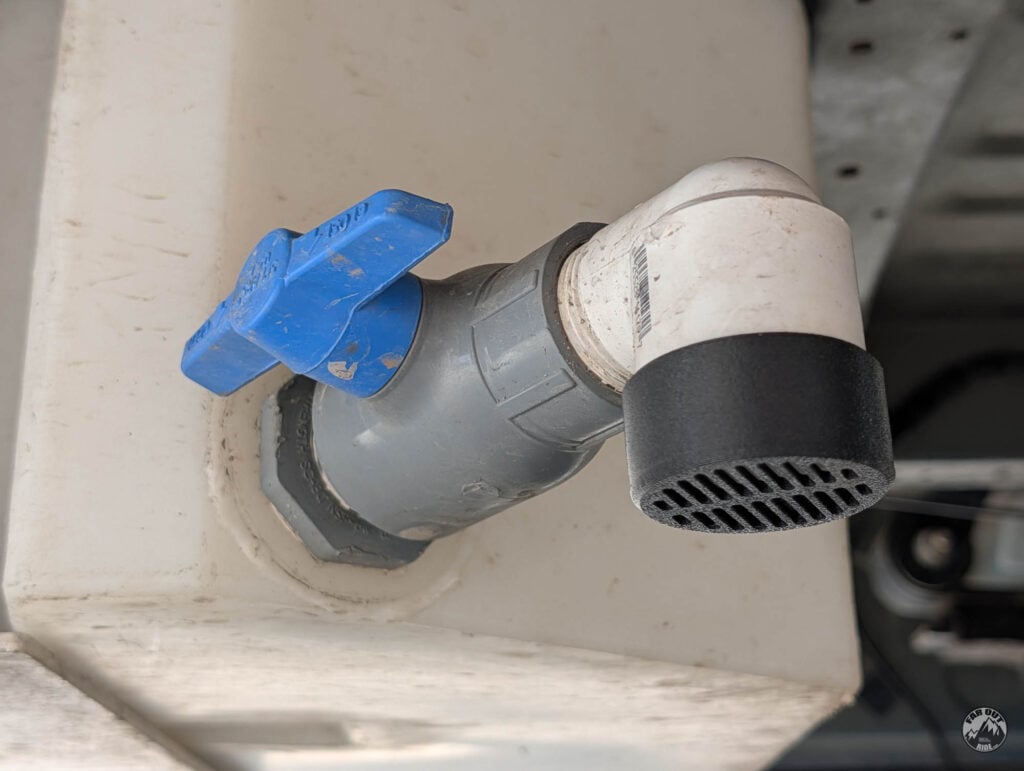
We installed a 1″ x 5″ CPVC pipe into the valve (using thread sealant as usual) and reinstalled the tank to its final location (with the CPVC pipe going through the 3D printed Pass-Through):

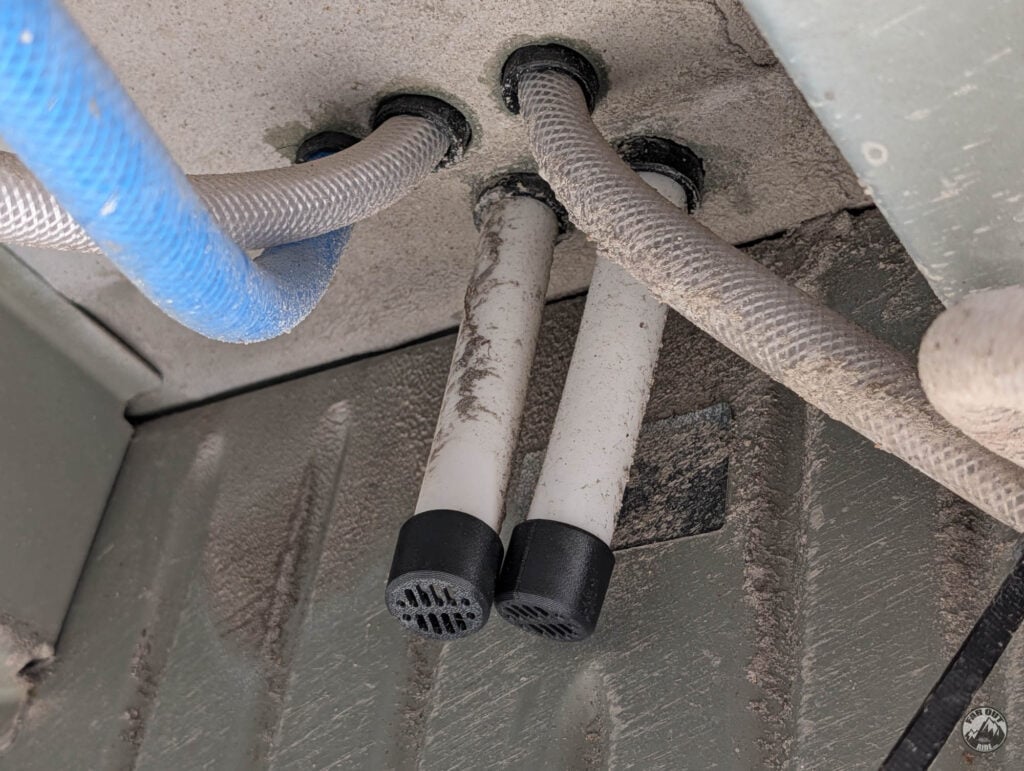
Under the van, the threads of the pipe are showing (you can see the Rubber pass-through, too). Success! Note that we primed the bare metal edges after making the hole:
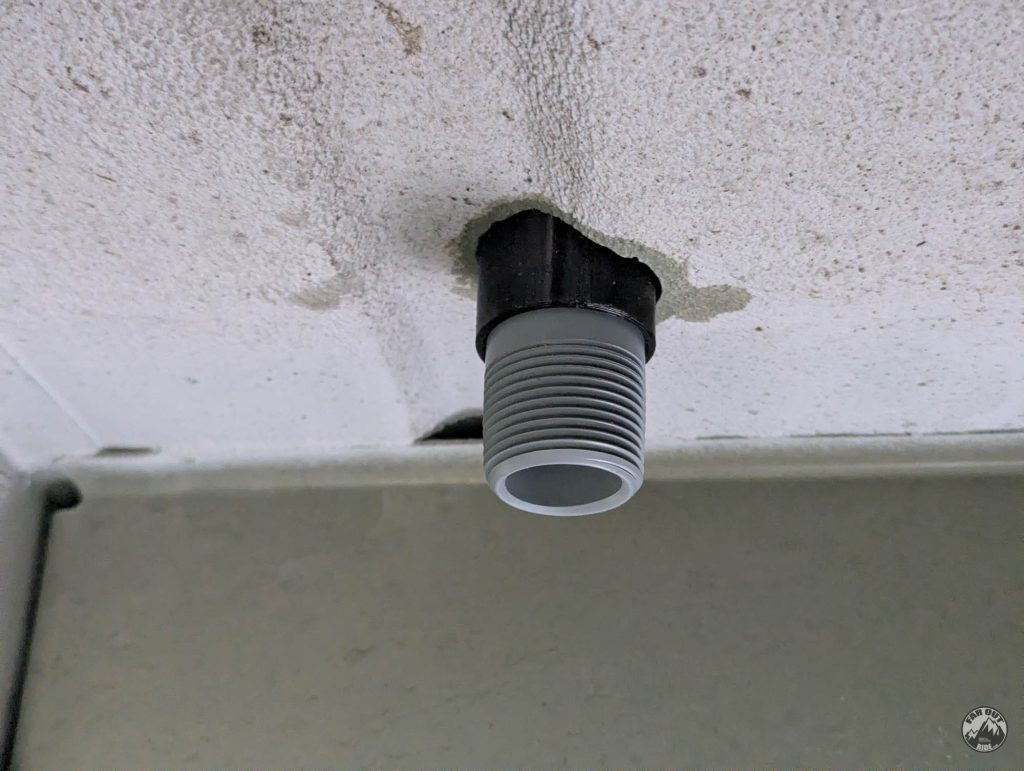
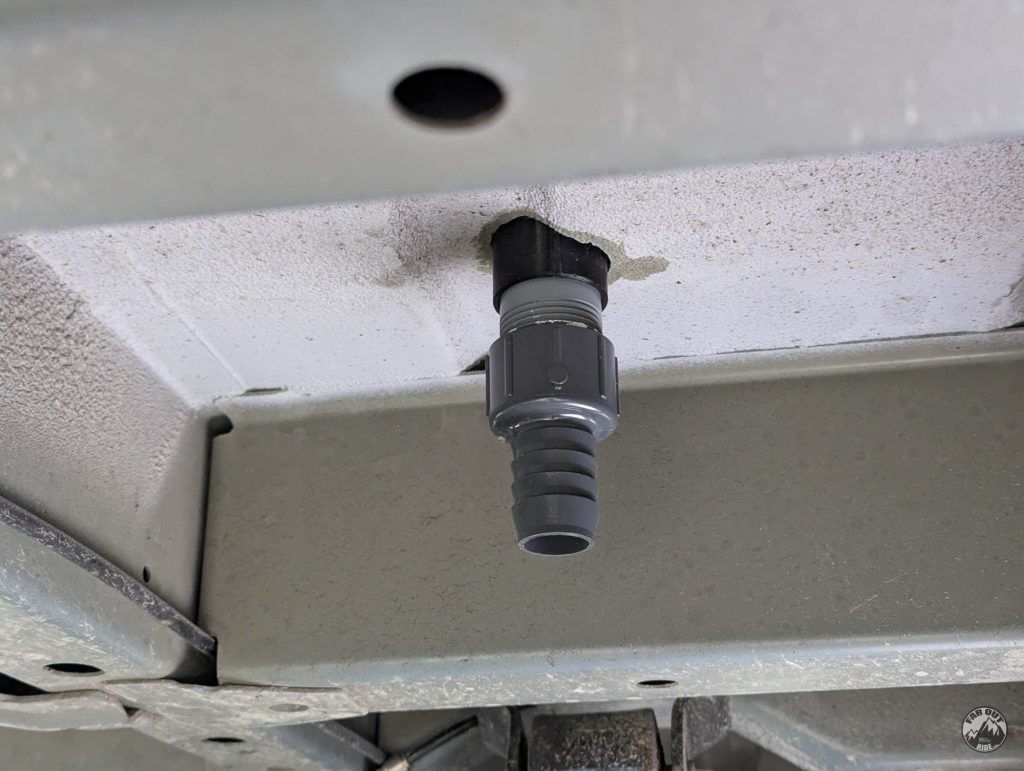
We can now install the barbed adapter, and then connect the spare tire tank to the wheel well tank (see Plumbing Section):
Spare Tire Exterior Fresh Tank

Tank:
Fill Port:
- Straight Fitting (1.5″ MNPT x 1″ Barb).
- We couldn’t find this fitting initially, but we’d use it if we had to start over!
- 1″ Hose (NSF/ANSI 61).
Pump Port:
Drain Port:
- Reducer (1.5″ MNPT x 1.0″ MNPT).
- We couldn’t find this fitting initially, so we used a reducer + nipple instead (photo)!
- PVC Ball Valve (1″ FNPT).
- Elbow Fitting (1″ MNPT).
Level Sensor:
1. Remove and relocate the spare tire:

2. Remove the winch cable and tether of the spare tire carrier mechanism, or relocate them so that they’re out of the way:

3. We’re in luck! There is a threaded stud, on the driver-side, onto which the tether can be screwed, so that it’s out of the way:

4. Here is another angle. Note that we zip-tied the winch cable to the tether:

5. Remove the two rubber plugs circled in the previous photo; the L-Bolt will be secured in these holes. There is no easy way, you can poke through them and pull hard with pliers:

6. Here are the two holes without the rubber plugs (circled):

7. It’s easier to install the fittings before installing the tank. Here are ours (yours may be different):
8. We crimped the level sensor to 18/2 cable (exterior rated):

9. And sealed the deal with glue-lined heat shrink for a waterproof and permanent connection:

10. Raise the van with ramps (always use the parking brake AND wheel chocks), and we’re ready for action!

11. Side-view:

12. Raise the tank to its approximate final location using the precision-tools:

13. The L-bolts are steel, so we painted them to prevent corrosion:

14. Secure the tank with the included aluminum plates, L-bolts, washers, and nuts:

15. Protect the level sensor cable with split-loom tubing and route it inside the van (as marked in red):

16. Front view of the level sensor routing, with the 15A Noco D-Pillar Entry Box in the foreground:

Final Result:
(note: we cut the L-bolt shorter with a Dremel, so it doesn’t protrude as much)


Water Pump and Accumulator
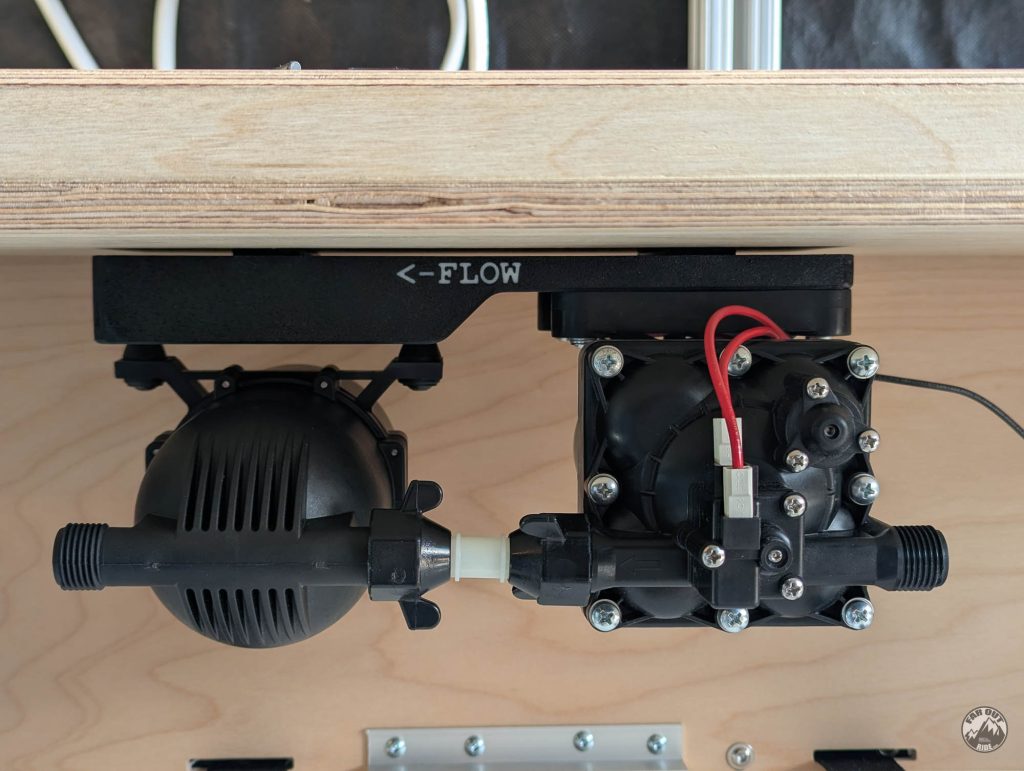
The pump and accumulator are mounted in the cabinet with a 3D Printed Shurflo Pump & Accumulator Mount Pad we designed/made. The goal is to allow the removal of the pump & accumulator easily, for winterizing (remove before freezing).
The brackets are in TPU (rubber) in an attempt to isolate the vibration. The nyloc nuts holding the pump & accumulator are embedded into the back face:
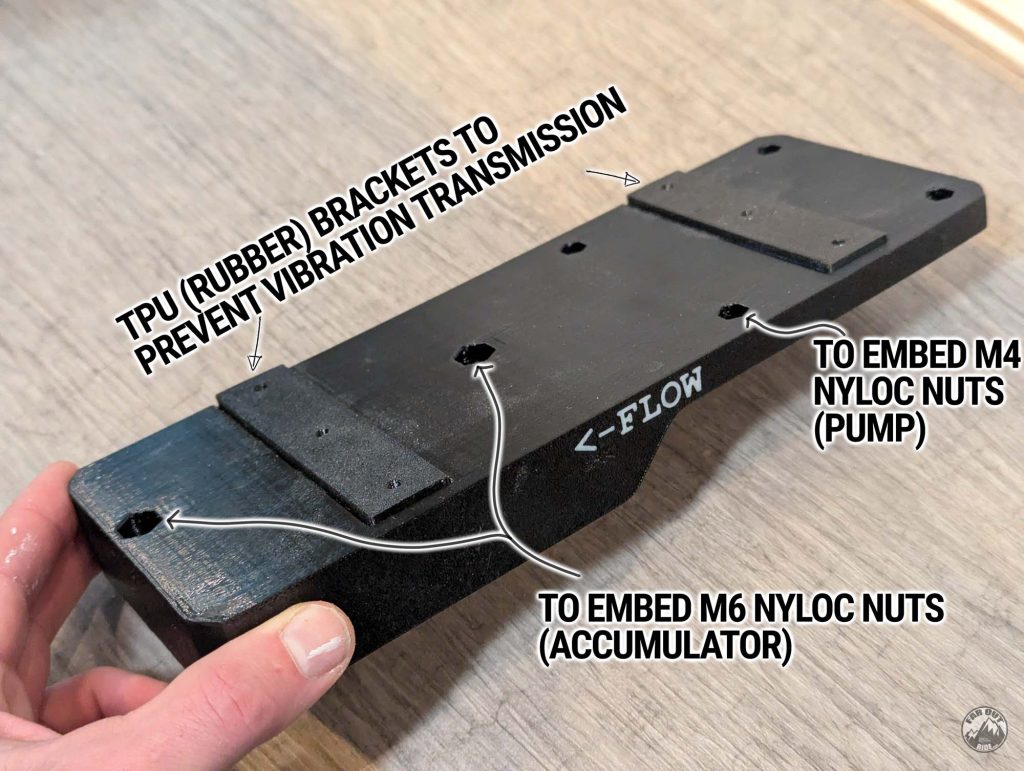
To help align the bracket perfectly, I included pass-through holes. Leave the brackets in the plate, then screw through the pass-through holes:

After screwing the brackets, slide the plate out, and voilà!

The nyloc nuts for the accumulator & pump are embedded into the back of the plate:

The pump is fastened with M4 screws, the accumulator with M6 screws:

The pump & accumulator mounting plate slides into the feet:

Nice!
Water Heater
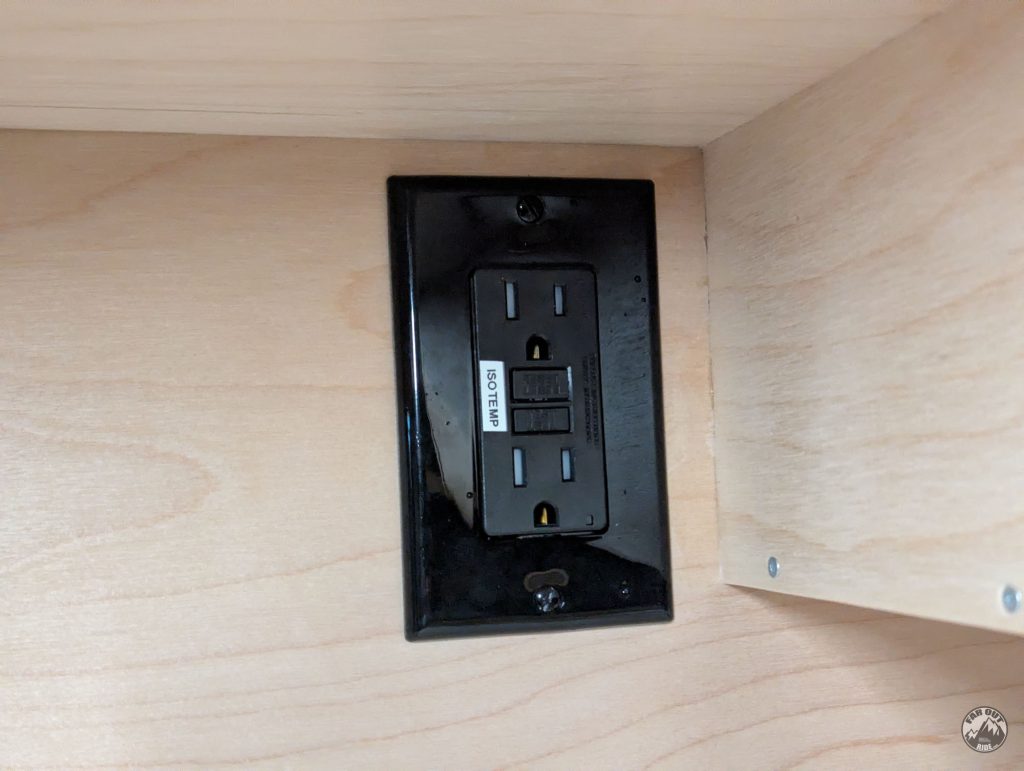
We pre-wired the 120V outlet and connected it to the EcoFlow Power Kit (as documented in faroutride.com/ecoflow-install). We can now bring it inside the cabinet and screw it in place:

I. Label. Everything.
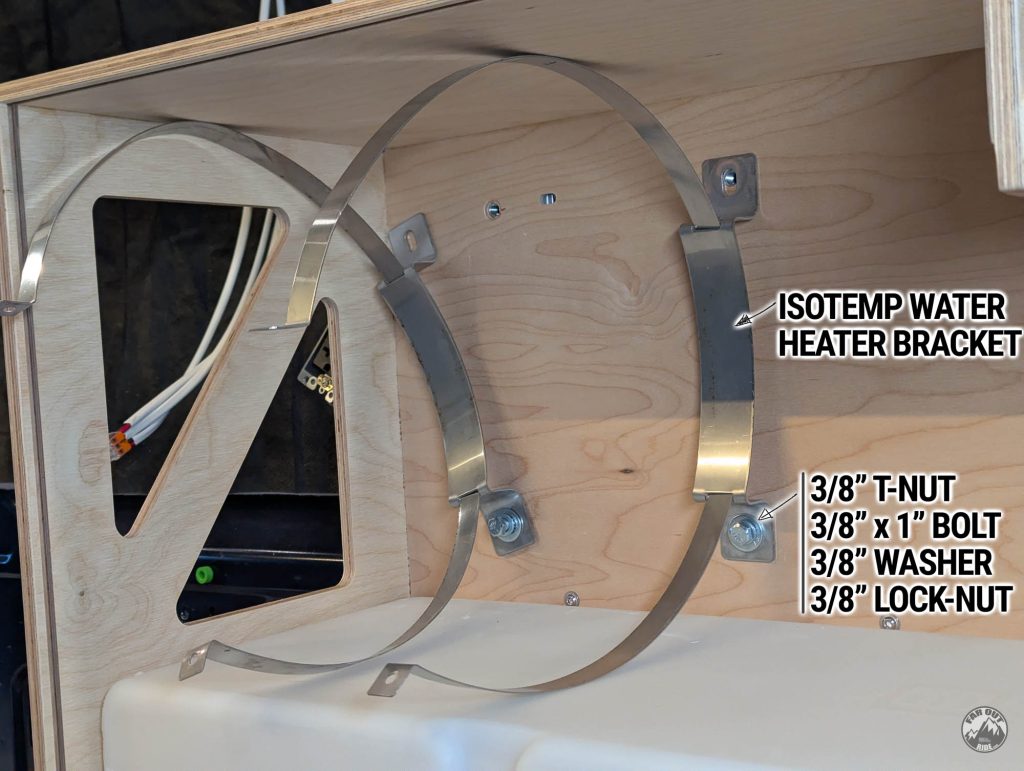
The Isotemp Spa Water Heater brackets can be mounted first. We used the following hardware:
Once the brackets are in place, the Isotemp Spa water heater can be slid in:
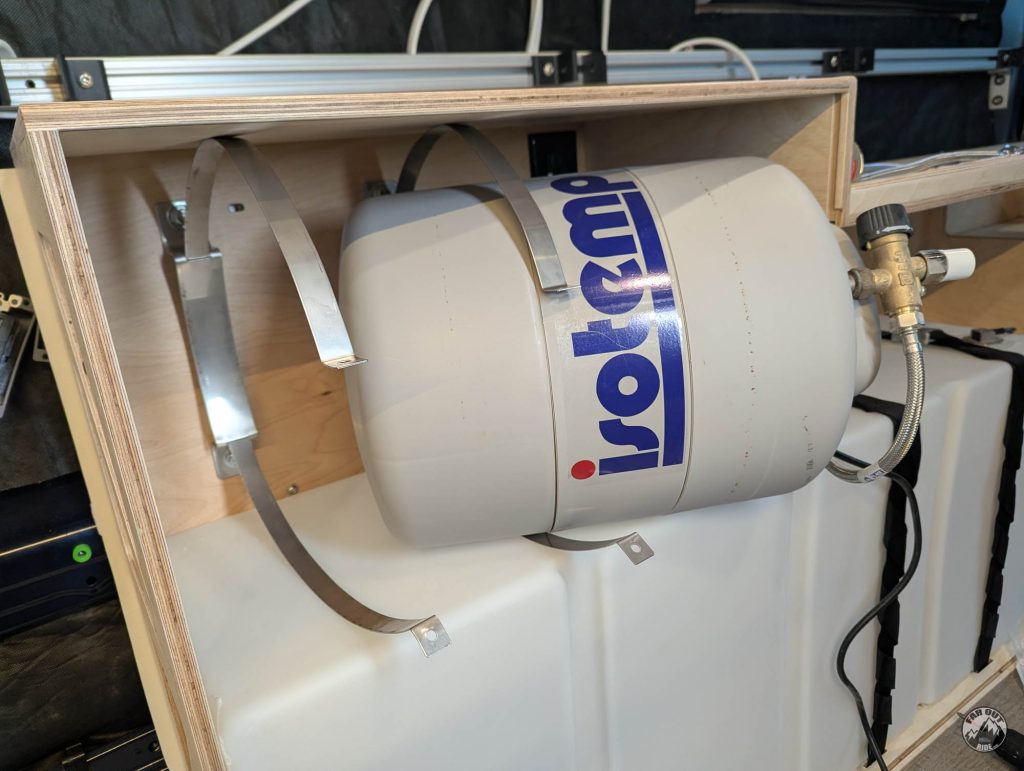
And then tighten the included screws to secure the heater in place:

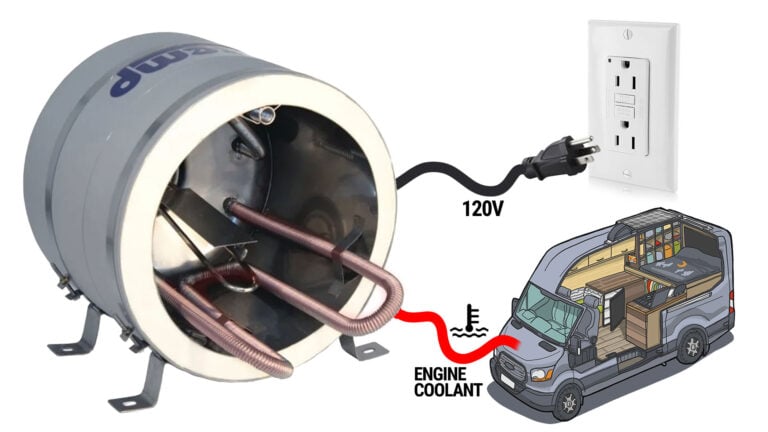
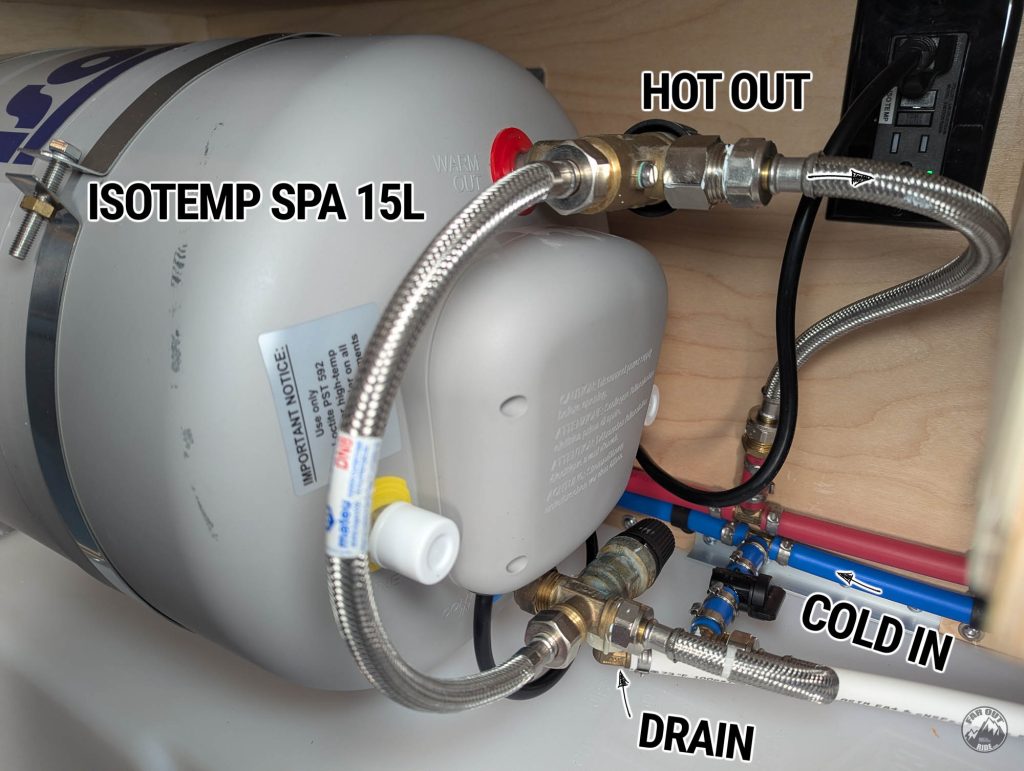
The water heater has its own dedicated guide — choosing the model, the engine-coolant loop, 120V wiring, and real-world power data:
Inlet/Outlet/Mixing Valve
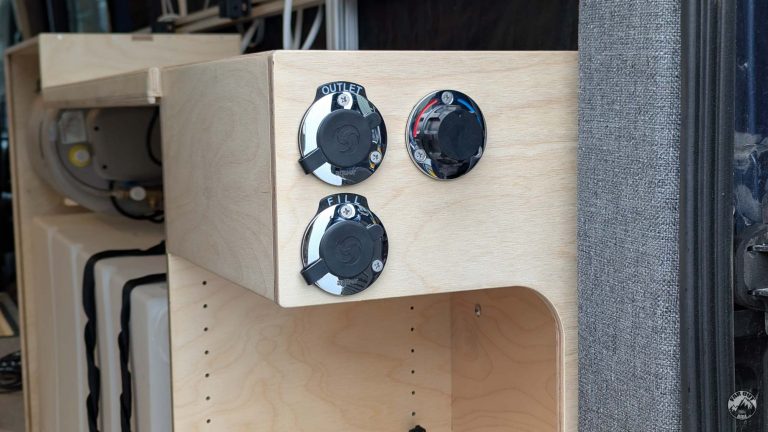
Like many of you, we’ll use Aquor inlets and outlets. We’re also using Aquor’s mixing valve to control the shower/bike-wash. Here are the hole diameters for the Aquor fittings:

Below, I temporarily installed the Aquor fittings, and I’m marking the location of the screw holes. I then piloted the holes with a 1/8″ drill bit:
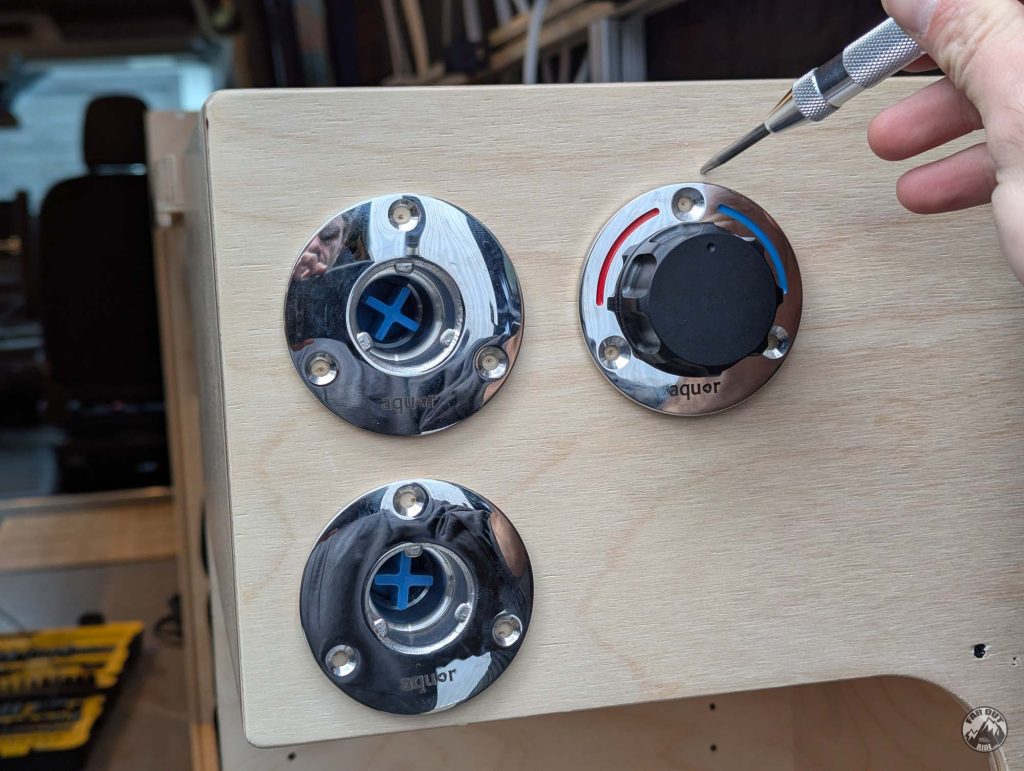
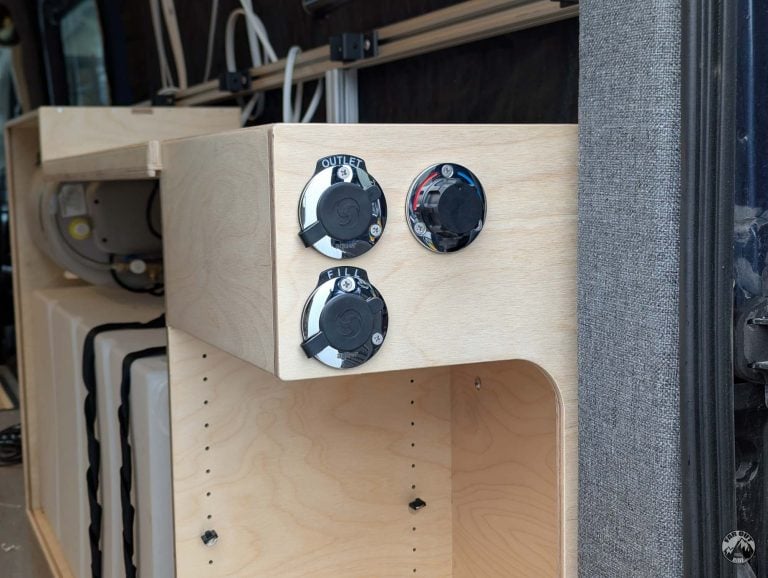
I designed and 3D printed labels to identify the fill port and the outlet (shower & bike wash):

All the Aquor fittings installed with the included screws:
Sink
We first fabricated our “Sink Cabinet” and installed the sink into it:
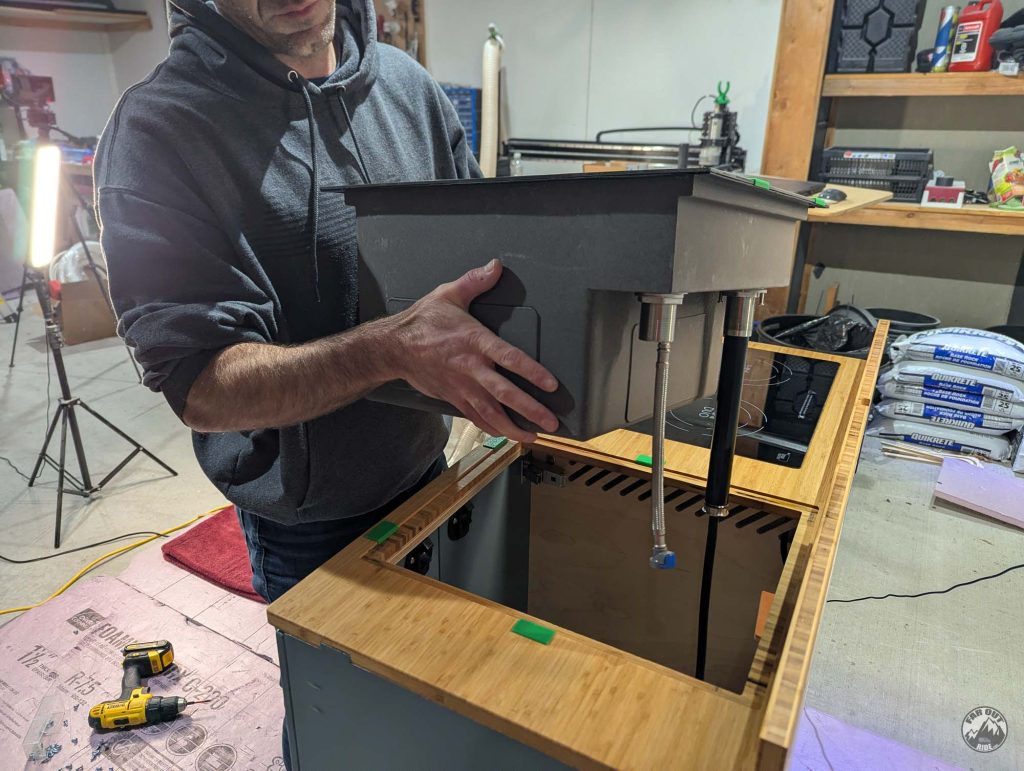
The cabinet fabrication and sink installation are documented here:

Hidden Shower
Our hidden shower features an in-floor shower pan and an overhead shower cabinet. We do have a separate write-up for these components:

Plumbing Fresh Water

Interior Fresh Tank

Exterior Fresh Tank
Water Pump, Accumulator, Hot Water
Bike Wash, Exterior Shower and Tanks Fill Port
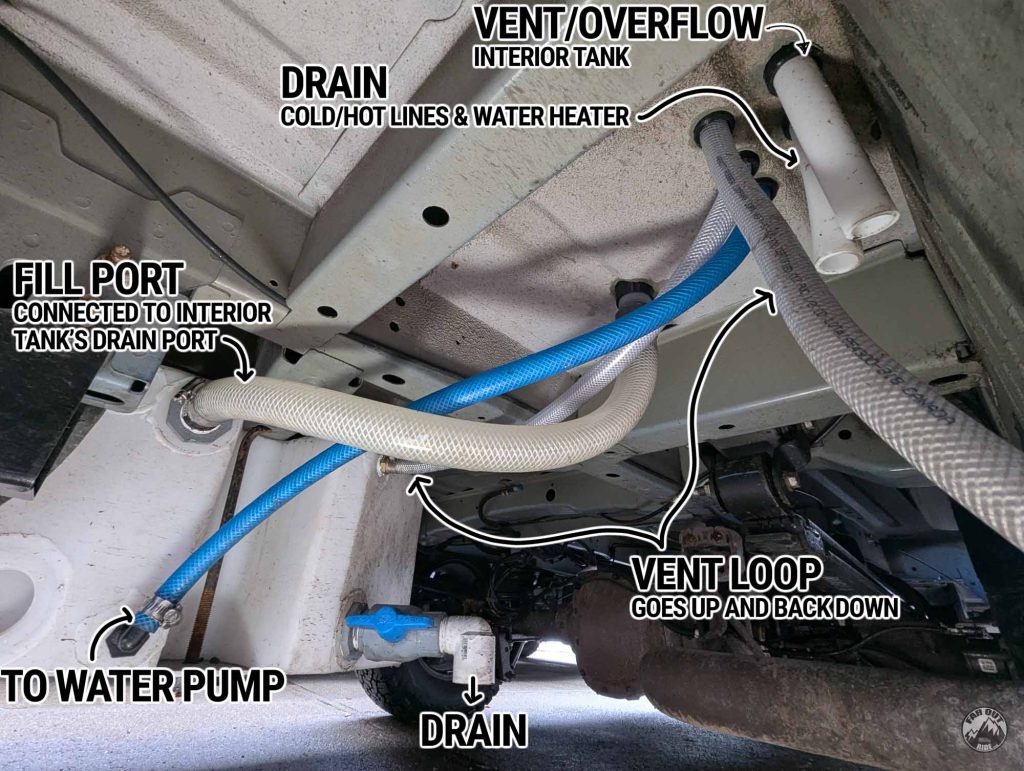
The bike wash / exterior shower, and the tanks fill port both utilize an Aquor RV City Water Inlet, and the temperature is controlled with an Aquor Mixing Valve. There’s an access cutout (removable panel) on top of our water cabinet to facilitate the plumbing:


Gray Water Installation
Undermount Gray Tank

Tank:
Fill Port:
- Elbow Fitting (1.25″ MNPT x 1″ Barb).
- Tee Fitting (1″ Barb).
- 1″ Hose (Trident #100 Flex).
- 1″ Stainless Steel Worm Gear Clamps.
Vent Port:
- Straight Fitting (1/2″ MNPT x 1/2″ Barb).
- We used an elbow fitting initially, but had to swap for a straight fitting later for space considerations!
- 1/2″ PVC Hose.
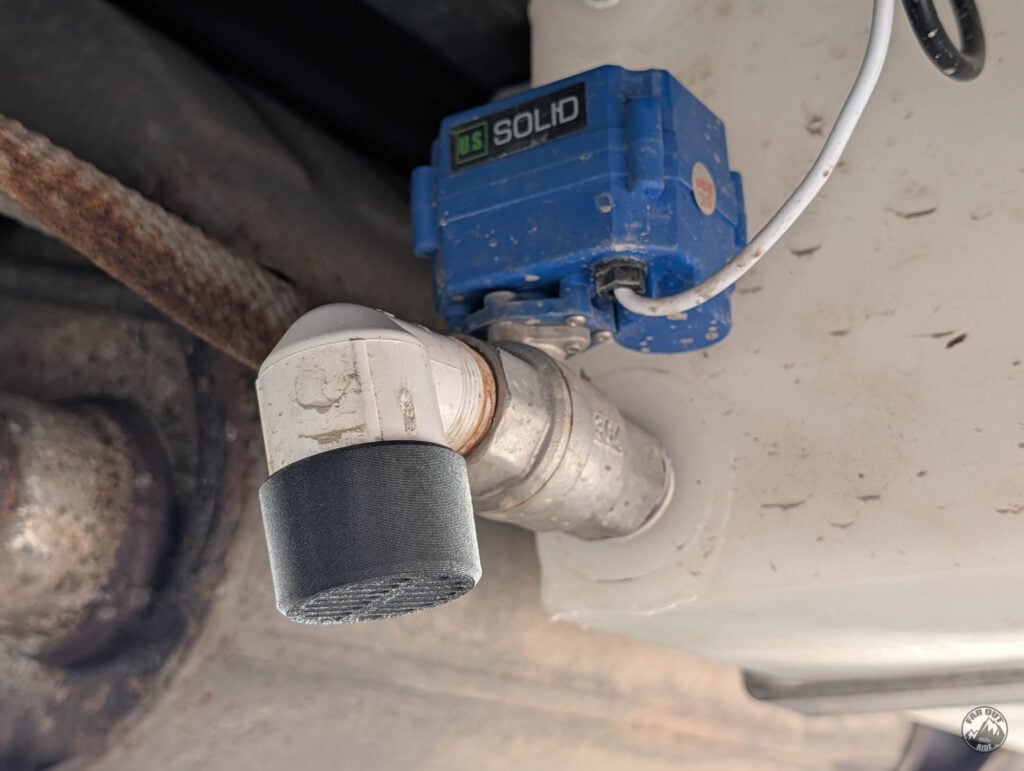
Drain Port:
- Straight Nipple (3/4″ MNPT).
- Motorized Ball Valve (3/4″ FNPT).
- Elbow Fitting (3/4″ MNPT).
- 18/3 AWG Wire (Outdoor Rated).
Level Sensor:
We unfortunately don’t have the same level of detail for this tank, I guess it was hard to focus with this guy hanging around…
1. Pre-install your fittings and get your straps/hardware ready:
2. We spent HOURS searching for a 1-1/4 BSP to 1″ Barb Elbow, but we couldn’t find one that fit in this tight space. So we went ahead and designed then 3D printed one:

3. Attach the 1″ hose to the shower drain fitting:

4. Put the tank in place and install the straps. It’s VERY tight, so having a flexible hose cut to the proper length is a MUST. It took us a few iterations to get it right!
+

5. The rear strap is attached to the running board stud (we reused the nut already present):

6. Near the exhaust, we added a rivet-nut (included with the tank) in an existing hole, and used a stainless bolt and washer (also included):

7. The front strap is attached to the running board stud (we reused the nut already present):

8. Near the exhaust, we reused a fastener already present:

9. Final result (the cables were routed a bit later, wait for it!):

10. We added a 3D Printed Bug Screen Cap:
Plumbing Gray Water
Under the Sink
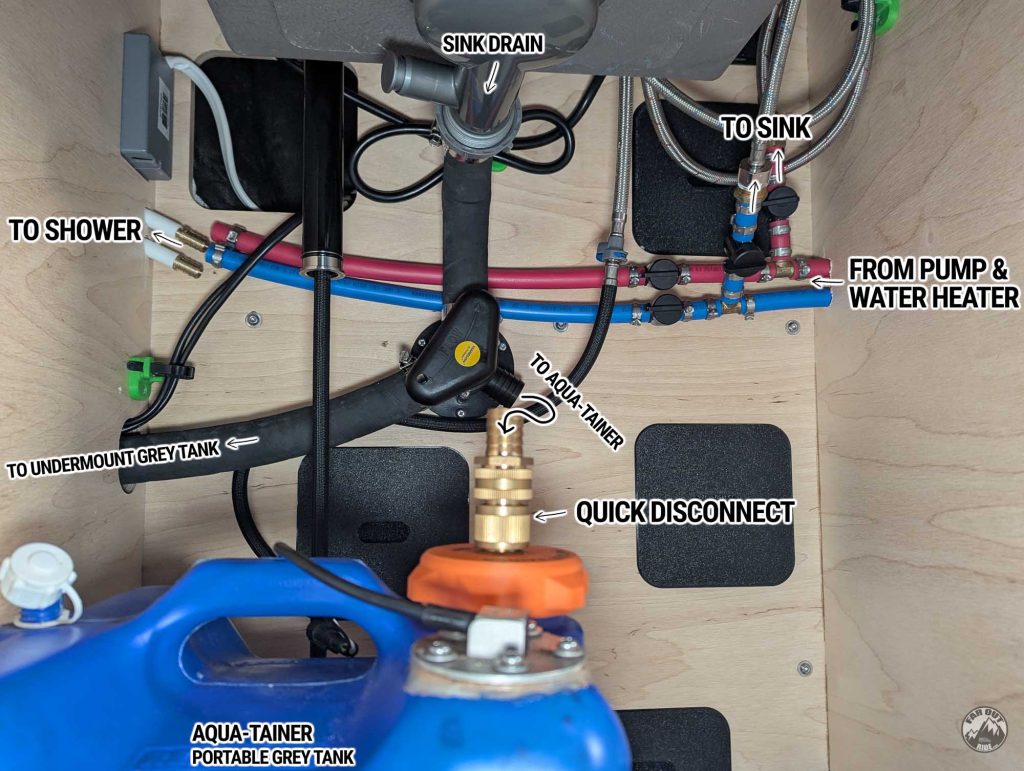
The 1″ Trident hose is connected to the drain with a 3D-printed Adapter for Trident Hose x TecVan Sink Drain.
Behind sink cabinet’s drawer…

Underfloor

Filling
Filling from a Hose
| ITEM | DESCRIPTION | QUANTITY |
|---|---|---|
| 1/2′ x 25” Zero-G Hose (Drinking water safe) | We love this hose! It’s more compact than traditional ones. We carry 2 x 25′ and join them together if we need 50′. | 2 |
| Aquor Faucet Connector | To connect the hose to the Aquor inlet | 1 |
Connect the hose at supply:

Connect the hose to the fresh tank inlet:
The flow can be controlled on the Aquor faucet:
Rotomolded polyethylene tanks are not meant to be pressurized, so we try to stop before the tank is full. If it overflows, no big deal, but at least we try to slow down the flow near the end – to minimize pressure:
The Aquor inlet spits a few drops when removing the faucet, so we carry paper towels handy:
The hose is stowed back on the Zero-G 25′ Hose Holder that we designed for our MOLLE Panels:
Filling From Jugs (Transfer Pump)
To fill the fresh tank from jugs, or to inject sanitizing solution into the fresh tank.
Because FarOutVan #1 is gravity-fill, we could simply use a funnel to dump water or sanitizer directly into the tank. That can’t be done with our Aquor RV City Inlet, so we made a transfer pump. We used it to fill from jugs on our Mexico Trip.
| ITEM | DESCRIPTION | QUANTITY |
|---|---|---|
| 12V Submersible Water Pump | 2.5 GPM | 1 |
| Cigarette Lighter Plug with Switch | To power the transfer pump. Includes a switch to turn it ON/OFF | 1 |
| Aquor Faucet Connector | To connect the hose to the Aquor inlet | 1 |
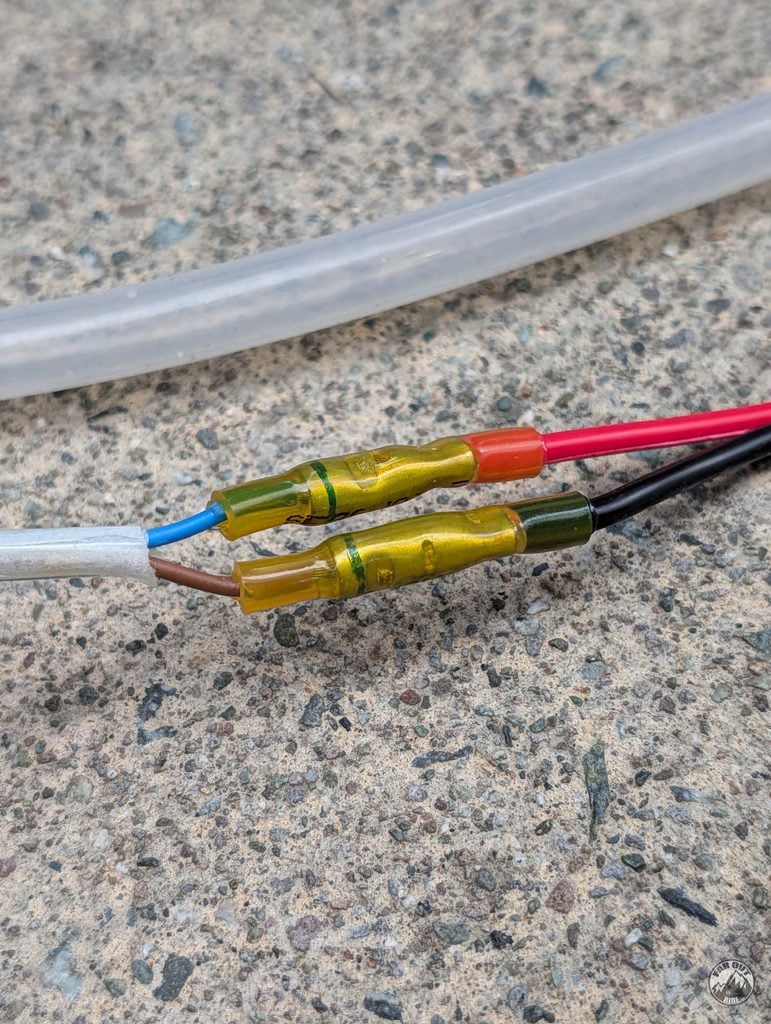
| Heat Shrink Butt Connector – Step Down | To wire the Transfer Pump (16 AWG) to the lighter plug (14 AWG). We don’t recommend Wago connectors here: they aren’t sealed, and this splice sits close enough to the pump that it gets wet. | 2 |
| 3/4″ ID Clear Tubing | Hose from transfer pump to Aquor faucet connector | 1 |
| 3/4″ Garden Hose Adapter x 3/4″ Barb | To connect the hose to the Aquor faucet connector | 1 |
| 1″ Split Loom Tubing | To bundle the hose and the electrical cable | 1 |
Drop the submersible pump into a jug, connect to the Aquor inlet, plug into a 12V outlet, and turn on the switch to transfer water (or sanitizing solution) into the fresh tank:
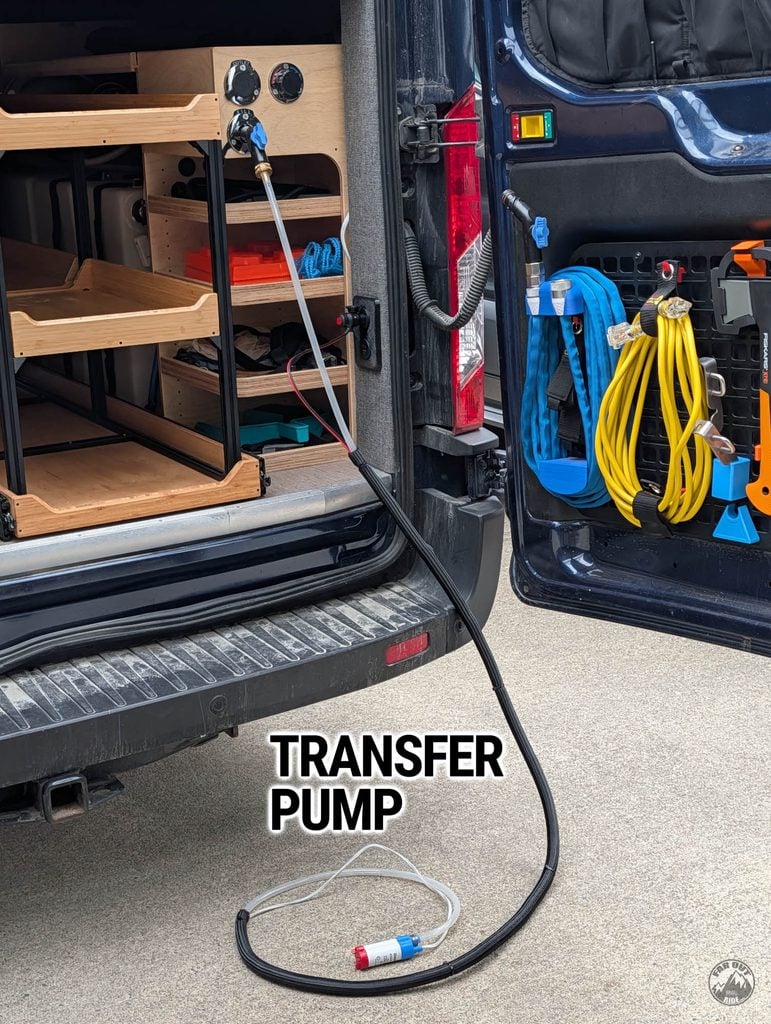
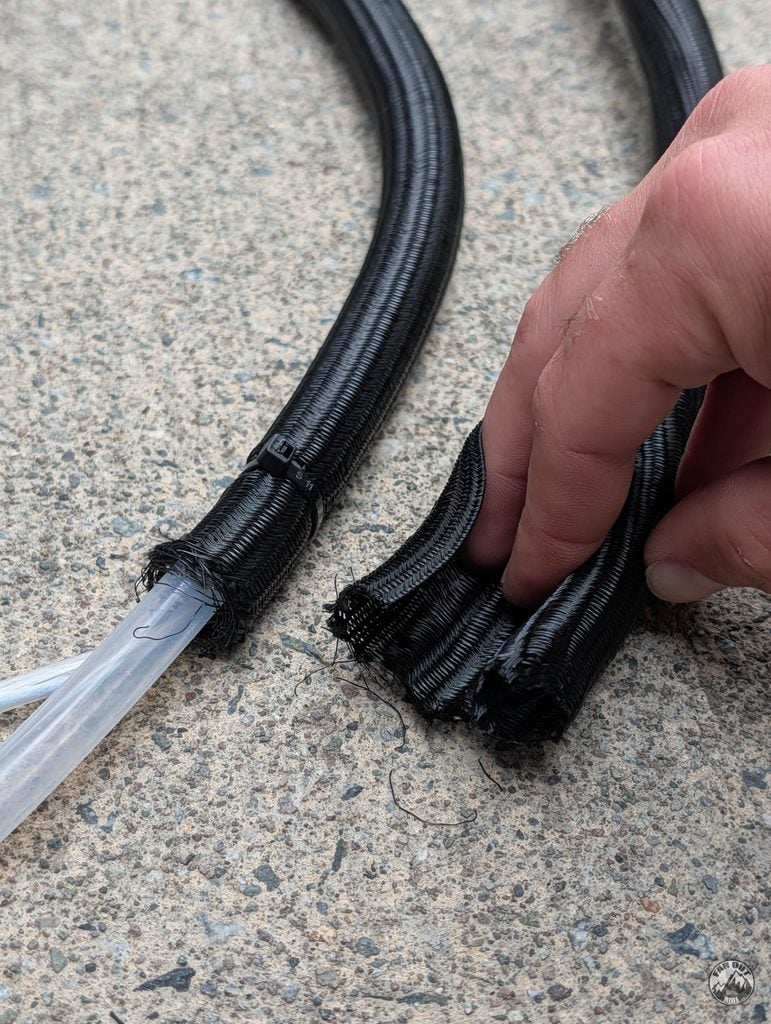
We bundled the electrical cable and water hose into split loom, otherwise it’s a bit messy:
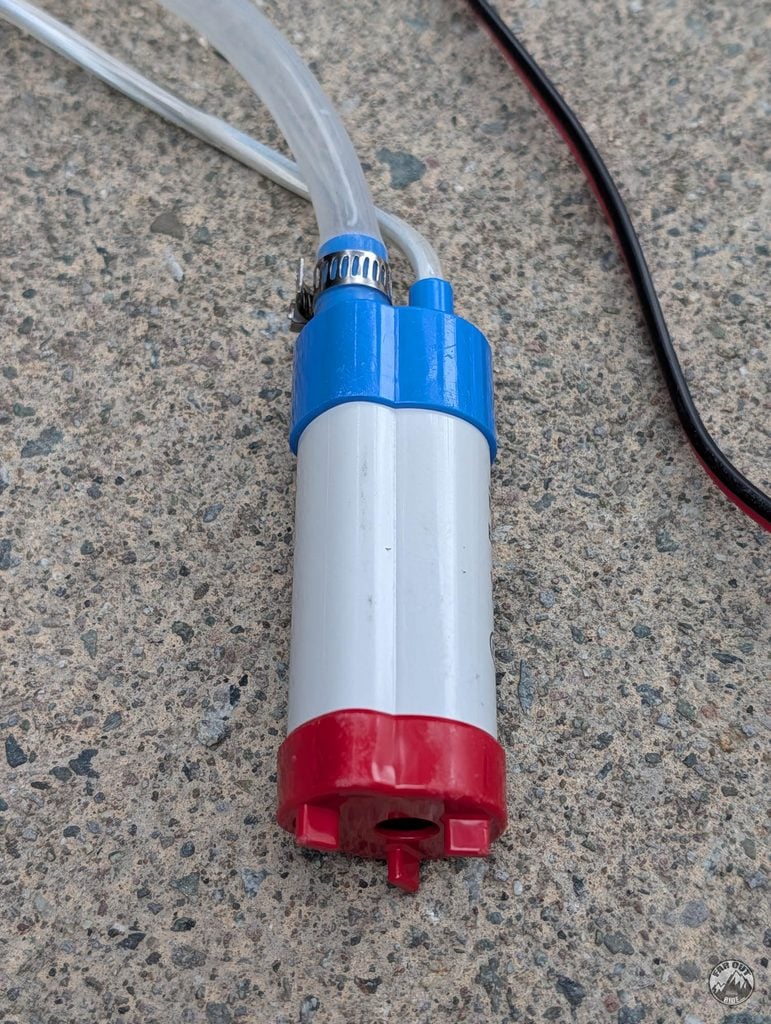
The electrical cable comes preinstalled on the submersible pump, the hose is secured with a stainless steel worm clamp:
We used step-down heat-shrink butt connectors (18/16 AWG to 14/12 AWG):
We made a D-Pillar Outlet Plate with 12V and USB outlets:
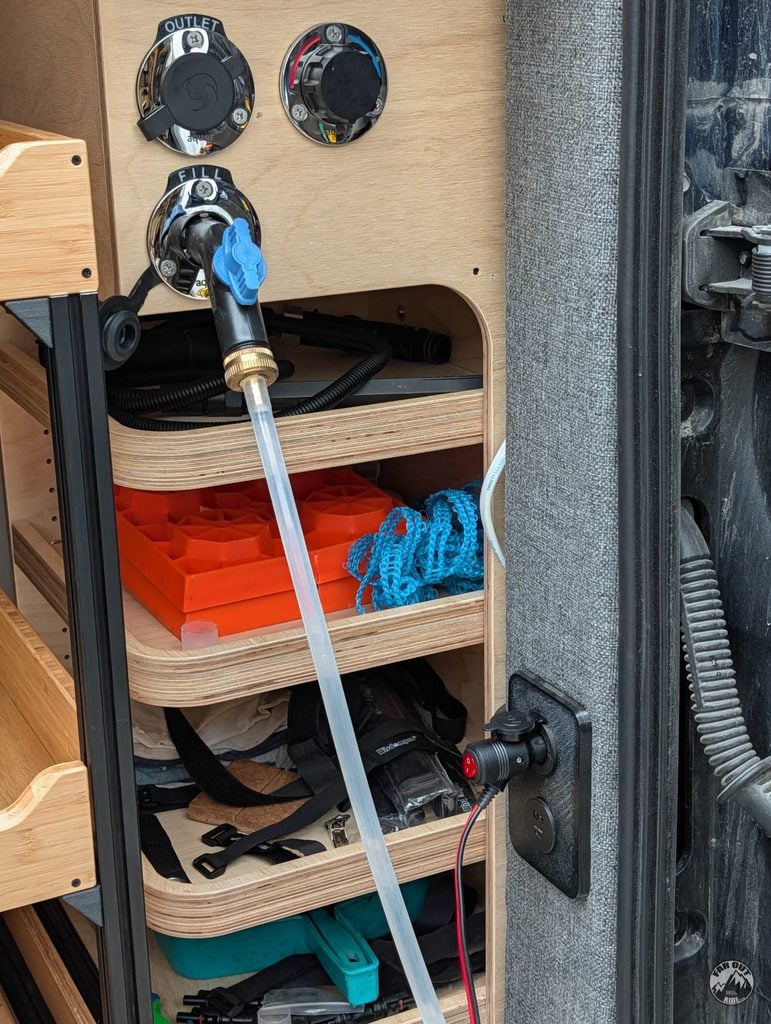
Thanks to AVC Rig for the idea!
Draining
Draining Fresh Water
Open the drain valve of the Wheel Well Tank (water will drain in the spare tire tank):
Open the drain valve of the Spare Tire Tank:
Draining Gray Water
Press the button for about 5 second to fully open the grey tank motorized valve:
Press the button for about 5 second to fully close the grey tank motorized valve:
Sanitizing
Add water to the fresh tank (about an inch or two):
Prepare the sanitizing solution – 1/4 cup bleach for every 16 gallons of water, diluted in water – and inject with the transfer pump:
Fill the fresh tank, circulate water through the entire water system, and let it sit for 4 hours or overnight:
Drain the fresh tank, refill, and circulate water through the entire system for a few minutes. Repeat once more:
Winterizing
Press the button for about 5 second to fully open the grey tank motorized valve:
Press the button for about 5 second to fully close the grey tank motorized valve:
Exterior Shower & Bike Wash
When camped remotely, we don’t mind an exterior shower…
Bikes sometime need a shower too!
On Second Thought…
Too soon!




Hello!
Love the write ups they’ve all been so helpful for my build. I have the same aquor mixing valve and hydrant connection. But I can’t find the right adapter to connect it to PEX. Were you able to find that in a store or did you have to order it online? Thanks!
Thanks Matthew, glad it helps! I updated the diagram above the page with all the parts, you should find it there 🙂
So the aquor mixing valve seems to have BSPP threads not NPT. At least according to its manual. Did you use NPT fittings without trouble? Finding a BSPP to PEX adapter has been really annoying
At first, I used a BSPP to NPT > NPT to PEX, and had a leak… So I went straight to an NPT-to-PEX, and it works just fine!
As shown here: https://faroutride.com/water-install/#exterior-shower
Thank you two for the awesome content! My wife and I have found it to be a cornerstone we refer back to often while doing our build.
Question: I’m wondering your reason from gravity fill in van1 to pressure fill in van2. Did you find you only fill with hoses and pressure and not jugs/filtered stream water?
Thanks, glad it’s useful for your build!
It’s mostly a packaging thing, not a change in habits. In Van 1 the tank sat in the open in the garage, so the fill port was right there and a hose in the hole was the simplest possible solution. In Van 2 the tank lives inside a closed water cabinet, so gravity filling would mean pulling the access panel every time.
And no, we didn’t drop jugs and stream water. You just can’t pour anymore, so we carry a small 12V transfer pump (info coming soon) that pushes water in through the same inlet. It doubles as what we use to sanitize the system.
Im wondering if the Grey water tank gets too hot being right next to the exhaust pipe? Any sign of melting? The shield looks like it covers part of it but not all.
No issues! It’s quite common to install a grey tank there 🙂
Hey, I’ve got the same sink you guys do and am curious about how you attached the Trident hose to the sink drain. I see a hose clamp in the pictures…did you attach a piece of PVC to the sink drain and then hose clamp the trident hose to the PVC?
Hi,
I 3D printed an adapter: https://faroutride.com/product/adapter-hose-tecvan-sink-3d-print/
Do you have a 3D printer? If not let me know, I can create a shippable product.
Thanks,
Antoine