

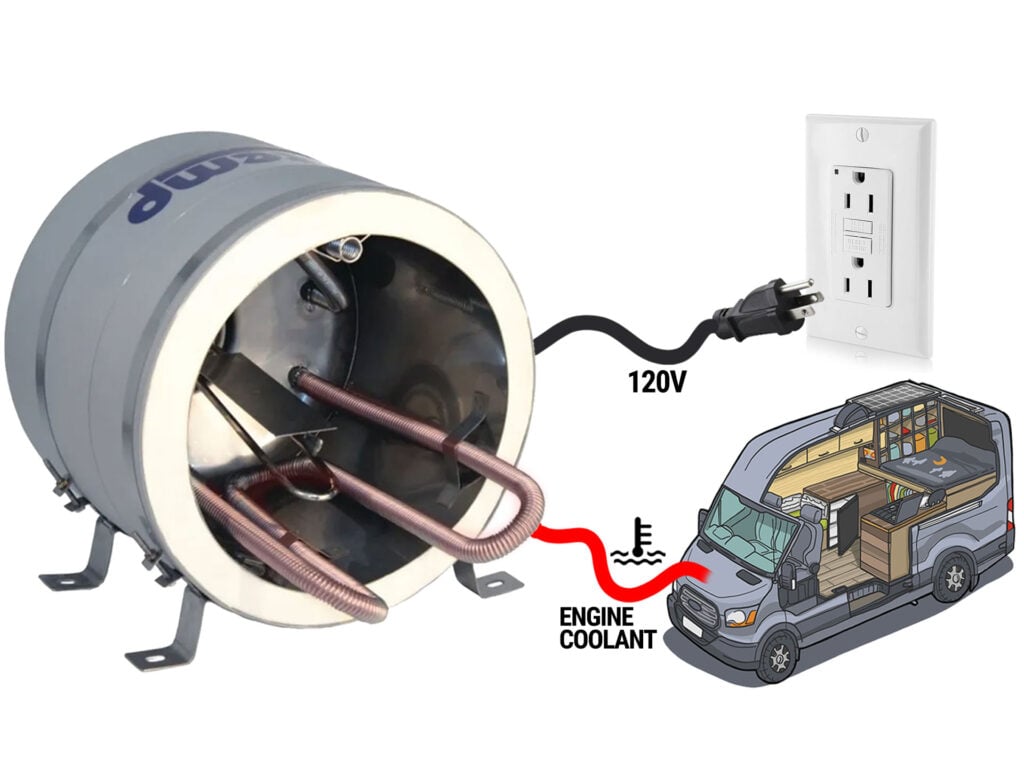
The Isotemp Spa is a dual-source water heater: it can heat the tank with a 750W electric element, with engine coolant (make “free” heat while driving), or both at once. While many opt for the popular Bosch water heater, we think the Isotemp is a better unit for mobile applications (more on that below).
This guide covers the full install: choosing a model, mounting, plumbing, the 120V circuit, and the engine-coolant connection to our Ford Transit. Then the numbers: heat-up times on each source, what everyday use looks like, and what we’d do differently. It’s one piece of our complete van water system.
Material and Resources
Time
Isotemp Spa: 4 hours
Engine Coolant: 8 hours
Cost
Isotemp Spa 15L: $775 USD
Engine Coolant: ~$560 USD
Weight
Dry: 24 lbs
Full: 57 lbs
Material
Plumbing
| Item | Description | Quantity | Buy |
|---|---|---|---|
| Isotemp Spa 15L | That’s the whole point | 1 | VanLife Outfitters |
| Stainless Steel Braided Hose | To connect the Spa to the PEX | 2 | Amazon |
| 1/2″ PEX x 1/2″ MPT Adapter | To connect the braided hose to PEX | 2 | Amazon |
| Thread Sealant (Loctite 577) | Curing sealant for the heater’s water-side NPT threads. | 1 | Amazon |
Electrical
| Item | Description | Quantity | Buy |
|---|---|---|---|
| 15A AC Breaker | Dedicated 120V branch circuit for the water heater, in the AC distribution panel. | 1 | Amazon |
| 12/3 AWG Marine Wire | From the AC panel to the heater. We ordered a 100ft spool because it’s also needed for the other appliances. | 1 | Amazon |
| GFCI Outlet + Cover | Dedicated outlet next to the heater for the Isotemp’s 120V cord. | 1 | Amazon |
| Outlet Box | Electrical box. | 1 | Amazon |
Engine Coolant
| Item | Description | Quantity | Buy |
|---|---|---|---|
| 4-Port Heater Bypass Valve Optional | All-brass manual valve, 5/8″ barbs. Allows bypassing the Isotemp loop (e.g., if the loop gets damaged or if hot water is not needed). | 1 | Amazon |
| Brass 90° Barb Elbows, 5/8″ | Connect the heater return line to the Isotemp loop | 1 | Amazon |
| Brass Union Barb, 5/8″ | Connect the heater return line to the Isotemp loop | 1 | Amazon |
| Brass 1/2″ NPT female × 5/8″ hose barb fittings | Connect the Isotemp to the engine coolant hoses. | 2 | Amazon |
| High-Temperature Thread Sealant | For Brass 1/2″ NPT female × 5/8″ hose barb fittings | 1 | Amazon |
| 5/8″ ID Heater Hose (SAE 20R3) | EPDM or silicone. From the engine bay to the Isotemp and back. Length per your installation. | 2 x 50 ft | Amazon |
| Stainless Hose Clamps | One per barb connection (10 joints, plus spares). | 12 | Amazon |
| Cushioned P-Clamps, Stainless | Secure the run to the frame every 12–18″, away from brake lines, fuel lines and moving parts. 2″ clamp holds the two hoses. | 16 | Amazon |
| Stainless Cushioned P-Clamps, 1″ | Single-hose mounting into existing threaded holes in the engine bay. | 1 | Amazon |
| 1/4-20 x 4″ Stainless Bolts + Washers + Nyloc Nuts | Secure the 2″ P-clamps to the suspension subframe crossmember. | 1 | Amazon |
| Push mount cable zip ties | To secure the run (fits in unthreaded holes, studs, etc.). | 1 | Amazon |
| Reusable zip ties | To secure the run. | 1 | Amazon |
| Heat- and UV-Stabilized Zip Ties | To secure the run. Rated up to 85°C (185°F), so keep them away from the exhaust. | 1 | Amazon |
| Stainless Steel Zip Ties | For mounting the engine coolant hoses near the exhaust | 1 | Amazon |
| Aluminized Sleeving, 1″ | Heat protection if routing near the exhaust. | 2 | Amazon |
| Braided Split Sleeve, 1″ | Abrasion protection on exposed sections (frame edges, wheel arch). | 25 ft | Amazon |
| Silicone Fiberglass Sleeve | Debris protection where the hoses run in line with the wheels. | 1 | Amazon |
| NBR elastomeric pipe insulation | To insulate the engine coolant loop inside the van | 2 | Amazon |
| Motorcraft Yellow Coolant (VC-13DL-G) | Prediluted 50/50, Ford spec WSS-M97B57-A2. The loop adds ~4L; the rest goes to burping top-ups. Never mix coolant types. | 2 gal | Ford dealer |
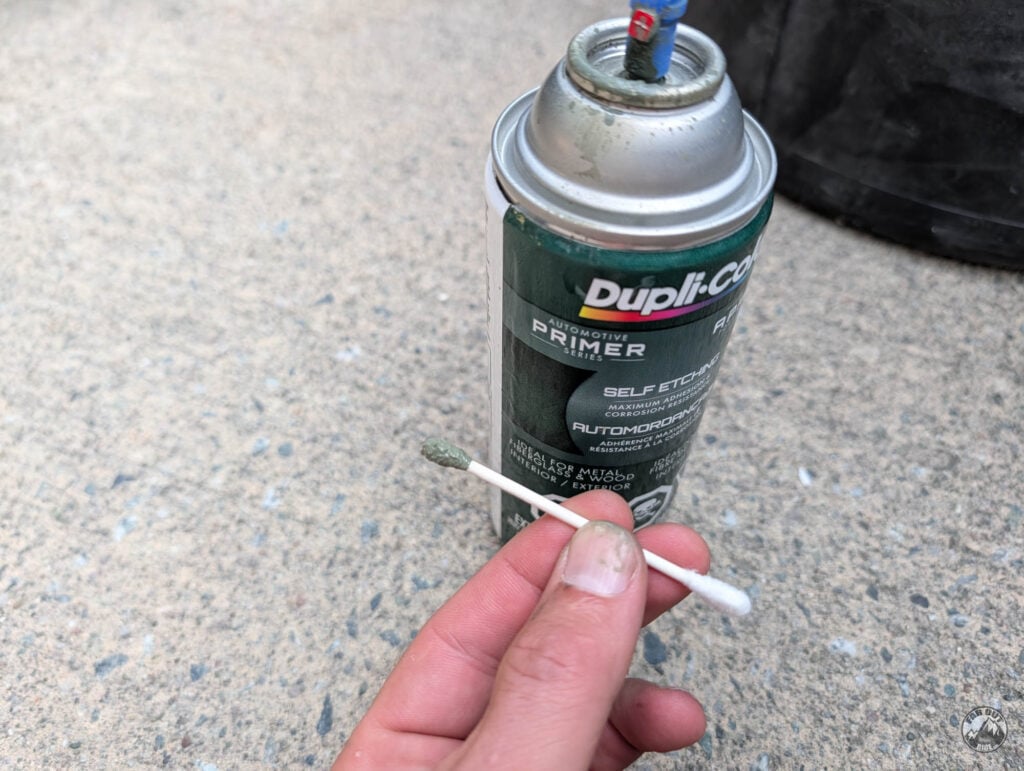
| Rust Inhibitor | 3 coats on bare metal edges (floor pass-through holes). | 1 | Amazon |
| 3D-Printed Brackets & Floor Pass-Throughs | Bypass-valve bracket, M10-stud bracket, and floor pass-throughs. PBT / glass-filled PBT, heat-resistant to 130°C. | — | FarOutRide |
Tools
- Power drill
- 1-1/4″ hole saw (floor pass-through)
- Utility knife or hose cutter (5/8″ heater hose)
- Adjustable wrench (NPT fittings, braided hoses)
- 5/16″ nut driver or flat screwdriver (worm-gear clamps, plus re-torque after first heat cycles)
- 7/16″ socket + wrench (1/4-20 P-clamp bolts on the subframe)
- Flush cutters (trimming zip ties)
- Drain pan (small coolant spill when cutting the return hose)
- Funnel (coolant top-ups)
- Phillips screwdriver (Isotemp front cover)
- Flat screwdriver (bleeder valve screw)
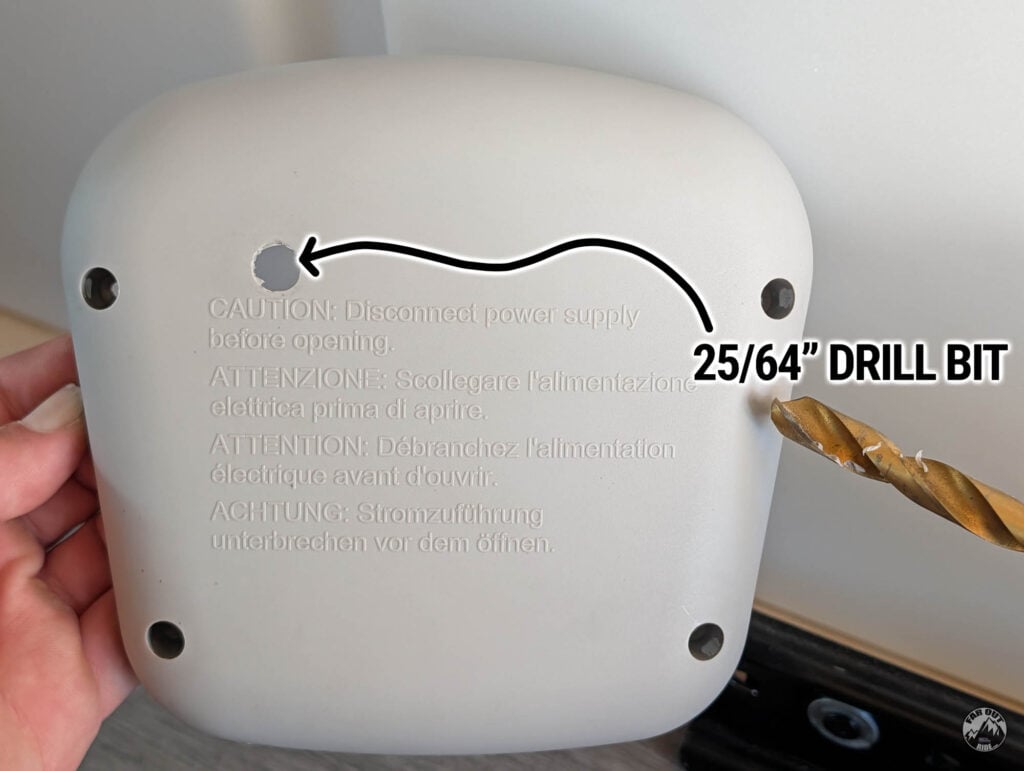
- 25/64″ drill bit (only if relocating the thermal-fuse reset button)
- Ramps or jack stands (under-van routing)
Why the Isotemp
Dual Source
- Engine Coolant: Make “free” hot water while driving.
- 120V: Keep water hot while parked.
- Or both at once!
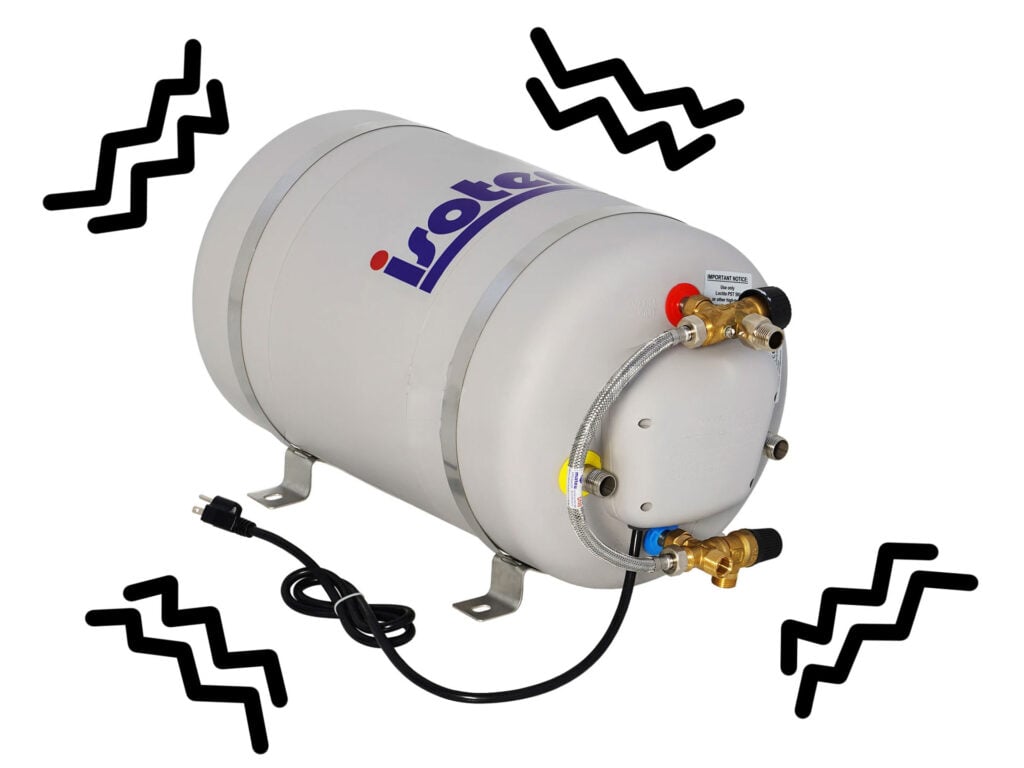
Made for mobile applications
AISI 316 stainless steel inner tank and flexible polypropylene outer casing absorb shocks without cracking. The polyurethane insulation dampens vibration, while 360-degree adjustable stainless steel feet securely anchor the unit to structural surfaces.
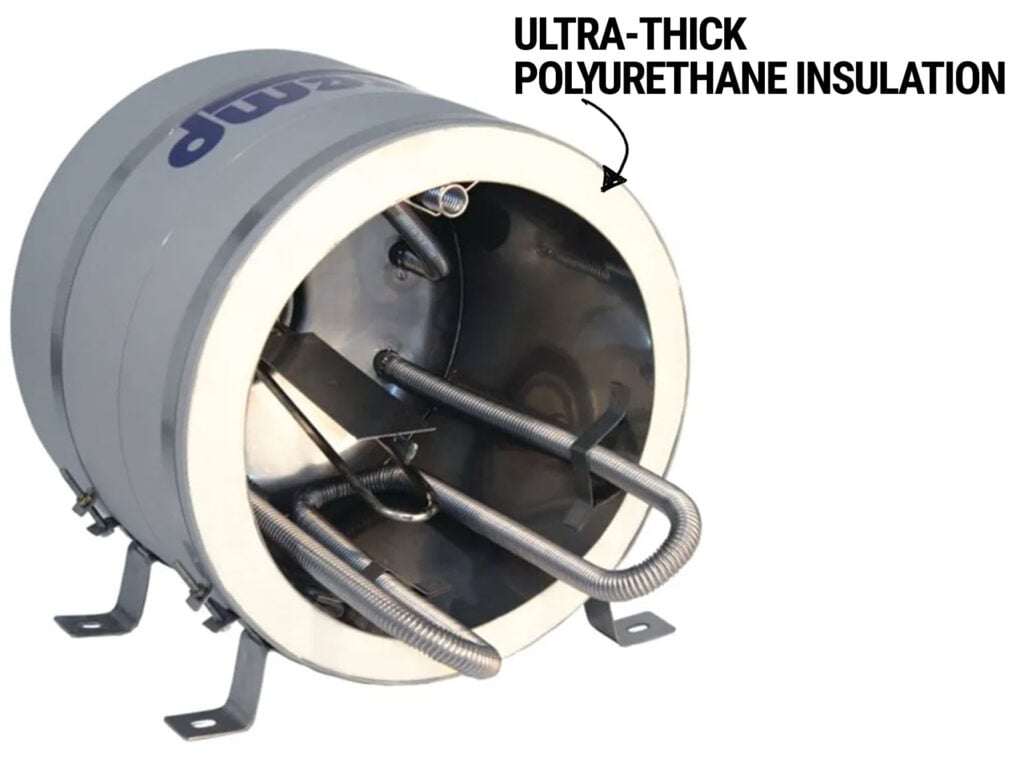
Insulated
Ultra-thick polyurethane foam insulation between the inner tank and the outer shell. Designed to keep water hot and usable for up to 24 hours after the engine or heating element has been turned off.
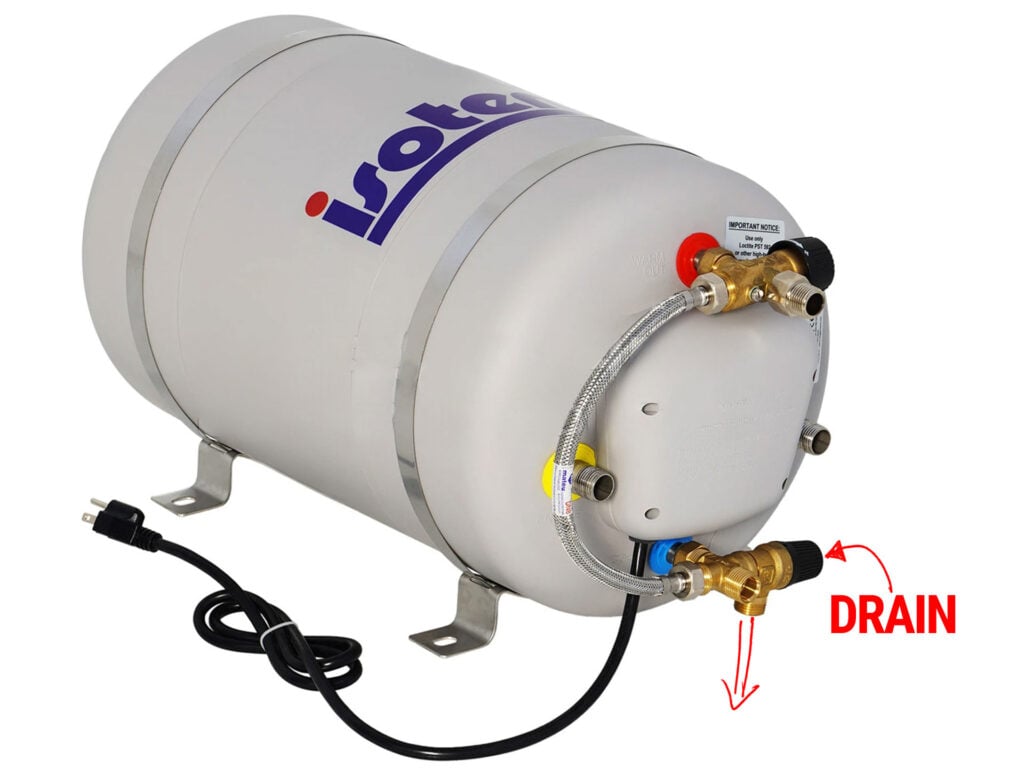
Easy to drain/winterize
Dedicated drain to empty the tank between trips, or for winterizing.
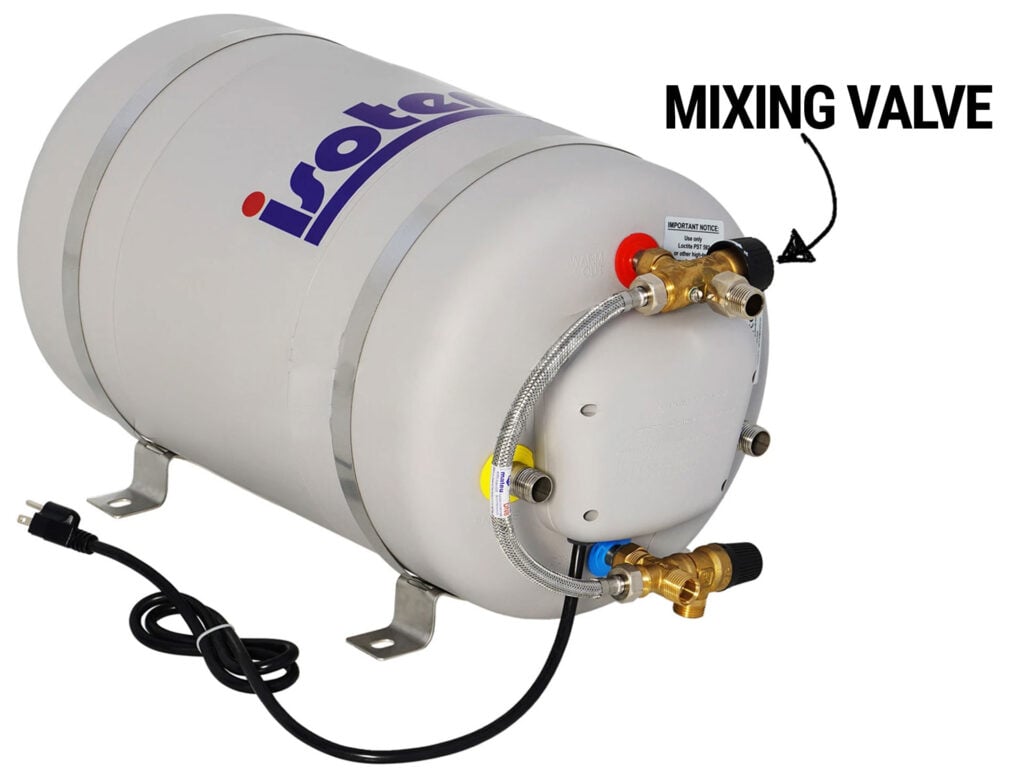
Built-in mixing valve
- No scalding — tank hits 90°C off the engine; taps never see it
- 15L showers like ~30–35L — hot storage blended down at the outlet
- Steady tap temp — same shower whether the tank is at 90°C or 60°C
- Protects PEX & fixtures — only the valve nipple sees full tank heat
Others
- No propane, no combustion — no gas lines, no exhaust vent
- Silent — no burner, no fan
- No anode to service — the 316 stainless tank doesn’t need one, unlike steel RV tanks
- 750W element — leave room to run other appliances simultaneously (e.g., induction)
- Marine quality — heating water on sailboats/vans for decades
Why Not the Bosch
The 2.5-gallon Bosch Mini-Tank Heater is quite popular in vans.

Why people pick it:
- It costs about a quarter of the Isotemp.
- Works out of the box on 120V.
Why we didn’t pick it:
- No heat-exchanger coil for engine coolant. All of its hot water has to come from battery or shore power, forever.
- 1,440W / 12 amps (vs Isotemp 750W). Higher numbers usually win, but not here. The Bosch will put way more pressure on the electrical system when heating. Having a smaller element is beneficial here, as it leaves room for other appliances to work simultaneously (induction cooktop, etc.).
- No drain. Draining the heater’s tank is routine maintenance in a van, between trips or for winterizing.
- No mixing valve. The thermostat tops out around 65°C and the tank delivers what it holds: 9.5L stretches to maybe 15–18L at shower temperature. The Isotemp’s 15L stored hotter delivers roughly double that.
- Thin insulation. It’s designed to reheat constantly from a wall outlet, not to hold a charge of heat overnight in a cold van.
- Residential design in a moving vehicle. It’s built for under a sink in a house: glass-lined steel tank, no vibration rating, upright-only mounting. The Isotemp is built for boats, where constant motion is the baseline.
| Bosch Mini-Tank | Isotemp Spa | |
|---|---|---|
| Engine-coolant heating | No | Yes |
| Electric element | 1,440 W (12 A) | 750 W (6.3 A) |
| Tank | 2.5 gal (9.5L), glass-lined steel | 15–25L, 316 stainless steel |
| Drain for winterizing | No | Yes |
| Thermostatic mixing valve | No | Yes (~2× effective capacity) |
| Insulation | Thin | Thick polyurethane |
| Mounting | Upright only | Horizontal or vertical |
| Built for | Under a sink in a house | Boats in constant motion |
That said, many people have used the Bosch for a long time, and it works. If you did your homework and still opt for the Bosch, it’s all good.
Looking at propane instead? We reviewed FarOutVan #1 Eccotemp L5 tankless:

Why Not a Hydronic System
In van-world parlance, “hydronic” means a fuel-fired coolant furnace and the integrated packages built around one: Rixen’s (the DIY-community reference), Timberline (what newer Winnebago Revels run), or a self-built system around an Espar Hydronic, Webasto Thermo Top, or Autoterm Flow. Strictly speaking, they’re not competitors: those systems heat a calorifier tank that is often literally an Isotemp. The real question is whether we needed a third heat source (a fuel burner) on top of the engine and the 750W element.
What the burner buys you: hot water anywhere with the engine off and no battery drain (a liter of fuel holds ~10 kWh of heat), cabin heat from the same loop, and engine preheat on cold mornings. What it costs: roughly $4-6k installed for the integrated packages, a burner + circulation pump + glycol plumbing with their own failure modes and maintenance habits, and some noise whenever it runs. One Transit-specific note: our van is gas, not diesel, so a diesel furnace would need its own fuel tank. Rixen’s works around this with a gasoline Espar burner that taps the van’s tank.
Our architecture already splits those three jobs across simpler systems: the Espar AS3 air heater covers cabin heat, the battery bank covers parked hot water, and the engine covers “free” hot water whenever we drive. If we were parked off-grid for a week at a time in winter without driving, the diesel burner’s fuel-tank energy budget would win. That’s not how we travel, so we kept it simple.
How It Works
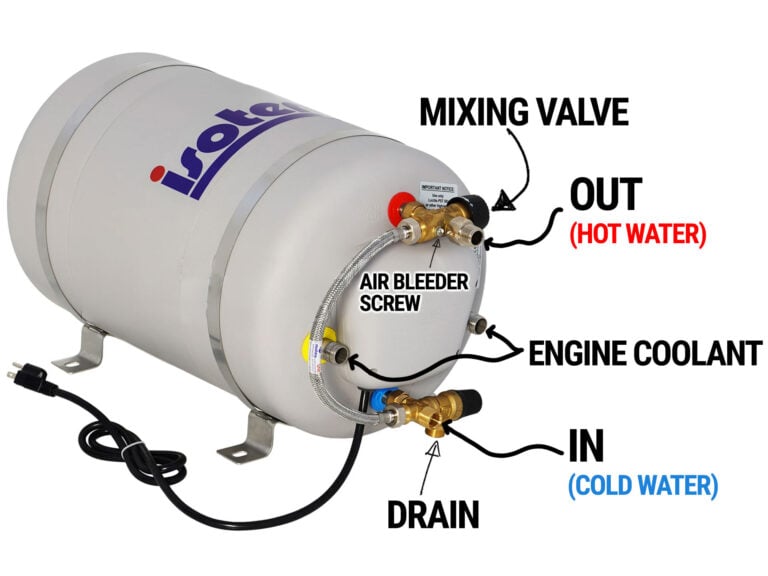
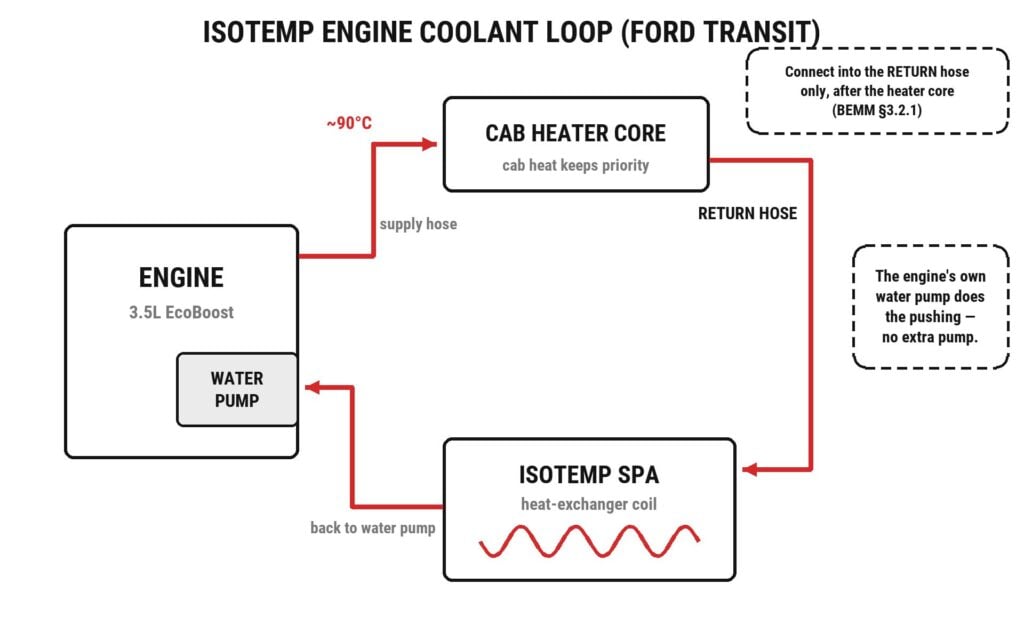
Inside the Isotemp there are two completely separate circuits. The tank holds your water. The engine coolant flows through a sealed heat-exchanger coil immersed in that water — heat crosses the coil wall, the fluids never do. Your water and the antifreeze never meet.
The 750W electric element sits directly in the tank, like a kettle. The two heat sources work independently, or at the same time.
On the coolant side, the loop is plumbed in series with the cab’s heater core, and the engine’s own water pump does the pushing — no extra pump needed. Once the engine is up to temperature, some of the ~90°C coolant that would normally shed its heat at the radiator takes a detour through the tank instead.
At the outlet, the thermostatic mixing valve blends in cold water, so your taps see a steady, safe temperature no matter how hot the tank is.
Choosing the Model
Isotemp offers three families that make sense in a van — and they all share the same DNA (316 stainless tank, 750W element, coolant coil, mixing valve), so everything in this guide applies to whichever you pick:
| Family | Sizes | Shape | Best for |
|---|---|---|---|
| Spa | 15 / 20 / 25L | Short barrel | Cabinets and under-bed corners |
| Slim | 15 / 20 / 25L | Long, narrow cylinder | Benches, narrow voids along walls |
| Slim Square | 16L | Rectangular | Flat against a wall, tight builds |

Capacity. Thanks to the mixing valve, stored liters aren’t delivered liters: 15L stored at 80°C delivers roughly 30–35L at shower temperature — call it a couple of water-wise showers plus a round of dishes. Going bigger costs three ways: cabinet space, weight (every liter is a kilogram, and the tank lives full), and energy — on the 750W element, heating 15L from cold takes about 1 kWh (~80 minutes), while 25L takes ~1.7 kWh (~2¼ hours). Off-grid, that’s a meaningful chunk of battery.
The dual-source logic favors small. The engine reheats the tank every time you drive — a small tank that’s always hot beats a big one you hesitate to heat. We’d size up only for 3+ people, or long stationary stints without shore power.
Our pick: the Spa 15. It fit our cabinet, it showers like a tank twice its size, and the engine brings it back to temperature in roughly 20–30 minutes of driving. So far, we haven’t wished it were bigger.
Mounting
Requirements
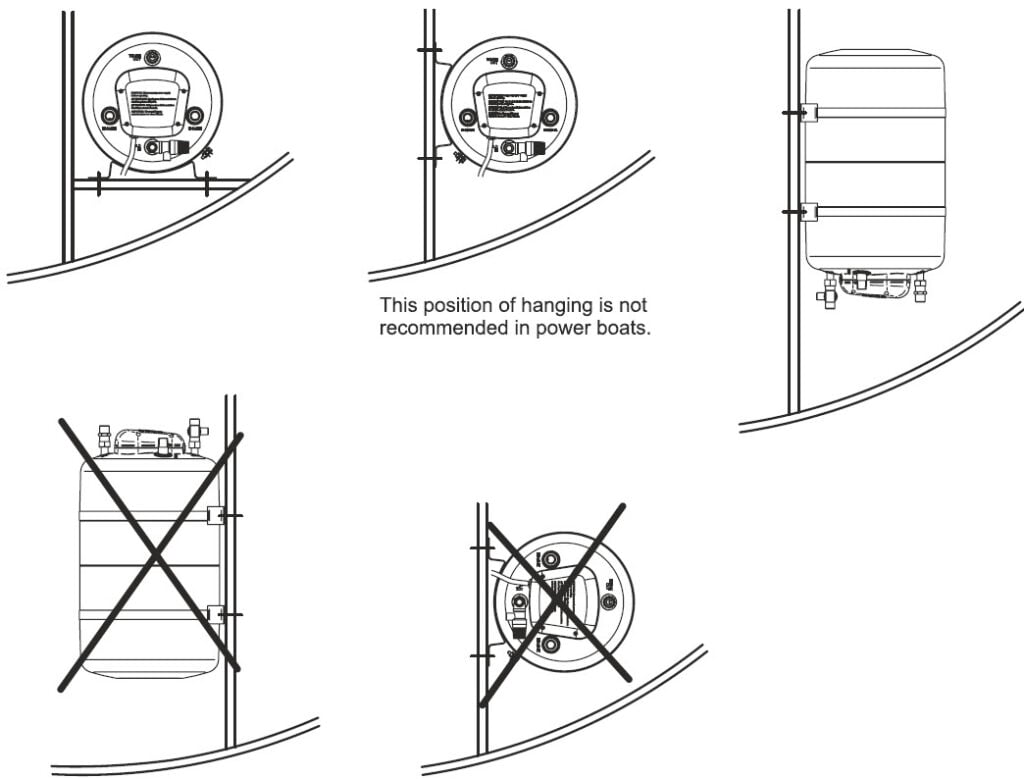
Orientation
Horizontal or vertical. The Spa performs equally well both ways.
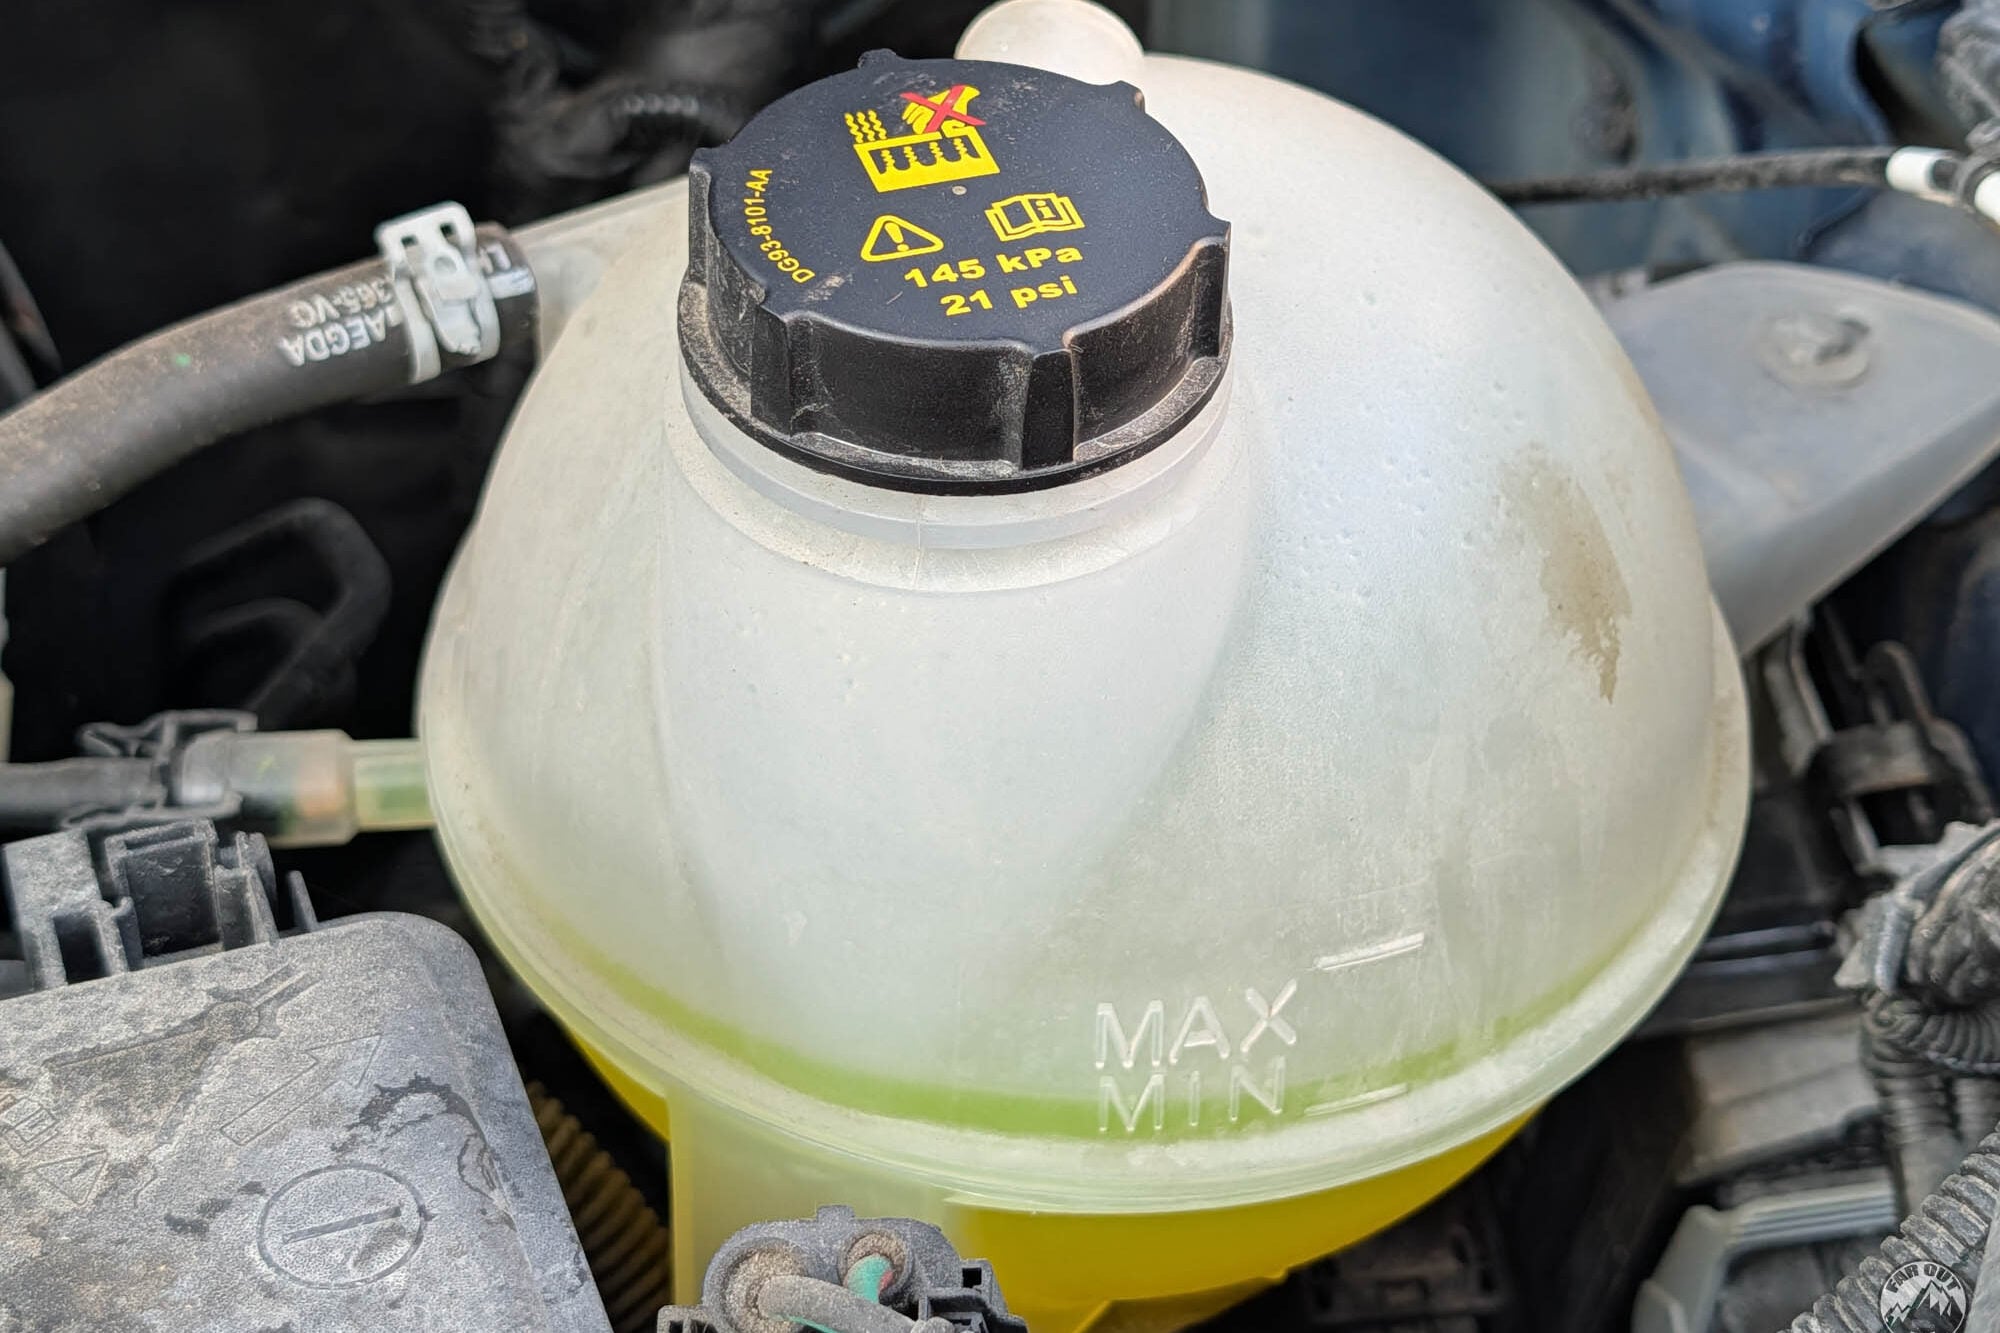
The drain/safety valve must end up at the lowest point of the tank.
Hanging the tank from its brackets (upside down or from a shelf above) is not recommended in a vehicle.
Clearance
Keep about 30 cm (1 ft) of clearance in front. The heating element, thermostats and reset button all live behind the front cover. You’ll also want hand access to the mixing valve and drain lever.
Plan the Safety-Valve Drain
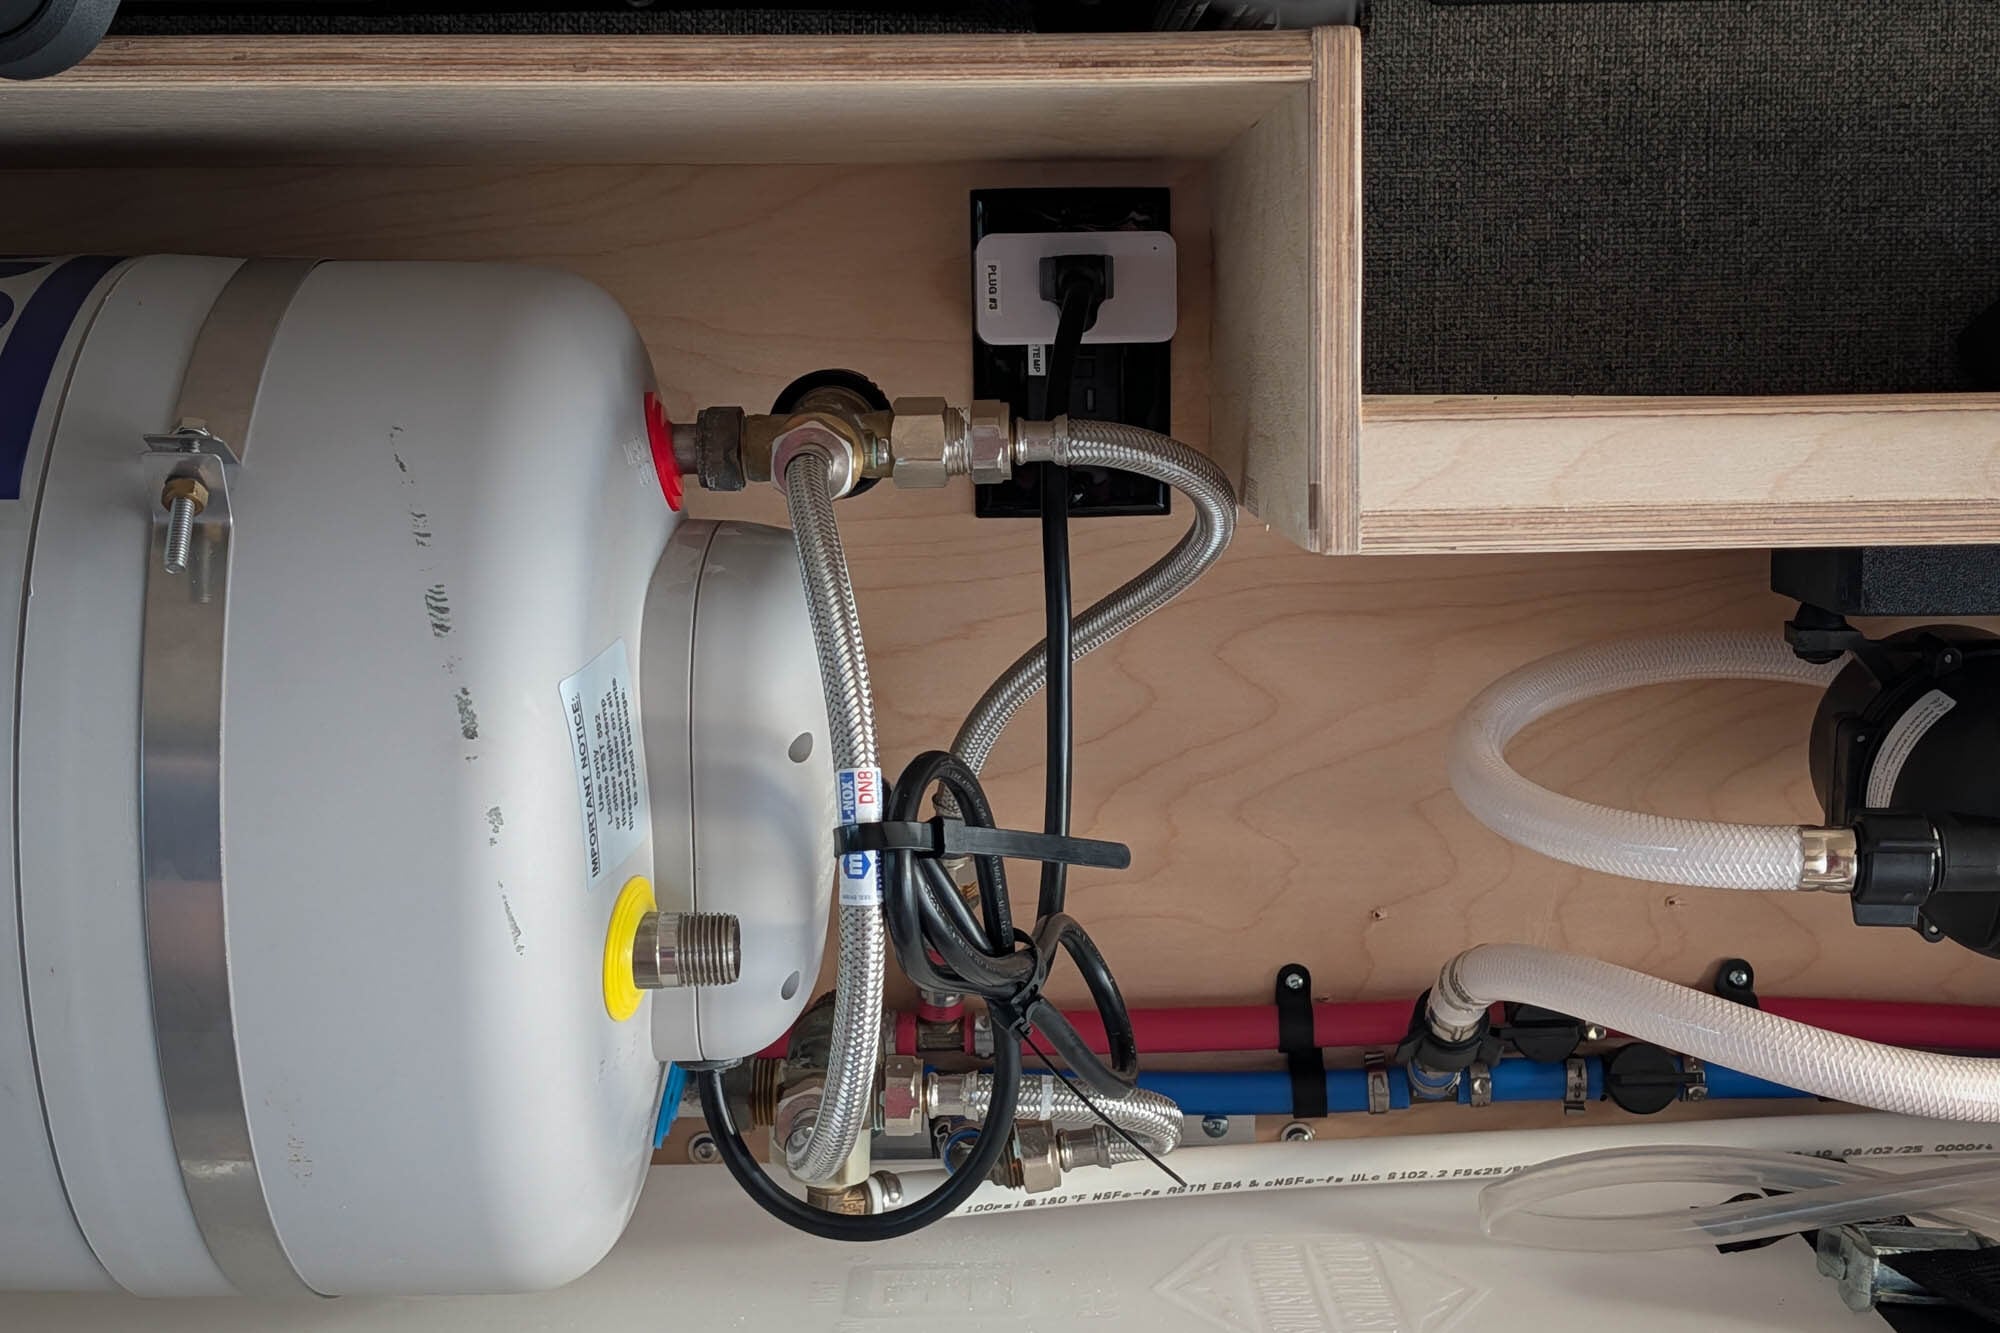
The discharge hose must run continuously downhill to an open, frost-free outlet, with no valve anywhere in it. The tank will push a small amount of water out of it during every heat-up cycle (thermal expansion), especially on engine coolant (very hot).
Stay Below the Degas Bottle
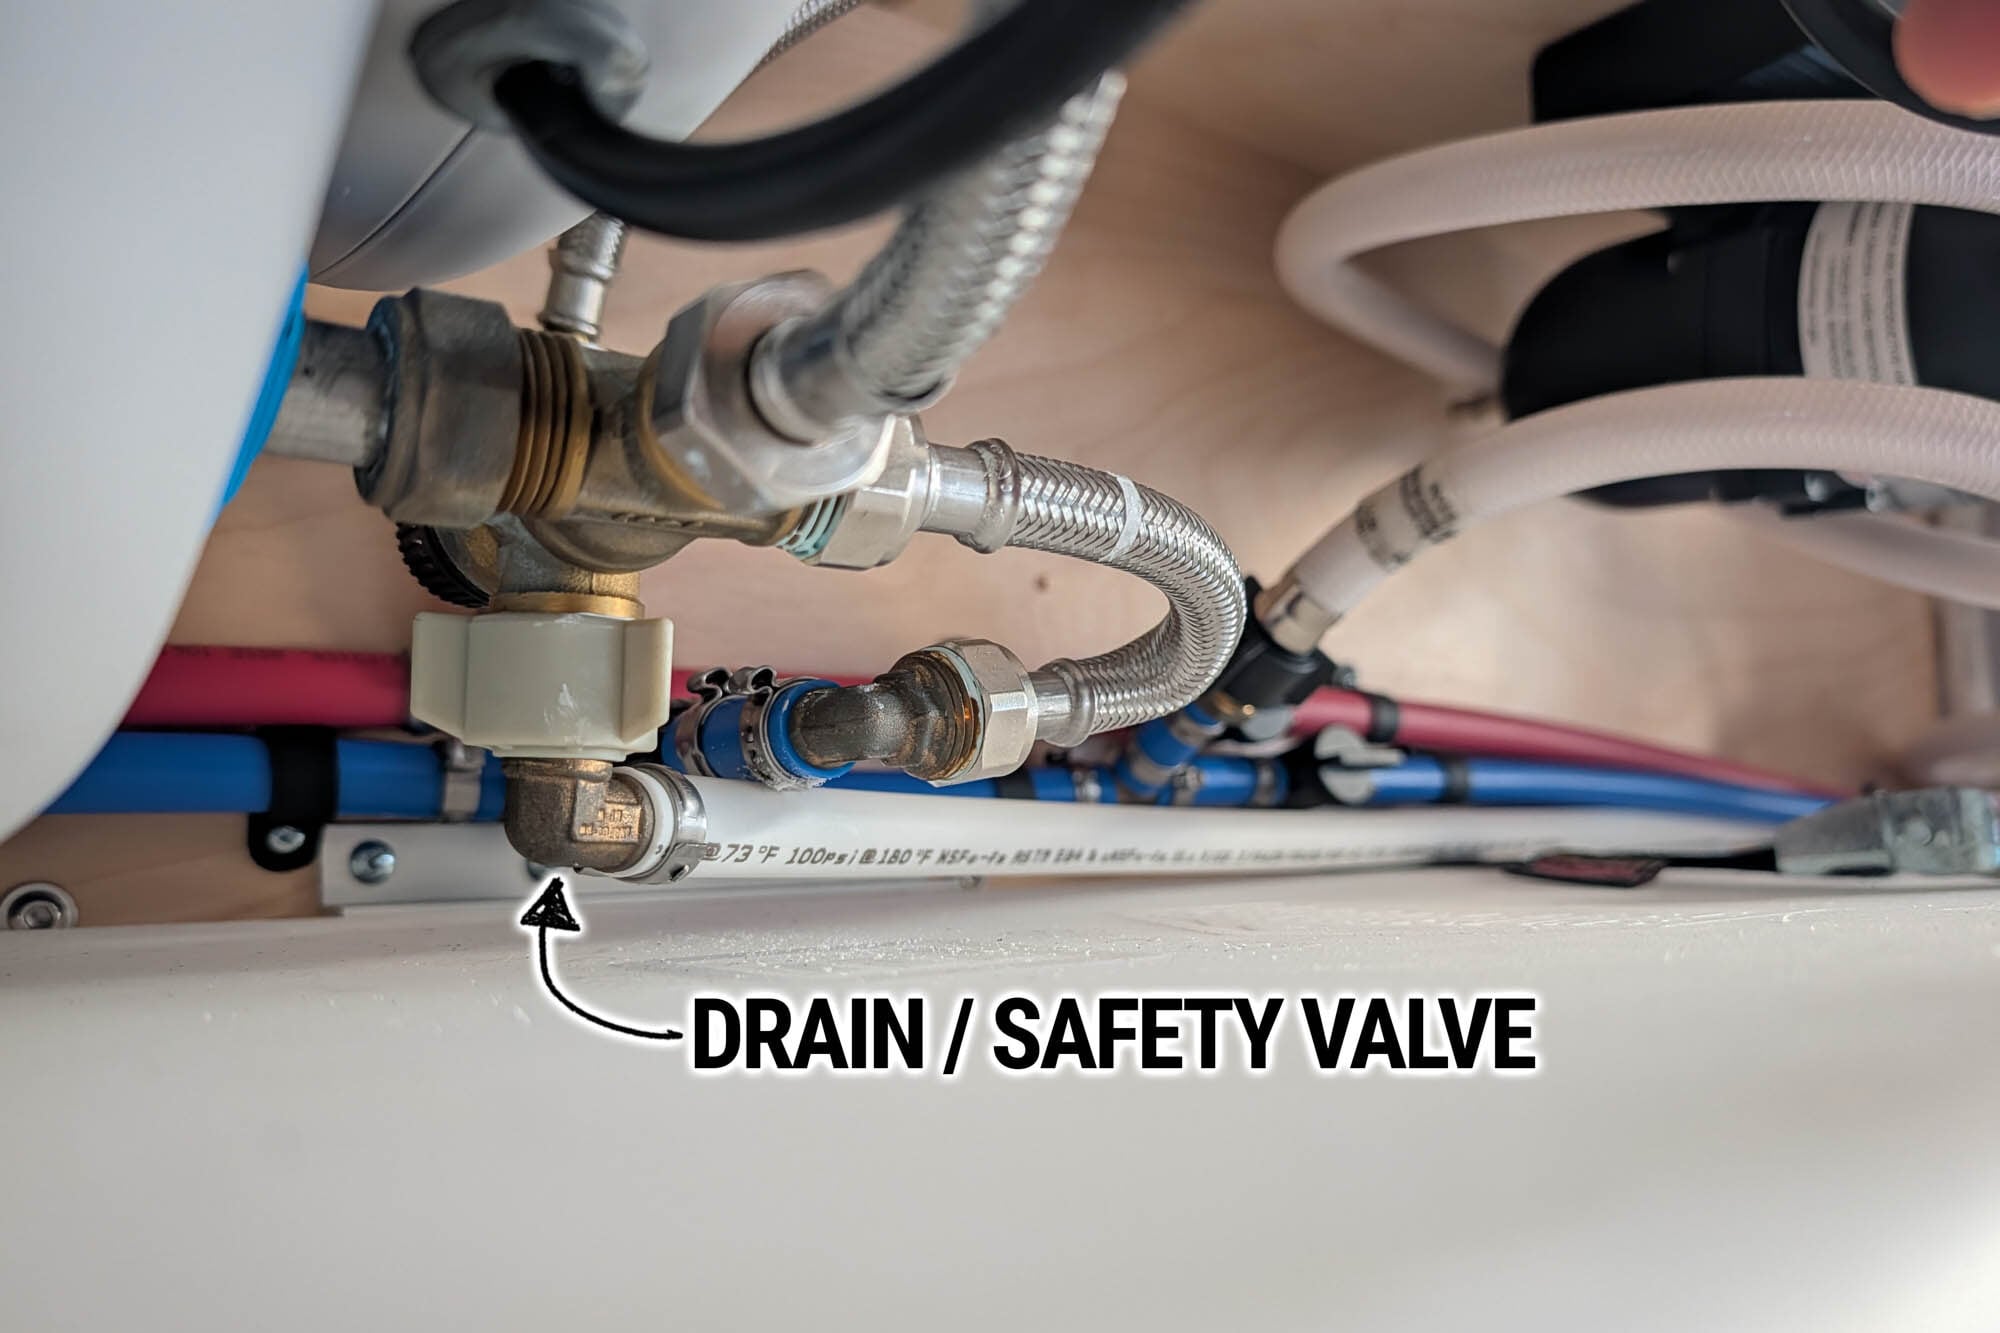
If the Isotemp and the coolant connections sit below the engine’s coolant reservoir, air purges itself back to the van’s bottle (in the engine bay). Nothing more to do.
Above it is OK too, but add a small air bleeder at the loop’s highest point.
Build for the Full Weight
A Spa 15 weighs 11 kg (24 lbs) empty but 26 kg (57 lbs) full, and it lives full.
How to Mount
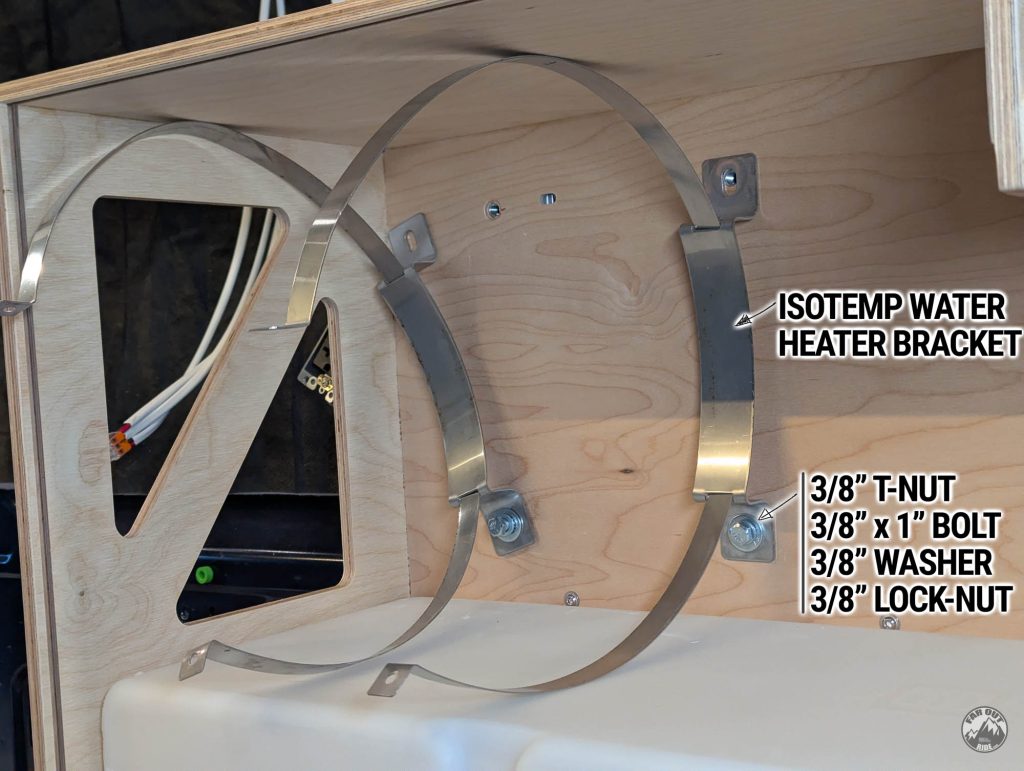
You can mount the Isotemp brackets first. We used the following hardware:
Once the brackets are in place, the water heater can be slid in:
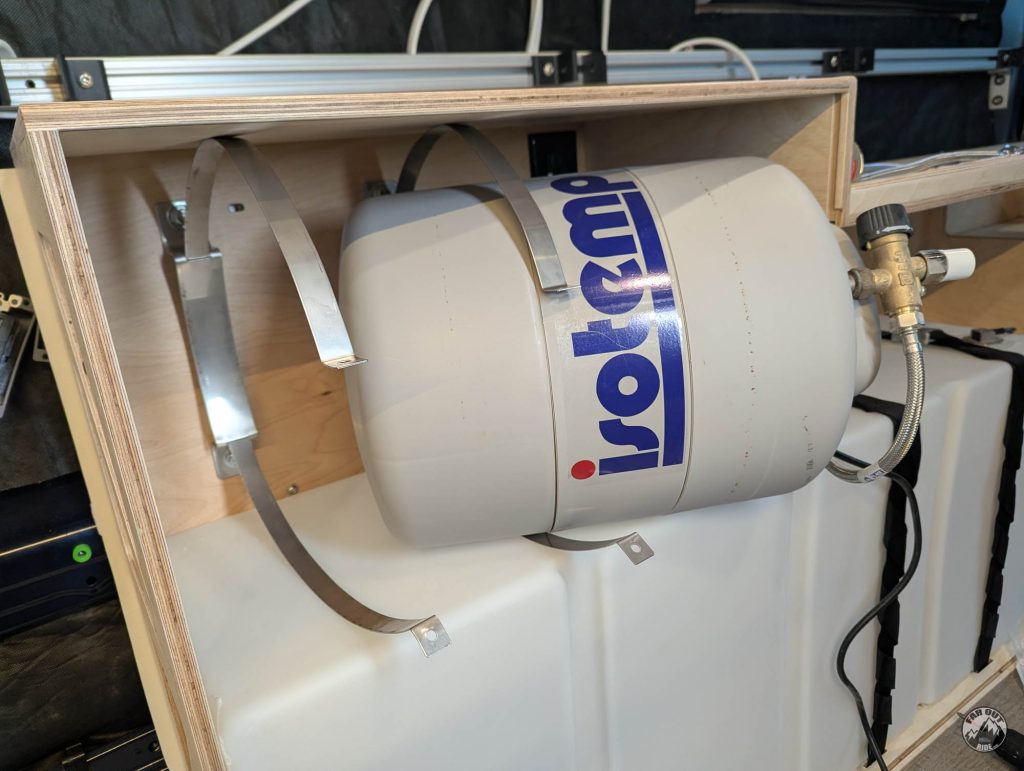
And then tighten the included screws to secure the heater in place:

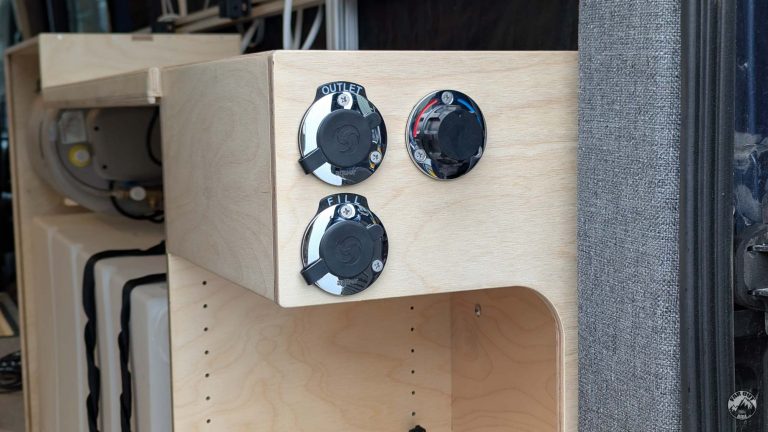
Water cabinet full write-up:
Plumbing
Requirements
Ports and Threads
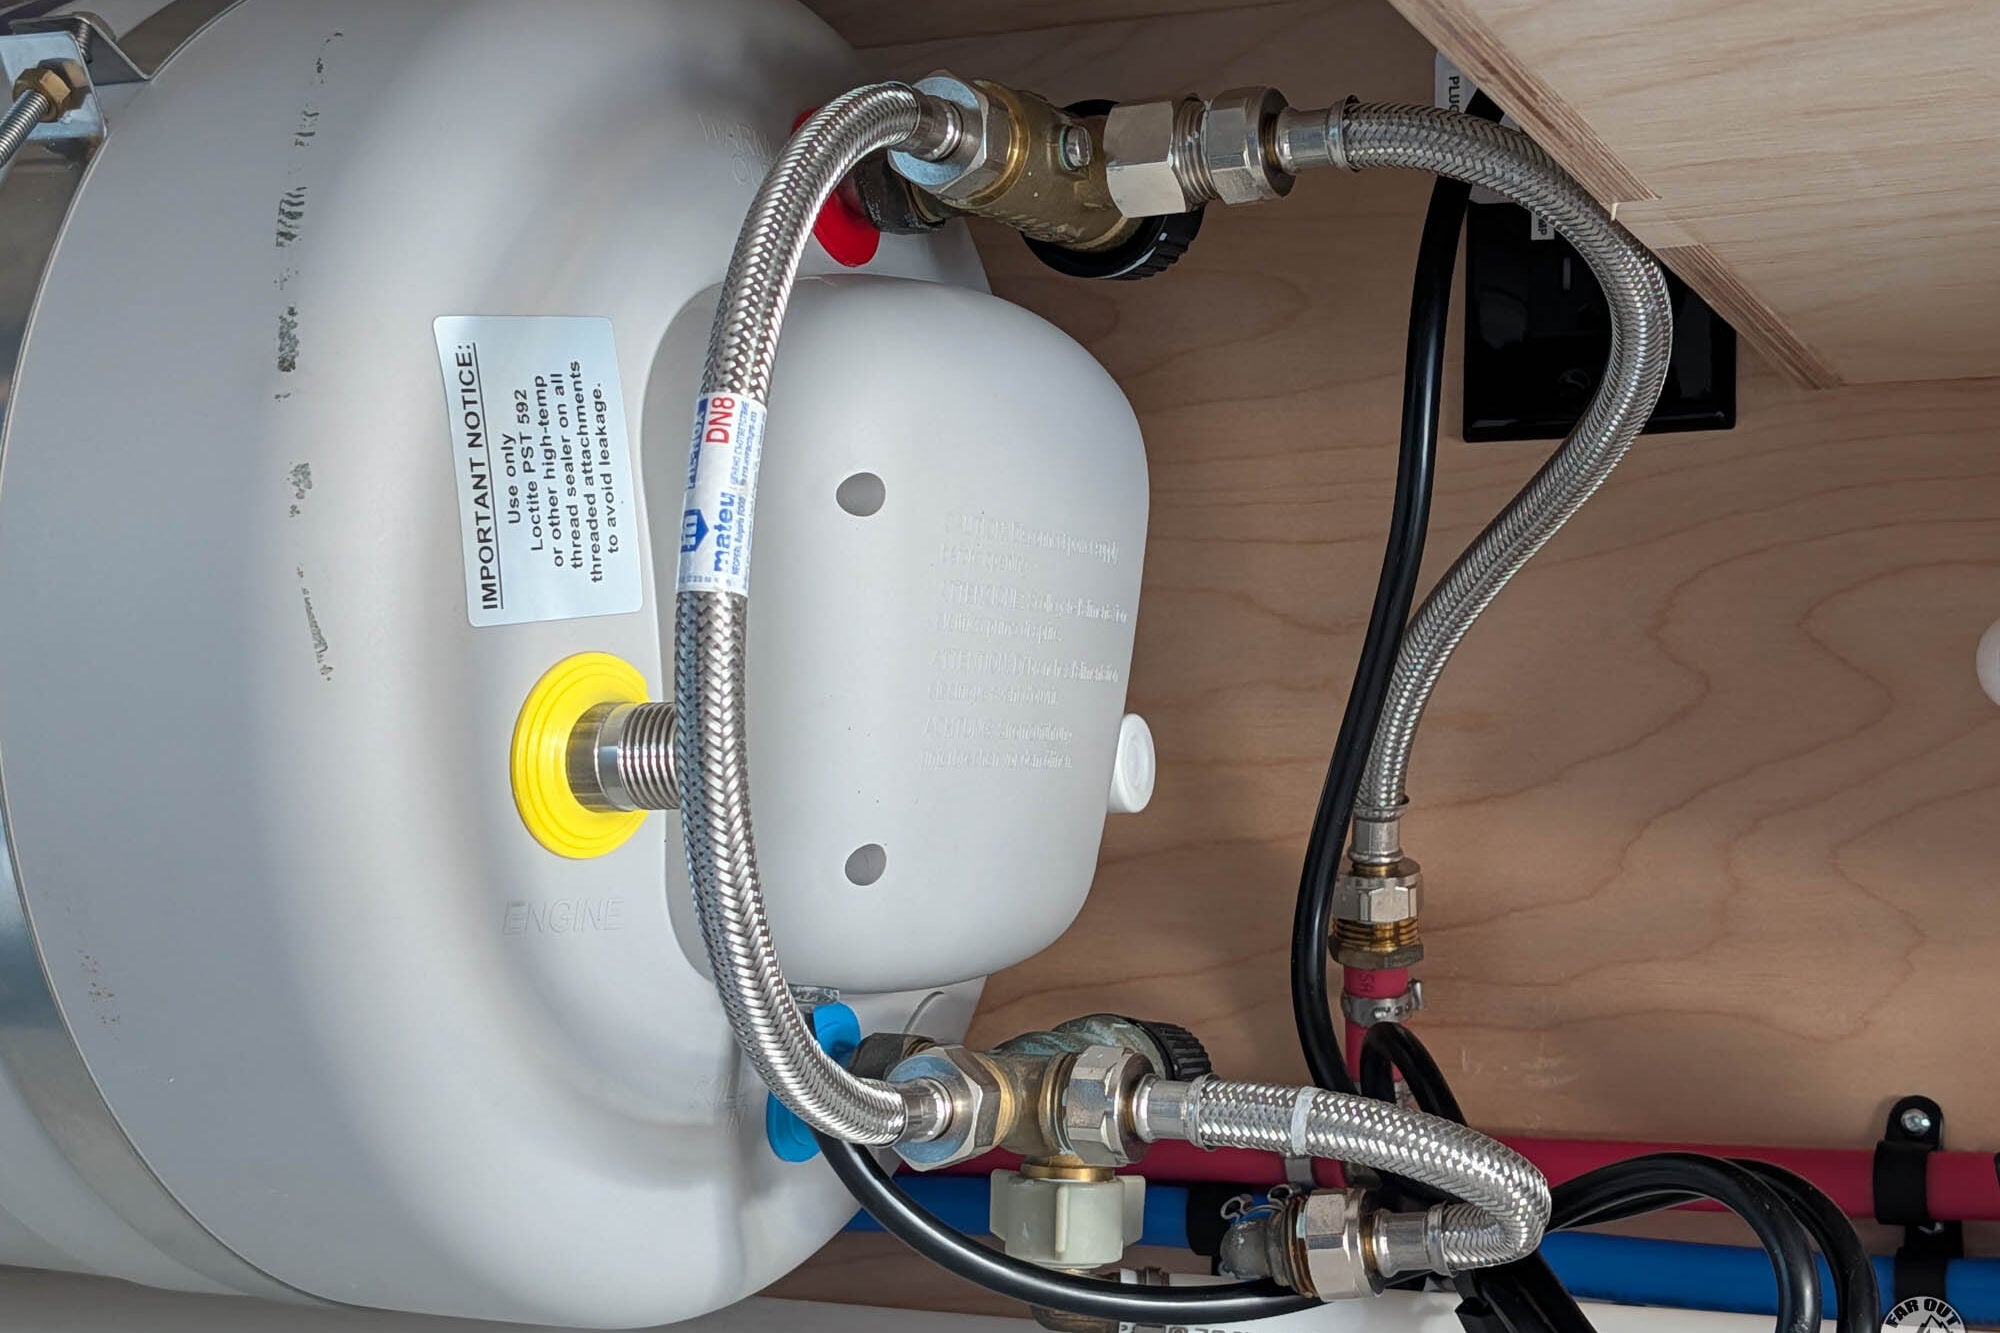
Cold inlet and hot outlet: 1/2″ NPT male on US units (G1/2 BSP nipples also fit).
Cold water enters through the combined safety/non-return valve. Hot water leaves through the thermostatic mixing valve.
Pressure Limits
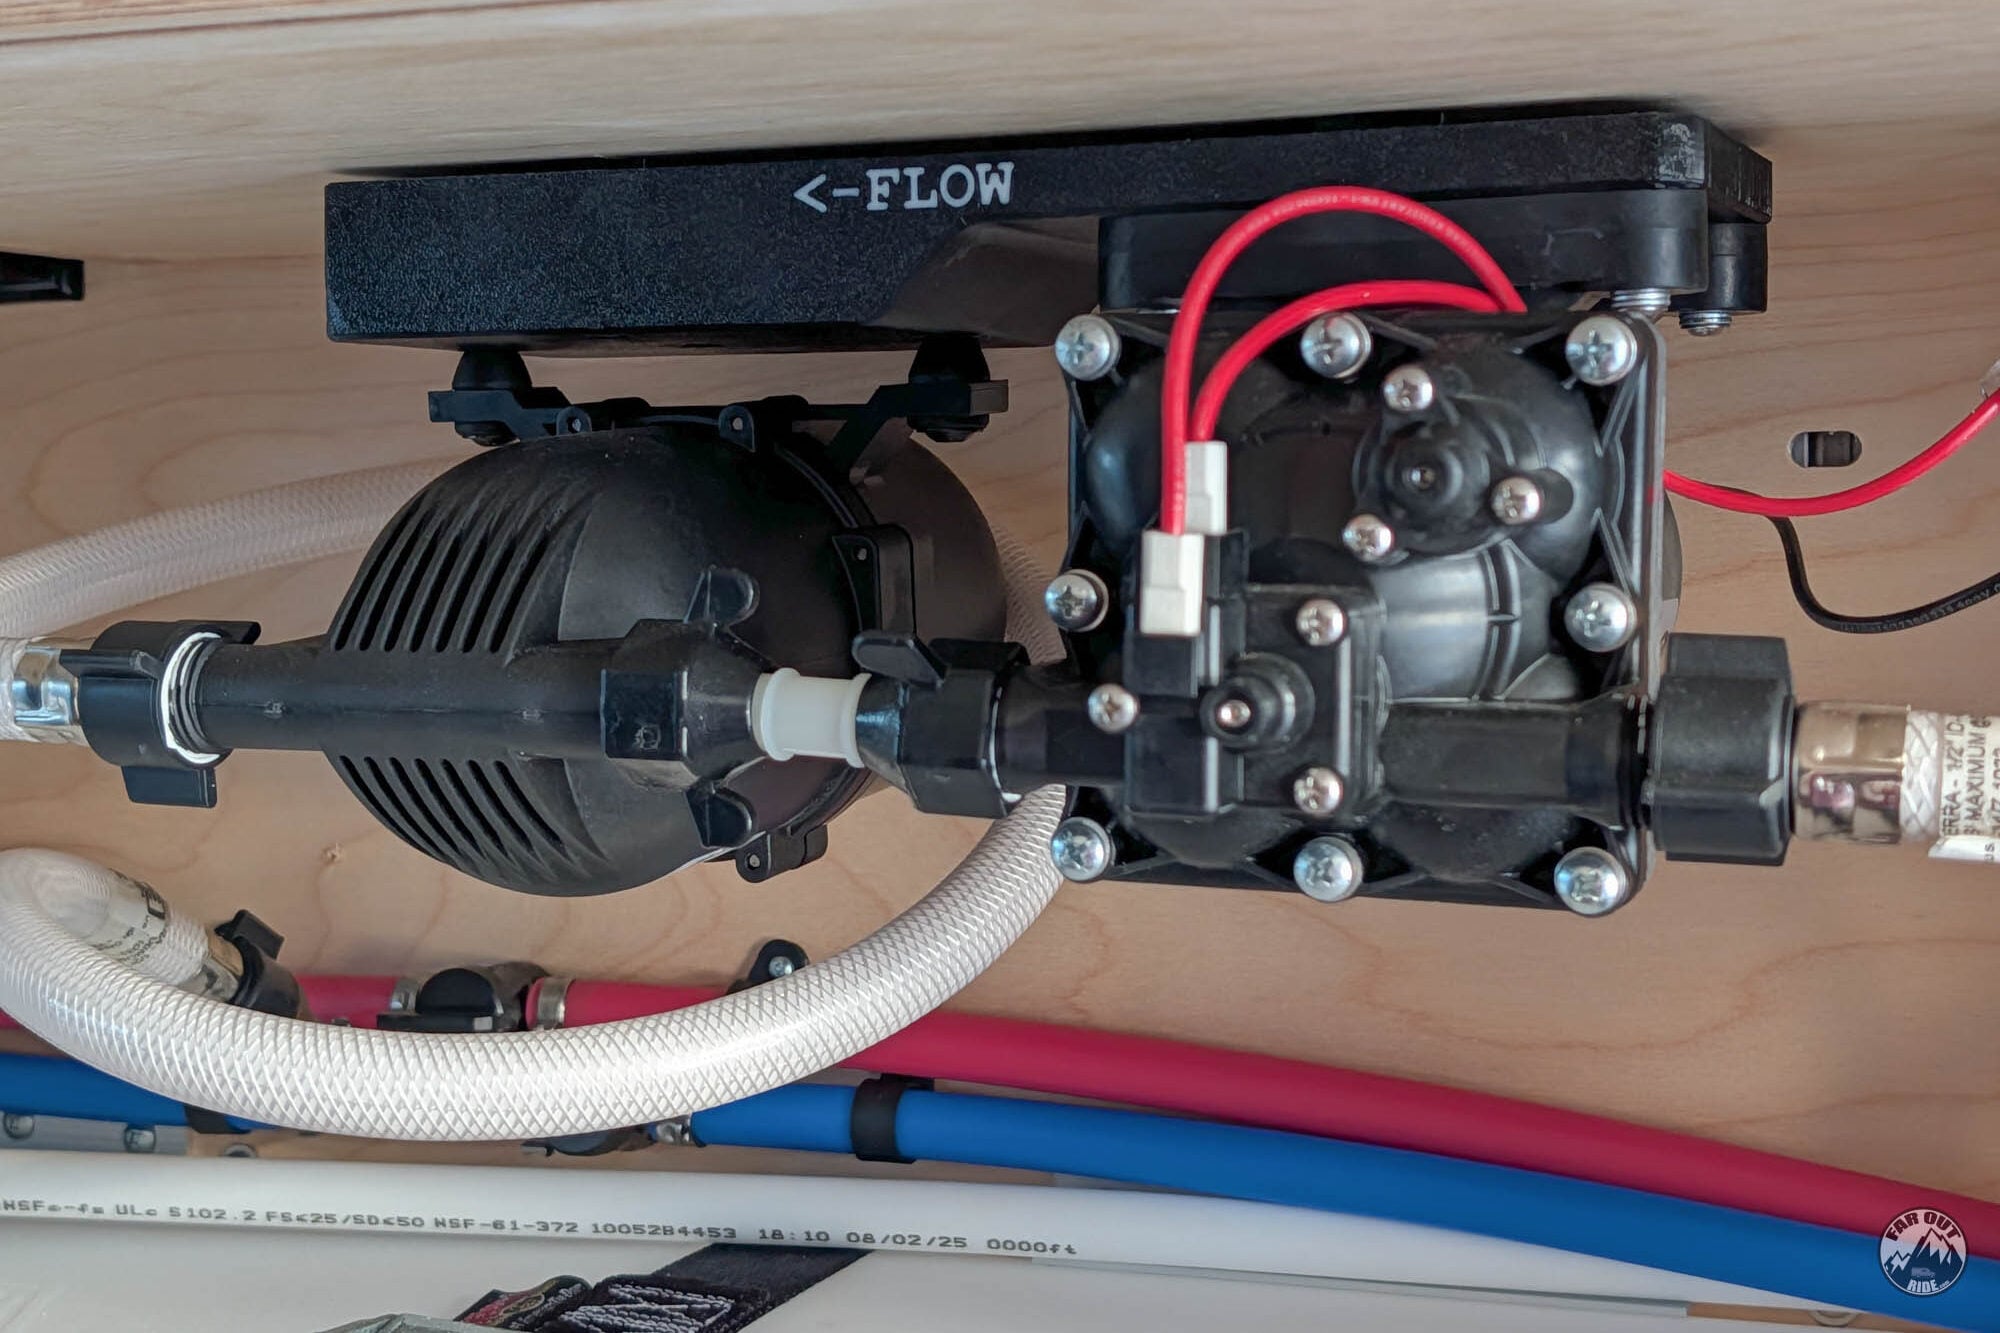
Water pump: 3.8 bar (55 psi) max. Typical van pumps run 2.8 to 3.5 bar, so any common pump is fine.
The tank’s safety valve opens at 6 bar (87 psi).
Hoses
Food-grade, heat-resistant hose rated 8 bar (115 psi), fastened with hose clamps. In a van build, PEX meets the spec and is easier to route.
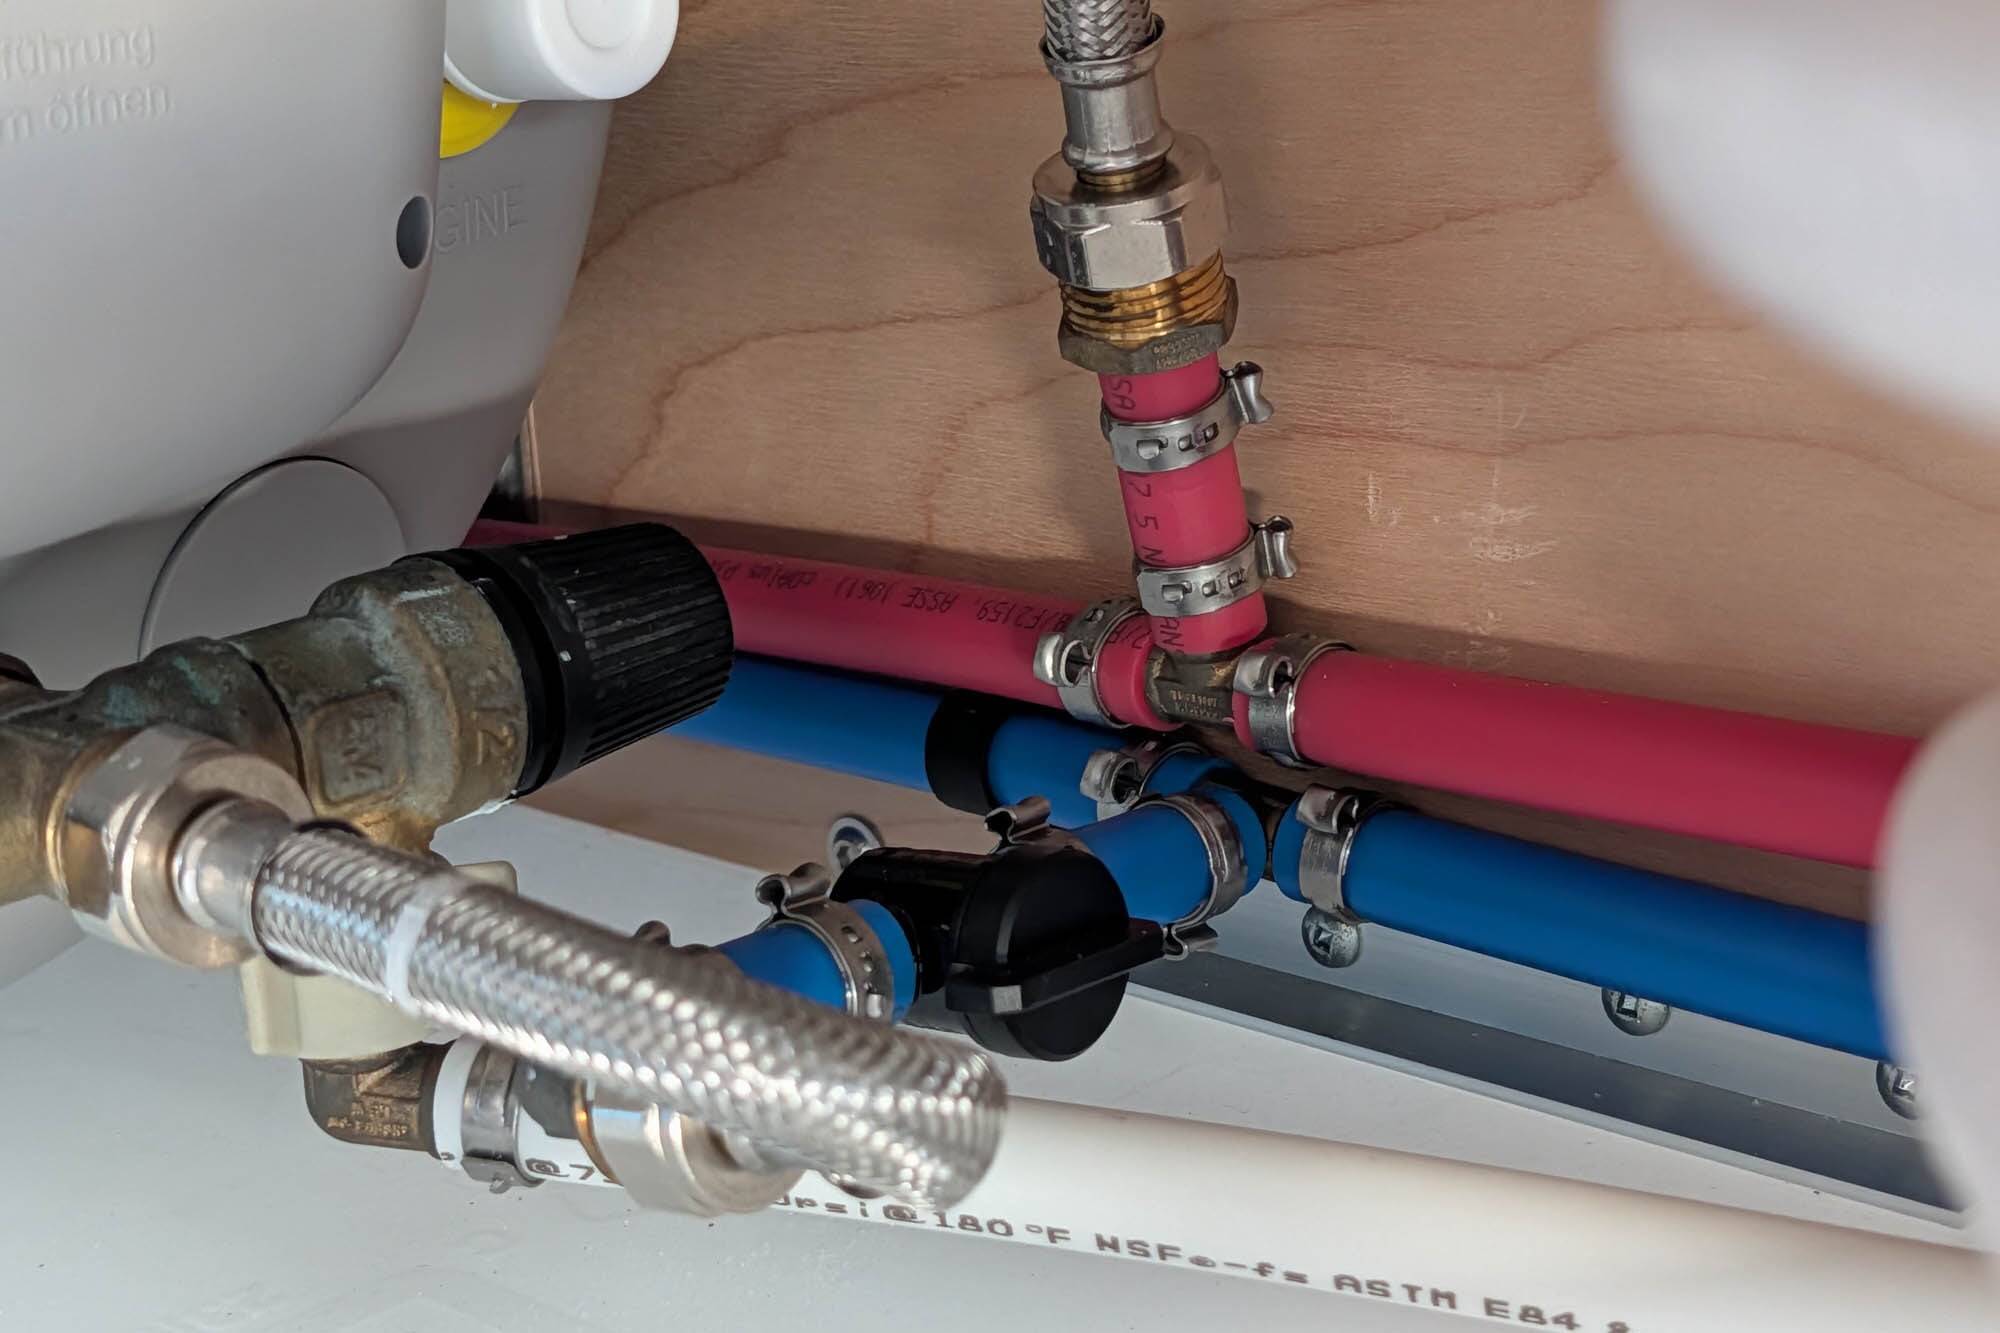
Metal Fittings at the Tank
Brass or stainless only on the heater’s connections. Seal the threads with a curing sealant such as Loctite 577.
Avoid plastic fittings near the tank unless they are specifically rated for the heat.
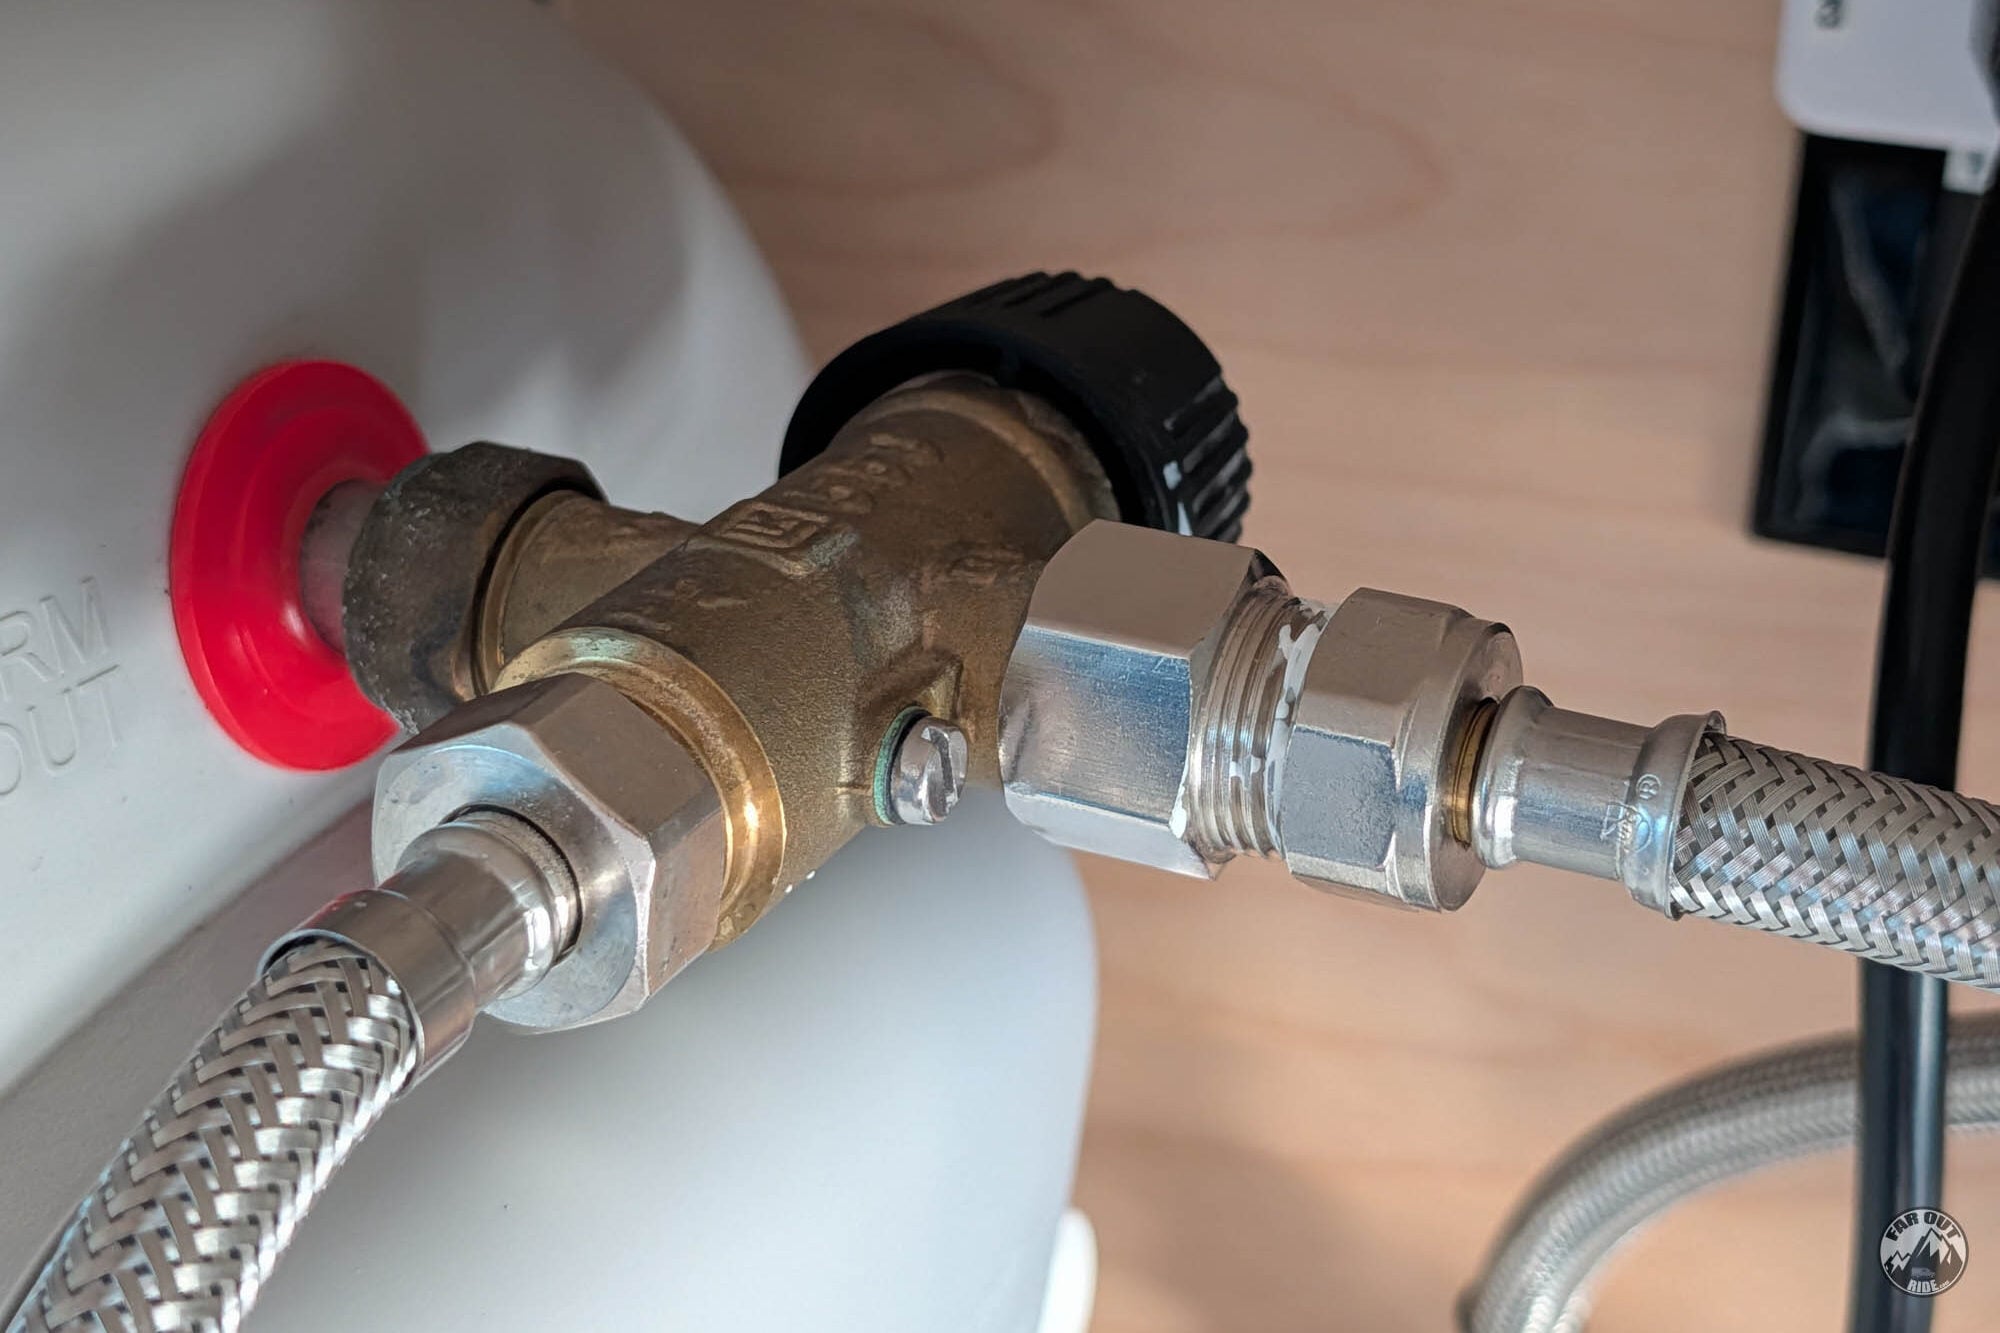
How to Plumb
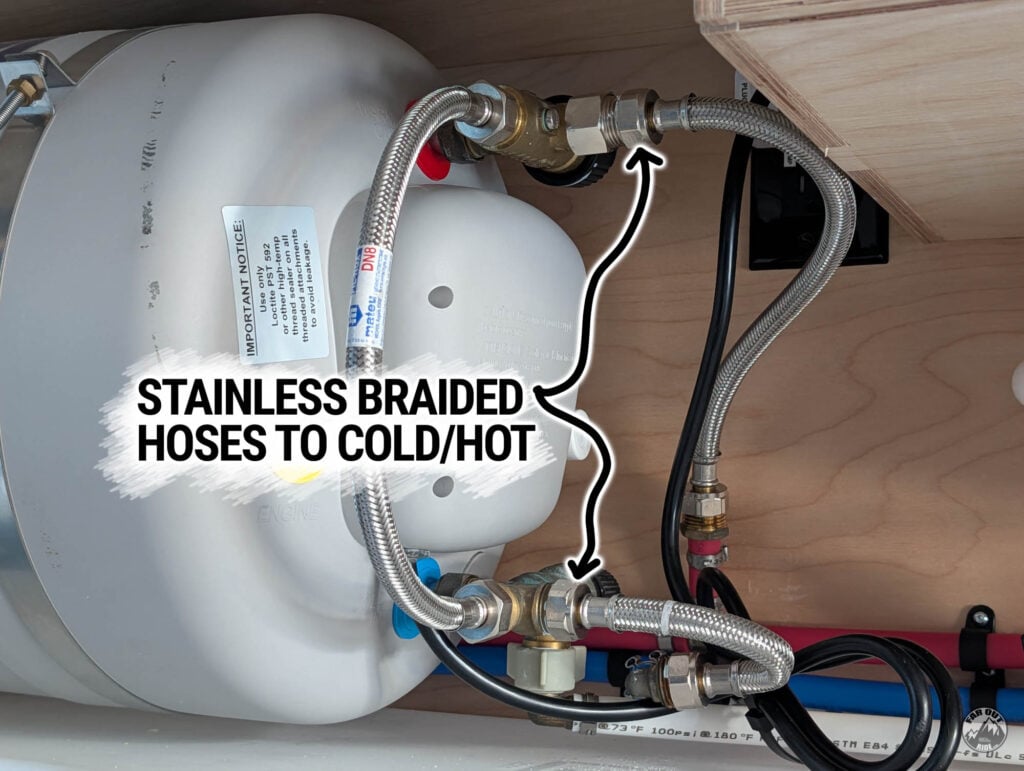
Our North-American Isotemp Spa came with 1/2″ NPT male fittings at the cold and hot ports. We used Braided Stainless Steel hose with 1/2″ NPT Female to connect the heater to the PEX tubing. Having flexible hoses between the appliance and the PEX helps with connecting/disconnecting:
For the rest of our water system installation, please refer to:

Electrical Install
Requirements
Circuit
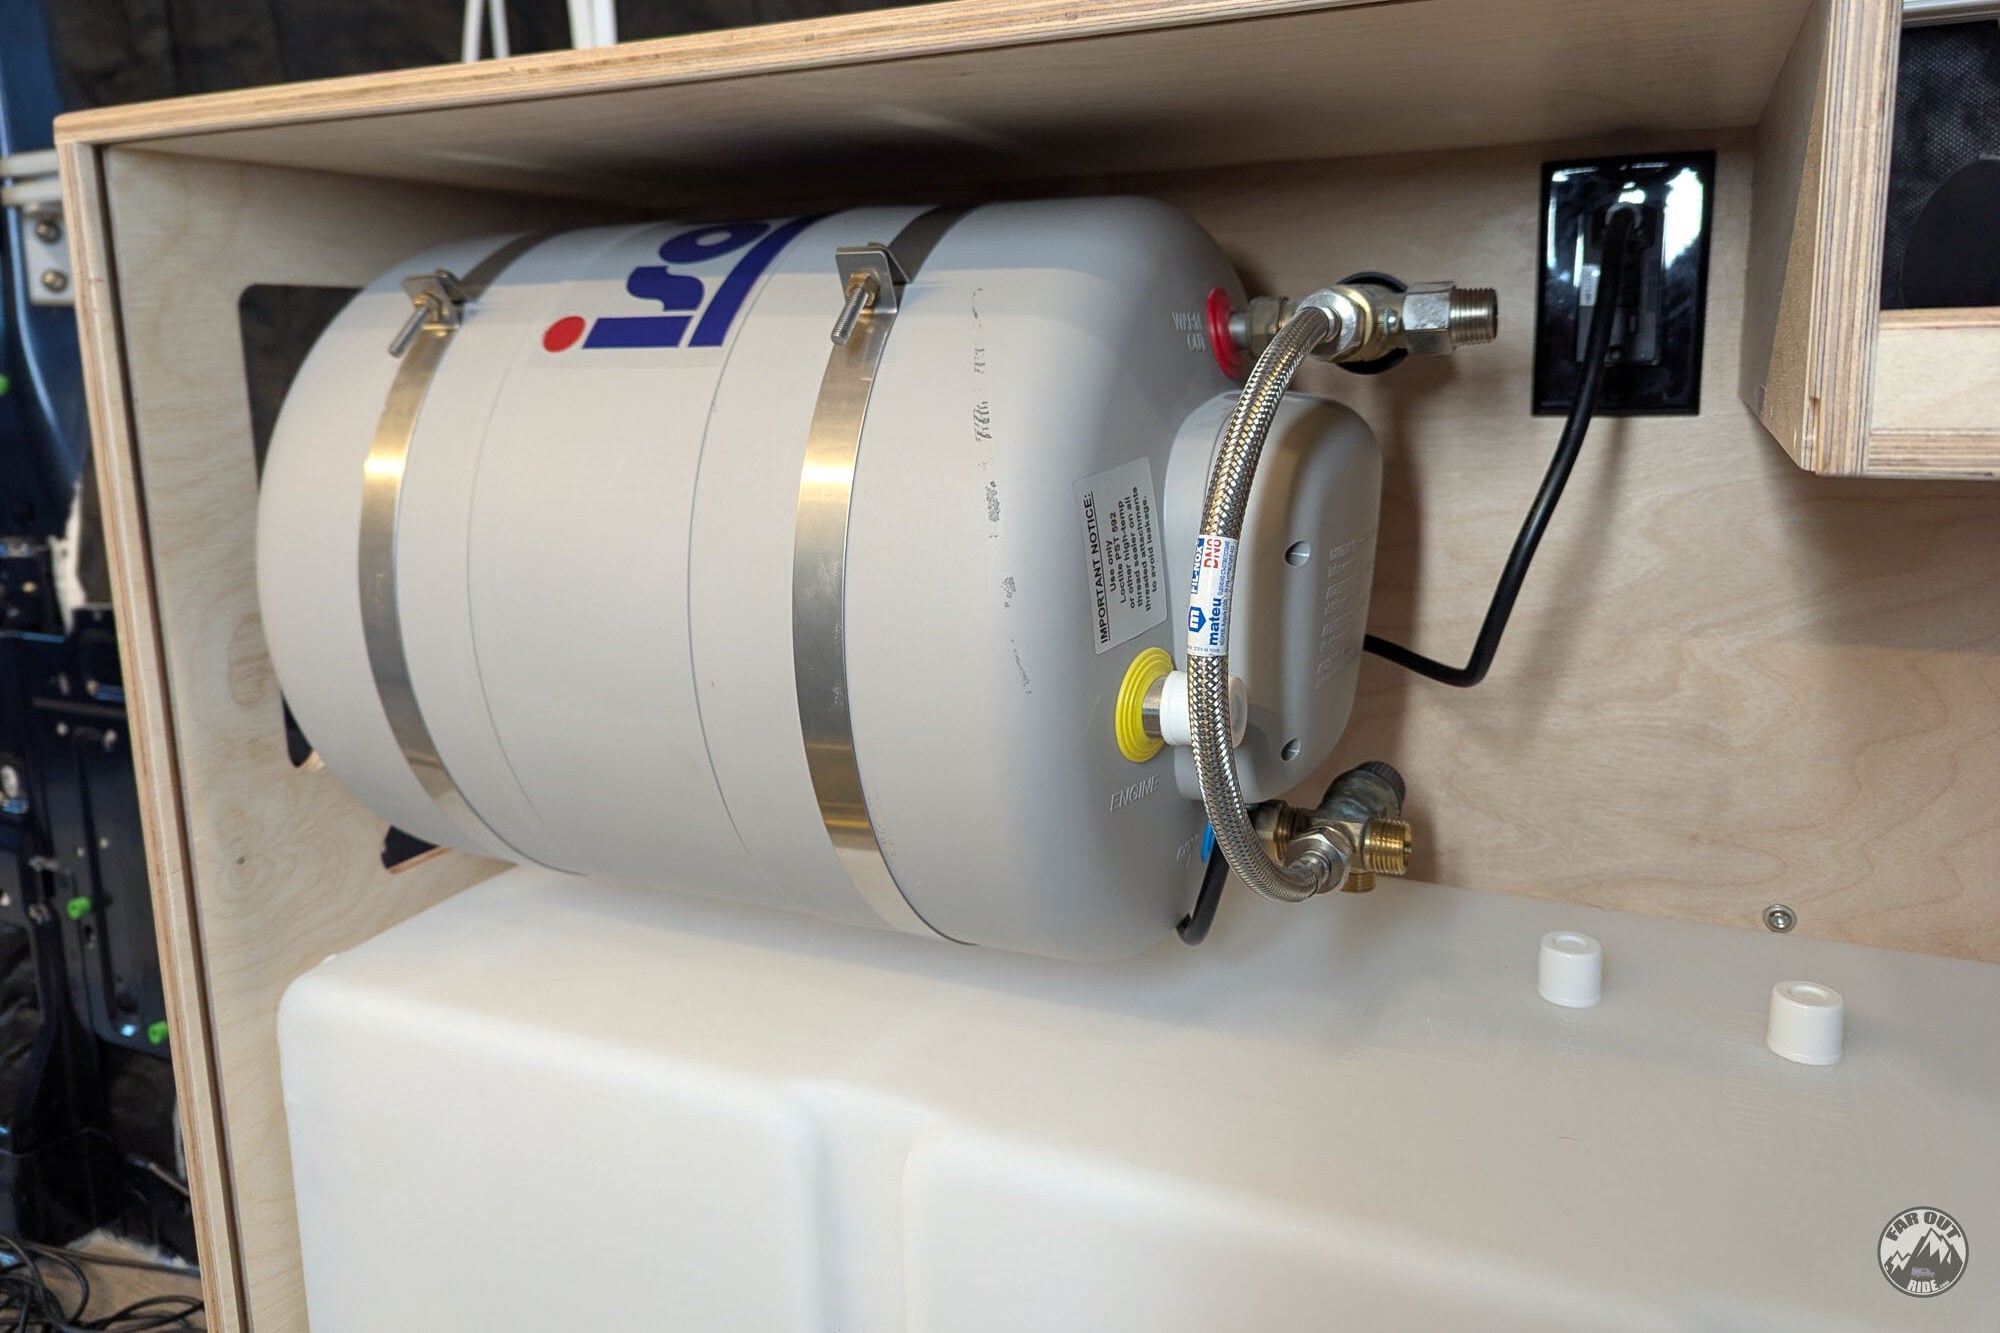
The 750W element draws about 6.3A at 120V. It plugs into a regular receptacle.
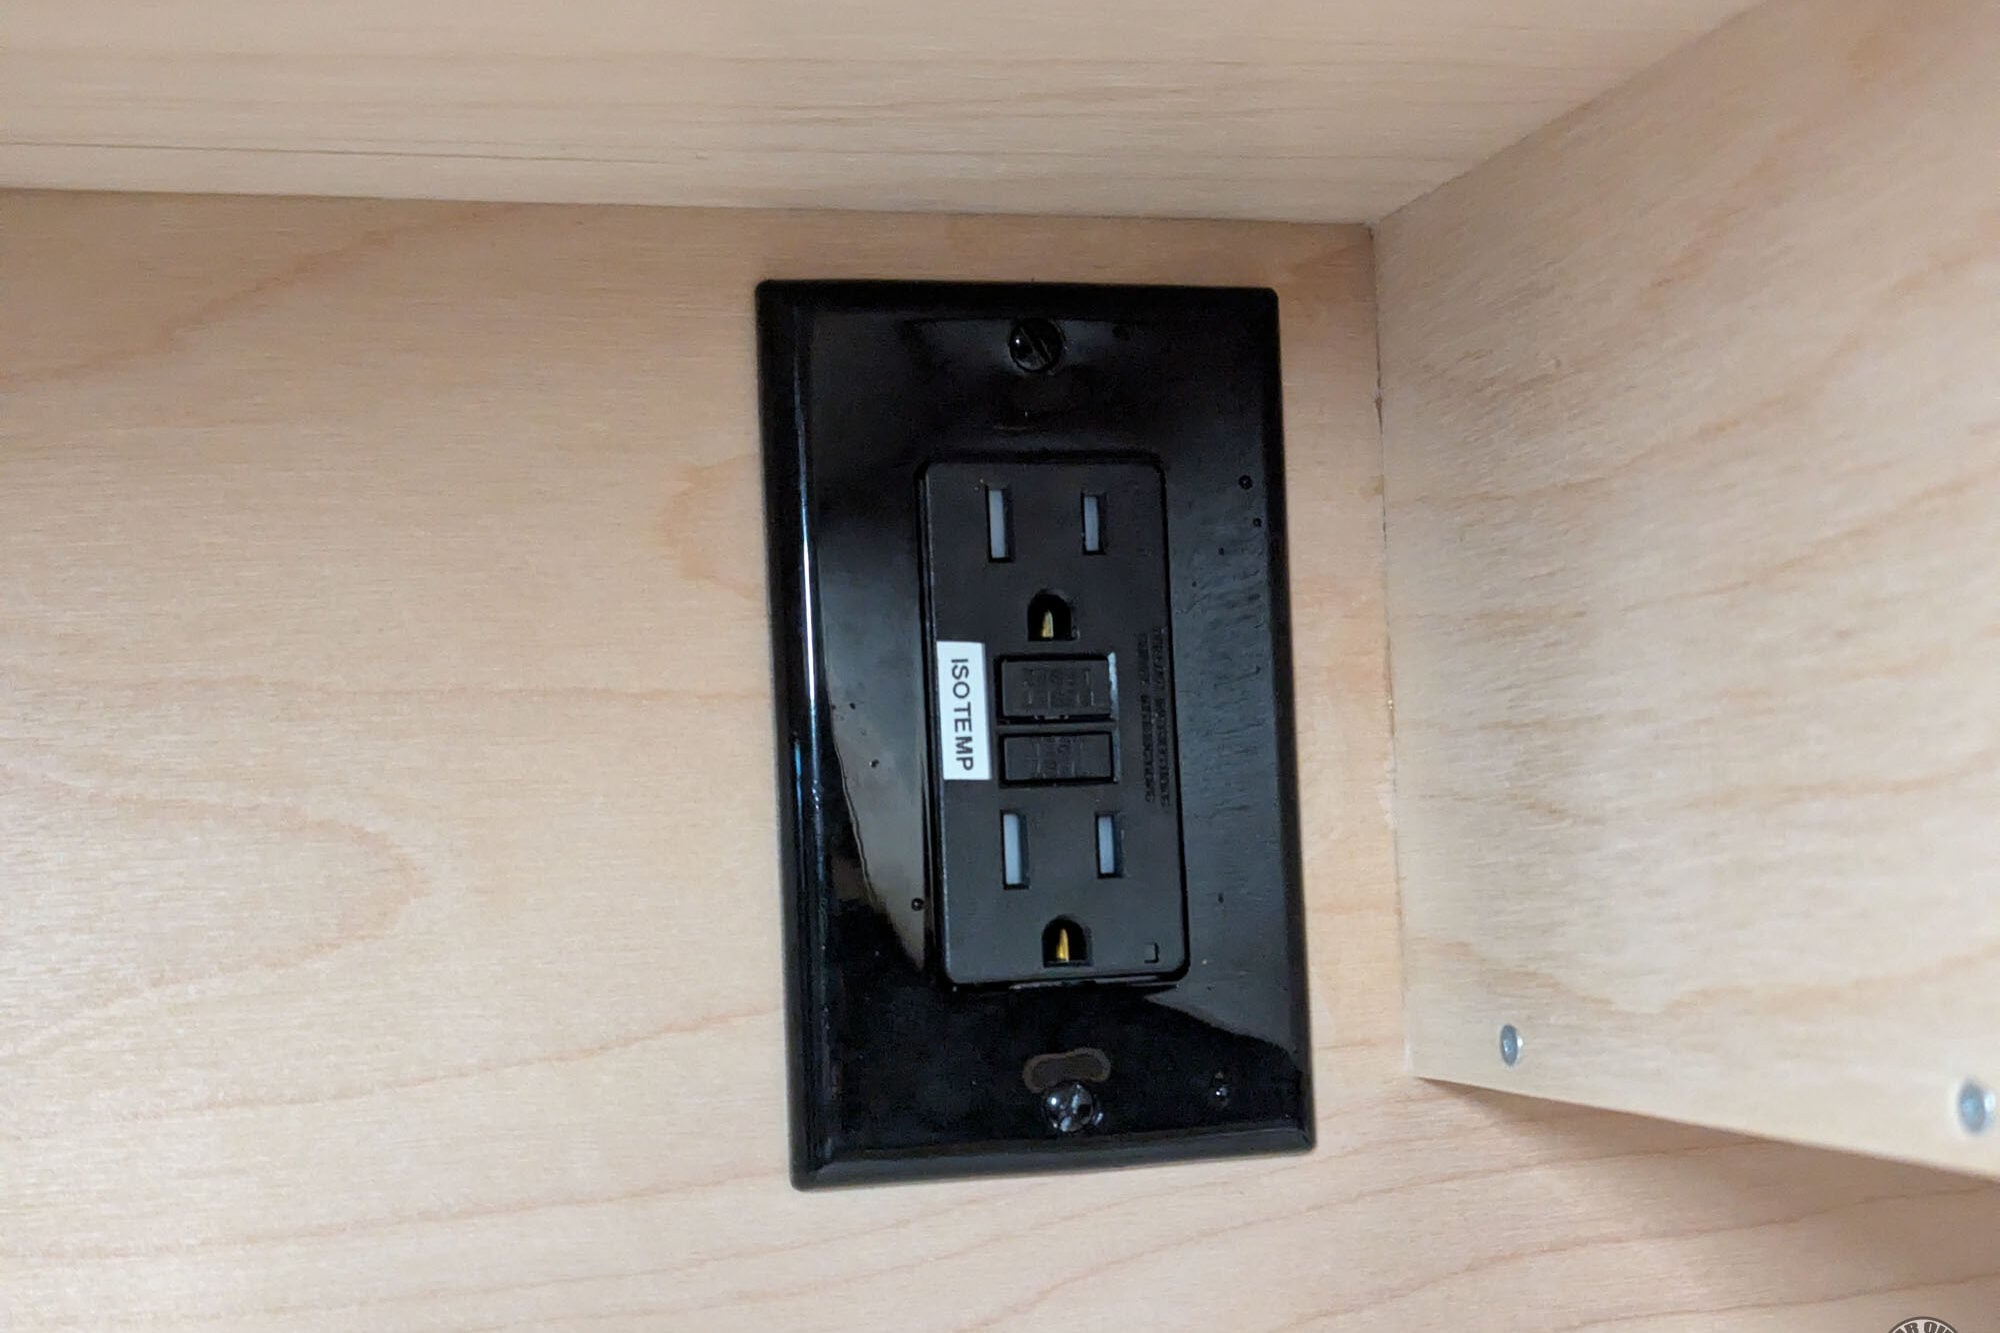
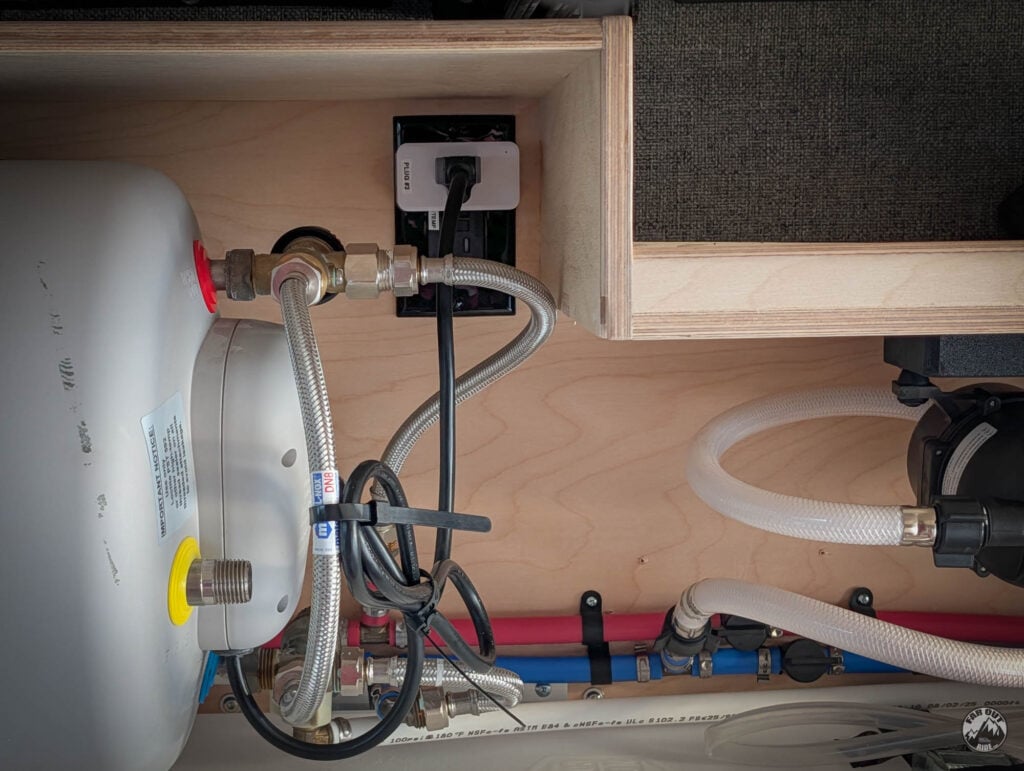
The Isotemp plugs in with its factory cord; we terminated the circuit in an outlet next to the tank.
GFCI Protection
The manual requires GFCI protection. A GFCI outlet at the tank or a GFCI breaker in the panel both satisfy it.
The heater must be properly grounded to the AC system.
Never Power a Dry Tank
Do not energize the element until the tank is full of water. A dry element will burn out.
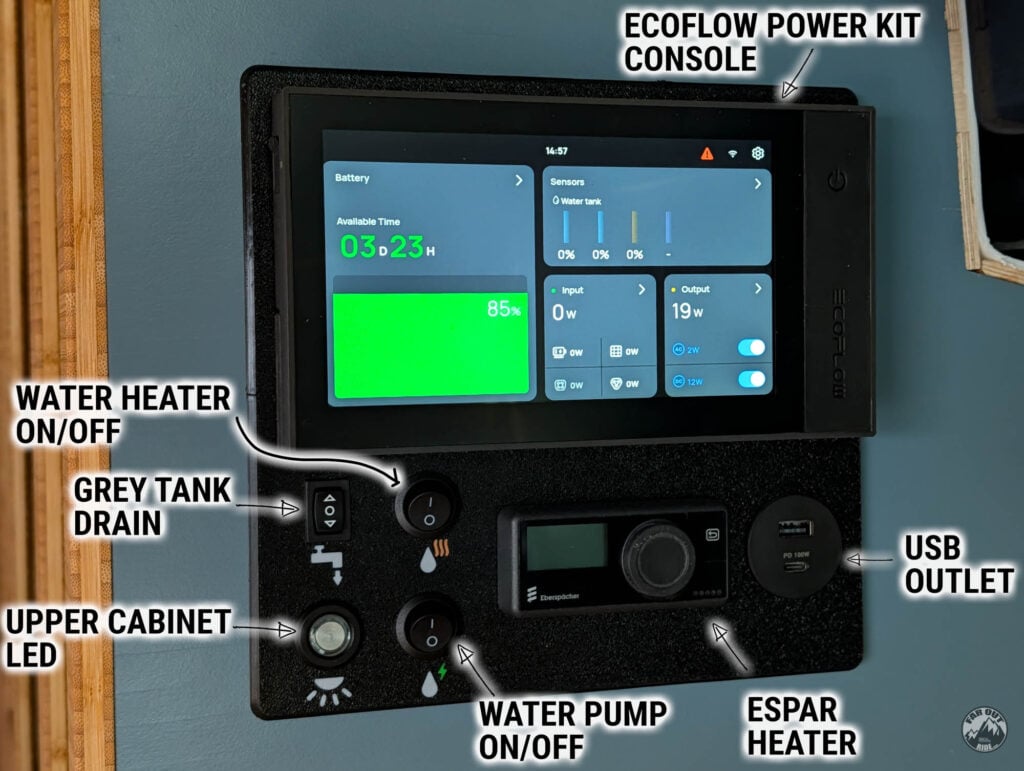
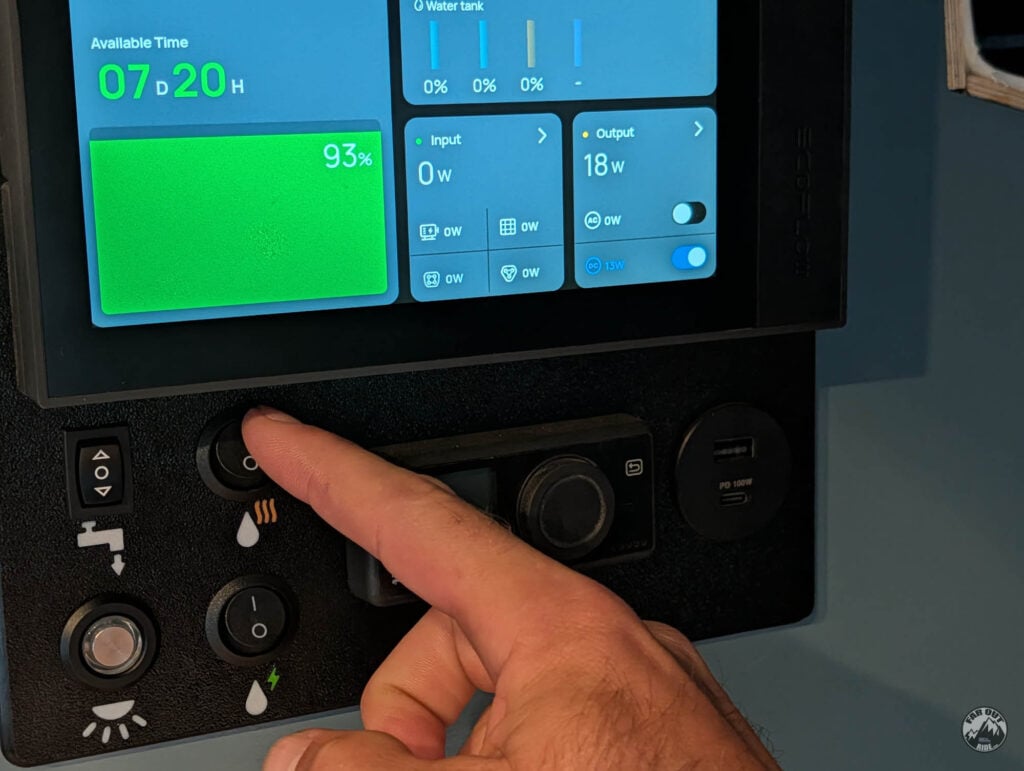
We added a switch to our control panel to easily turn the Isotemp electric element ON/OFF.
Built-In Thermostats
The element is controlled by a 75°C (167°F) working thermostat, backed by a 96°C (205°F) overheat cut-out with a manual reset button behind the front cover.
If the element ever stops heating, check the red reset button first. More in “The Thermal Fuse” below.
How to Wire
Just plug the Isotemp into a 120V outlet, and voilà!
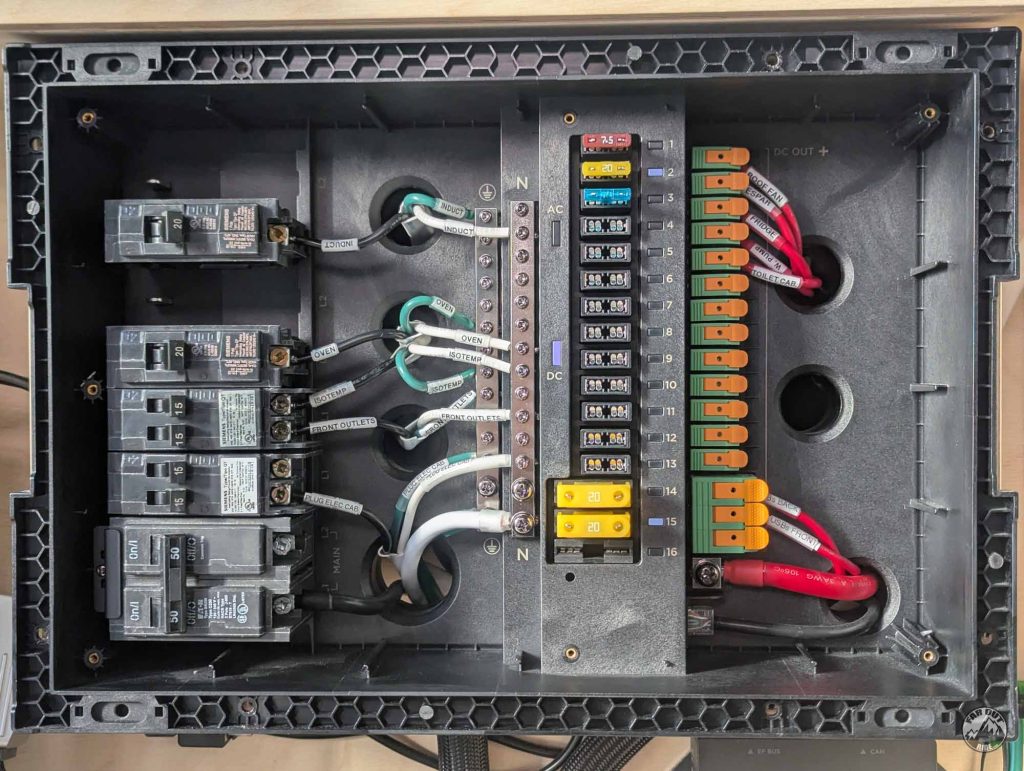
Now, installing and wiring a 120V outlet is another story, and we tell the full story here:
Engine Coolant Install
Requirements
In Series, After the Heater Core
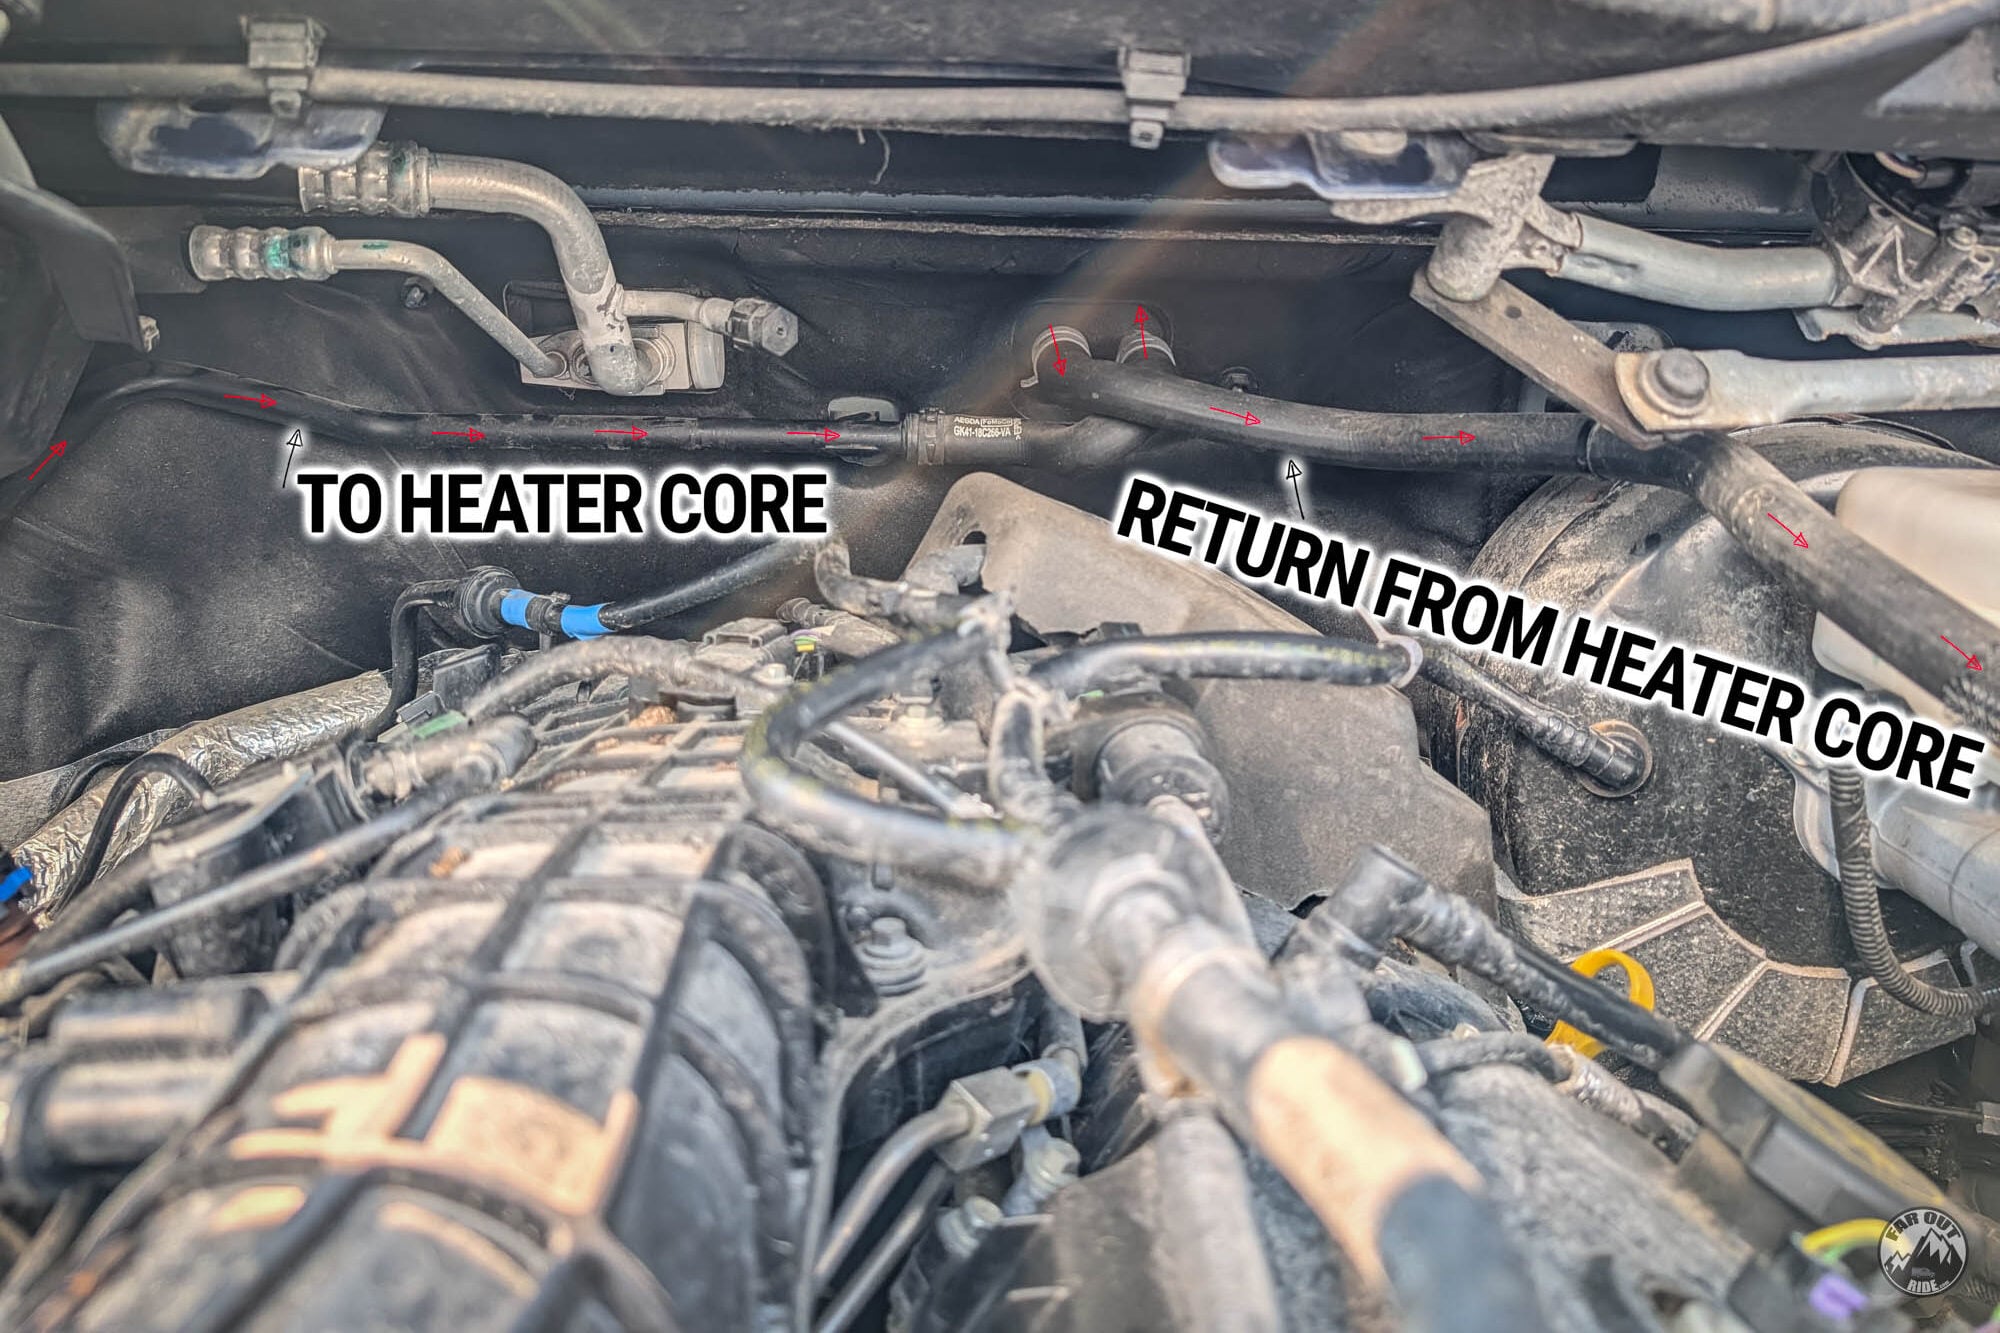
Ford allows connections only into the heater hose between the cab heater core and the water pump return inlet (BEMM §3.2.1). Plumb the Isotemp in series, downstream of the cab heater core. Cab heat keeps priority and the engine’s own water pump circulates the loop.
The heater hose at the firewall labeled GK41-18C266-VA is the supply. Don’t tap into that one.
Ordering a new Transit? Add the Auxiliary Heater Prep Package (option code 62C) at order time — Ford factory-installs the loop under the vehicle, with tap points ready to go. Vans that have it can connect there instead of cutting a hose (and skip most of the routing work below).
Hose Specification
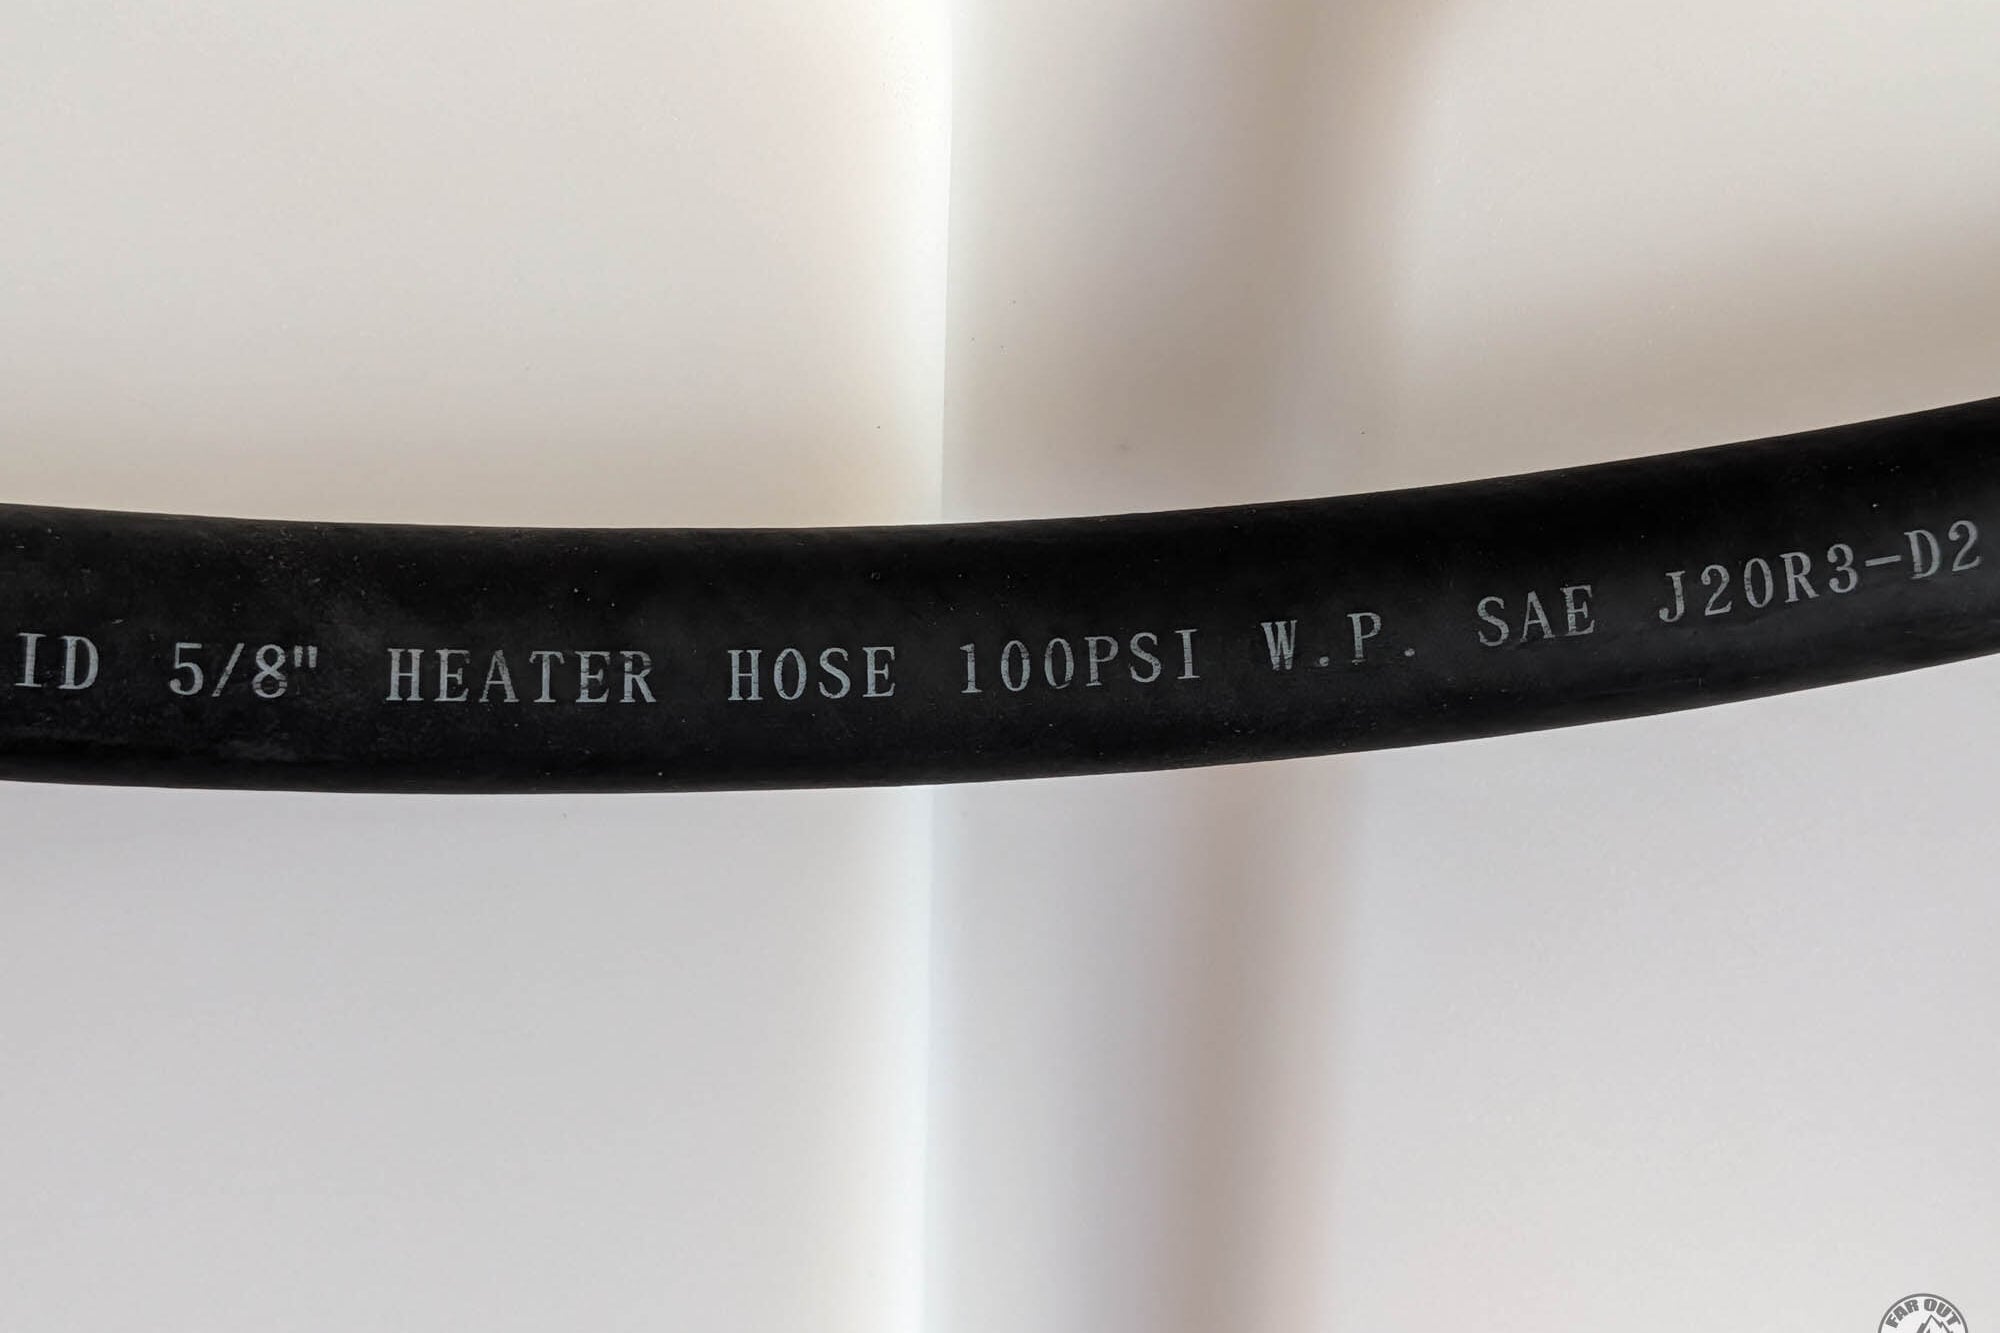
5/8″ (16mm) minimum ID, heat-resistant reinforced hose rated 6 bar (87 psi) and antifreeze-resistant: standard SAE 20R3 heater hose qualifies.
Our return line measured 5/8″ too, so the whole loop stays one size, end to end.
Added Coolant Volume
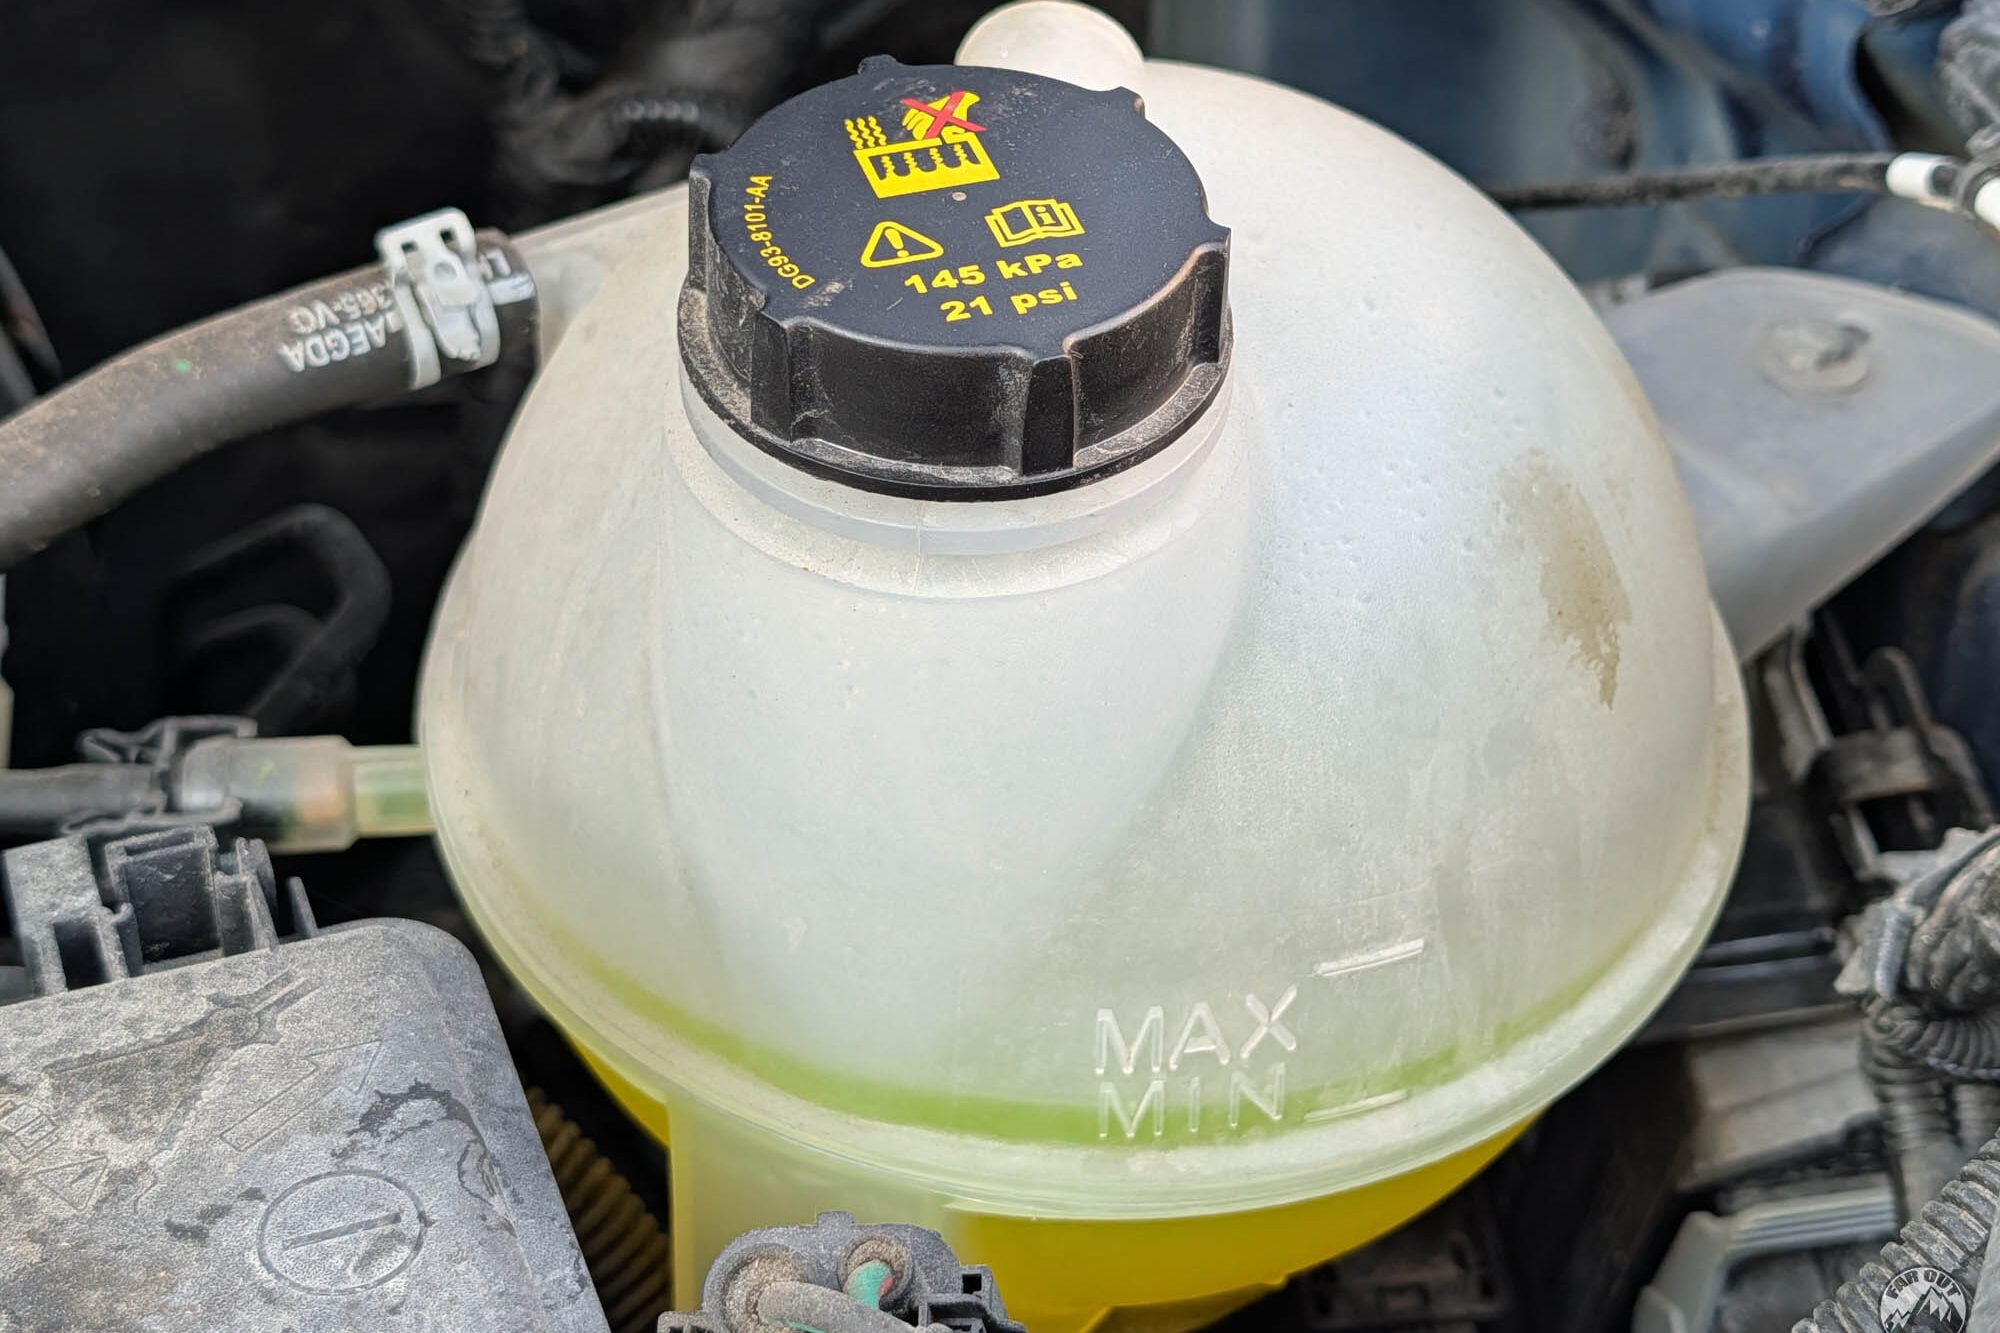
Ford asks for no more than 10% added coolant volume (BEMM §3.2.1). The EcoBoost holds 14.1 L, so the guideline works out to about 1.4 L.
Our 56 ft loop adds roughly 3.4 L in the hose plus 0.5 L in the exchanger: about 27%, well over the guideline. Every real installation we found is in the same range, and they have run for years without trouble.
Why it works: coolant expands about 4% from cold to hot, so the extra 4 L adds only ~0.17 L of expansion, which the degas bottle absorbs between its MIN and MAX marks.
Keep the run as short as your layout allows, and check the cold coolant level over the first few drives.
Coolant Rules
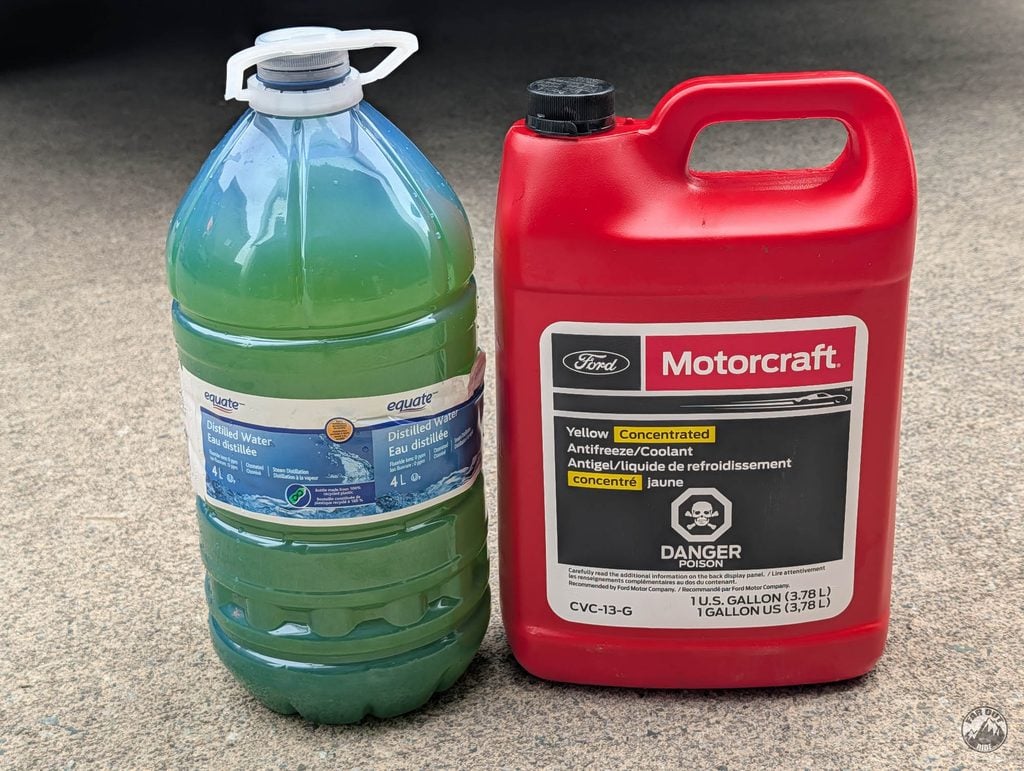
Motorcraft Yellow (spec WSS-M97B57-A2) only (Ford Transit). Never mix coolant types, and never use propylene glycol.
If using concentrate: mix with distilled water, never tap. Tap water carries minerals that attack the system over time.
Protect the Run
Heat-sleeve any hose within 100 mm (4″) of exhaust components (BEMM), and secure the run to structure every 30 to 45 cm, clear of brake lines, fuel lines and moving parts.
Secure the hose to the body structure or to proper brackets only. Never tie it to wiring harnesses, brake or fuel lines, or any other flexible component.
Near the engine, keep 10 mm (0.4″) of clearance to the engine assembly at full torque roll. The engine rocks on its mounts under load.
Everything that lives in the engine bay must tolerate heat: Ford says to assume 130°C (266°F) under the hood when selecting materials (BEMM §3.2.3).
How to Connect to Engine Coolant
It’s extremely challenging to take clear photos in the engine bay and under the van… we took as many photos as we could, and let them speak for themselves!
To secure the engine coolant hoses, we used a mix of:
- Heat- and UV-Stabilized Zip Ties. Unless noted otherwise, assume zip ties are rated for up to 85°C (185°F). The engine bay and near the exhaust can get hotter than that.
- Push-Mount (Fir Tree) UV-Stabilized Zip Ties. Mount into existing unthreaded holes.
- Stainless Steel Zip Ties. If mounting very near to the exhaust.
- Stainless Steel Cushioned P-Clamp 1″. Mount into existing threaded holes.
Engine Bay
Bypass Valve
Per the Isotemp manual, coolant can flow through the heat exchanger at all times, even when the tank is empty.
As such, a bypass valve is not mandatory. But if the loop to/from the Isotemp fails (rodent, debris, etc.) and coolant is lost, that’s bad news for the engine (no more cooling). So, we like having the option to bypass it.
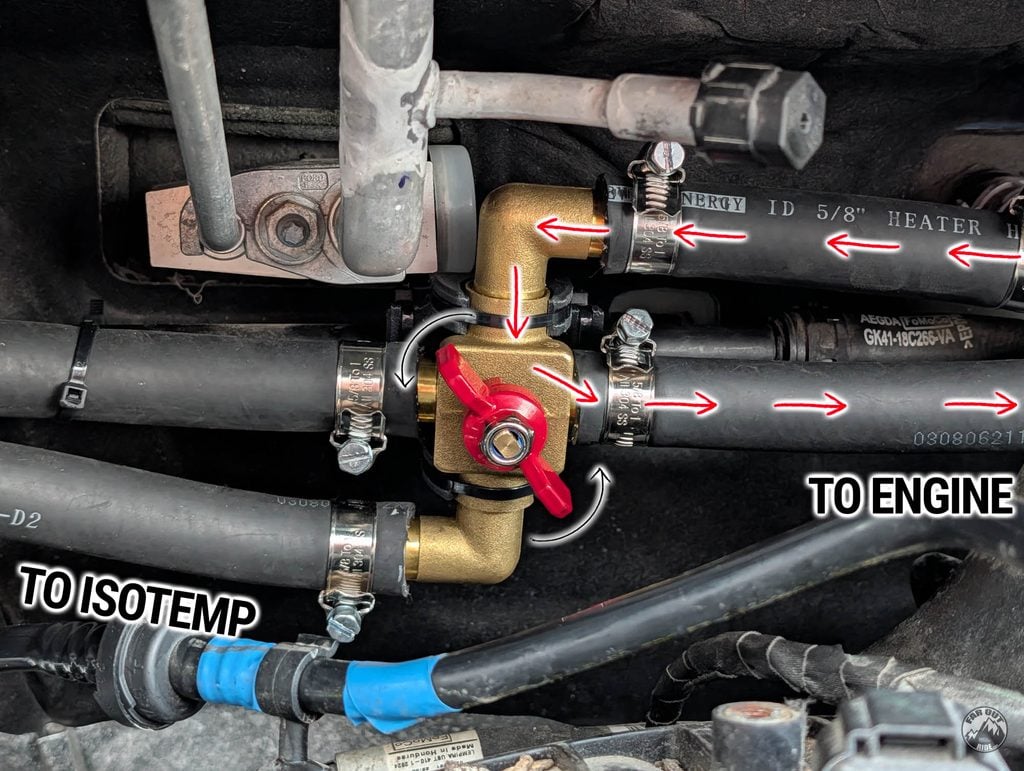
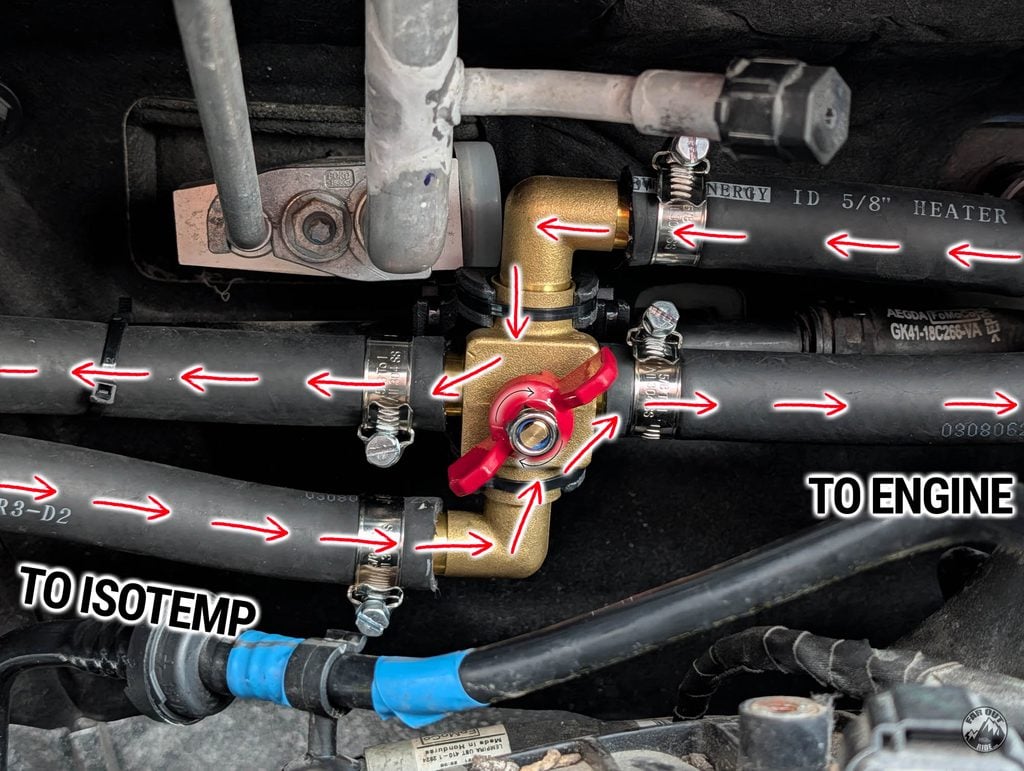
Here’s our 3.5L EcoBoost before any modification:
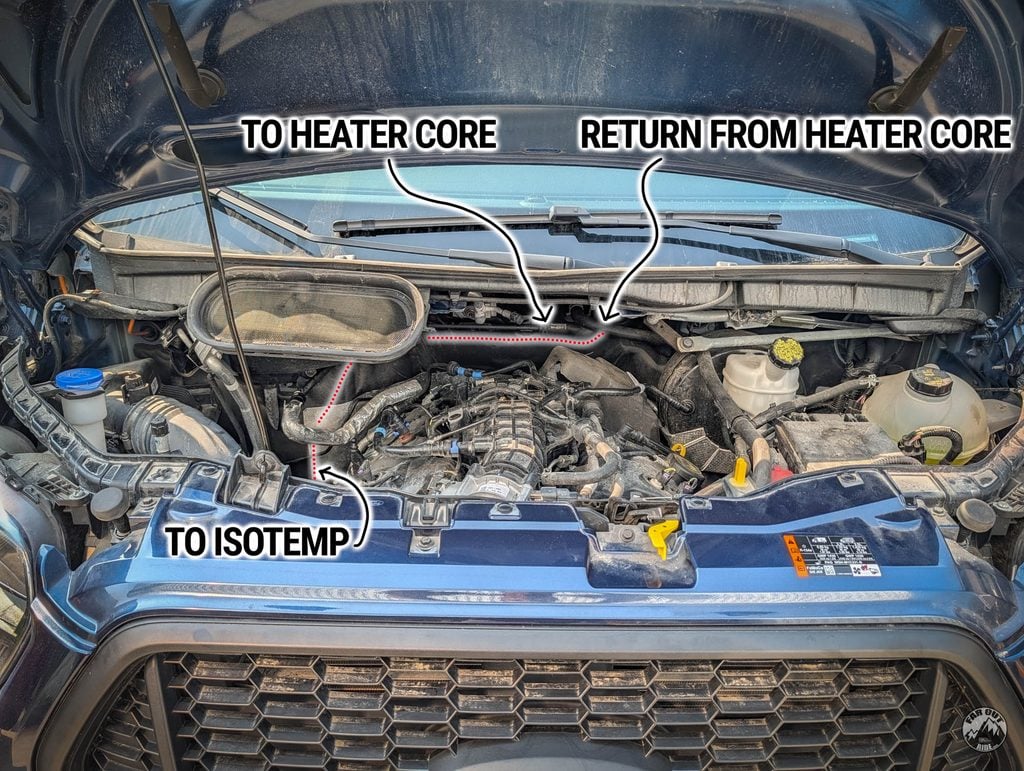
Per BEMM, we will connect the Isotemp loop to the return hose – that’s after the heater core:
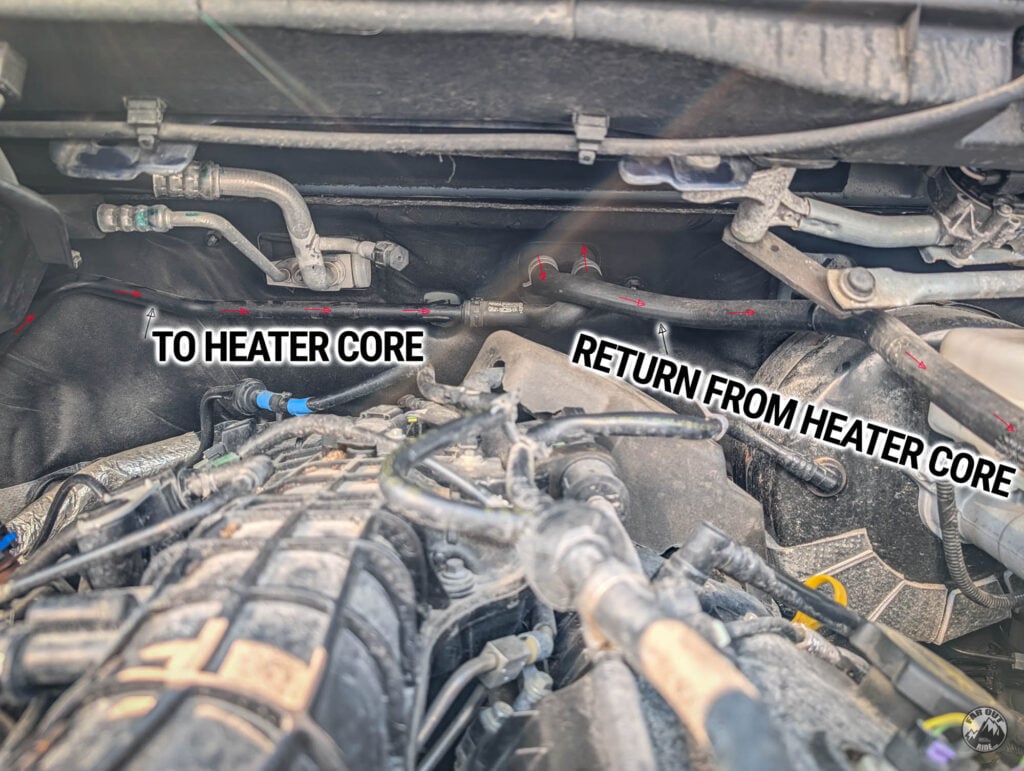
And here’s the routing after the fact (click to enlarge):
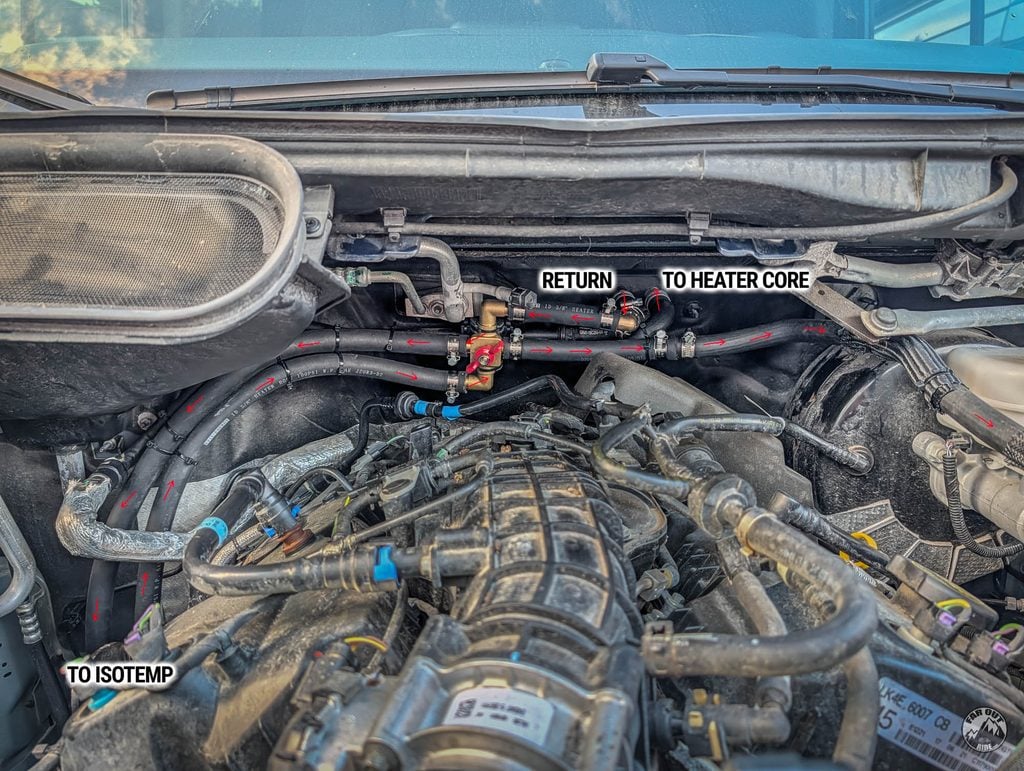
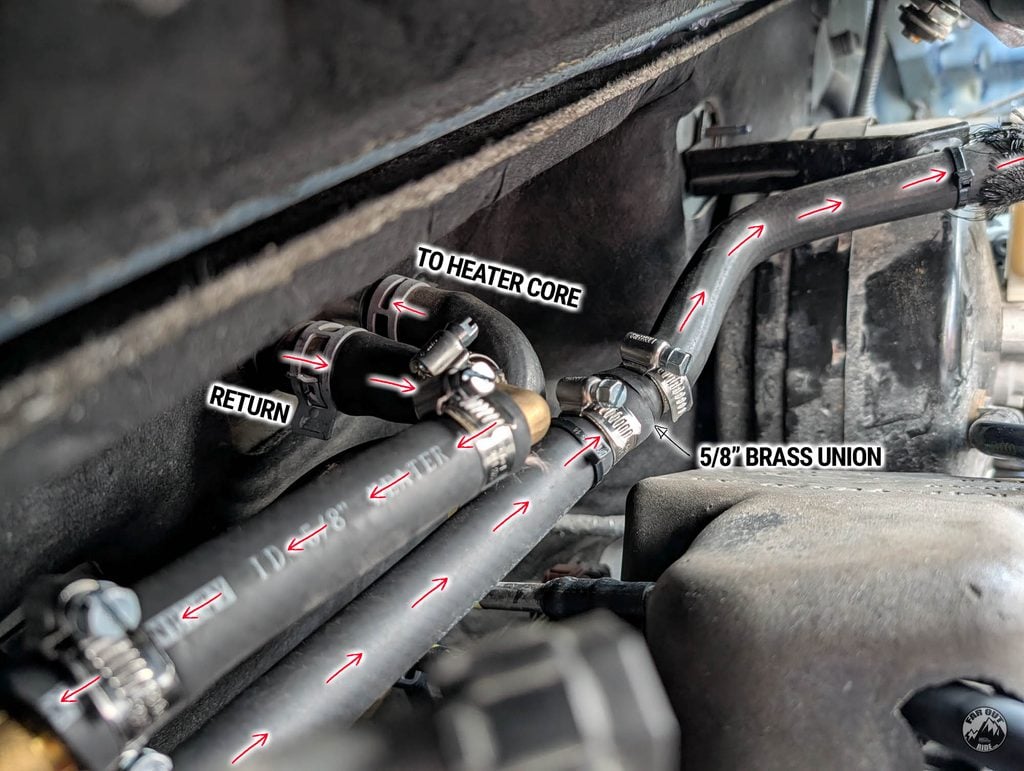
We trimmed the return hose near its end (expect ~100 mL of coolant to spill), used a 5/8″ brass elbow to get to the bypass valve, then a 5/8″ brass union to reconnect to the trimmed hose after the bypass valve:
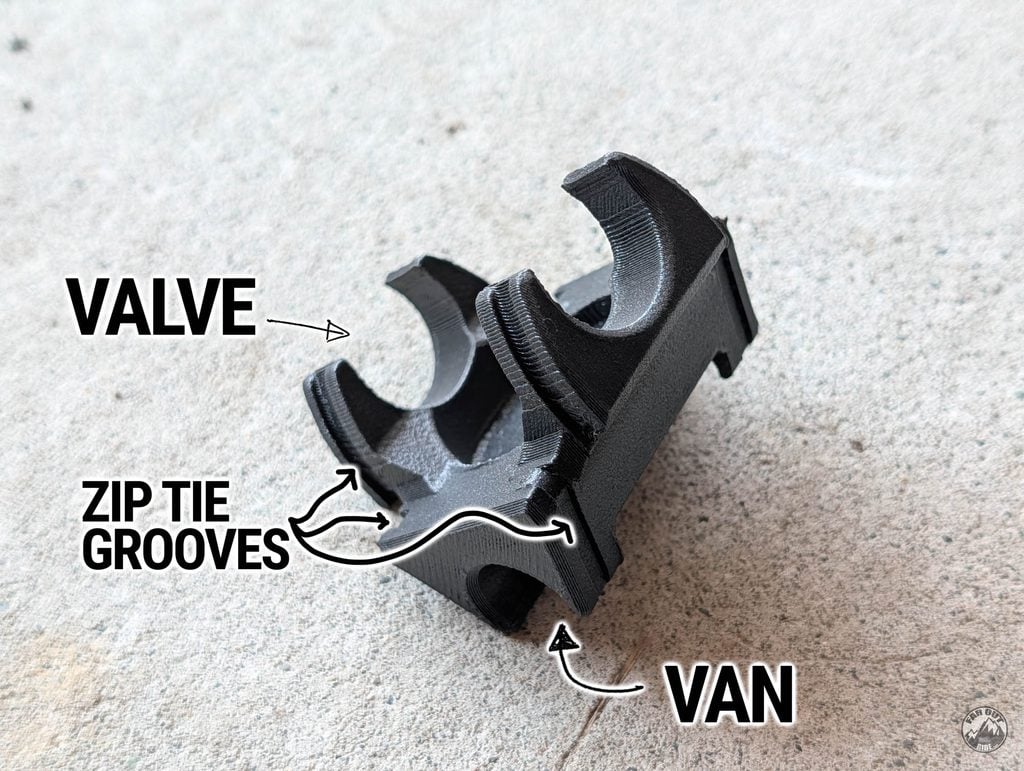
We designed and 3D printed a bracket to hold the valve, with zip-tie grooves as a double-safety feature. It’s made out of PBT and resists up to 130°C (266°F) (PBT is a tough engineering plastic commonly used in car engine bays because it resists heat, moisture, and harsh fluids like oil, fuel, and coolant.):
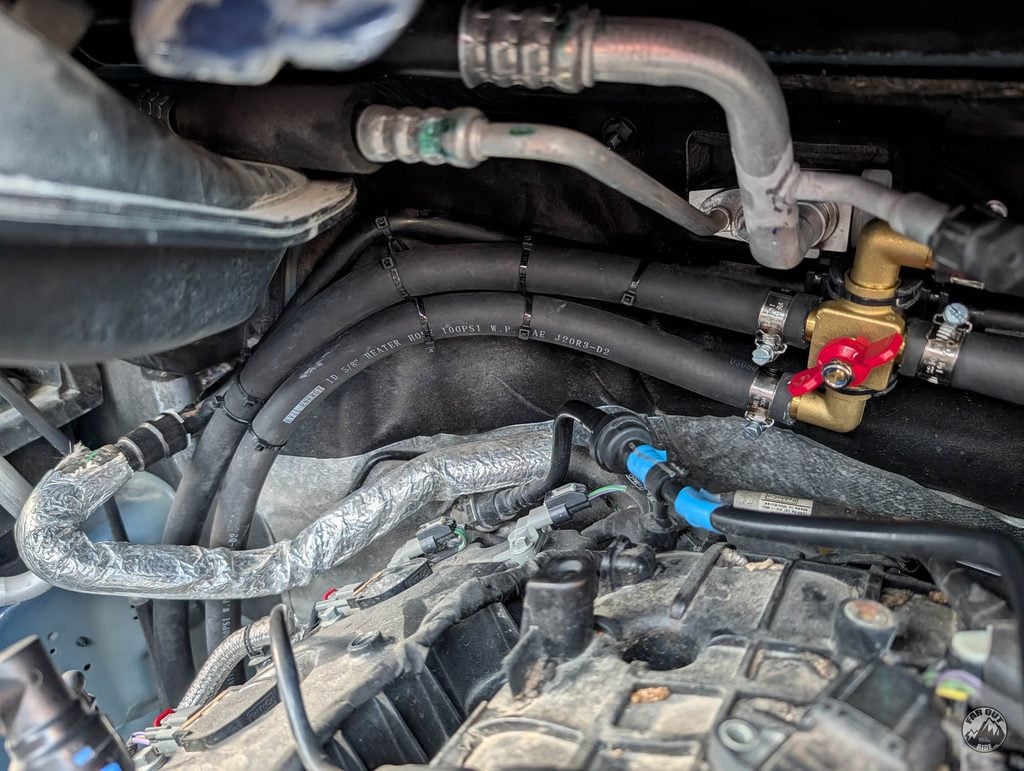
The loop to the Isotemp is routed towards the passenger side:
Then it goes towards the front axle. We 3D printed a bracket that attaches to the existing M10 stud:
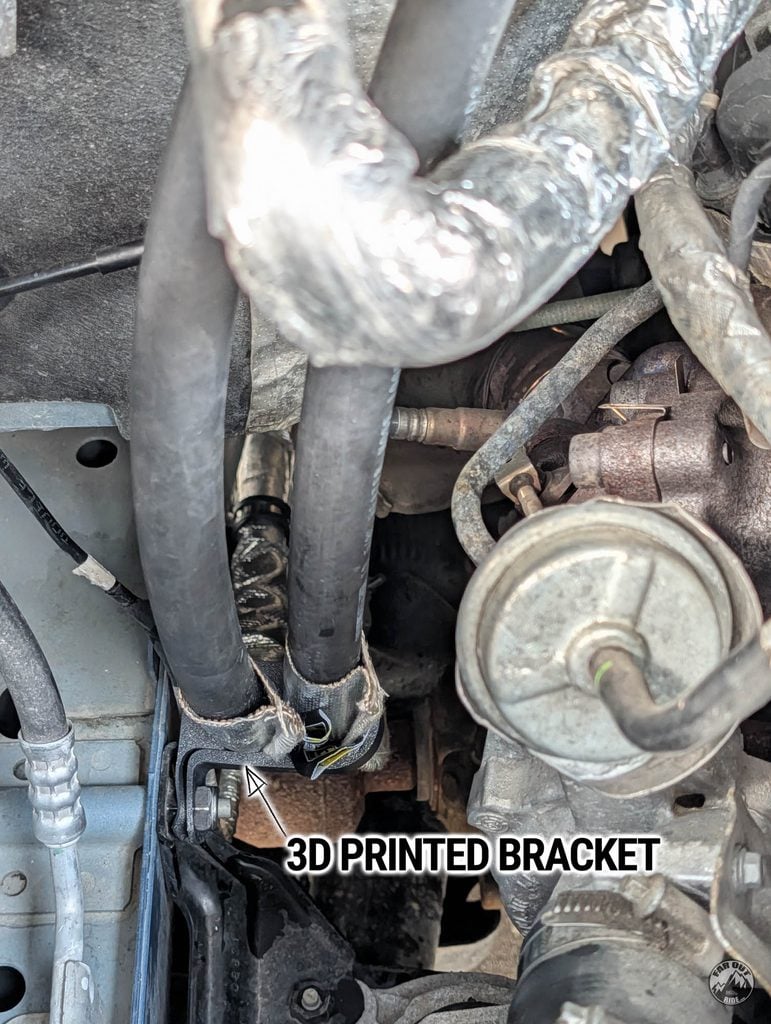
From the engine bay, looking at the Suspension Subframe Crossmember. There is about 2″ clearance between the hoses and the exhaust, so we protected the hose with Aluminized Sleeves:
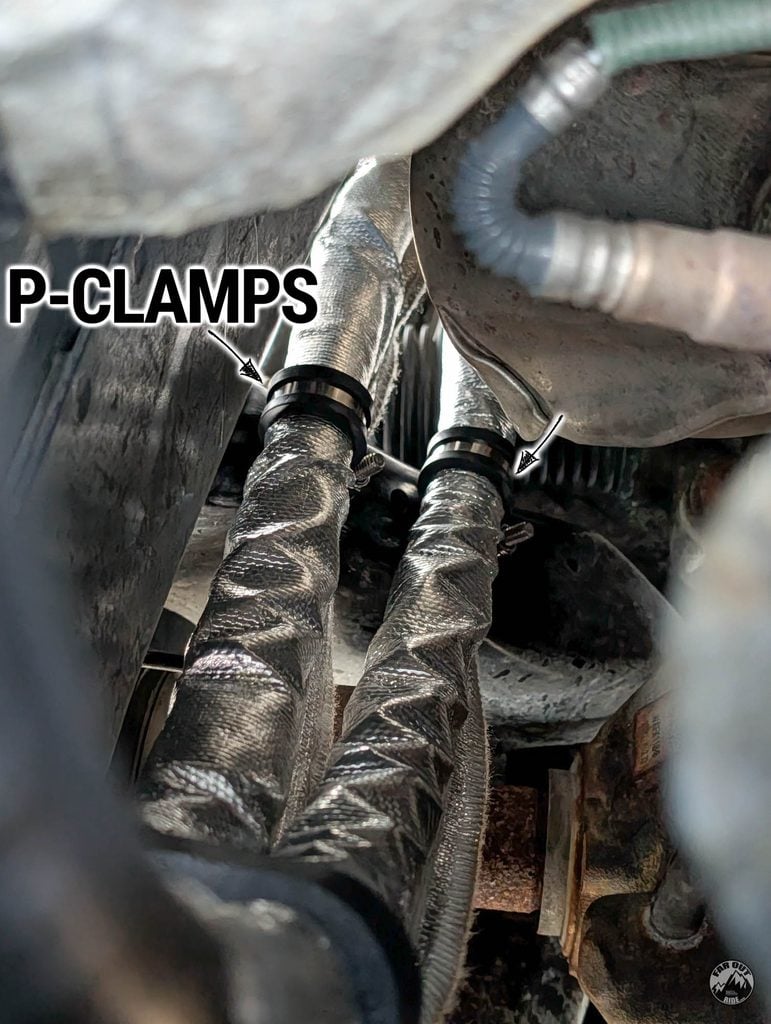
Front Axle
Looking from under the van at the Suspension Subframe Crossmember. The P-Clamps are secured with 1/4-20 x 4″ stainless bolts + washers + nyloc nuts. This is probably the crux: so tight it’s extremely difficult to install and tighten the hardware!
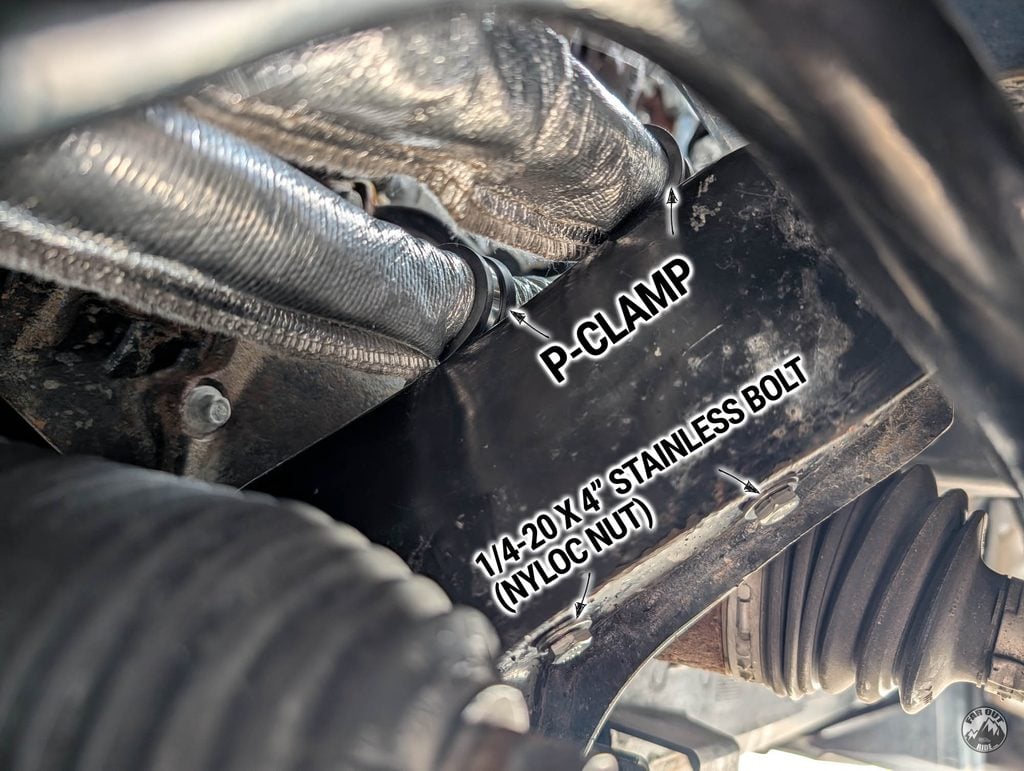
Then, the hoses go around the subframe:
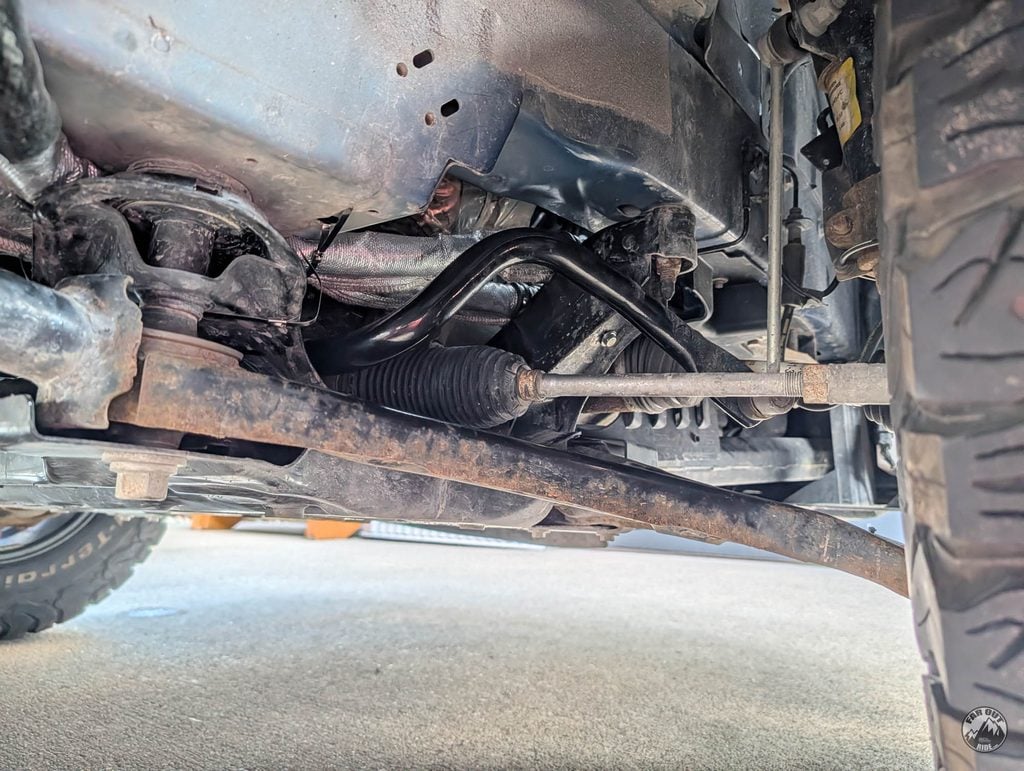
After the aluminized heat sleeve, we used silicone fiberglass sleeve (the black shiny thing) to protect the hoses from debris, as they are in line with the wheel:
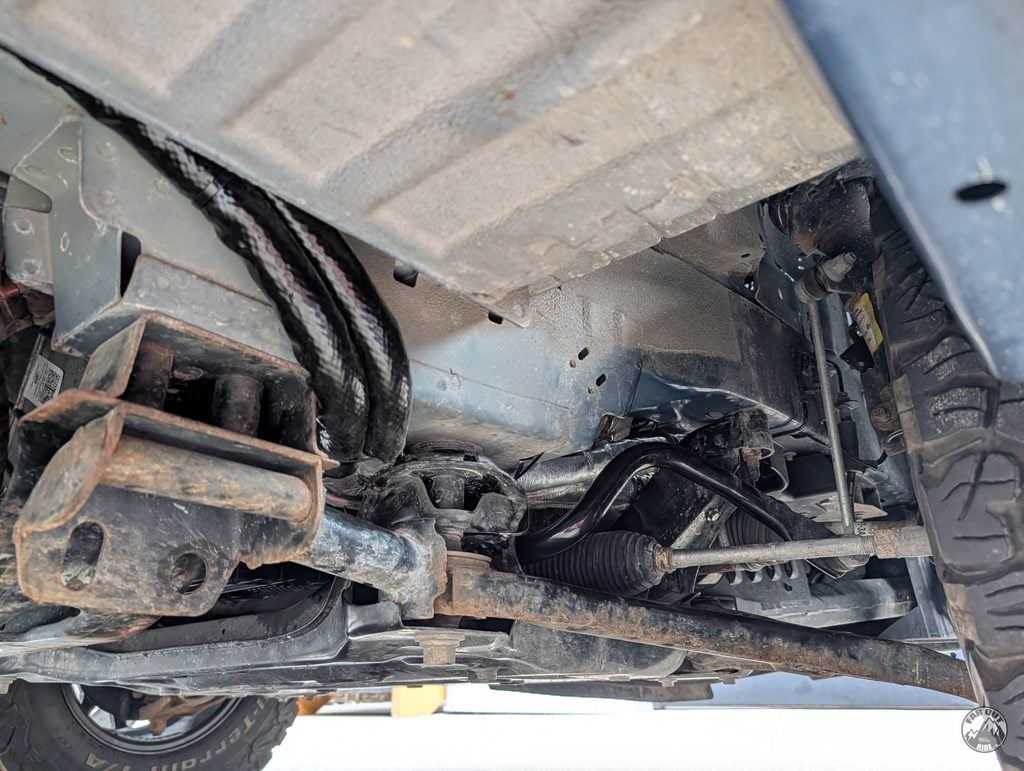
Mid Axle 😆
From the front axle, the loop is routed along the van on the passenger side:
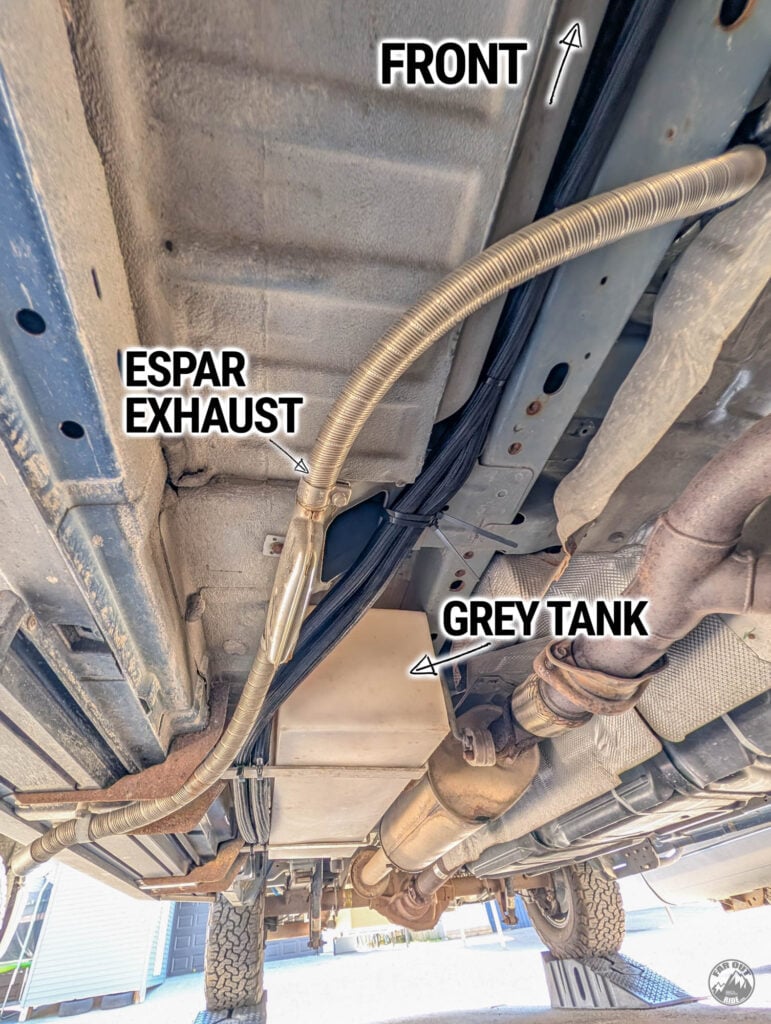
Crossing the Espar AS3-B2L exhaust and the grey tank:
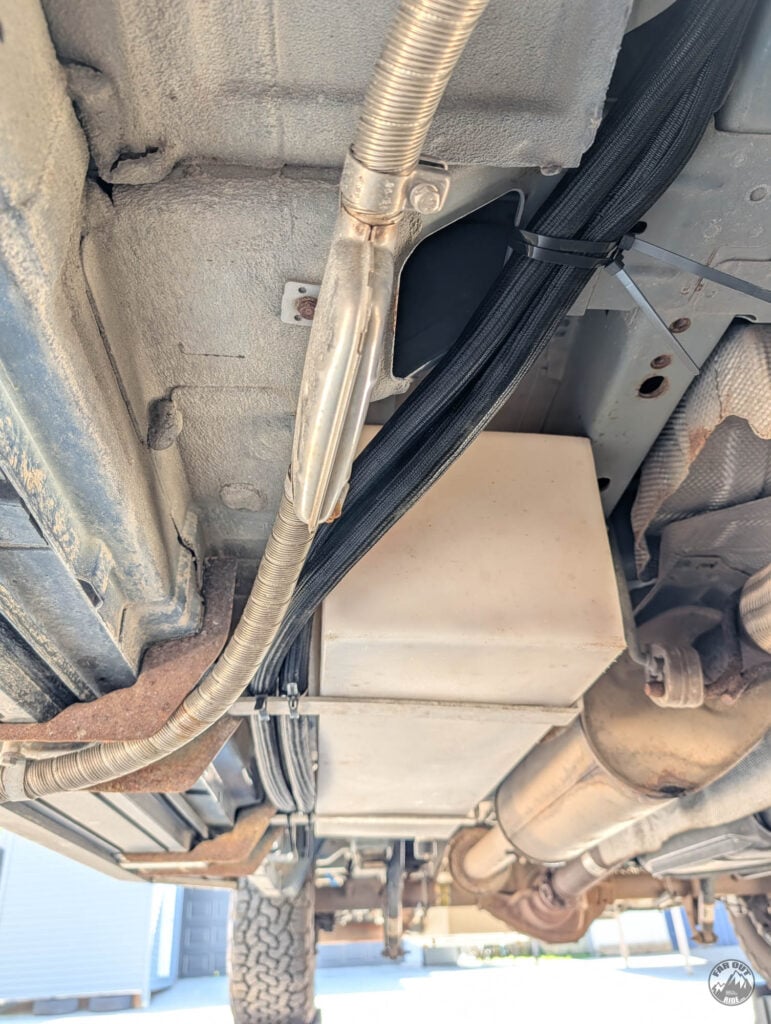
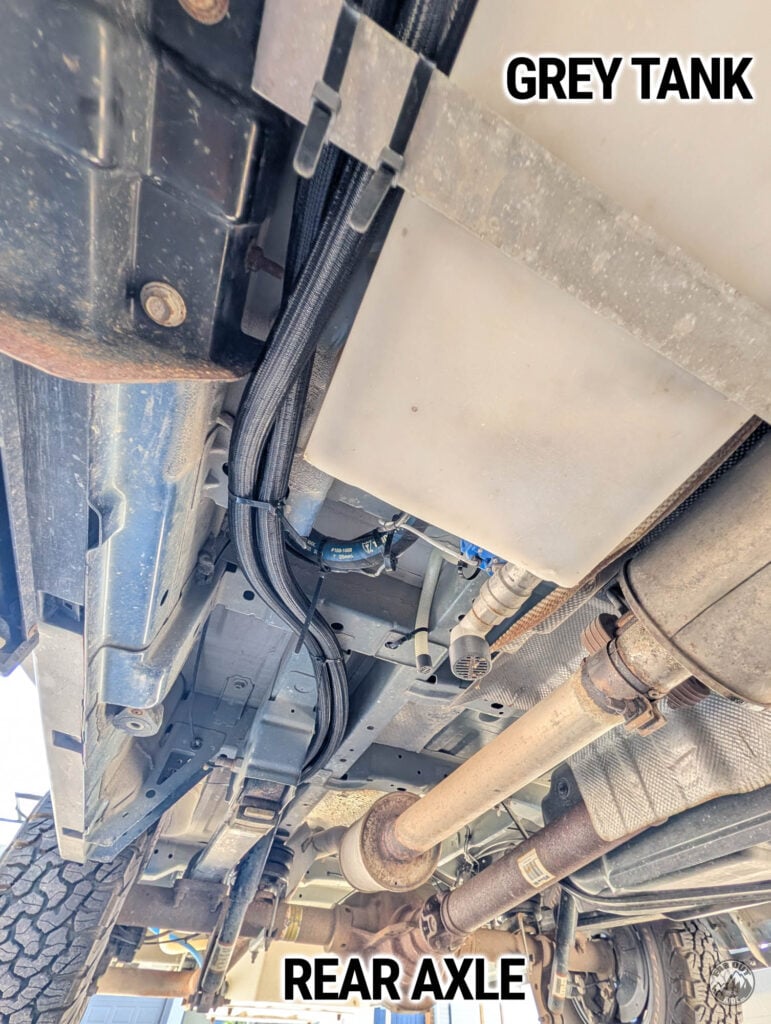
Rear Axle
Passing by the rear suspension air bags:
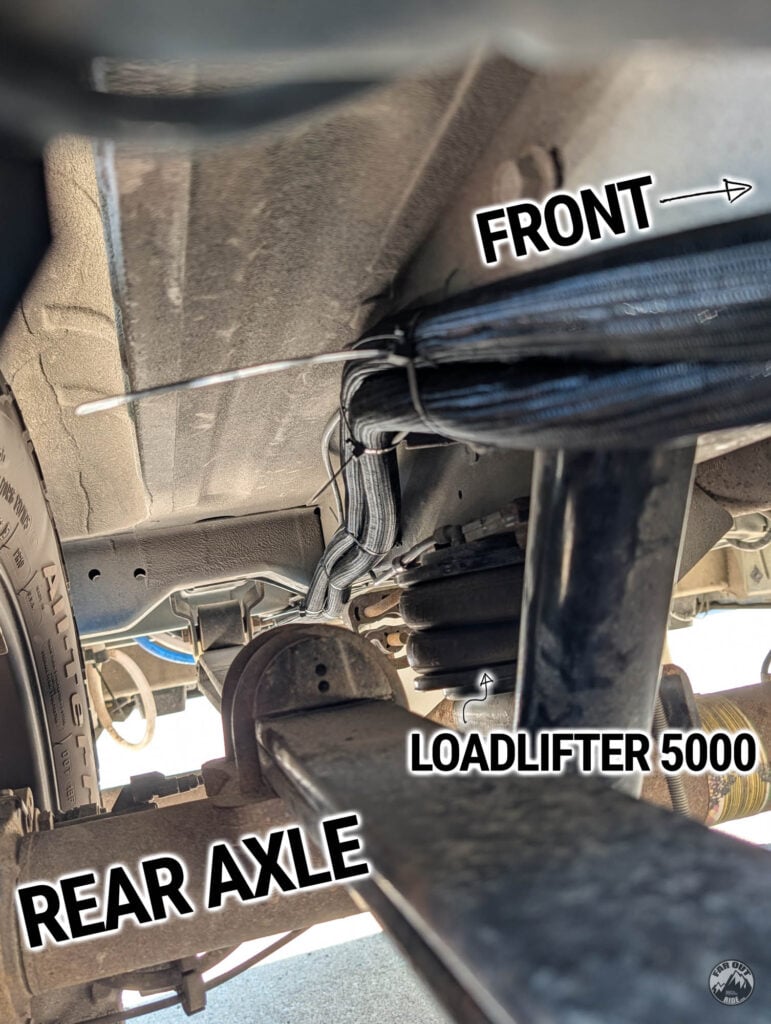
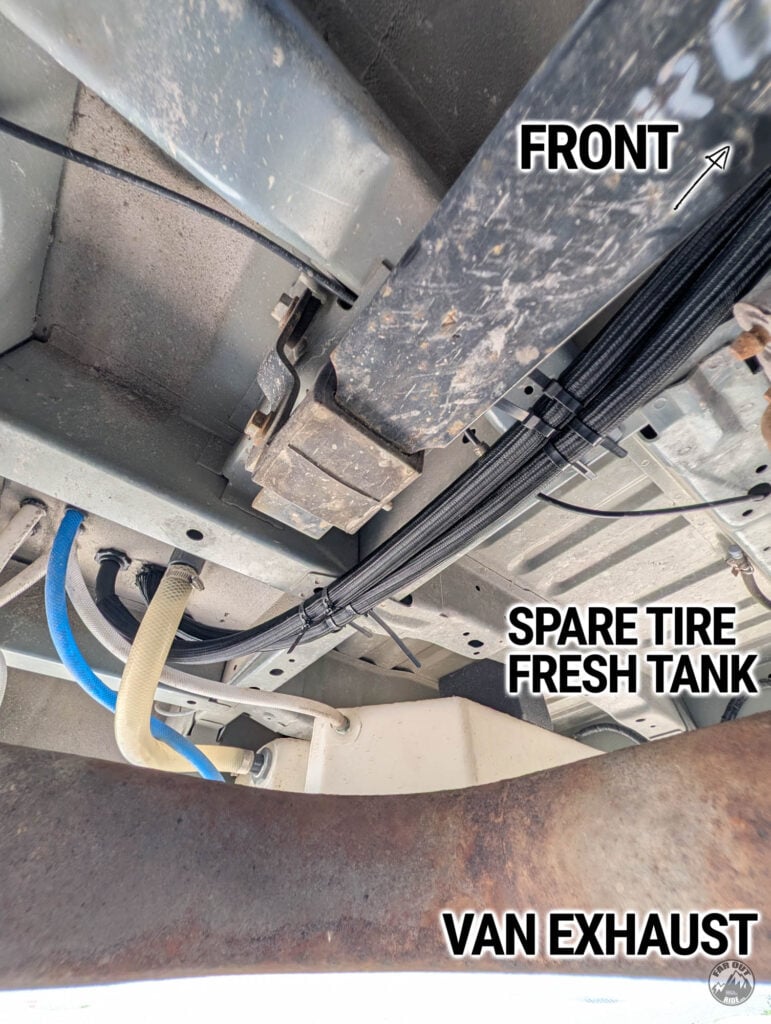
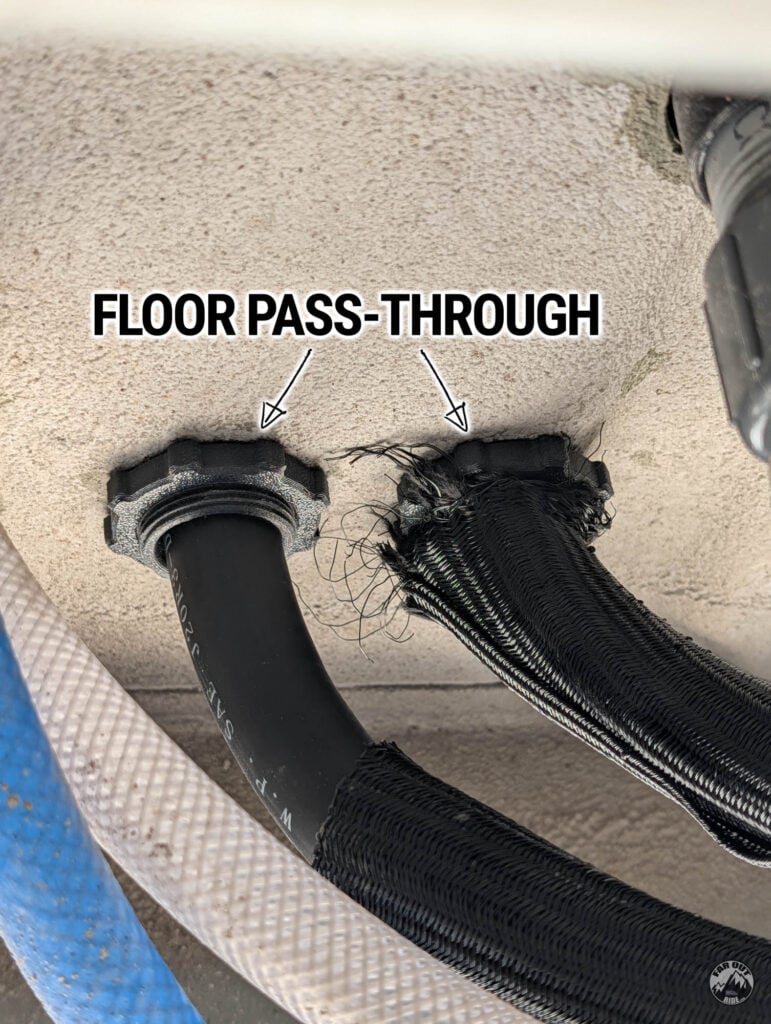
Floor Pass-Through (to Water Cabinet)
Drill with 1-1/4″ hole saw:
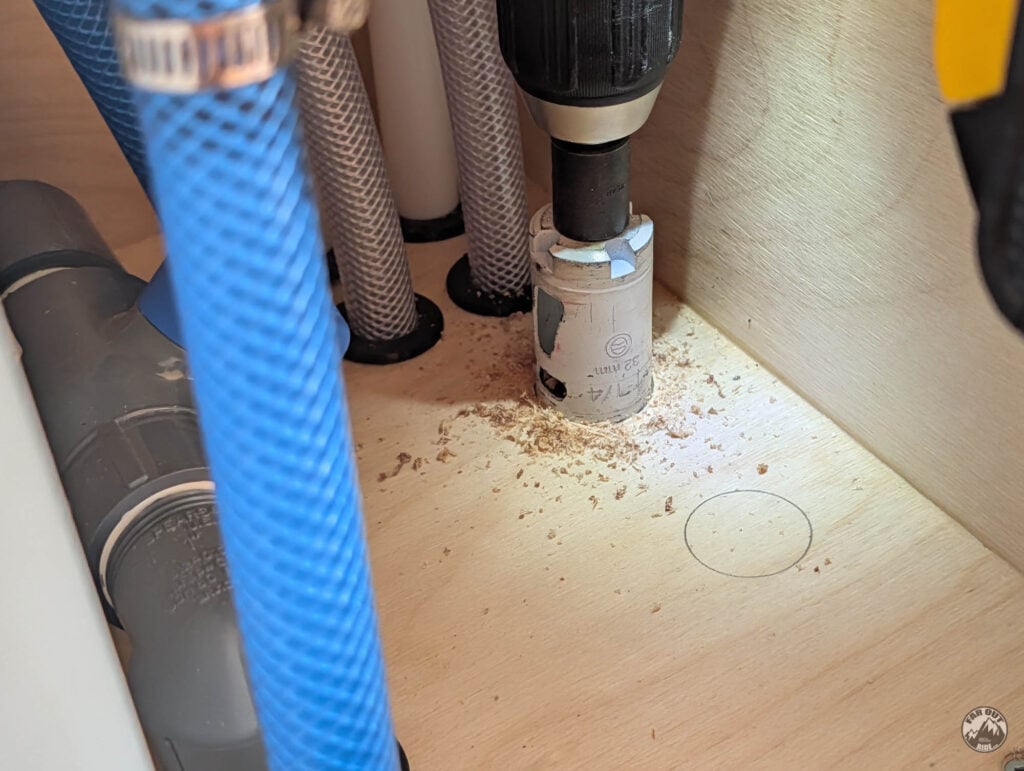
Holes seen from under:
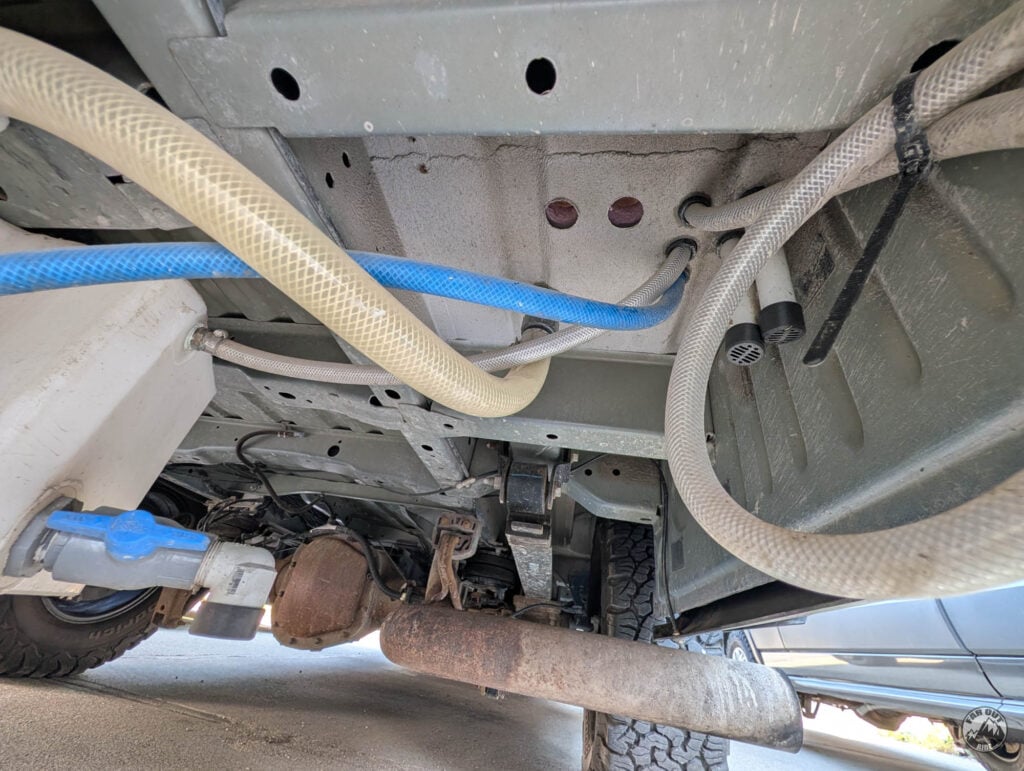
As usual, rust inhibitor is added to the bare edges (3 coats):
We designed and 3D printed floor pass-throughs for the 5/8″ engine coolant hoses. They’re made out of glass-filled PBT, which is temperature-resistant up to 130°C:
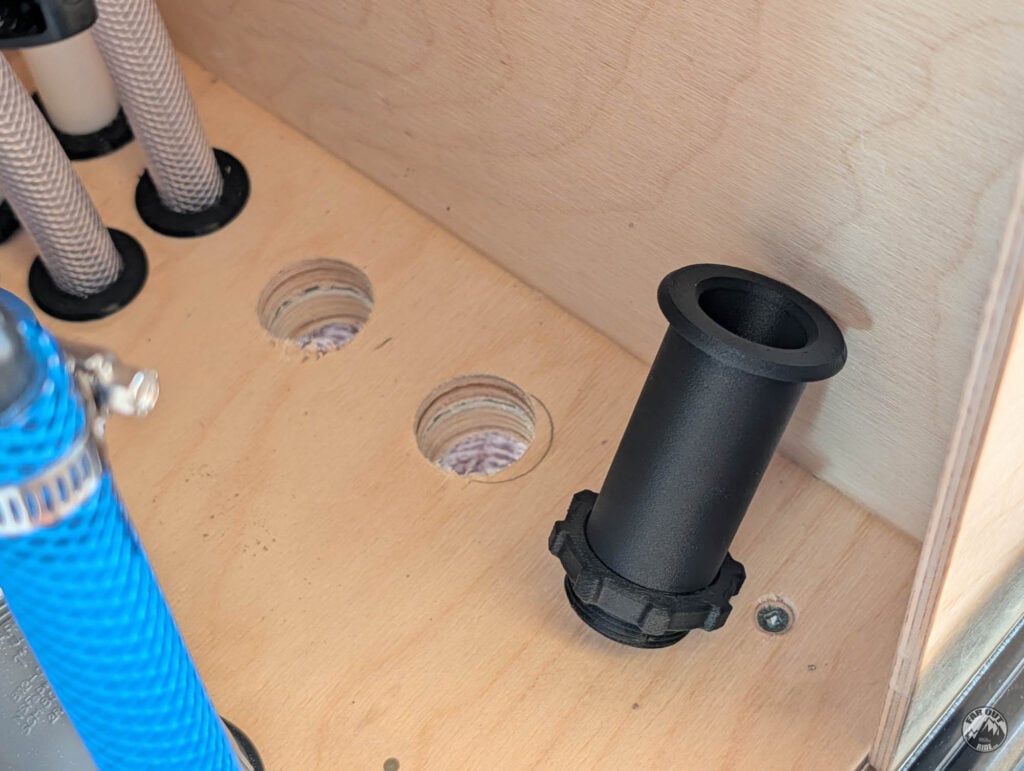
The pass-throughs are inserted from the top:
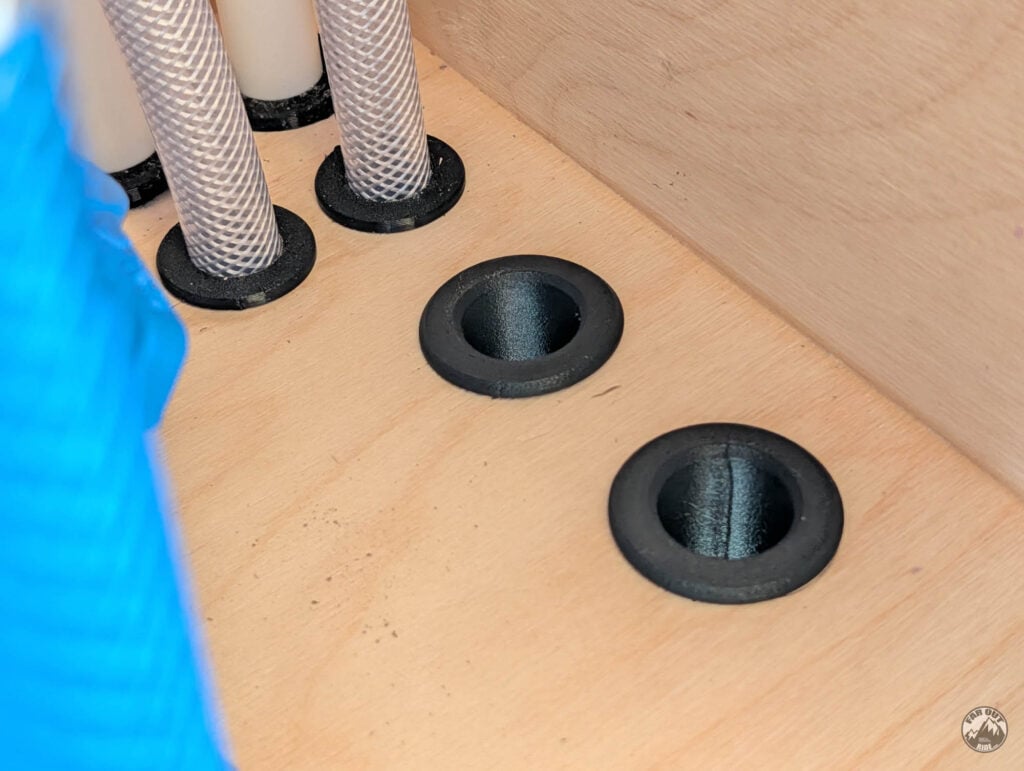
They stay in place thanks to the underfloor nuts. They have just enough clearance so that a 5/8″ hose can slide through:
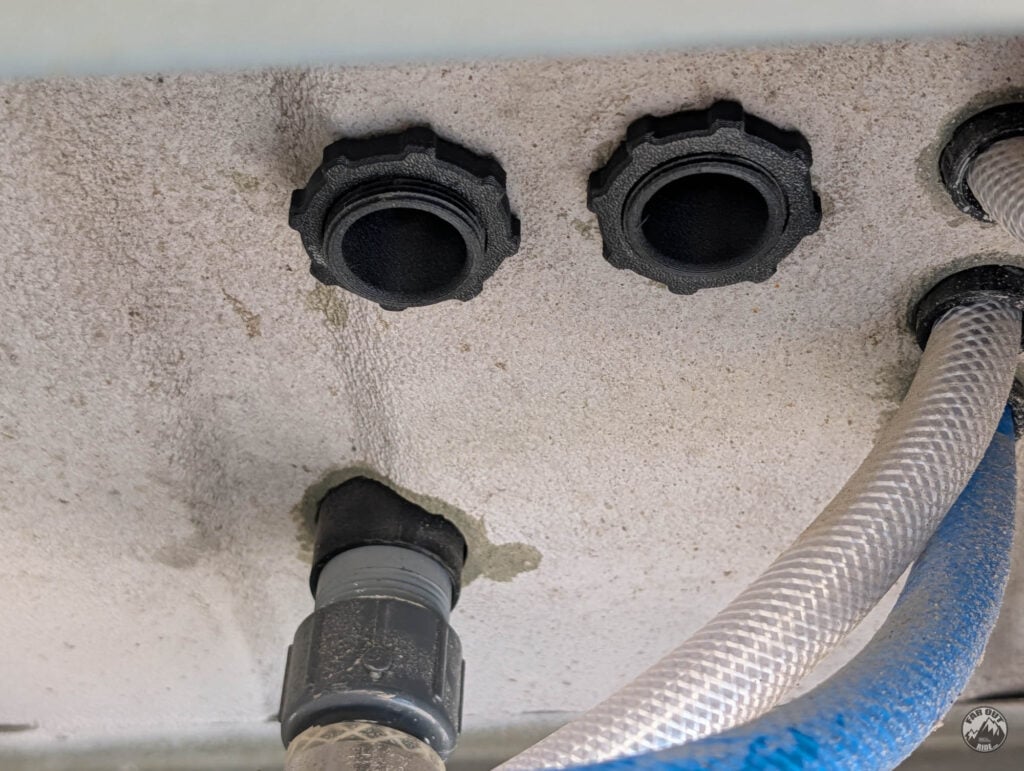
Water Cabinet
Our North-American Isotemp Spa came with 1/2″ NPT male engine coolant ports:
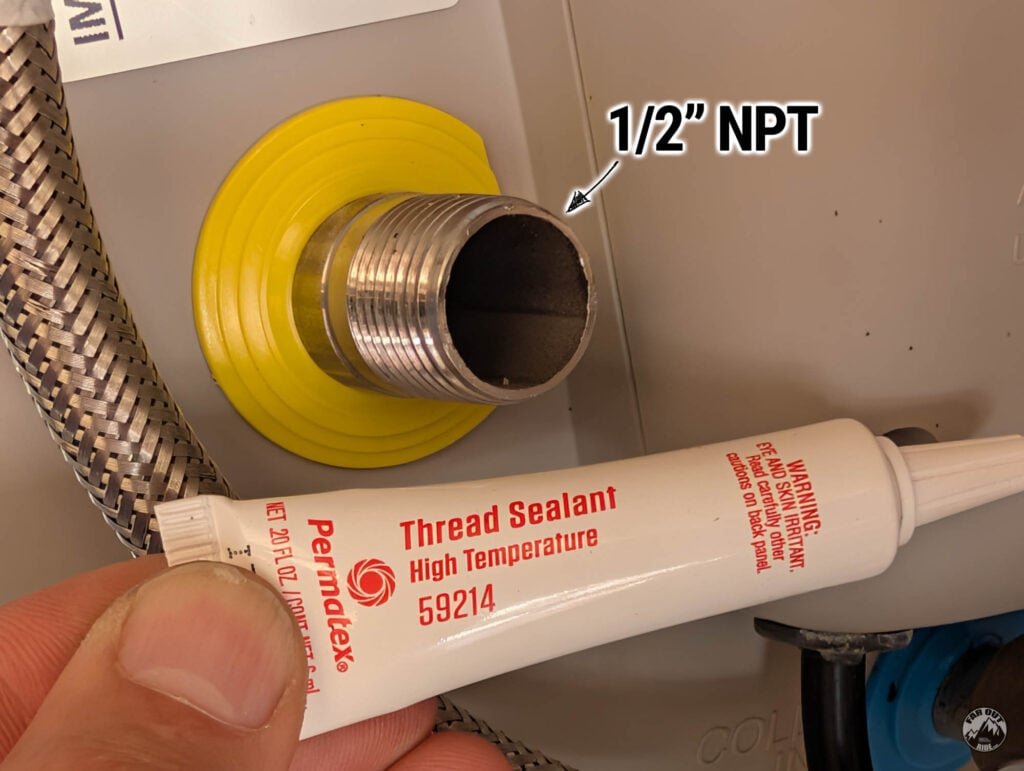
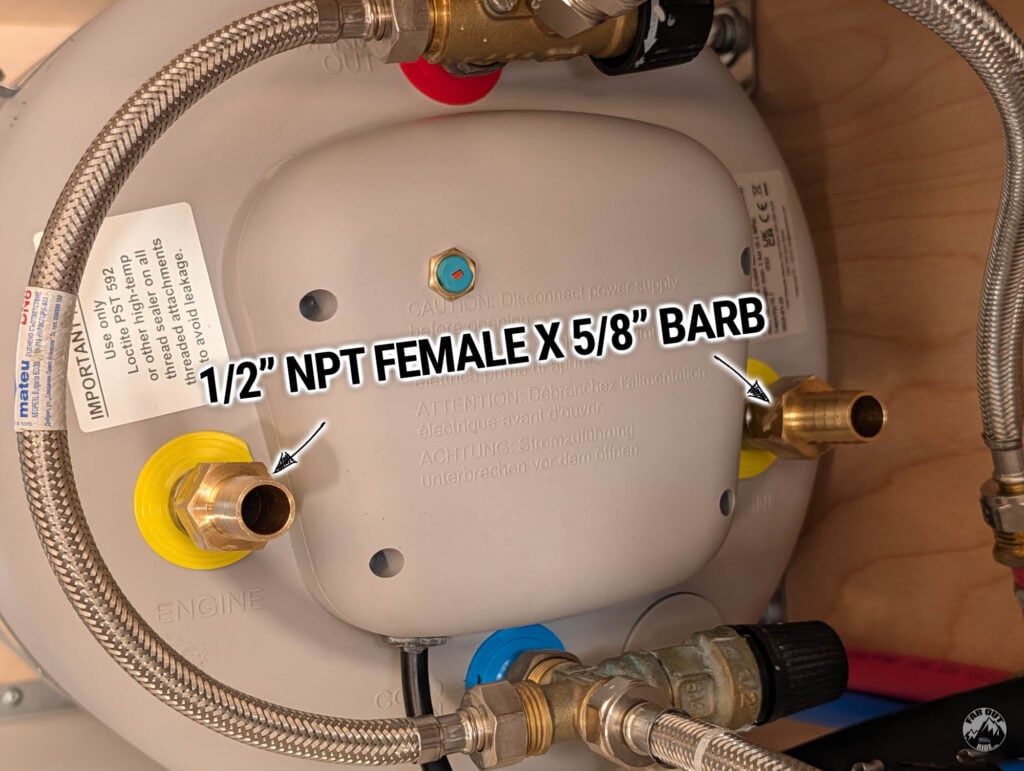
Add brass 1/2″ NPT female × 5/8″ hose barb fittings. Per the manual, use a high-temperature thread sealant such as Loctite 592 (or Loctite 567), or Permatex 59214. Do not use Teflon tape.
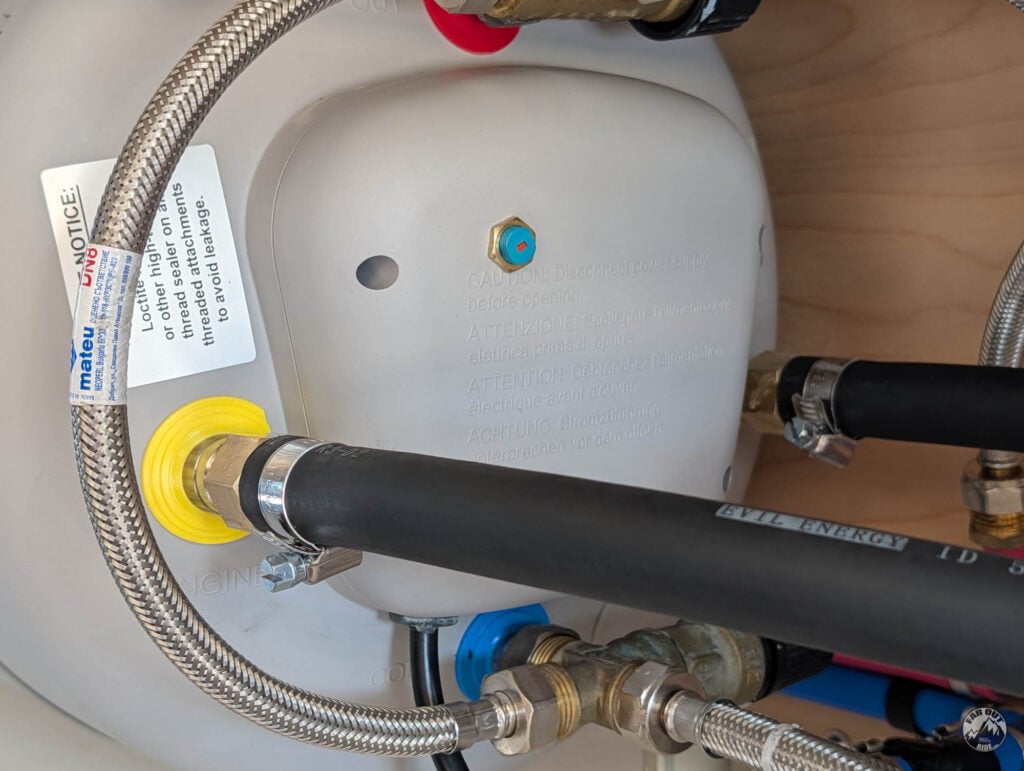
Slide the 5/8″ hose onto the barb fittings, and secure with Stainless Worm Gear Hose Clamps:
Here’s how the hoses are routed through the cabinet:
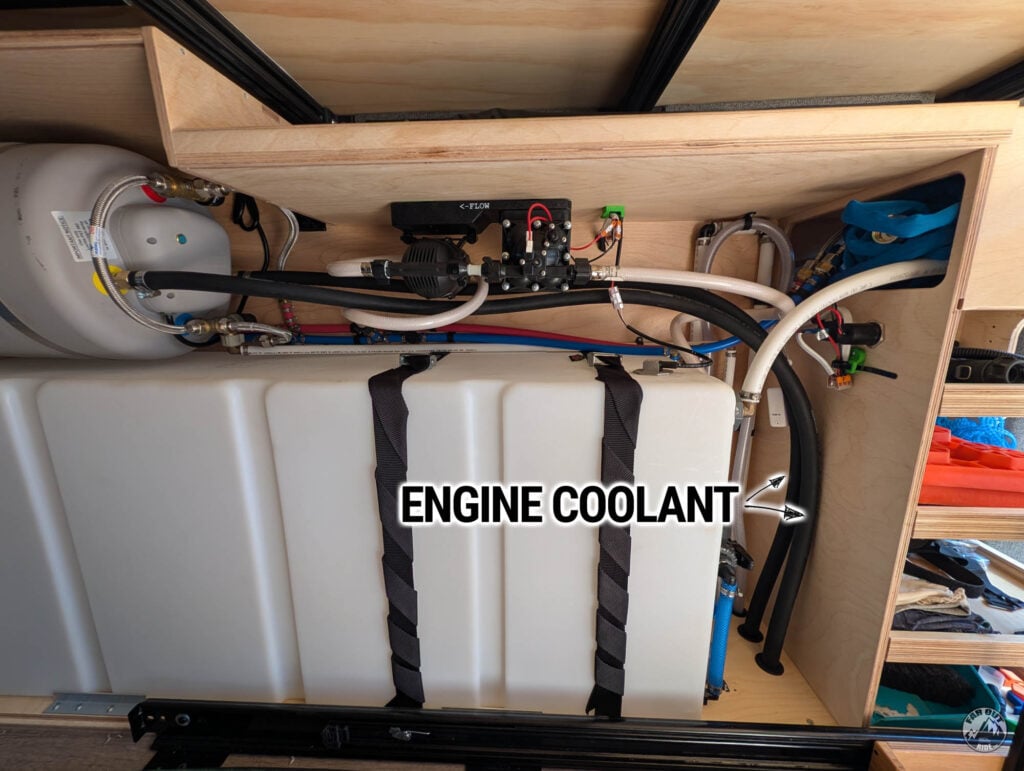
The hoses get really hot, so we added NBR elastomeric pipe insulation (-57 to 105°C) around them (look at the hose in the back):
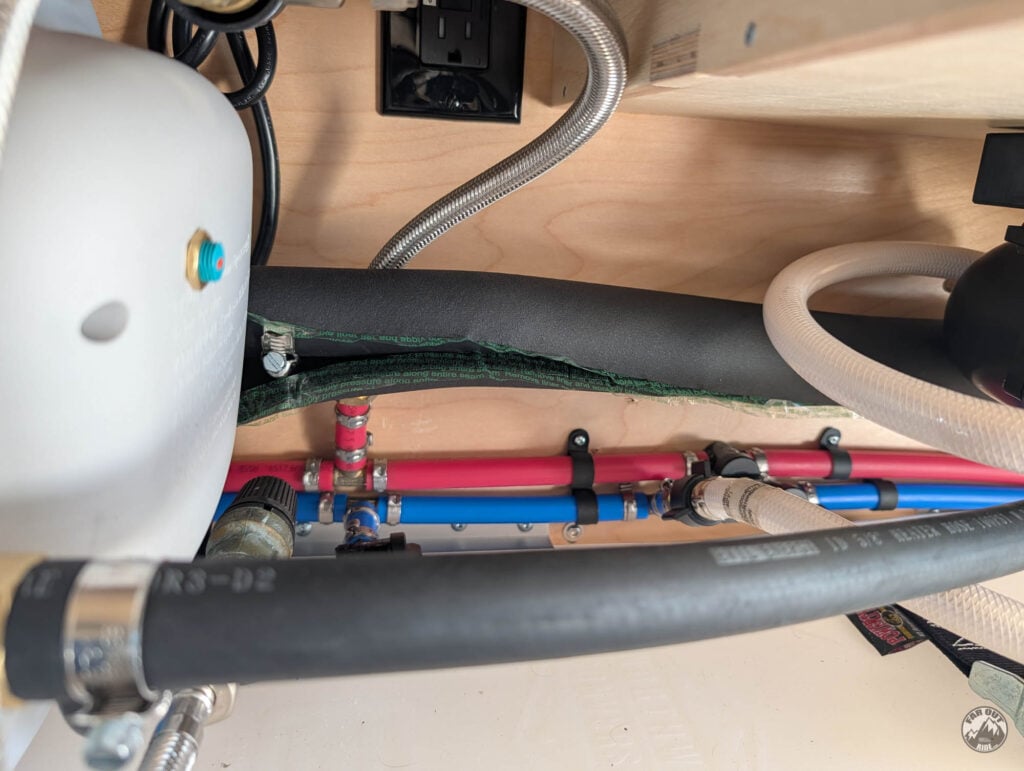
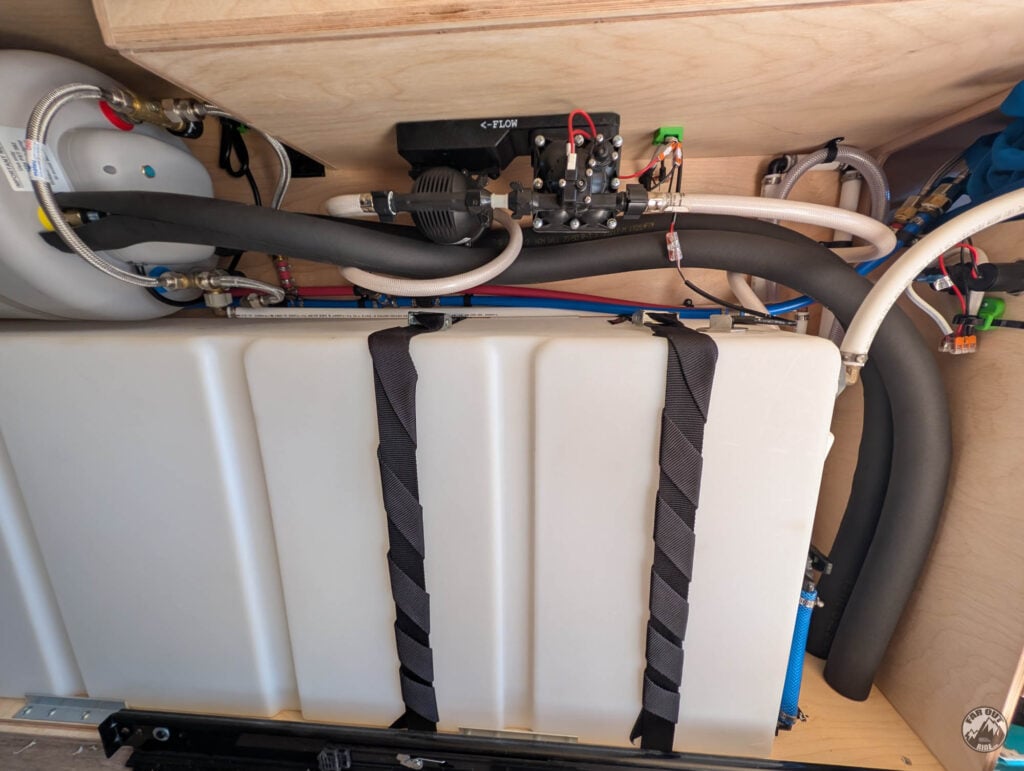
The two hoses covered with insulation:
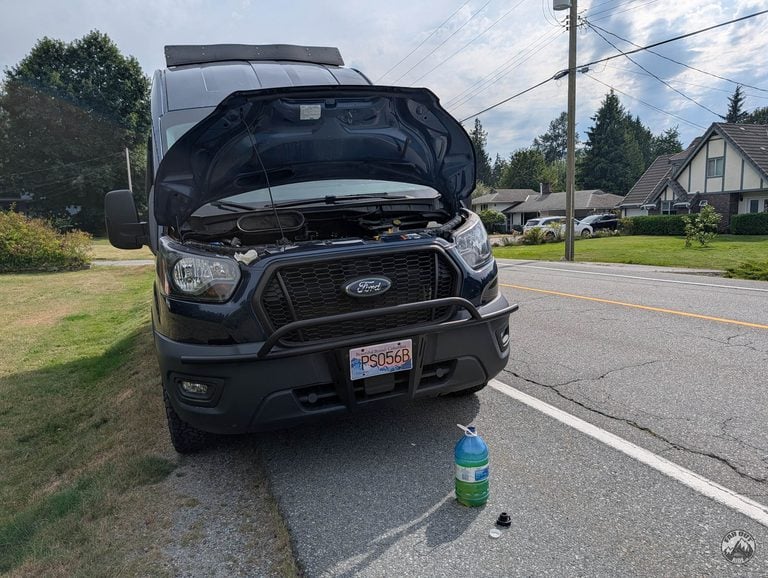
Top-Up Coolant
Motorcraft Yellow (spec WSS-M97B57-A2) only (Ford Transit). Never mix coolant types, and never use propylene glycol.
If using concentrate: mix with distilled water, never tap. Tap water carries minerals that attack the system over time.
If you installed a bypass valve, set the valve to open the loop to the Isotemp:
Engine cold, van level. After opening the bypass valve, wait for the coolant to gravity-flow and top up the bottle to the MAX line. But don’t expect much at this step to be honest:
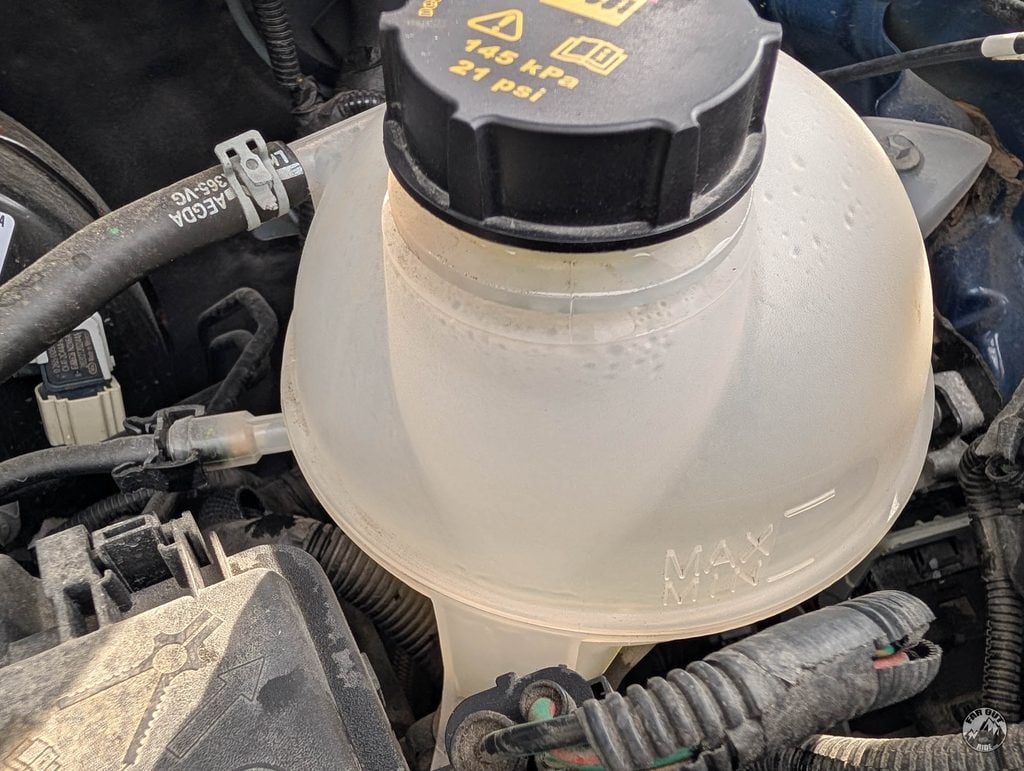
- Close the cap (until hard stop). Start the engine and idle with cab heat on max temperature, fan on low. Hot air at the vents is your proof that the heater circuit is actually flowing and not airlocked.
- While it idles at temperature, inspect the loop. Hot and pressurized is when a weep shows itself.
- Turn off engine, let cool, and top up to MAX line. Close the cap. Again, probably still not much at this point…
- Drive around the block (short drive, 1 minute or so), re-check and top up. Still not much…
- Drive to a steep hill, up and down. Still a short drive. Keep an eye on the temp gauge. This helps air bubbles trapped at a high point move to the degas bottle. Driving up/down and getting the engine to higher temp is what really moves the coolant! Expect to add quite a bit more coolant at this step!
- Drive to a steep hill, again (short drive). We had to do this 2–3 times before the coolant level stabilized.
- Watch the temp gauge on the next drives, and carry coolant with you. Abnormal climb means airlock: shut down, cool, top up, resume.
- A few days later, re-torque every worm-gear clamp. Rubber takes a compression set after the first heat cycles. Keep coolant in the van, just in case.
Filling/Draining/Winterizing
Filling The Water Tank
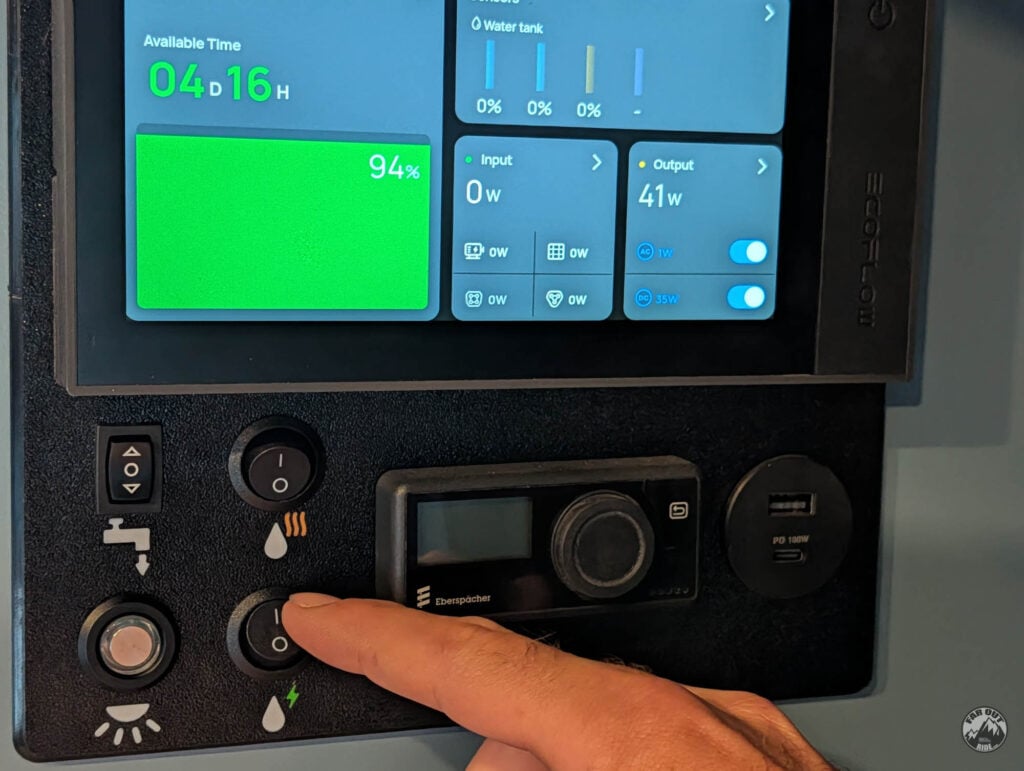
Ensure there’s water in your fresh water tank, then switch the water pump ON:
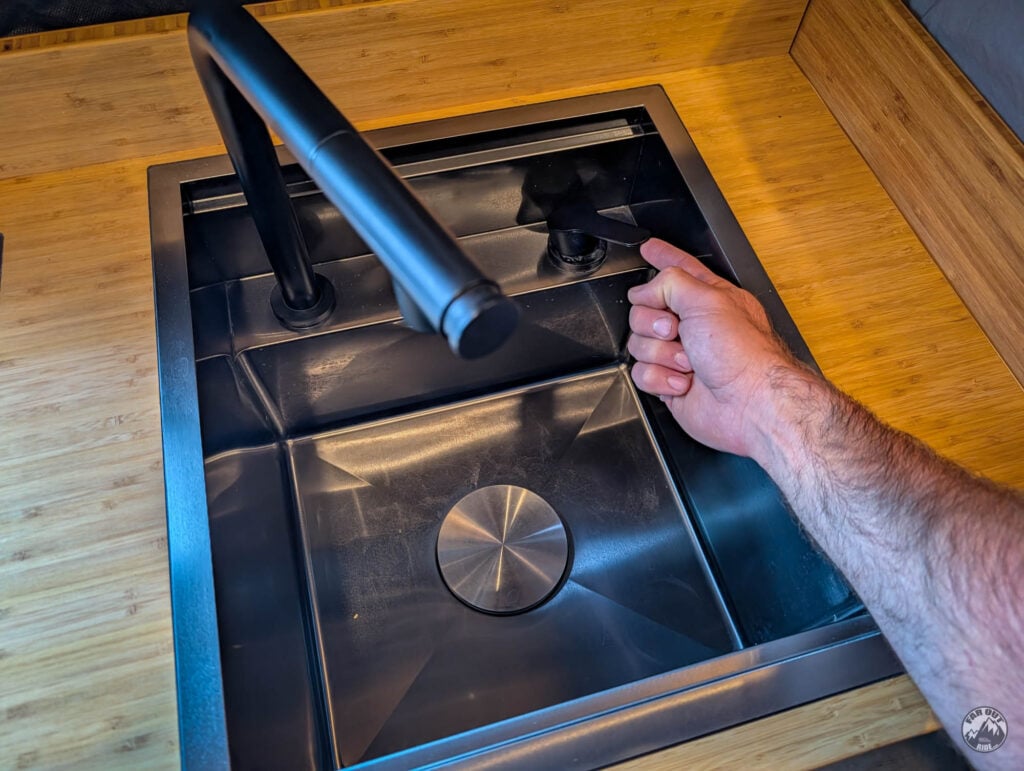
After a minute or so, open the hot water tap. This bleeds air from the tank (water in = air out). After a little while (a minute), air will stop sputtering from the tap:
Once the Isotemp tank is full (the pump stops running), it’s safe to turn it on:
Draining/Winterizing the Water Tank
Ensure the Isotemp’s 120V element is OFF:
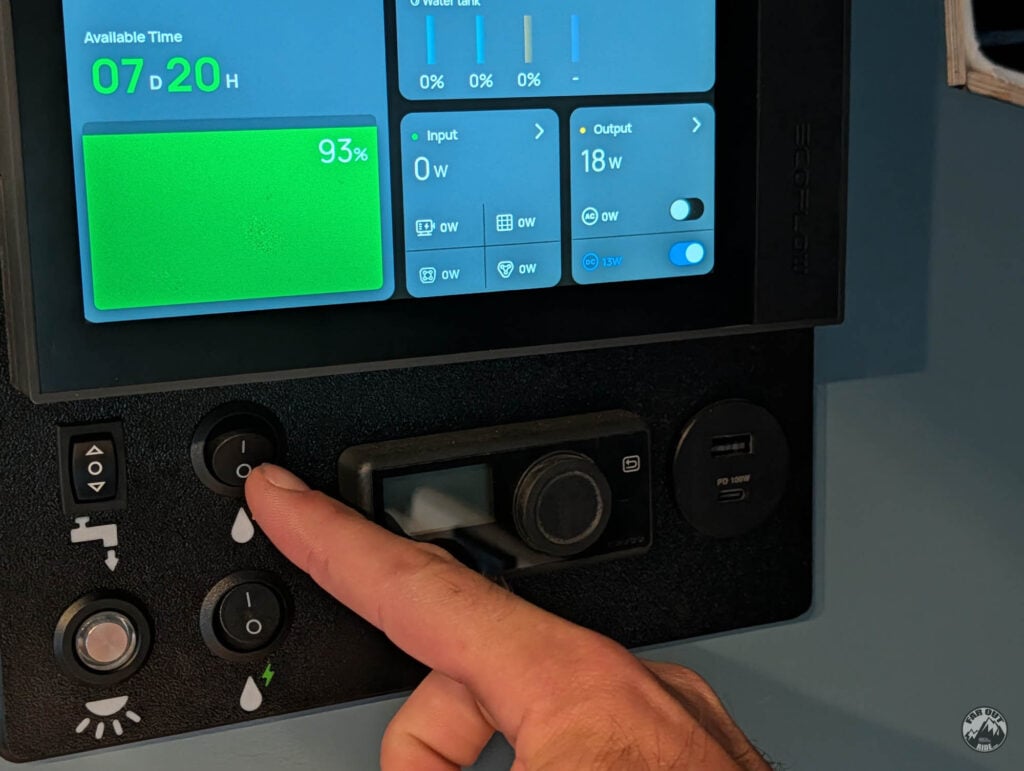
Turn OFF the water pump:
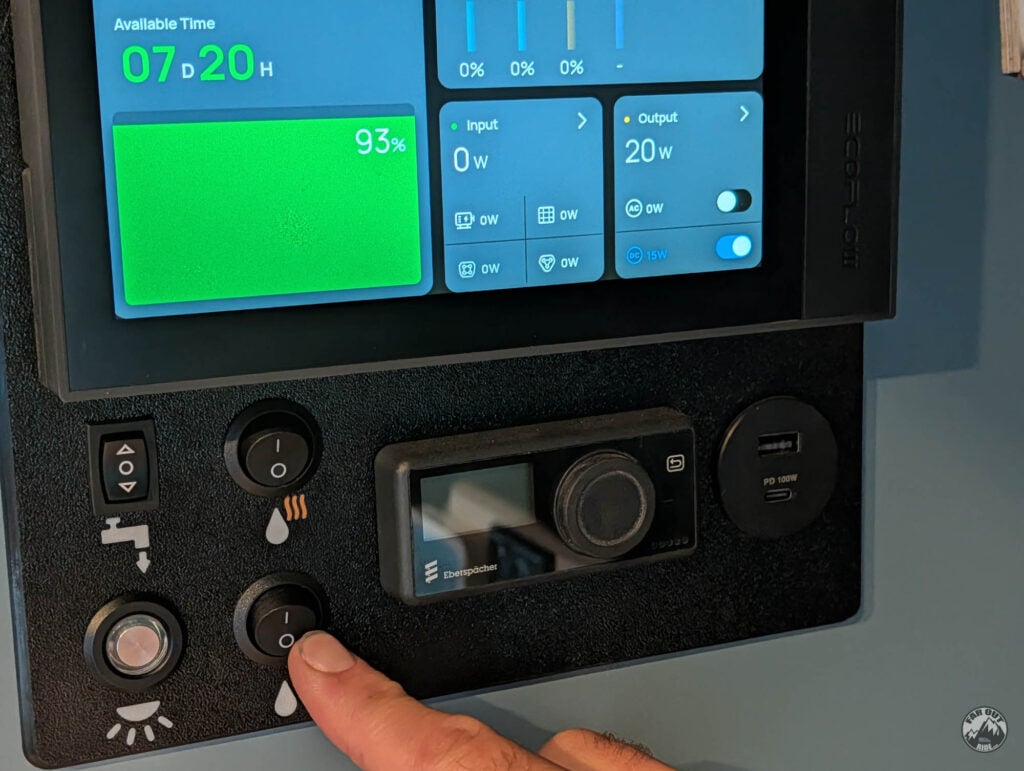
Turn the Isotemp drain valve counterclockwise to open it:
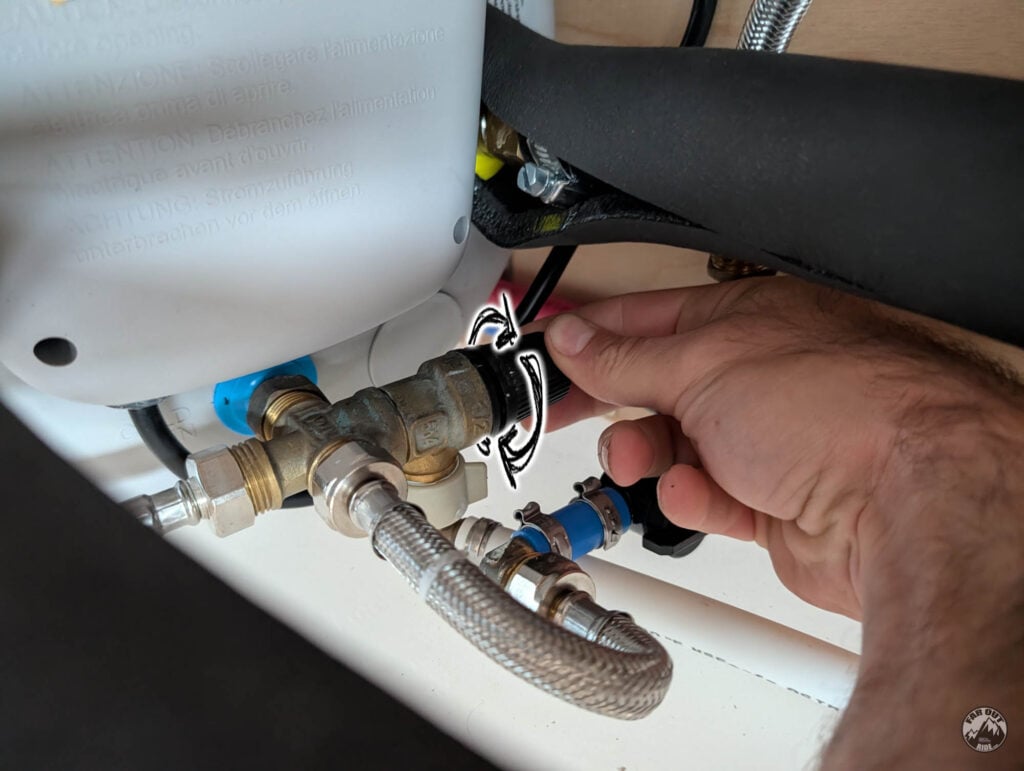
Remove the Isotemp bleeder valve screw (don’t lose it!) with a flat screwdriver and wait for the tank to fully drain:
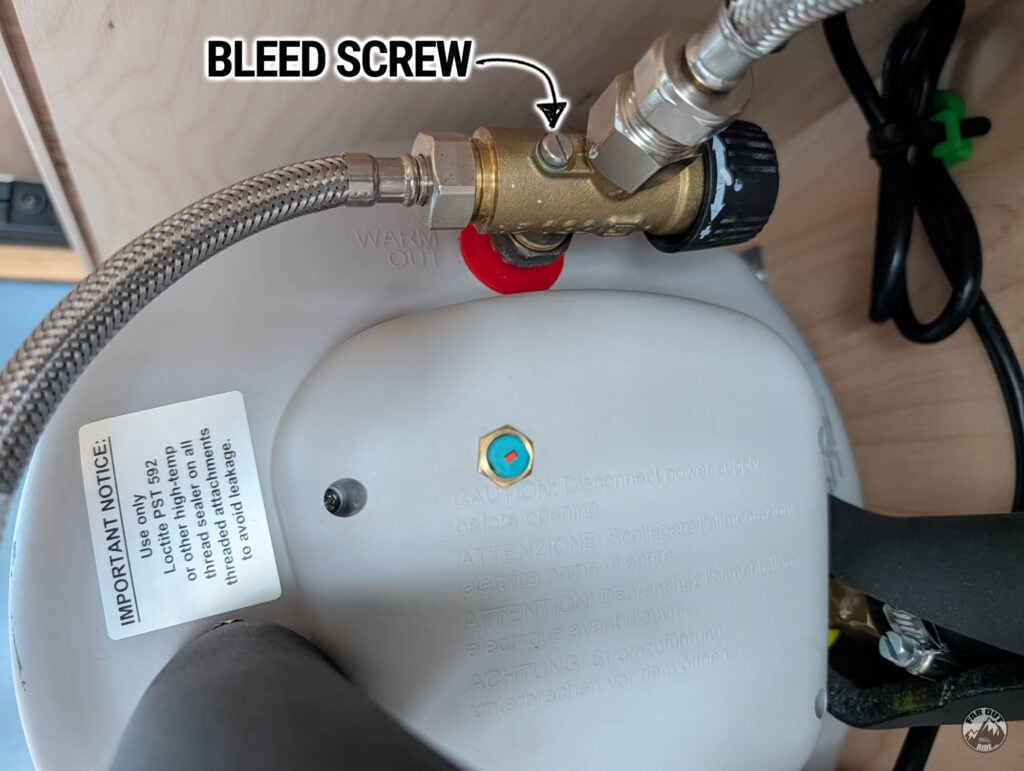
Heating the Water
Initial Heat-Up
120V
Heating a full 15 L tank is one steady pull: 726 W average for 1 h 21 min. Total: 980 Wh at the plug, ≈1100 Wh from the battery with the 12% inverter loss. In practice we do the initial heat-up on shore power before leaving the house, so the battery only pays for top-ups on the road.
Engine Coolant
coming soon!
Maintaining Temperature (No Hot Water Use)
120V Only
With nobody using hot water, the Isotemp fires a short reheat burst (≈800 W for 3–4 min) about every 55 minutes: every ~45 min at night, with longer gaps during the warm afternoon. That adds up to ≈1386 Wh per day at the plug. Keeping the tank hot costs ≈1552 Wh per day from the battery with the 12% inverter loss — more than heating the tank from cold once. Worth switching the heater off when you won’t need hot water for a while.
Engine Coolant Only
coming soon!
A Week of Real-World Use
120V Only
During a 7-day trip in August (two of us), we heated the tank on a simple routine (one session in the morning, one in the evening, ≈850 W while the element runs) rather than keeping it hot all day. That gave us enough hot water for dishes, plus showers on some days. Days without showers came in at 602–690 Wh at the plug; shower days ran 1035–1472 Wh. Average: ≈975 Wh per day, 6.8 kWh for the week. With the 12% inverter loss, that’s ≈1090 Wh per day from the battery — about 30% less than the ≈1552 Wh of keeping the tank on hot standby around the clock, with actual hot water use included this time.
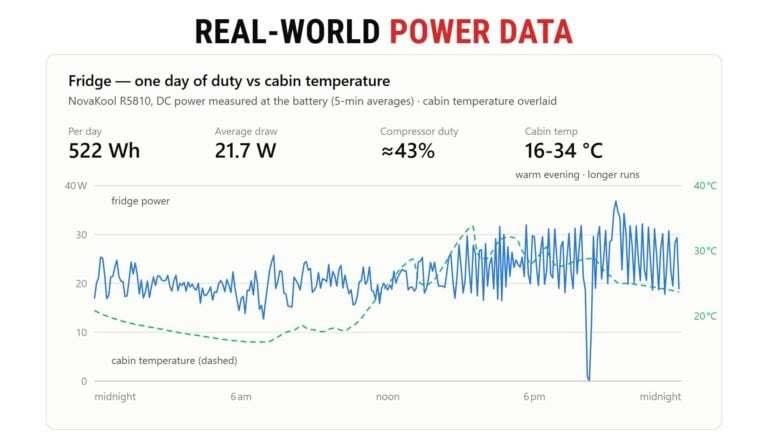
We’ve got all the data here (induction, oven, fan, fridge, etc.):
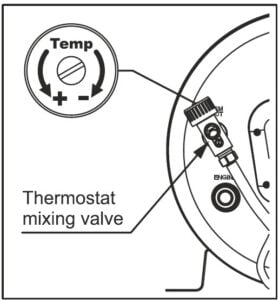
Thermostatic Mixing Valve Setup
Set the Mixing Valve
Adjustable from 38 to 65°C (100 to 150°F). The valve simply caps what the taps see — the capacity stretch comes from how hot the tank is. Warmer settings deliver hotter water at the tap but eat into the scald margin.
We set ours by feel: warm enough that the fully hot tap is just right at the shower, and no hotter.
Thermal Fuse
Manual Reset
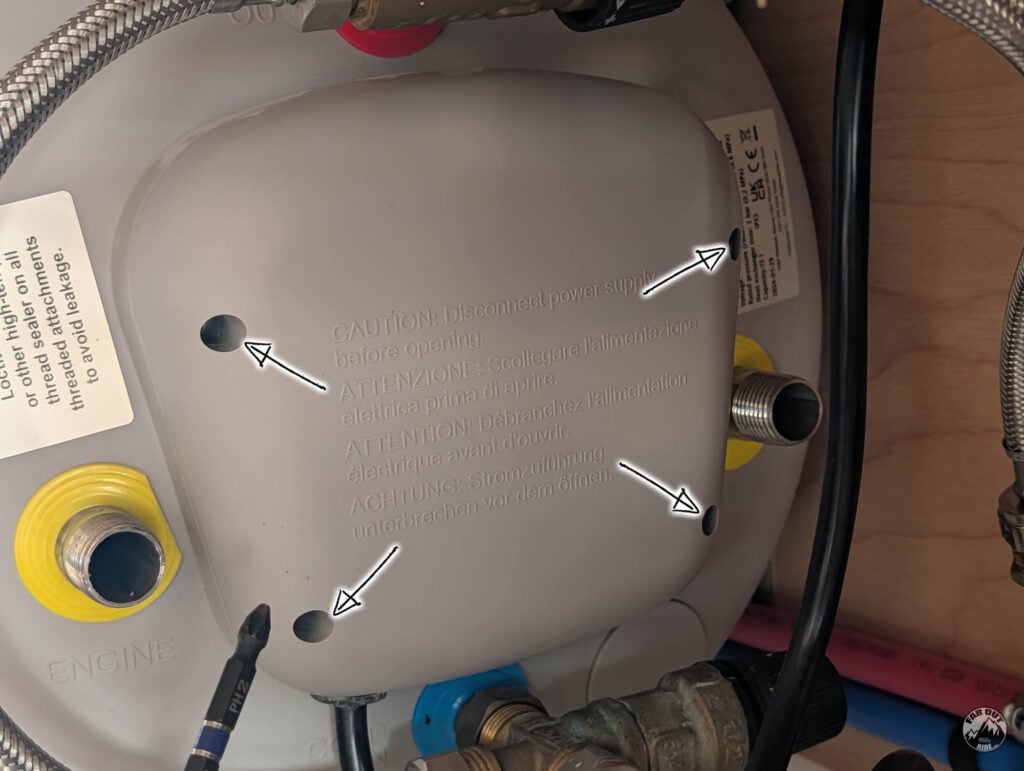
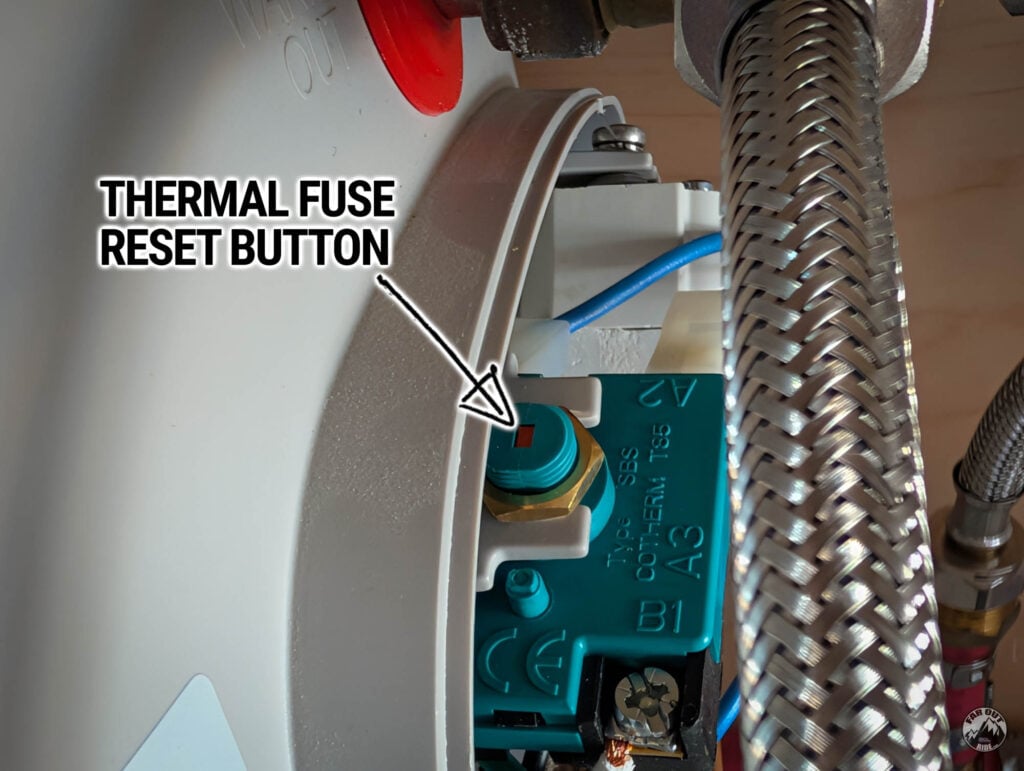
The Isotemp Spa has overheat protection (a thermal cut-out, or thermal fuse) located under the front cover. If it trips, you can reset the fuse by pushing the red button on top of the thermostat.
Unplug the power cord, and remove the cover’s four screws with a Phillips screwdriver:
Here’s the thermal fuse:
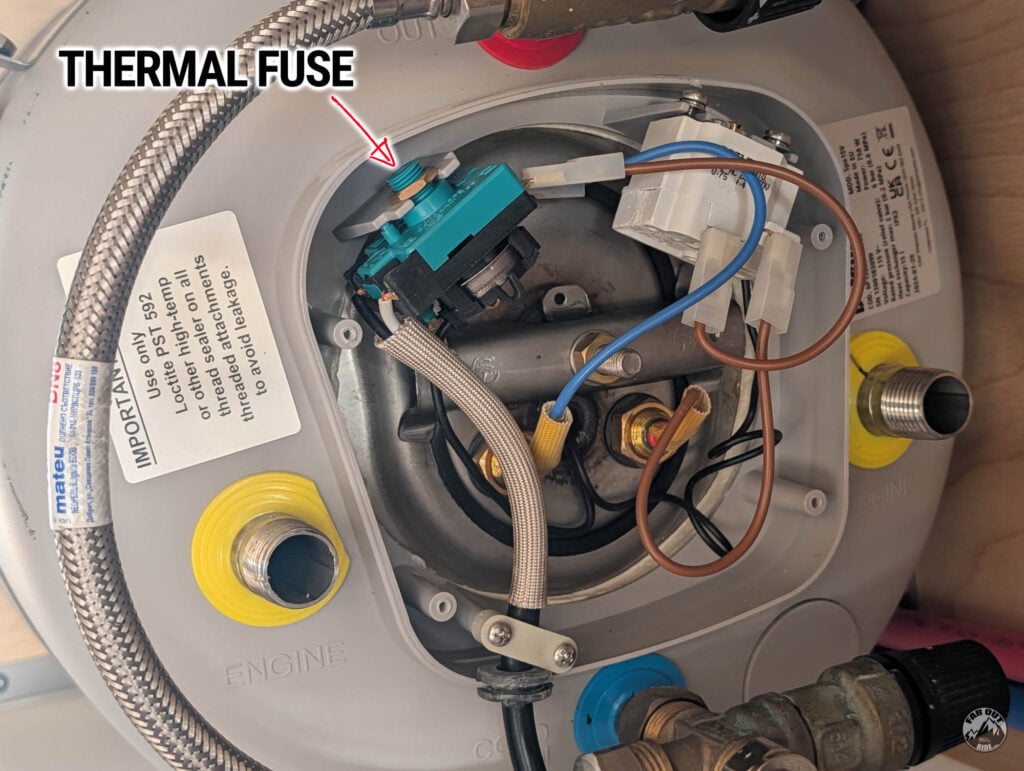
Press the red button to reset the thermal fuse:
Relocate the Thermal Fuse
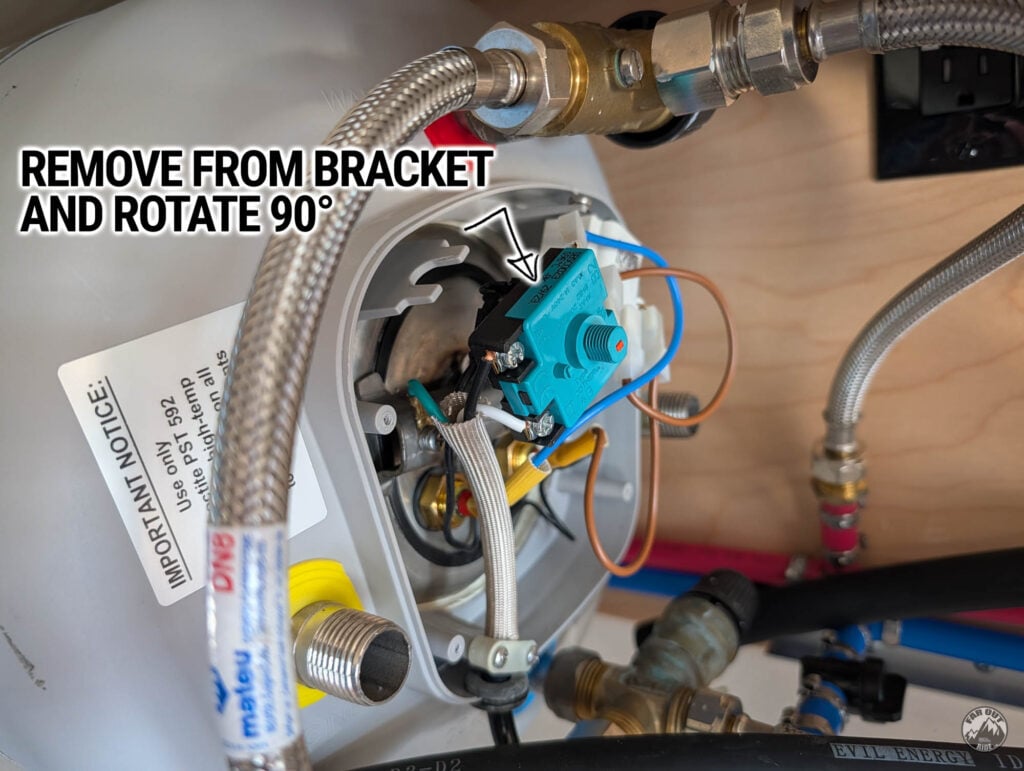
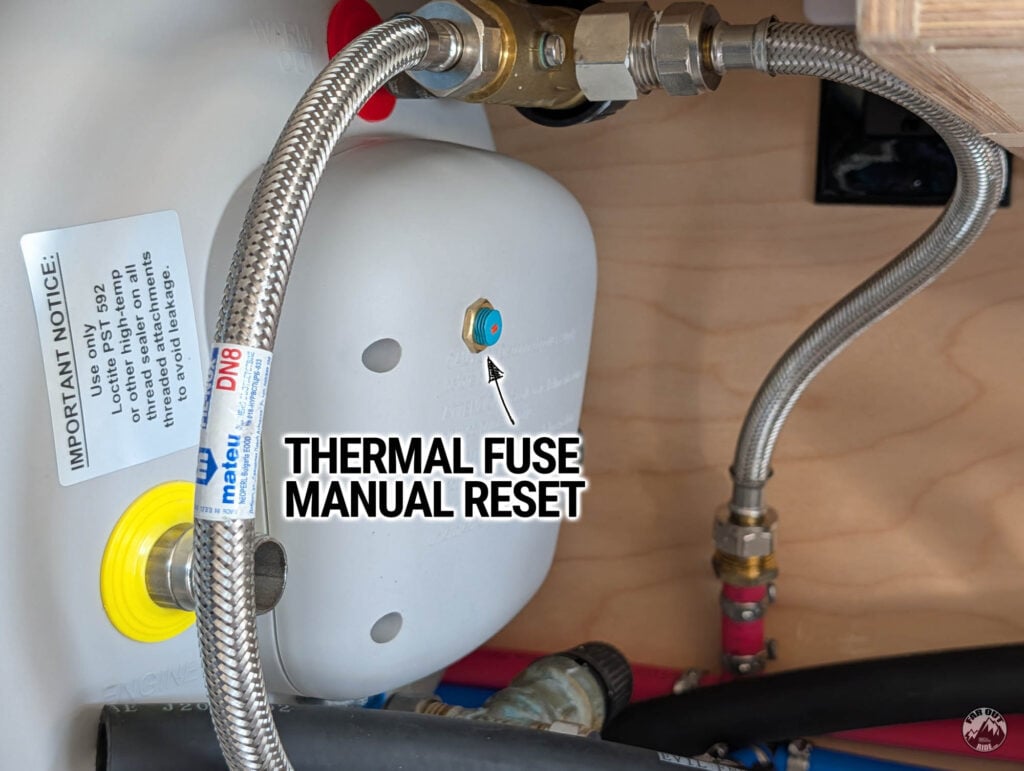
If using the water heater on 120V only, you shouldn’t have to reset the fuse. But with engine coolant, the thermal fuse is known to trip quite often… So, just in case, we made the reset button accessible without having to remove the cover (thanks to Onyx Van for the tip!):
Remove the thermal fuse from its holding bracket and rotate it 90° toward the front:
Drill the front cover with a 25/64″ drill bit, at this location:
Install the thermal fuse through the hole, and reuse the nut to secure it in place:
On second thought
We initially thought we’d use the Isotemp Spa only on 120V, since we have a huge battery bank, but it was the appliance that consumed the most power. Connecting the engine coolant is definitely worth it!




Any chance you post the file or link of the 3D printed floor pass-through?
Hi Myles,
Here it is: https://faroutride.com/product/coolant-hose-floor-pass-through-3d-print/
Measure the thickness of your floor (cabinet + floor) before printing: the nut only reaches the thread if the floor is about 62 to 73 mm thick.
Cheers,
Antoine
Was the insulation pipe for the coolant lines fit snug or was it there bit of space? I got the same one as you and my coolant line isn’t snug inside the insulation pipe, since it’s one inch ID and the coolant line is thinner.
It was snug if I recall properly. But an air gap wouldn’t hurt at all – it’s good, actually. Except, of course, if the insulation occupies too much space in your cabinet.
Good day,
I finished converting my van (Promaster) last spring. So far, I’ve only been running my Isotemp Spa 20 on 120V, with 3×150 Ah lithium battery bank. I have notice that turning on the Isotemp daily consumes about 15% of the battery capacity. It is ok with the alternator recharging the batteries but I might be a problem if I stay parked at the same place few days with no sun. I’m considering connecting it to the engine coolant as you did.
Regarding the electrical installation, did you use or would you recommend an electrical timer. I’m planning to install the Intermatic SW60MWK model near the front lateral door.
We do have an ON/OFF switch, but no timer. Not a bad idea.
I don’t see why it wouldn’t work!
I’m stoked to see someone else using one of these 4-way bypass valves. Just a word of caution: Mine (an identical “Amazon” one), does not fully shut off the second loop. It’s very close, but not a perfect seal. I think if you were to have a leak somewhere in the water heater circuit, and you isolate that circuit using the valve, some small amount of coolant might slowly leak out through the valve. For this reason, I recommend carrying an extra bottle of coolant just in case…
Thanks for the heads up.
This one’s installed, but maybe I’ll order another one to test it…
Thanks again,
antoine
Would love to see you test this!