A van’s water system is simpler than the electrical side: a pump, tanks, sink, some PEX. And it’s well worth the build, because running water (and optionally a hot shower) draws the line between “van camping” and “van life“! We’ve now built two vans:
FarOutVan 1
Super simple yet very functional
- Single fresh tank (interior)
- Portable grey tank (undersink)
- Sink (no hot water)
- Exterior hot shower (propane)
FarOutVan 2
All the amenities
- Dual fresh tanks (interior & exterior)
- Dual grey tanks (portable & exterior)
- Sink (with hot water)
- Interior hidden hot shower
- Electrical + coolant-fed water heater
This guide covers the design fundamentals that apply to both vans. The full installation walkthroughs live in the FarOutVan 1 Installation (bottom of this page) and our FarOutVan 2 water installation. Let’s build stuff!
Water System In A Nutshell
Main Components
Fresh Tank
Stores clean, potable water used for drinking, cooking, showering, and washing.
Fresh tanks are typically installed:
- Inside the van, in the garage: large tank (15-35 gallons), less subject to freeze than outside.
- Inside the van, below the sink: small portable water jugs – can be filled almost anywhere, but more often, are less subject to freezing than outside.
- Outside the van, under the floor: often installed in lieu of the spare tire – subject to freezing.
Grey Tank
Collects relatively clean wastewater from the sinks and shower.
Typical grey tank installation:
- Small portable water jug under the sink: easy to empty, but more frequently – less subject to freezing than outside.
- Outside the van, under the floor: large tank more subject to freezing.
Black Tank
Exclusively for toilet waste. It contains human waste and toilet paper, requiring specific chemical treatments.
We personally avoid black tanks in our vans, because we prefer to use composting toilets.
Water Pump
Maintain pressure in the system at all times.
We like to use a diaphragm water pump, because it’s pressure-activated; there is no ON/OFF switch. When the pressure drops (a faucet is opened), the pump senses it and starts pumping to restore pressure, continuing until the full pressure is restored. From a user perspective, it’s exactly like using water in a house.
Accumulator
(optional)
Creates a pressure buffer, thus reducing the pump’s cycling and pulsation.
An accumulator is optional with most modern diaphragm pumps, but we much prefer to use one because of the reduced cycling and pulsation.
Water Heater
(optional)
… heats… water… You guessed it!
In FarOutVan 1, we kept it simple with an instant-hot shower system outside, in the back of the van. Our sink didn’t have hot water at the faucet, so we heated water with a kettle on the stove. Simple, and we lived full-time like that for four years.
In FarOutVan 2 we have a “central” water heater, and each appliance is connected to it.
Simple Water System
FarOutVan 1


Diagram
(Click on the components to learn more)

Items List
| Component | Description | Quantity | Buy Link |
|---|---|---|---|
| MAIN | |||
| Fresh Water Tank | 25 Gallons | 1 | Amazon |
| Test Plug | To plug the fill hole of the water tank | 1 | Amazon |
| Water Tank Filler with valve | To fill the water tank | 1 | Amazon |
| Fitting: 1/2″ MPT to 3/8″ Barb | To install the vent hose | 1 | Amazon |
| Hose: 3/8″ I.D. clear | That’s the vent hose | 1 | Amazon |
| Fitting: 1/2″ MPT to 1/2″ PEX | To install the drain valve | 1 | Amazon |
| Valve: 1/2″ PEX | To drain the fresh water tank | 1 | Amazon |
| Fitting: Shurflo 1/2″ MPT to 1/2″ Hose Barb | To install the vinyl tubing for the drain | 1 | Amazon |
| Tubing: 1/2″ Braided Vinyl Clear | Flexible drain that can be folded away | 1 | Amazon |
| Shurflo Water Pump | Diaphragm Pump, 3 gallons per minute, 55 PSI | 1 | Amazon |
| Shurflo Accumulator | To reduce cycling | 1 | Amazon |
| Shurflo Strainer | Prevent damaging the pump if crap enters the system… | 1 | Amazon |
| Elbow Adapter | 90° angle to connect Silencer Kit (as needed) | 1 | Amazon |
| Shurflo Silencer Kit | Reduce noise from pump vibration | 1 | Amazon |
| ON/OFF switch | “Emergency” water pump switch | 1 | Amazon |
| Fitting, “Tee”: 1/2″ PEX to 1/2″ PEX to 1/2″ PEX | To split the PEX pipe for sink & shower | 1 | Amazon |
| Valve: 1/2″ PEX | We turn this valve off in winter and drain to prevent freezing (we don’t use the shower or bike wash in winter) | 1 | Amazon |
| SINK AND GREY WATER | |||
| Dometic VA7306AC Sink | Dometic sink not sold anymore; here’s an alternative | Tecvan | |
| Swivel Fitting: 1/2″ FPT to 1/2″ PEX | To connect the PEX pipe to the sink | 1 | Amazon |
| End Cap: 1/2″ FPT | To cap the unused hot water sink fitting (essential!) | 1 | Amazon |
| Drain | The sink does not include the drain, so make sure to order this! | 1 | Amazon |
| Camco Flexible Drain | 1 | Amazon | |
| Wye & Valves | To direct grey water into aqua-tainer or through-floor | 1 | Amazon |
| Quick-Connect | To easily detach the aqua-tainer for dumping | 1 | Amazon |
| Garden Hose | 1 | Amazon | |
| Hose Clamps, Worm-type | To ensure the garden hose doesn’t slip out of the aqua-tainer | 1 | Amazon |
| Aqua-Tainer | 4 gallons grey water tank | 1 | Amazon |
| SHOWER | |||
| EccoTemp L5 | On-demand propane shower | 1 | Amazon |
| Swivel Elbow Fitting: 1/2″ FPT to 1/2″ PEX | To install the water valve | 1 | Amazon |
| Valve: 1/2″ PEX | Water Valve | 1 | Amazon |
| Valve: 1/2″ FPT to 3/8″ Flare | Propane Valve. See our Propane System article for more. | 1 | |
| BIKE WASH | |||
| Spray Faucet with coil hose | 1 | Amazon | |
| Swivel Fitting: 1/2″ FPT to 1/2″ PEX | To connect the PEX pipe | 1 | Amazon |
| End Cap: 1/2″ FPT | To cap the unused hot water sink fitting (essential!) | 1 | Amazon |
| OTHERS | |||
| Fitting, “Tee”: 1/2″ PEX | This is required if, like us, installing both the shower & the bike wash | 1 | Amazon |
| Fitting, Elbow: 1/2″ PEX | The PEX pipe can bend 5″ radius max. For tighter turns, use this elbow. | As Required | Amazon |
| Bend Support | This has less restriction than an elbow | As Required | Amazon |
| PEX Tubing, 1/2″ | a.k.a. pipe, hose… | As Required | Amazon |
| Fitting, MISC | We can’t possibly list all the fittings you might need for your installation! Here is the complete SharkBite catalog. | SharkBite Catalog | |
| PEX Cutter | PEX tubing can be cut with a carpenter’s knife, but this tool will make your life easier | 1 | Amazon |
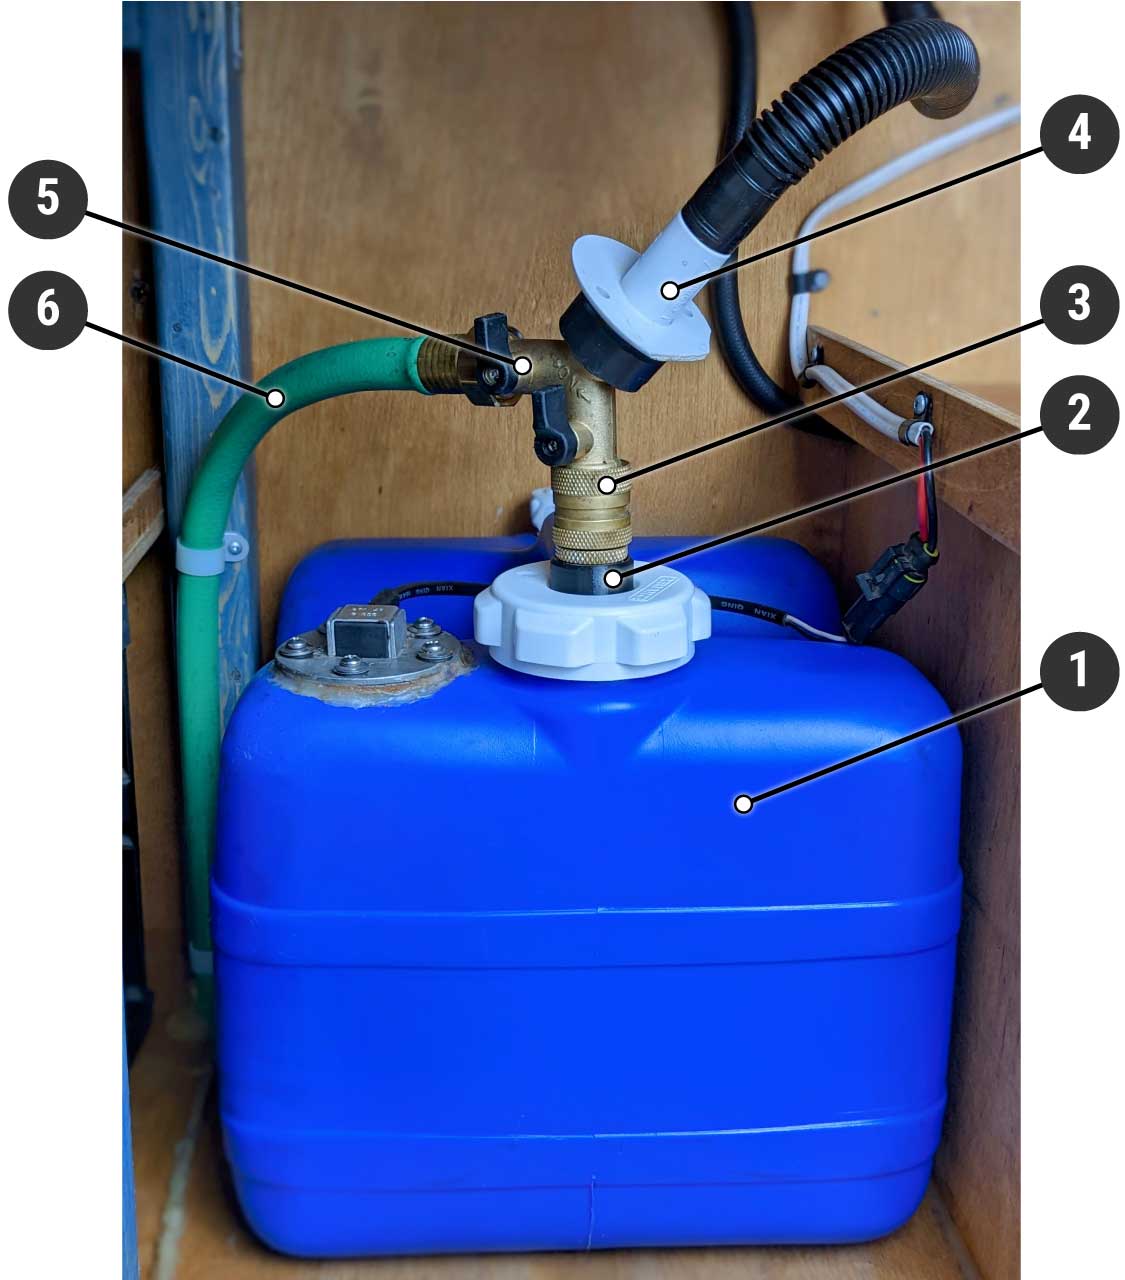
Complete Water System
FarOutVan 2
(Currently in construction)

Diagram
(Click on the circles to learn more)

Fresh Water Tank

Fill Port
Gravity Fill
Typically, fresh tanks in vans are unpressurized, meaning they are designed to store water but not hold pressure (e.g. pressurized city inlet). Therefore, gravity fill is recommended.
FarOutVan 1’s fresh tank is gravity-filled, and it couldn’t be simpler. We don’t want our van to look like an RV, so we didn’t install an exterior fill port.
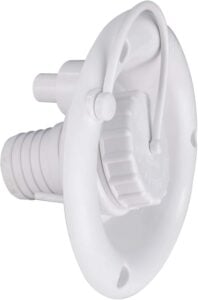
We simply insert the hose in the fill port, and flow can be shut off with the Camco Shutoff Valve Add-On:

The fill port is closed using this test plug:

We carry a 50 feet hose (lead free and BPA free) to fill our fresh water tank. If we had to start over, we might consider carrying two 25 feet hoses, because 25 feet is what we need 95% of the time and using a longer hose slows down the process (more length adds flow restriction). So for the rare cases when we need over 25 feet, we could connect the two hoses together…

A gravity fill hatch inlet can also be install to “relocate” the fill port:
Pressure Fill
Pressure fill is typically the “city water inlet” found on RVs. Once the tank is full, pressure will build inside the tank (assuming the overflow port don’t allow as much water OUT as water IN).
FarOutVan 2 utilizes the Aquor RV City Water Inlet. Theses inlets are popular with a reason: they feature a quick-connect with valve that’s super easy to use. To minimize pressure buildup in the fresh tank, we used 3/4″ PEX tubing.
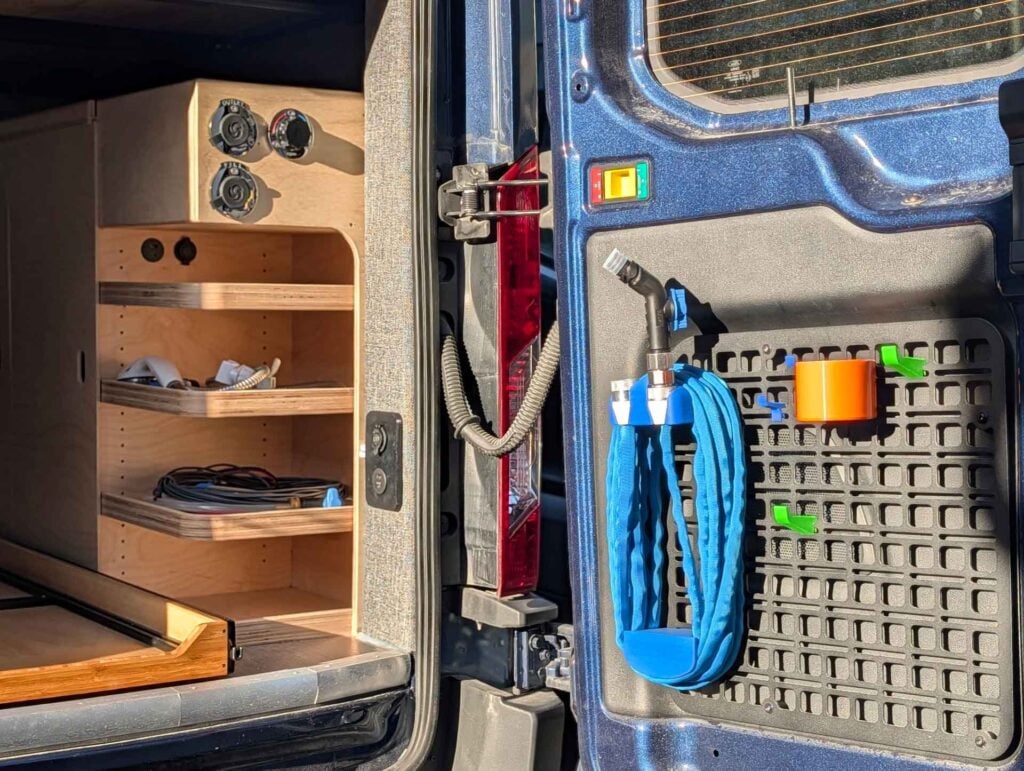
For FarOutVan 2, we found the neat Zero-G hose which is WAY more compact than FarOutVan 1’s Camco hose. We carry a 25-ft hose on the Rear Door MOLLE Panels for quick access (attached with a 3D Printed Holder for Zero-G Hose that we designed), and we have another 25-ft hose in the water cabinet in case we need 50-ft:
Water Pump Port
The outlet that feeds your water pump. It’s usually on the front or back of the tank, at the bottom edge.
Most tanks have 1/2″ NPT female outlet ports, so a 1/2″ NPT male fitting is required (check with your brand/model to make sure).

Drain Port
The outlet used to empty your tank (between trips, winterizing, etc.). It’s usually larger than the other ports, to allow more flow.
Vent Port
When pumping water out of the tank, or filling it, the water volume removed or taken in must be replaced with air. That’s the role of the vent port. To prevent water from coming out of the vent port (when braking or on steep or rough roads, for example), we connected a hose to the vent port and installed it about 15 inches above the tank.
The tanks we recommend (see “Water Tank Links” table above) have 1/2″ NPT female vent ports (so a 1/2″ NPT male fitting is required).
See section 1.3.1 for picture.
What Size?
It totally depends on your usage and how many days of autonomy (without having to fill) you want. As a rough guideline and to help you make your calculations, here is our usage living full-time in the van:
- One shower (one person) uses a little less than 3 gallons of water (that’s being very careful not wasting water, i.e. turning shower off when soaping, etc.).
- We dump between 2-4 gallons of grey water from the sink every day (we cook a lot, so we wash a lot of dishes; you might dump less than that).
That being said, we fill our 25 gallon tank every 4-5 days in summer (depending on showers). Every 7-10 days in winter (we shower in aquatic centers or gyms and try to fill our 1L water bottles as often as we can in public places).
When choosing the size of your tank, remember that water is not a luxury, it’s essential! Having to search for water frequently is no fun, so make sure to select a tank that gives you plenty of autonomy!
Inside or Outside the Van?
By installing our tank and plumbing inside the van, we can use our system even during skiing season, nice! We tested it in temperatures as low as -24F (-31°C). Of course, having the tank inside occupies precious space in the garage, but that’s a compromise we are happy to make.

If we were to use the van exclusively in summer, we might consider installing our tank outside the van, underfloor. Installing the tank underfloor frees garage space AND improves the van handling because it lowers the center of gravity.
If we were to start over, now that we know that we use much less water in winter, we would consider installing a tank inside the van AND a tank outside the van. The idea is to maximize water capacity without occupying too much space in the garage:
- In summer, we would use both tanks (extra capacity for showers).
- In winter, we would winterize the outside tank and use only the inside tank.
- Remember, this extra precaution is because we use the van below freezing temperatures! If that’s not your case, there’s probably no point in doing this.
- That’s food for thought, we don’t have any installation layout/details for that…
More water tanks here:
Wheel Well & Spare Tire Tanks
Wheel well & spare tire water tanks are a thing now, and we wish that option existed when we built FarOutVan 1! Actually, we ARE currently building FarOutVan 2 and installing a wheel well tank and a spare tire tank!
Space Optimization
Decrease the waste of space, increase the living/storage space. That’s the name of the game when building a van!
Lower Center of Gravity
The fresh water tank carries a significant weight; lowering the center of gravity will improve the handling of the van.
Simpler Installation
No need to build a raised shelf to clear the wheel well.
Models


There’s also has a few other van-specific interesting options:
Ford Transit

Sprinter

ProMaster

Grey Water Tank
Portable Interior Tank – FarOutVan 1 & 2
Pros
- Portable = Easy to dump
- Interior = less subject to freezing
- Simple installation
Cons
- Small-ish = Dump more frequently
- Collect water from sink only
- Occupy storage space
1. Aqua-Tainer
We use 4 gallon Aqua-Tainer, but 7 gallon works too.
2. Aqua-Tainer x Garden Hose Adapter
Aqua-Tainer threads are proprietary, no existing fitting will fit. So we designed and 3D printed our own! Buy in our Store.
3. Garden Hose Quick-Connect
4. Camco Sink Drain
Easy flexible sink drain. Buy on Amazon.
5. 2-Way Valve (optional)
To divert water into the grey tank, or through the floor. Buy on Amazon.
6. Garden Hose
Through-floor drain. Buy on Amazon.
Permanent Exterior Tank – FarOutVan 2
Pros
- Large = Dump less frequently
- Collect water from sink + shower
Cons
- Exterior = subject to freezing
- Complex installation
The underfloor grey water tank installation is documented here:

What Size?
That depends on how often you don’t mind having to empty it. As a guideline, we empty our 4 gallon grey water tank almost every day:
- Washing dishes is what uses the most water. We cook a lot, so we wash a lot of dishes! You might get less grey water than we do.
- If we use our hole-in-the-floor, we don’t have to empty our grey water tank every day…
Inside or Outside?
Because we use the van for skiing in winter, we had to install our grey water tank inside the van so it doesn’t freeze. It uses some space under the sink, but we’re happy that we can use our sink during winter!
The lowest temperature we have experienced so far is -31°C (-24F), and we could still use the water system! 🙂
Black Water Tank
We don’t have a black water tank and we don’t need to search for RV Dump Stations. Neat! How is that? Because we installed a Nature’s Head composting toilet. And we’re SO GLAD we did! We talk about our composting toilet here (how it works, how it’s emptied, what frequency, etc.):


Water Pump
Diaphragm Pump
A diaphragm pump keeps the water system pressurized at all times. It means having running water just like at home in a house.
The pump has no on/off switch. It starts automatically when the pressure drops, and it shuts-off automatically when the appropriate pressure is reached. For example, using the sink (or shower, or whatever) creates a pressure drop; the pump senses it and runs until the pressure goes up again.
One of the most common and reliable diaphragm pumps out there is made by Shurflo:
Shurflo Revolution 4008
- Shut-Off Pressure: 55 PSI
- Re-Start Pressure: 40 PSI
- Recommended Fuse: 10 amps
- Flow: 3 Gallons Per Minute

5.1.1- Connecting The Pump
The Shurflo Revolution 4008 has one 1/2″ NPS male inlet and one 1/2″ NPS male outlet. Because the pump produces quite a lot of vibration, it’s better to connect the pump using flexible pipes. We recommend using the Silencer Kit from Shurflo:

It’s also a good idea to install a strainer at the inlet port of the pump, so debris can’t find its way through the pump and damage it:

We connected the silencer to the strainer with this fitting (to save some space):

5.1.1- Electrical Wiring
By now, we understand that a diaphragm pump doesn’t require an ON/OFF switch… However, we recommend adding one to manually shut the pump off. It’ll prevent the pump from running indefinitely when the fresh water tank runs empty (it’ll happen!).

The pump has to be connected to the electrical system. Don’t worry, we also have a guide for that 🙂

Manual Pump
To keep things really simple and to save on electricity, a manual pump can be installed:
Hand Pump

Foot Pump

Accumulator
If installing a diaphragm pump (like the Shurflo we recommend), you might consider adding an accumulator. The accumulator contributes to longer pump life, less noise, less amperage draw, and reduced water pulsation. It also reduces cycling (the pump starts less often), nice.
Per manufacturer: “The most efficient use of the accumulator occurs with the accumulator pressure set at the same pressure as the pump’s re-start setting.” (Hint: it’s 40 PSI for the Shurflo Revolution 4008 pump). We tested different pressures, and we prefer to set it to 30 PSI as the water volume capacity is greater at that pressure (therefore, the pump cycles less).
The pressure can be checked with a normal tire gauge (you have one in your glove compartment, right?) and adjusted with a bike pump (it’s a schrader valve), it’s super easy. When checking or adjusting pressure, just remember to turn off the pump and to open the sink faucet (this is to read the static pressure). The accumulator comes unpressurized.
Shurflo Accumulator

Sink
For Pressurized System
Pretty much any sink will do. We have the Dometic VA7306AC sink in FarOutVan 1 because it’s compact, foldable and looks great. If your counter space is limited, it’s a great way to optimize it. The only downside we found is that the foldable faucet is in the way when washing/rinsing large items (such as full size plates or pot/pan); we wish it was located further back so we didn’t have to swing it around.
Edit: Looks like the Dometic sink we used is no longer sold. We installed the TecVan sink in FarOutVan 2:

Tec Vanlife
A newer option that recently caught our attention! It looks super classy, functional, and also convert as a shower head!
- 52″ extra-long pull-out head (see demo in video).
- Made from 3mm stainless steel coated with a thick layer of oil-free nanotechnology coating resistant to staining.
- Removable cover (can be used as a cutting board!).
- Cold & hot water fittings: 1/2″ NPT.
- Drain size: 1-1/2″ fitting (strainer not included).
- Exterior dimensions: 450mm x 390mm (17.72″ x 15.35″).
- Interior dimensions: 380mm x 347mm (14.96″ x 13.66″).
- Cutout: 420mm x 360mm (16.54″ x 14.2″).
- Depth: 230mm (9″)

For Manual Pump
If going for a manual pump, keep things simple!
Spout

Sink

Hot Water
Nope
We don’t have hot water in the sink in FarOutVan 1, and we’re OK with it: we just use our kettle to heat water. That’s the most economical way (water and gas) for sure! The most annoying part is that it’s not really practical to rinse the dishes with the kettle, so we rinse them with cold water, which makes drying the dishes more difficult. For everything else, we don’t mind.
Kettle With Thermometer

Electric
The Bosch Mini Tank Water Heater is quite popular in vans. It comes in 2.5-gallon, 4-gallon, or 7-gallon tank capacity, is plugged to a 120V AC outlet, and is rated for 1,440W.
Pros:
- Easy to install
- Affordable
Cons:
- Not designed for a mobile application (could get damaged by vibration)
- No drain valve (winterization)
- 1,440W heats fast, but can overload your electrical branch if used simultaneously with another 120V appliance.

Electric & Coolant (Hybrid)
The Isotemp Spa (by Indel Webasto) is a fantastic option. It comes in 4-gallon, 5.3-gallon, 6.5-gallon. It works on 120V AC (750W), or from the vehicle coolant (VERY efficient), or both.
Pros:
- Easy to install (electric only)
- Designed for mobile applications (vibration, very robust)
- Features a drain valve (easy to winterize)
- Excellent tank insulation (will stay hot without heat source for a long time)
- If connected to the vehicle coolant, VERY energy efficient (“free” heat while driving)
- 750W-rated = won’t overload the electric branch (can be used simultaneously with other appliances).
Cons:
- Higher cost upfront
- More complex installation if connected to the vehicle’s coolant.

Propane
Tankless (On-Demand)
As the name suggests, a tankless water heater has no tank. Water is heated instantly on-demand, so it can provide a continuous flow of hot water. It’s super-efficient since it doesn’t have to keep water hot all day.

This is what we used for the first 10 months in our van. But then we realized we don’t need to have a portable system. It is quite bulky and cannot be integrated to our water system. So we decided to try something else…

We’ve been using the Eccotemp since 2018 and we’re super happy with it. It’s good, cheap, and easy to install. It can be integrated into a pressurized system, it’s not bulky, and the water is surprisingly HOT.
With Tank
Atwood has a wide range of water heater models, but the one that catches our attention is the G8A-6E model:
- Tank Capacity: 6 gallons
- Water Temperature: 100F to 150F
- Energy: Propane
- Recovery: 11.6 gallons per hour
- Dimensions: 16″ high x 12.5″ wide x 18″ deep
Make sure to check Atwood’s website for all their available models: http://www.atwoodmobile.com/water-heaters.asp
Atwood 6 Gallon Water Heater

Diesel
If budget is not an issue, you might consider the Webasto Dual Top Evo. It’s an air heater (similar to our Webasto air heater installation) AND water heater combined. It works with diesel and has an 11 liter water tank integrated. Fun fact: it’s over $7K…
Webasto Dual Top Evo

Bike Wash
FarOutVan 1
Washing a bike uses quite a lot of water, so we obviously don’t use it very frequently. But there are some occasions where the bike wash is a real life saver; removing a layer of mud from the down tube by hand is no fun!
Now, can someone explain why Antoine is CONSTANTLY walking in dog poo while Isabelle is not??! We’re thinking of renaming it the “Dog Poop Wash” as it has become the primary use…
Exterior Spray Faucet

Inlet, Outlet, Mixing Valve
FarOutVan 2
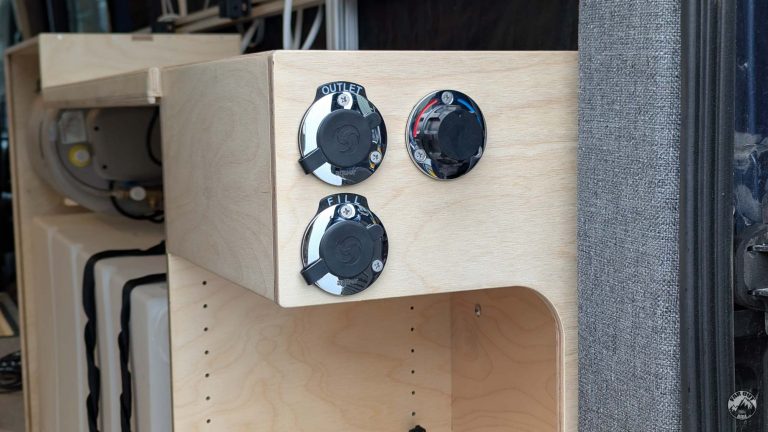
Like many of you, we used Aquor inlets/outlets and mixing valve to the back of the van:

Bike wash, exterior shower, and fresh tank fill: Aquor RV City Inlet. Mixing valve = Aquor Mixing Valve.
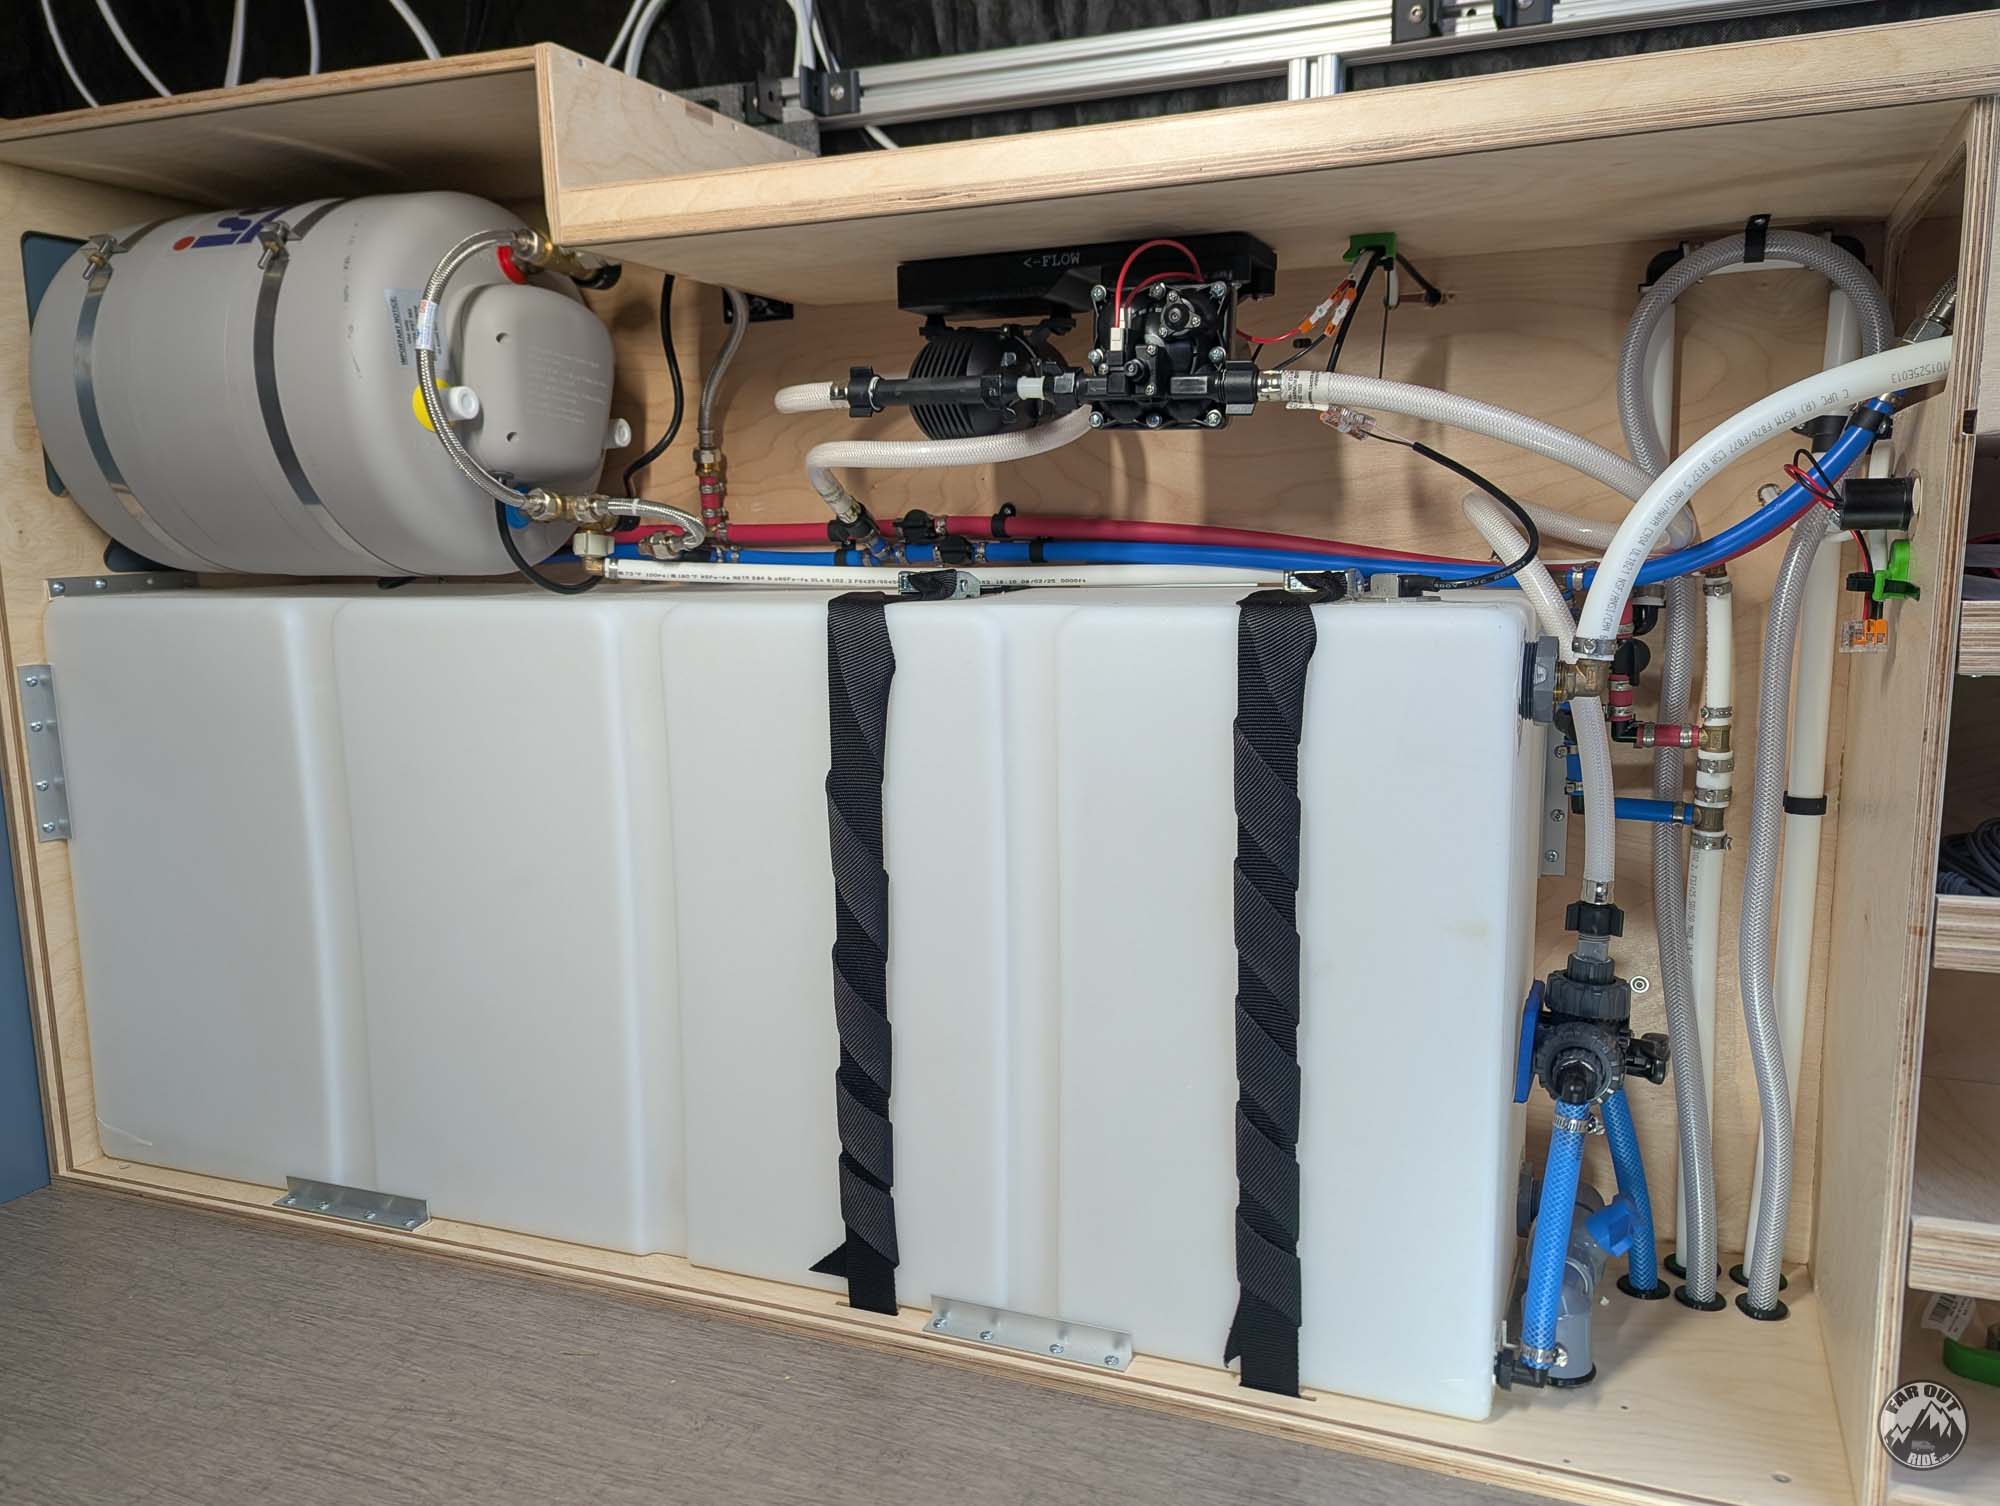
https://faroutride.com/water-cabinet/Under the hood (FarOutVan 2’s Water Cabinet):

Pipes & Fittings
Pipes
Let’s get straight to the point, PEX tubing is what you want.
- PEX tubing has become the standard for houses and RVs.
- It’s cheap and readily available in any hardware or RV store.
- It comes in red/blue color to differentiate hot/cold side (both colors have the same properties).
- It resists freezing (but fittings might crack, don’t let it freeze!) and high-temperature.
- It’s easy to cut, easy to connect, and easy to route (flexibility: 5″ minimum radius for 1/2″ diameter PEX).
- It won’t corrode.
- Note that PEX is NOT UV resistant and should not be installed under constant sun exposure.
PEX Tubing

PEX tubing can be cut with a carpenter’s knife, but a PEX cutter will make your life easier:
PEX Cutter

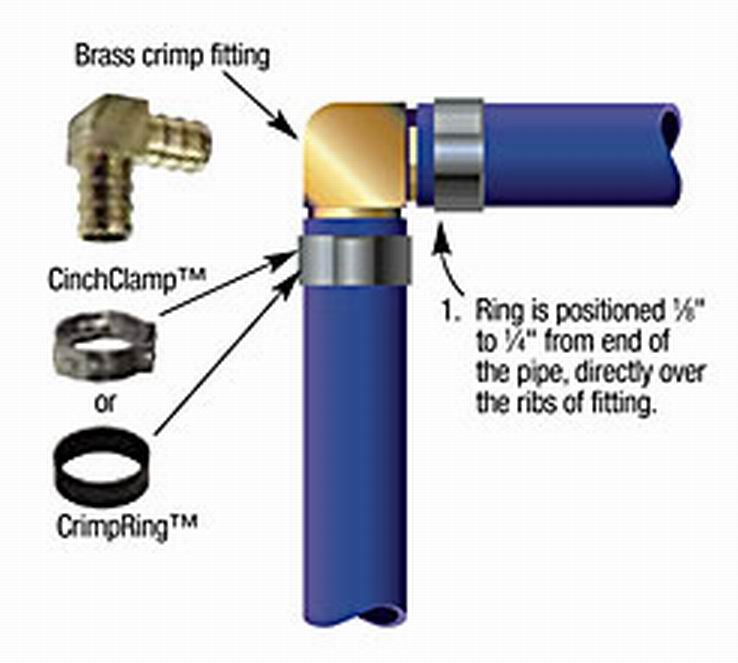
Fittings
10.2.1- Clamping
This is the method we recommend for permanent, leak-free connections. It’s easy, fast, fun (yep!) and there is very little chance for error. It’s also good to know that a clamp tool can clamp any ring size (as opposed to crimp). Here is how it goes:
- Insert the clamp ring on the outside of the PEX tubing.
- Insert the barbed fitting into the PEX tubing.
- Using the Clamp Tool, compress the clamp ring. The clamp tool will not release from the clamp ring unless a properly-secured connection has been made; therefore, a GO/NO-GO gauge is not required!
PEX Clamp Tool
For 3/8″ up to 1″ rings

PEX Clamp Rings
1/2″

10.2.2- Crimping
Crimping is very similar to Clamping; a crimp ring is used instead of a clamp ring. Both methods give equally good results, except a GO/NO-GO gauge has to be used for crimping to ensure the crimp ring was sufficiently deformed. Crimping is the cheapest method for large projects.
PEX Crimp Tool
For 1/2″ rings

PEX Crimp Rings
1/2″

10.2.3- Compression Fittings
The disadvantage with clamp/crimp is that it might be impossible to operate the tool in tight spaces. In that case, you could use Flair-it compression fittings as they require no tool for installation. We personally haven’t tried them, but they’re quite popular in the RV industry. Flair-It fittings come in a variety of shapes and functions:

10.2.4- Push-To-Connect Fittings
Push-to-Connect fittings are almost too good to be true. Just push the PEX tubing into the fitting and voilà! …In fact, maybe they are indeed too good to be true. We tried them and when we pressurized the system, many fittings had slow leaks.
- Slow leaks are the worst because they’re hard to notice and could create damage in the long run… Why did we have a slow leak? The Sea Tech fittings rely on an O-ring that goes on the outside of the PEX tubing (not inside); the surface of the PEX tubing must be scratch and damage free. These fittings are “reusable”, but the action of disconnecting creates scratches on the outside surface of the tubing…
- O-Rings dry and lose efficiency in the long run.
- Some people reported having no issue at all after many years, but we think they are too sensitive to install, to outside tubing surface conditions and to O-ring deterioration. We’re not 100% confident, so we pass (we would be OK with them for temporary repair or outside installation).

10.2.5- Threaded Fittings
For all threaded plastic fittings:
- Do not use Teflon tape or Teflon paste! These are lubricant, not sealant, designed for metal fittings and they will promote over-tightening of plastic fittings = cracks = leaks.
- Don’t over-tighten: finger tighten plus one or two turns.
- Use non-hardening, plastic-safe, non-toxic thread sealant (not lubricant). It’s a paste that does not dry and can be removed easily (not permanent).
- We did not use thread sealant on the Shurflo fittings attached to Shurflo appliances (pump & accumulator).
Thread Sealant

Compatible with plastic fittings (PVC, CPVC, ABS, Nylon). Non-toxic (OK for potable water). Non-hardening. See product info (pdf).
Winter
To Winterize
When water turns from liquid into ice, its volume expands by approximately 9%; as a result, any water trapped into a component that freezes will crack said component.
In an RV, it is almost impossible to completely drain the water from everything. The best way to achieve this would be to use an air compressor to blow out the system, but it’s not guaranteed to work… That’s why most people winterize their water system with antifreeze.
Our water system, however, is quite simple; there are few components, and these components are all accessible. So it can be winterized by draining all the water and without adding antifreeze. Empty the water tank completely and, with the pump activated, open each faucet independently (sink, hot shower, bike wash) for a rough “pre-drain”. Disconnect the water pump, the accumulator, the hot shower (Eccotemp), and the bike wash. Water will come out, so have a large bowl and some towels ready! If you can, take all these appliances inside your house for the winter (hey, the removal should only take a few minutes of your time it’s not that bad!). If removing them is not possible, blow out with compressed air to drain them well. Be extra careful with the hot shower (Eccotemp), it’s much harder to drain because of the heat exchanger (we’d really take this one inside the house for the winter..).
Or To Not Winterize
Since we usually live full-time in the van and all our components (pipes, water heater, fresh water tank, etc.) are located inside (warm-side), we can use our water system ALL-YEAR, sweet! We even used it when it was -24F (-30°C). We only take the precaution of winterizing the bike wash / shower at the back of the van; this area can freeze occasionally (it’s far from any heat source), so we avoid taking any risk and drain it.

Hacks
12.1- Water Bandit
To increase our chance of finding water while we’re on the road, we carry a neat Water Bandit. It can be fitted on almost any tap (thanks to the rubber side), then a hose can be connected to it (thanks to the “garden-hose-fitting”) on the other side. We’re using it occasionally.

12.2- Sillcock Key
Following this post, many of you recommended we get a Sillcock Key. Apparently, this tool can open water supplies at some rest areas, campgrounds, corner stores, etc. After a few years on the road, we actually only used it once, but we’re happy we had it!

Monitoring Tank Levels
Keep it simple!
For a majority of people, monitoring the level of the tanks just by looking through them does the job. That’s what we did for the first year or so we lived full time in our van; it worked just fine, and it’s the cheaper solution.
Simarine Pico
After a year or so living full time in our van, we decided to upgrade for a fancy monitoring system. The Simarine Pico is not only sexy, it is also packed with cool features: battery monitoring, tank level monitoring, temperature sensors, inclinometer, etc. We appreciate the tank level feature (fresh tank, grey tank & Nature’s Head liquid tank) and the low/high level alarm. It would be hard to go back after getting used to it…

How to sanitize the Water System
Because we live full time in our van, our water system is constantly refreshed (we fill our tank approximately every 4 days). Therefore, we sanitize our tank every six months. If you must leave your van alone for a week or two without draining the system, consider sanitizing before using it (especially in a hot climate!).
1- Prepare a bleach solution
- Use 1/4 cup of bleach for every 16 gallons of water in your fresh tank.
- Dilute the bleach in at least 1 gallon of water.
- Do NOT add the bleach in the tank without diluting it first!
2- Sanitize
- Add the bleach solution to the fresh tank and fill with potable water.
- Circulate water through the entire water system for about a minute (by opening the sink and other devices).
- Let it sit for at least 4 hours (overnight is better!)
3- Rinse
- Drain the fresh water tank and re-fill with potable water.
- Circulate fresh water through the entire water system for a few minutes.
- Repeat once more (drain, re-fill, circulate, drain).
- That’s it!
Installation – FarOutVan 1
Below is how we installed our water system in FarOutVan 1.
For FarOutVan 2: Water System Installation – FarOutVan 2
Tank Installation
The tank is installed above the wheel arch:

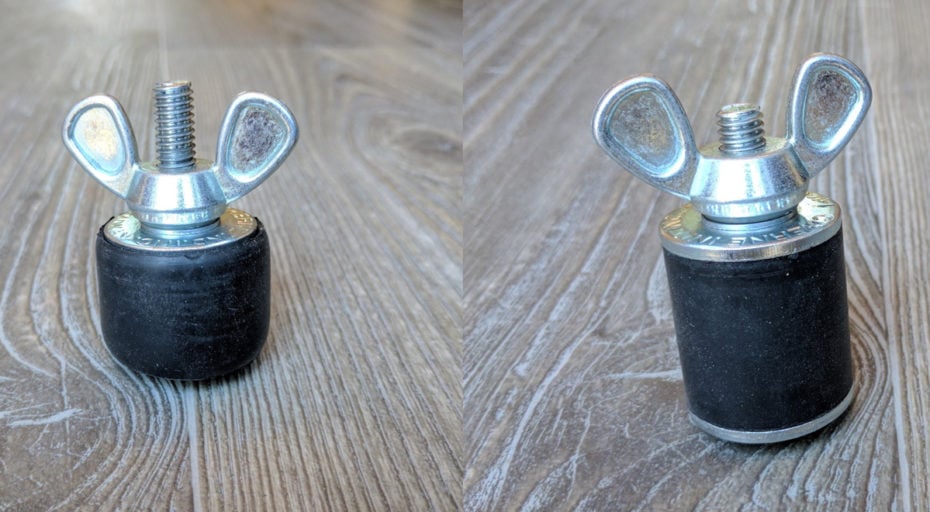
The tank is secured with BoatBuckle Kwik-Lok Tie Downs 2″x4′ (Buy on Amazon). They’re super strong and easy to install/remove. They are attached to Stainless Steel Tie-Down “D” Rings (Buy on Amazon):

When the tank is full, there is noticeable “bow” on the unsupported side of the tank; we therefore added a wood support to counterbalance the bow (the straps alone won’t help). Note that the wood support must go across the entire height of the tank (from bottom to top) to be effective (otherwise the strap will flex):

Water Pump, Accumulator & Plumbing Installation
Water pump & accumulator:

We built a “shield” for the pump and accumulator and installed the switch on it:

It looks like this with the “shield” on:

This is the tubing near the pump and the accumulator:
- Our tank has a water pump port at the rear; unfortunately this tank is not made anymore… The tanks we suggest have all ports on the same side.
- To save space, we used a Shurflo 90° elbow adapter fitting between the strainer and the silencer kit.

And this is the tubing where it splits toward the bike wash / shower:

Sink and Grey Water Tank Installation
The sink installation into the cabinet is covered in our Sink & Stove Cabinet article

This is our grey water tank:

Meanwhile in China:

Bike Wash Installation

Hot Shower Installation
To connect the cold water (blue PEX tubing), we used a swivel-elbow adapter followed by an elbow (per our water diagram); this way the valve (which acts as the shower handle) is easily accessible and is routed around the propane valve (see also following picture for a different view angle).

When not in use, the shower head is stored using a Quick Fist Clamp mini (Buy on Amazon):

The shower head temporary mounts in the window using a suction cup adapter (Buy on Amazon):

And that’s our exterior shower setup. We documented how we built our exterior shower
If you’d rather have an indoor setup, see our hidden shower with in-floor shower pan in Van #2.

On Second Thought…
- October 2017 : One month living full-time in the van! We talk about the water system in our “First Month on the Road” article
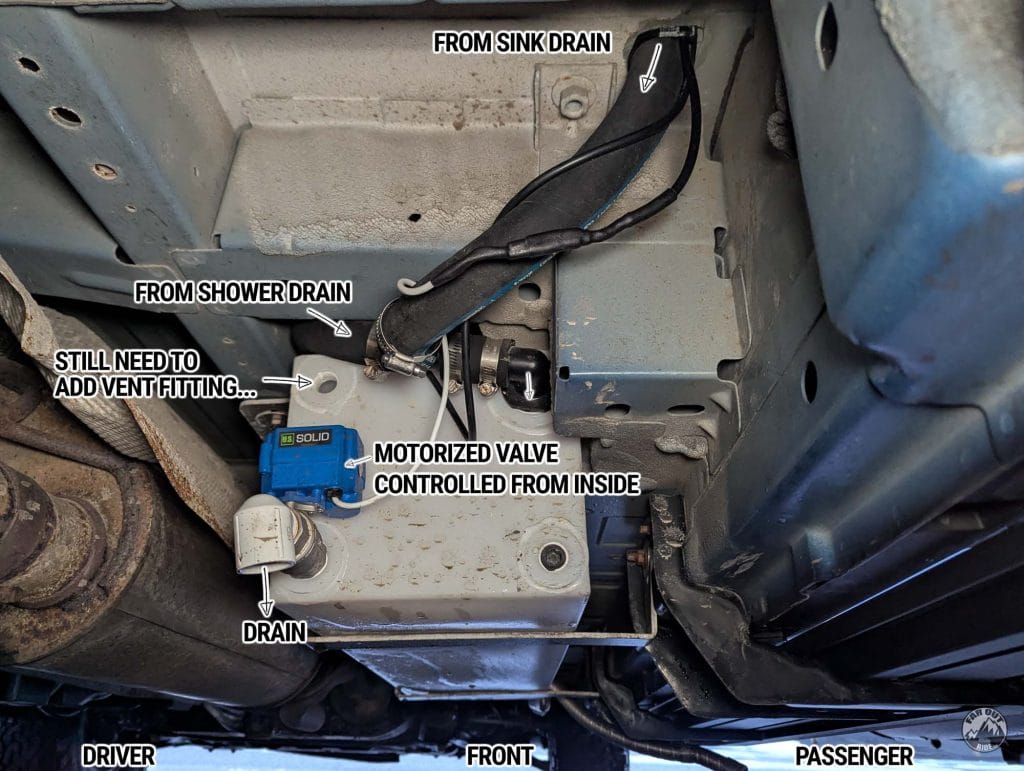
- December 2017: We modified our grey water system so we can dump water directly through the floor (or in the grey water tank).
- June 2018: We traded the Mr Heater BOSS for an EccoTemp (see justifications above in this article). We also re-plumbed our system using PEX tubing instead of braided vinyl tubing (because that’s the proper way to do it).


First of all, the work you did with this website is absolutely enormous. Titanic work. Thank you SO SO much!!! You helped so many people!
My question is about not winterizing the water system. You go on a long cold day on skis and when you are back everything that has water in it will be frozen. Unless you let the webasto run while you are out…
Thank you so so much again for all the work!
Stas
Depends…
Here in the Pacific Northwest the temperature are generally quite warm at the base, so water won’t have time to freeze.
On a really cold day (east coast!), then yeah we will let our air heater run. We typically schedule it to start/stop a few times during the day (instead of letting it run continuously all day).
We discuss about that here: faroutride.com/winter-vanlife/
cheers!
Antoine
Hi! I don’t see mention of adding a water filter to your hose while filling, or from tank to sink. Do you think that’s important?
We lived 4 years full time without any filter.
I’d say that’s totally a personal decision! 🙂
Have you had any issue with your through floor grey water drain freezing in the winter? I am wanting to install an indoor grey water tank that will have a drain in the bottom so I can drain the tank trough the floor. I live in the high mountains and I am wondering if you think it will freeze up or have you been able to use the through floor system in the winter. Thank you!
I don’t remember it ever freezing, so no issues to report!
It looks like your tank has a drain outlet on the opposite side of the fill, back facing your pump. But the tanks you link to have all 4 on the same side? Also, did you use the second drain? Why not just drain by pumping?
A am about to install a propane and water system in a Ford Transit based on your guides. In your propane system guide, you recommend using copper gas lines to connect each appliance because hoses deteriorate over time. Yet in this water system guide your picture of the installed water heater shows the gas line is a flexible black hose. Do you no longer recommend copper for connecting the appliances? Or is there a special reason for using a flexible hose on the water heater? Thanks.
hi,
thank you for a most excellent website. it is a great resource and has helped me a lot for my bus build. in the section on draining into the grey water jug under the kitchen sink you mention the difficulty of attaching to the proprietary jug lid (and have so craftily created a 3-d printed solution ! ). i have found the u-line jugs ( https://www.uline.com/BL_8191/Jerricans ) have standard 3/4 mip threads on the lid and it’s easy to find a 3/4 mip to garden hose brass connector. the jugs are also translucent so one can easily see the fill level.
Your water system guide is excellent! And the interactive water system diagram, where one clicks on a part to see what it is, is very helpful. However, it is no longer interactive. It was working last week but as of October 31, 2024, it is no longer interactive. There is a note near the top of the page saying this page was updated on the 29th. That update may have caused the interactive portion of the page to break. Though even without the interactivity, this is still a very helpful guide.
Hi!
Thanks for reporting this. I had to tweak a few things, should be working now!
Let me know,
Antoine
The interactive diagram is working fine. And the item list is back too. Thanks for a prompt fix.
Hey, thanks for this guide 🙂
I’m currently designing an interior gray water system for my van (in hopes of winter-proofing my water system). I’m curious if there’s anything you’d change about your interior gray water setup if you were to do it again or if it all worked as intended. Are you guys happy with the manual drain process and the 4 gallon portable tank? Does the tank venting work as expected and are their any odors from venting as the tank fills on the inside of the van?
Thanks again for any help and all of the great guides!
Hello
Thank You so much for this website and all the info. You guys are Van Masters!!!!!! Im in the process of my first build and I have a few questions about your plumbing. I would like to use the Ecotemp L5 as a water heater. I noticed that the L5 operates on 1.5 gpm and your sureflo pump is rated at 3 gpm. Is the ball valve thats plumbed before the L5 used to reduce water flow? Also I will have an all electric system for my cooking so I will not have a 20lb propane tank. I read that it is possible to use a 1lb. propane tank on the L5 with a reducer. Do you have any knowledge of that? Thank You for any advice
Hi!
It’s OK (and desirable) to have a water pump with a higher capacity than the shower, you don’t need to match them.
Remember you will most likely use the shower and other utilities at the same time (interior faucet, etc), so you want your pump with more capacity.
For using the Ecotemp with a 1LB tank, I’m not sure exactly sorry.
cheers
How did you wire the ON/Off switch to the pump?
Have you guys had any issues at higher elevations with the propane heater?
We used it at over 10,000 feet elevation in Mexico, but it started to struggle at that elevation.
The good thing about the Propex is that at high elevation is struggles to start, but won’t damage itself. As opposed to gas/diesel heaters which tend to get clogged and then requires maintenance.
cheers
Hey,
Thanks for all the information on your site. It has been incredible useful for my build! For sercuring the water tank, did you just use regular screws that came with the D-rings, and screw them into the wood bed legs? Or did you use bolts? Thanks!