Here is how we built our sink & stove cabinet for our Ford Transit DIY camper van conversion!
A while ago, we brainstormed about our living requirements; below are the requirements specific to this cabinet:
- Propane range (stove/oven) will be used
- Pressurized Sink
- The cabinet must be easy & quick to remove (we never know)
- Big enough for storage, but not that big so it does not use all the “living room” space
TIME SPENT ON THE JOB: ~40-60 hours (This is approximate. Time has become a vague concept at this point. This cabinet was easier & faster to build than the Overhead Storage Cabinet, because there are fewer funky shapes to deal with.)
TOTAL COST: $280 USD (approx. This excludes the sink and the propane range)
Disclosure: This post contains affiliate links, which means that if you click a product link and buy anything from the merchant (Amazon, eBay, etc.) we will receive a commission fee. The price you pay remains the same, affiliate link or not.

MATERIAL:
- Framing Lumber, 2″x3″ (Bought from Home Depot)
- Baltic Birch plywood, 3/8″ thick (Bought from our local shop)
- Titebond III Wood Glue (Buy on Amazon)
- Pocket Hole Screws kit. (Buy on Amazon)
- Karlby Ikea countertop (Bought on Ikea)
- Door Hinges 1/4″ overlay (Buy on Amazon)
- Door Catchers (Buy on Amazon)
- 1/4 fender washer (Buy on Amazon)
- 1/4-20, .280 Steel Cross Nut Prebulbed (Buy on Amazon)
- 1/4-20 bolts, various lengths (Buy on Amazon)
- #8 X 1-1/4-Inch Square Drive Flooring Screw, black (Buy on Amazon)
- Frame’s Blue color: Saman water-based wood stain
- Olive (Buy on Amazon)
- Azur (Buy on Amazon)
- Whitewash (Buy on Amazon)
- Finish: Water based flat varnish (Buy on Amazon)
- Baltic Birch’s Walnut color: Watco Danish Oil light walnut (Buy on Amazon)
- Low-E EZ-Cool (Buy on Amazon)
- Dometic Sink VA7306 with integrated folding faucet & cover (it seems this faucet isn’t sold anymore. Here’s another option: See on Tecvan.co)
- JR Products 9490-215-022 Sink Strainer (Buy on eBay)
- Wedgewood (Atwood) Vision 17″, 3 burners & oven, with Piezo (Buy on Amazon)
TOOLS:
- Kreg Pocket Hole Jig Mini (Buy on Amazon)
- Skil saw (Buy on Amazon)
- Freud Finish Blade 60 tooth (Buy on Amazon)
- Jigsaw & Blades (Buy on Amazon)
- Power drill (Buy on Amazon)
- Drill bits (Buy on Amazon)
- 220 grit Sanding paper (Buy on Amazon)
RESOURCES:
- Atwood Range Manual
- Dometic Sink VA7306 Manual
- Our Atwood Range long term review: faroutride.com/wedgewood-vision-range-review/
PRE-REQUISITE:
- Get a van!
- Modify your van by following our Build Journal!
Disclaimer
This is not a “How-To”. This is a “how-we-did-it”, following our own requirements and using our own (limited) skills.
First of all, we modeled and located the sink & stove cabinet.
We used the cutout dimensions from the Atwood Range Manual:


Here we go!

We installed the bottom plywood panel. The wheel well & frame cutout was trimmed on the spot.

To join the frame, we used once again the Kreg Pocket Hole Jig Mini as it makes the job easy and provides strong joints without fancy tools!


- Here is a short Wikipedia Article on Pocket Hole Joinery
- The joints will be as straight as your cuts… our cuts were not perfect, but it’s OK; we straightened things up when we fastened the frame to the bottom & side panels.
And here is the frame!

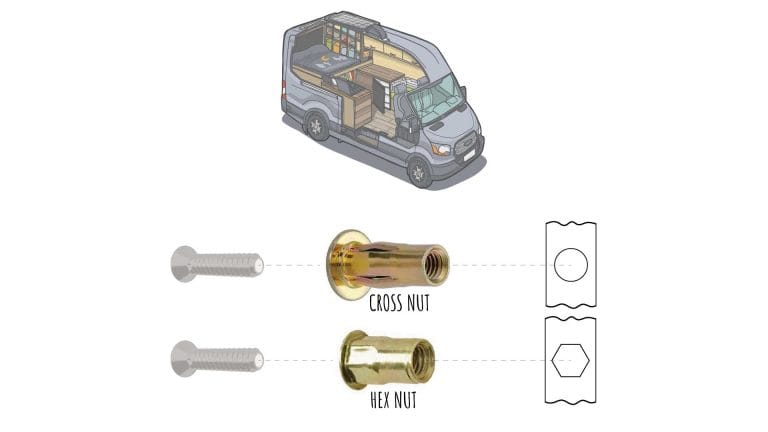
We want the cabinet to be easy & quick to remove.
We located 2 existing holes in the van and we installed Cross Nuts in them. The cabinet will be fastened with these 2 accessible Cross Nuts (and 3 holes in the floor as well) through the back panel of the cabinet.

Not familiar with Cross Nuts? That’s O.K.! Make yourself comfortable and read our Cross Nut post:
Thinsulate is doing a great job at insulation, but we still have some metal exposed. This metal is very conductive thermally, therefore we covered it with Low-E EZ-COOL.
You can see the EZ-Cool in the back. Meanwhile, we also started to prepare the wall for wood paneling and added the back panel of the cabinet

There is a big gap between the back panel and the Cross Nut; we filled it with 1″ thick Baltic birch plywood to avoid stressing the cabinet while torquing the bolt. Basically, this acts as a big fat washer…

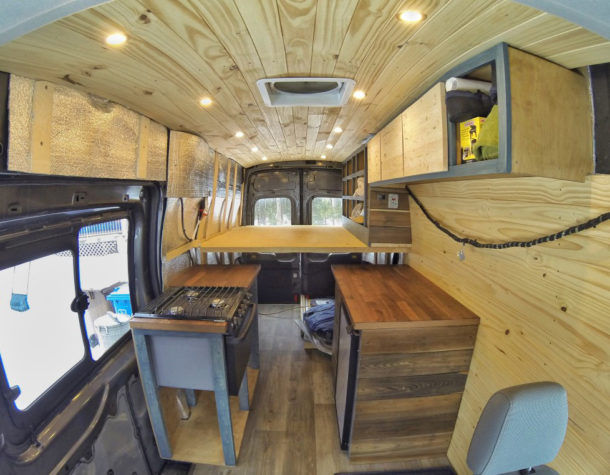
The frame is ready to receive the countertop!
We want a nice & clean cut, so we’re using our friend’s epic skills and epic tools…

The countertop was then attached to the cabinet’s frame and the oven installed.
We were really into it, so we forgot to take pictures, but that’s pretty straightforward… we just screwed the countertop to the frame from below. Here is the result:

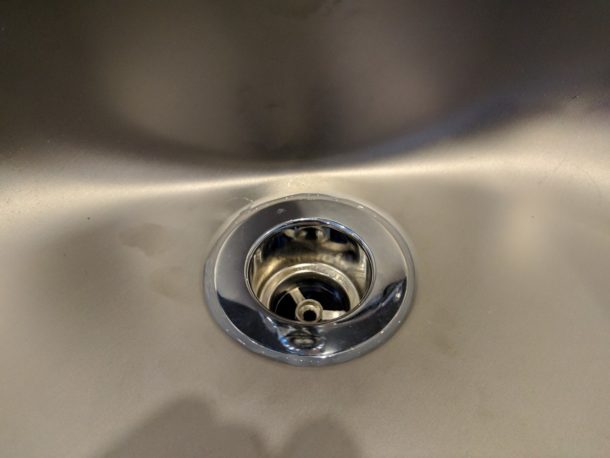
We then trimmed the countertop to receive the sink.
We wish the manufacturer instructions would include a 1:1 scale template of the cutout… the diagram is far from easy to understand, so we first made it in cardboard, tested it, then transferred the template to the countertop.


We then added a “groove” around the cutout periphery
This is to ensure that the sink rests on its gasket (see a few pictures below) and is water-sealed.

We applied Minwax Polyurethane on the trimmed edges (as for all the countertop trimmed edges) to protect from water infiltration. (Varnish could be used as well)

Even with the template, it took some trial-and-error (a lot actually) to get the sink to sit perfectly…
We fixed the gasket around the sink periphery using vinyl adhesive strip (Buy on Amazon), then we applied GE Silicone II (Buy on Amazon) between the gasket and the countertop to seal the deal.
WARNING: Silicone is a MESS to work with, you might come up with a better solution. If not, ensure to have towels and soapy water at proximity…

The sink is fastened with four screws:
The sink basket was then installed
There seem to be two schools of thought:
- Use Plumber’s Putty (Pro = easy to remove, Con = I don’t have that at home right now)
- Use Silicone II (Pro = Leak is less likely + I have some at home right now, Con = very hard to remove)
Well, it looks like we will use Silicone:


We then added cedar doors to the cabinet:

We used 1/4″ semi-wrap overlay hinges (Buy on Amazon):


We added some cedar finish as well on this side:

We’re done, sweet!!
…actually, we still have to build storage (shelves, drawers, etc) but we will wait a bit later, until we really understand our needs and until we know exactly what will be stored in the cabinet.

On second thought…
Again, we used cedar planks for finishing. We’re aware that this wood is VERY soft and will scratch very easily. Time will tell if we regret our decision!


I know you no longer have this can build l, but do you remembering if the weight of the oven was primarily resting on the countertop via the metal edging around the stovetop, or was it resting on the wooden beams under the oven?
Oh what a h beauty! No to just look @ but I mean so cleverly done & the part about removal of pieces inserted is fantastic!
I’m sorry if I missed this- how did you attach the plywood floor to the van floor and also the cabinet legs to the plywood floor?
Hey!
Here is how our floor is made/installed: https://faroutride.com/floor-installation
Most of our cabinets our fastened to the wall with threaded inserts(https://faroutride.com/threaded-inserts/) and screwed to the plywood’s floor (wood screws, basically).
antoine
Thanks for another great article! Question about the Karlby Countertop, how much does it weigh, and how much did it cost you? (The link doesn’t lead to a specific product anymore 🙂 ). I went looking at Butcher blocks at my local Lowes and wow, they are heavy!!
It is indeed heavy. Sorry I don’t have the weight though, and you should be able to find the price online.
We may look for something more light-weight for our next build. Bamboo plywood maybe? Hard to find, but looks good and 1/2″ thickness should be enough if it’s well supported underneath. We’ll see!
This is where we came into your website: Note: So much of what you reccomend is no longer available or too expensive…(a Dometic sink costs $350.00?) I was very tempted to buy your full plans….BUT….I wind up having to figure it all out on my own instead. I get that you are overwhelmed with (this)(these) (lol) comment’s, but in order to make this all fluid for the customer, you need to stay on top of Sinks that no longer exist…explain that the Camco Drain works in conjunction with the sink’s own drain…etc…
You guys have accomplished a lot…A LOT! Job well done…but keep at it…keep refining it…Thanks. Brian
Thanks for your comment. This page mainly explains how we built our cabinet. You will find our latest sink recommendation here: https://faroutride.com/water-system/#sink
What did you use/do to stain the cedar for the sides, drawers? I like the multicolor look.
I mixed water and vinegar with steel wool. Some mixes had more vinegar than other which made the cedar more or less “aged”.
How do y’all cook indoors in the winter with propane? Do you have a venting setup with your stove?
Ventilation is the key! https://faroutride.com/fan-installation/
Hi,
you mention 3 holes in the floor for the cabinet..I assume you mean just the plywood floor!, not the van metal?
Into the plywood floor, correct!
Would you buy the same sink if you were going to do it again. It appears Dometic is no longer producing this sink but I might be able to get one. What are it’s pros and cons? Thanks for all the info!
Cons: It’s on the small side for washing full-size items (pots and pans) and the folding faucet is a bit in the way, other than that it’s great!
I must have missed something, how did you attach the range to the cabinet/frame? I can’t believe it would be safe just sitting there while driving. I’d be concerned about the gas line getting damaged if the range slid out some.
Also what’s the depth of the finished cabinet?
The range have multiple point of attachement for screws: 2 at the front (below the oven), 4 inside the stove.
The depth of the cabinet is 20″. You’ll find all the interior dimensions here if that helps: https://faroutride.com/interior-layout/
Good luck!
Great info, your electrical write up was priceless for me. Well worth the fee. My stove question is did you add any insulation around the oven to reduce heat/burn transfer into the cabinet and wood surrounding the oven, have you had any problem with cabinet getting super hot when using oven – Thanks Kyrie
We didn’t add insulation, but we left an air gap (as indicated in the installation manual). No overheat problems; it works just fine 🙂
Just an FYI – when any propane appliance says it is not for indoors, it’s because propane appliance produce carbon monoxide when they operate; some produce more than others (I think it has to do with completeness of the burn, perhaps), so if it’s not rated for indoor use that’s because it produces too much carbon monoxide f0r safety reasons (short term over-exposure can be deadly; long-term exposure to smaller amounts can also be harmful).
How is the Ikea countertop holding up after a few years? I understand it’s a particle board core and they specifically mention not for damp environments.
Still in perfect conditions. With the Webasto heater, the inside of the van is not damp at all. Humidity is around 40% all winter.