Right from the start, we knew we wanted wood paneling finish in our DIY camper van conversion. It is fairly easy to obtain a nice & clean finish with the tongue and groove paneling: each plank will sit flush to the adjacent planks, creating a uniform & continuous surface. The planks are relatively thin at 5/16″ thickness, making them flexible enough to conform to the van’s funky surfaces. We did not sand the planks, but we finished them with varnish to protect them against a spaghetti incident.


Time spent on the job
40h approximately (including furring strips installation)
Material
- Knotty Pine Wood Paneling, 5/16″ thick X 4″ wide x 96″ long (We bought them from our local Rona)
- Baltic Birch Plywood Sheet, various thicknesses (We bought them from our local shop in Montreal, Langevin Forest)
- #6 Screws, length 1/2″ and 5/8″. We used brass screws for the aesthetics… (Buy on Amazon)
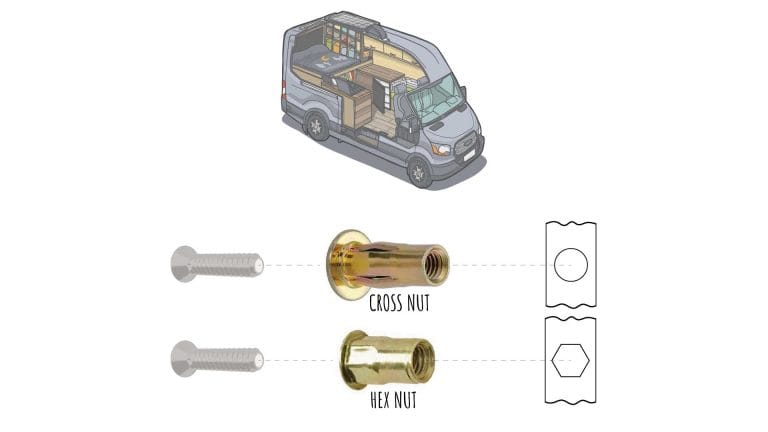
- Cross Nut (Buy on Amazon)
- Varnish
Tools
- Jigsaw & Blades (Buy on Amazon)
- Power drill (Buy on Amazon)
- Drill bits (Buy on Amazon)
- Countersink Drill Bits for Power Drill (Buy on Amazon)
Resources
- There’s nothing to see here.
Pre-requisite
Here is how it goes!
Furring strips
The wood paneling is not attached directly to the van; it’s attached to furring strips that we first installed. We installed furring strips every 2 feet or so, depending on what was possible. As usual, we did not use metal screws; we used Cross Nuts (Buy on Amazon) to attach the furring strips to the van walls. Not familiar with Cross Nuts? That’s fine, we wrote an article (size guide, how-to, etc.) here:
The furring strips are made from Baltic Birch Plywood; it is a high-quality plywood. For the same thickness as regular plywood, there are more layers and the material characteristics are more uniform.
It was super important for us to maximize the living area; therefore, we did not want to “overdesign” the furring strips. Instead of using typical 2″x 3″ straight stud frames, we used 1/4″, 3/8″, or 1/2″ thick Baltic birch plywood furring strips that conformed to the van’s curved surfaces. It made the fabrication of the furring strips & the installation of the paneling much more time consuming, but we’re very glad we did it!
The furring strips are generally 4″ wide. We used 1/2″ plywood for the ceiling, 3/8″ plywood for almost-flat surfaces of the walls, and 1/4″ plywood* where we wanted the paneling to conform to the van curvatures.
*Disclaimer: ¼” Baltic birch plywood is THIN! Will it withstand the test of time? We think so, but if you choose the do the same, do it at your own risk! ¼” “regular” plywood is probably not strong enough (it will probably crack at screw locations). If you’re using the van for cargo or if you plan on attaching heavy stuff to the wall, ¼” is probably not strong enough.


Wood paneling
The wood paneling is screwed into the plywood furring strips every two feet or so. We used #6 brass countersink screws because they blend well with the wood color. To avoid cracking the paneling, we pre-drilled and countersunk every hole before screwing into it. This is time consuming, but the pine is quite soft and will crack at installation or later with the cold/hot/vibration.


On second thought
Does the wood paneling squeak? It does yeah. We learned to live with it, and we don’t really mind it. Music easily covers the squeaks 🙂 To get rid of it, we could probably apply a little Silicone between planks (and between planks/furring strips), but then it would be difficult to remove them later if needed for some reason.
You might be interested in:


Thank you for all your info!!! Amazing and it’s been very helpful for my build.
Did you drill right through the ez-cool and into the frame to place the cross nuts for the furring strips?
Thanks!
Hans
We made small holes into the ez-cool, so that there is no ez-cool between the cross nut and the van structure.
cheers,
antoine
Hello,
Thank you for this website! I’ve got a question related to those posed by others about attaching the furring strips to the van. I’ve used crossnuts elsewhere in my build, so this question is specific to the wood paneling application:
Did you countersink the holes in the furring strips so that the heads of the bolts used to attach the furring strips to the van did not disrupt the flat surface? When I attach wood with crossnuts elsewhere in the van, an exterior washer and the head of the bolt protrudes above the plane of the wood. Clearly you’ve done something different here.
Thanks again!
We did countersink the holes, so the bolt head (we used flat head bolts) does not protrude out of the furring strip. Sorry if we weren’t clear about that!
Cheers!
Hello,
What you have done is so nice!
My question is, how would you do all that you have done but had less weight in the end? I read somewhere in the end you were close to the GVW thing… Seems all the wood is a lot of the weight… walls and ceiling… but I don’t have a clue really 🙂
Thanks so much… enjoy time with family this fall….
Yes, wood is heavy! Using lighter material such as 80/20 to build the structure, thinner plywood instead of T&G for walls and ceiling, lighter countertop, etc. would probably help to minimize the weight. It’s hard to tell how heavy the van will become when doing the conversion. We were quite surprised to realize we were almost maxed-out.
Highly recommend skinning all the walls immediately after insulation and electrical wiring, before building out the rest for any readers. It makes it a huge pain to make a ton of cuts around stuff and is a huge waste of time.
What’s the material I see in the pictures that you put between the furring strips and the metal, some kind of insulations?
Ted
Low-E: https://faroutride.com/ez-cool-installation/
How did you attach the last roof panels where the ceiling furring strip ends and the gap to the wall?
Hey Antoine and Isabelle. There are a bunch of wires that are hanging down and some of your pictures, and then they suddenly disappear! Where did they go? Are they behind the cabinets or behind the wood paneling walls? We are currently trying to figure out what to do with our wires.
Yes, most of the wires are behind the wood paneling and under the bed; but nothing is “hanging down”. The wires you see in the pictures were not fixed as we were not done yet with the wiring when we took the pictures.
the factory wire harness that follows the wall at about head height, from front of the van to the back of the van on both sides… where did this bundle of wires go? Its not apparent to me that you can put them behind the wood paneling when the furring strips are directly against the pillars. There is no bulge of wires going over the pillars, so apparently somehow you put them behind the pillars. I’m wondering how you did this I haven’t found a disconnect in the wire harness that would allow me to fish it through the walls and subsequently reconnect. Thanks
Sorry for the late response. We only have a wire harness on one side of the van and it’s hidden right under the overhead cabinet. We explain how we did at the end of this article: https://faroutride.com/overhead-storage-cabinet/ Hope this helps!
Hi! I’m wondering why you chose to attach the plywood to furring strips instead of directly to the van walls? Thank you!
We didn’t want to drill any hole in the van walls to prevent rust; furring strips are attached to van walls with cross-nut.
Can you use rivet nuts instead? Or does it have to be cross nuts?
We are using rivet nuts for our second van 😉
Following the results we got from this test: https://faroutride.com/threaded-inserts/#experimentation-spinout
Could you have attached the plywood to the van walls using rivet and by using the holes in the van? I’m trying to figure out if the furring strips are needed.
Hello,
starting my van build and I saw you mentioned the wood squeaks? Are you referring to the tongue and grove?
It looks so clean. Thanks
What did you do to attach the tounge and groove ceiling boards in the very back of the van where the wire runs? Did you install a board to screw up and into or what?
Hi there! Thanks for the article! I was wondering if you had an estimate of how many square feet of cedar tongue and groove paneling you used for the entire van? Thanks again!
I honestly don’t recall that. Maybe you could use our Thinsulate calculator to find out the surface area to cover: https://faroutride.com/thinsulate/
Cheers
Hey there! What size cross nuts did you use on the ceiling? The sizes are so different than the walls! Thanks!
Hello, what bolts did you use to connect your furring strips to the crosscuts? thank you so much
You have to use the same diameter/thread as the crossnut; most likely 1/4-20. The length depends on the furring strips thickness. Something like that, except choose material STAINLESS STEEL instead of Zinc: https://www.lowes.com/pd/Hillman-1-4-in-20-x-1-1-2-in-Slotted-Drive-Machine-Screws-3-Count/3035946
Hello! What did you attach the furring strips to cross nuts with? Thanks!
Hi Antoine,
We LOVE your build and all your advice. So thank you very much. Quick question: Do you think a 7.5″ wide paneling would be too wide (i.e. not follow the curve of the van as well) if placed lengthwise through the van like yours?
Thanks!
I’d say it depends more on the thickness of the wood. Some people use large sheets of plywood, so I’m guessing 7.5″ wide would work 😉
Good luck!
antoine
Thanks for the detailed instructions on yall’s build. Its been extremely useful. I was wondering if there was any reason that you didn’t do all of your wall/ceiling panelling completely before installing bed, cabinets, ETC?
It seems like it would be simpler to install the floor, complete wall insulation, run electrical/plumbing, completely panel the walls and ceiling then begin installing items such as cabinets, bed, ETC. Is there a reason that you did not take this route? Obviously the method you took came out great, just wondering if there was reasoning behind it. Thanks again for the help!
Hi!
In fact there is no paneling behind the cabinets… There’s no need for it, it would be “dead weight” and waste space. But I agree that paneling the whole thing would make thing easier and the cons are almost negligible… So it’s up to you to choose your preferred method 🙂
Good luck!
Hi Antoine, are your ceiling boards connected to anything forward of the furring strip attached to the ceiling rib closest to the cab? Up where it ends above the headliner and you made the nice L shape piece covered in fabric?
Thanks for the help!
It’s the “pressure” that hold them there; because they are curved. There are no screws at the headliner.
Hope that make sense! Cheers!
Hi Antoine, I’ve been getting inspiration from your build and am starting on a similar layout. Thank you for sharing.
I was wondering what you did with the harness of wires that runs above the rear doors and along the driverside wall. It looks like you ran them above the cieling above the rear doors? I was thinking of paneling over them along the wall as well. Thanks again.
Tim
That’s correct, we relocated it (a few inches) higher, on the ceiling and it’s covered by the wood paneling.
Good luck 🙂
Thanks for all the info. I’ve been using you amazon links whenever applicable. This question has been asked already but was not answered. How did you attach the T&G towards the front where it transitions to the headliner? Is it just sort of ‘pressure fitted’ up into the roof of the van because of the curve?
Thanks!
Exactly! The T&G isn’t screwed near the headliner; it’s just “pressure-fitted” because of the curvature. Hope that make sense. Cheers!
Hi Antoine
Do you remember the thickness of the T&G used on the roof so you could get that bend at the front of the van? Thanks
It’s the same as for everything else: 5/16″. They do bend 🙂
Hi,
Did you install the furring strip between the van wall and the crossnuts? Or did you secure the furring strip between the crossnut and a bolt? Basically, did you use any bolts at all to install the furring strips?
The hole min and max of the crossnuts are quite close to eachother. There is basically no tolerance at all. Does it matter if the hole is slighlty over or under size?
Cheers,
Max
Yep, the furring strips are installed using crossnuts and bolts!
The cool thing about the crossnut is that they can accept a wider range than rivnut, so we’ve use them in larger hole.
Cheers!