Right from the start, we knew we wanted wood paneling finish in our DIY camper van conversion. It is fairly easy to obtain a nice & clean finish with the tongue and groove paneling: each plank will sit flush to the adjacent planks, creating a uniform & continuous surface. The planks are relatively thin at 5/16″ thickness, making them flexible enough to conform to the van’s funky surfaces. We did not sand the planks, but we finished them with varnish to protect them against a spaghetti incident.


Time spent on the job
40h approximately (including furring strips installation)
Material
- Knotty Pine Wood Paneling, 5/16″ thick X 4″ wide x 96″ long (We bought them from our local Rona)
- Baltic Birch Plywood Sheet, various thicknesses (We bought them from our local shop in Montreal, Langevin Forest)
- #6 Screws, length 1/2″ and 5/8″. We used brass screws for the aesthetics… (Buy on Amazon)
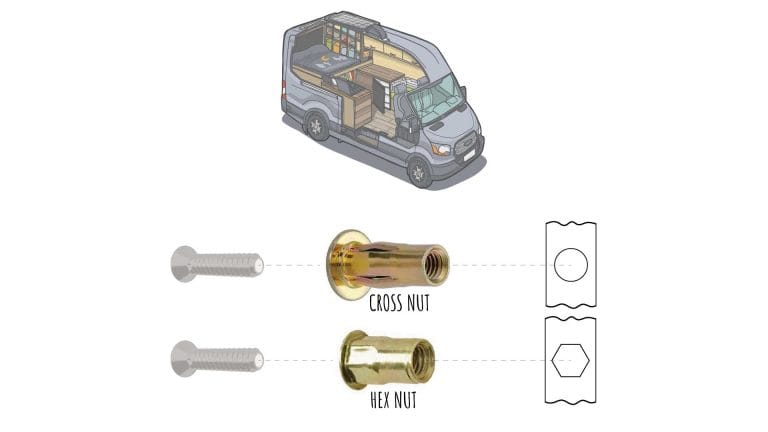
- Cross Nut (Buy on Amazon)
- Varnish
Tools
- Jigsaw & Blades (Buy on Amazon)
- Power drill (Buy on Amazon)
- Drill bits (Buy on Amazon)
- Countersink Drill Bits for Power Drill (Buy on Amazon)
Resources
- There’s nothing to see here.
Pre-requisite
Here is how it goes!
Furring strips
The wood paneling is not attached directly to the van; it’s attached to furring strips that we first installed. We installed furring strips every 2 feet or so, depending on what was possible. As usual, we did not use metal screws; we used Cross Nuts (Buy on Amazon) to attach the furring strips to the van walls. Not familiar with Cross Nuts? That’s fine, we wrote an article (size guide, how-to, etc.) here:
The furring strips are made from Baltic Birch Plywood; it is a high-quality plywood. For the same thickness as regular plywood, there are more layers and the material characteristics are more uniform.
It was super important for us to maximize the living area; therefore, we did not want to “overdesign” the furring strips. Instead of using typical 2″x 3″ straight stud frames, we used 1/4″, 3/8″, or 1/2″ thick Baltic birch plywood furring strips that conformed to the van’s curved surfaces. It made the fabrication of the furring strips & the installation of the paneling much more time consuming, but we’re very glad we did it!
The furring strips are generally 4″ wide. We used 1/2″ plywood for the ceiling, 3/8″ plywood for almost-flat surfaces of the walls, and 1/4″ plywood* where we wanted the paneling to conform to the van curvatures.
*Disclaimer: ¼” Baltic birch plywood is THIN! Will it withstand the test of time? We think so, but if you choose the do the same, do it at your own risk! ¼” “regular” plywood is probably not strong enough (it will probably crack at screw locations). If you’re using the van for cargo or if you plan on attaching heavy stuff to the wall, ¼” is probably not strong enough.


Wood paneling
The wood paneling is screwed into the plywood furring strips every two feet or so. We used #6 brass countersink screws because they blend well with the wood color. To avoid cracking the paneling, we pre-drilled and countersunk every hole before screwing into it. This is time consuming, but the pine is quite soft and will crack at installation or later with the cold/hot/vibration.


On second thought
Does the wood paneling squeak? It does yeah. We learned to live with it, and we don’t really mind it. Music easily covers the squeaks 🙂 To get rid of it, we could probably apply a little Silicone between planks (and between planks/furring strips), but then it would be difficult to remove them later if needed for some reason.
You might be interested in:


I see you guys left the big vehicle wiring harness outside the furring strips here. Where do you end up putting it? Love the content!
We made an “L” shape thingy in pine to hide it under the upper cabinet. Scroll down this page for some photos: https://faroutride.com/overhead-storage-cabinet/
In the bedroom, the hardness goes through the cubbies: https://faroutride.com/bedroom-storage/
Same strategy for FarOutVan2! https://faroutride.com/van-2/
Hi,
Love your site, the design and craftsmanship is enviable. I am just beginning my “dream” stage and plan to install simple 1/4″ plywood paneling (weight/cost).
I am planning to follow your lead on birch plywood furring strips and figure walls for 1/2″ and ceiling 1/4″ strips.
How much birch plywood did you use for furring strips (please guesstimate by thickness)?
Thanks
Has attaching the upper cabinets just to the vertical furring strips on the wall been strong enough? I’m working on framing now and wondering if I should add furring strips lengthways down the ceiling to attach the top of the cabinets to
Our upper cabinets are attached to the structure of the van (metal) with cross nuts. Not sure if it’s super well obvious in this post but here it is anyway: https://faroutride.com/overhead-storage-cabinet/
Antoine,
I know you used furring strips attached by rivnuts to the van’s roof ribs to attach the ceiling boards. How did you attach the ceiling planks at the very end of the van and the very front of the van? There is no rib at the very back. Do your planks just connect to the other ribs and “hang loose” at the very back and the very front of the van?
Hi! Did you treat (paint, polyurethane, etc.) the birch furring strips prior to installing?
Thanks, we love how thorough your guides are!!
We did, to protect them from moisture and such.
Thanks for the kind words 🙂
Hi, thanks for this great resource! I’m not quite sure how you are holding the baltic birch furring strip to the wall. Do you hold it only with the rivet nut lip only (install rivet nut on top of the wood)?
Or, do you hold the wood with a bolt that you insert into the rivet nut? If its the bolt that hold the furring strip, you end up having bolt heads coming out everywhere that doesnt sit flush with the birch? Thanks for clarifiing 🙂
Cheers
Hey! It’s holding with flat head 1/4-20 bolt, so the head doesn’t protrude. Similar to this: https://amzn.to/3MA10bD
I’ve countersunk the hole in the wood prior with a countersink drill bit.
Cheers,
antoine
Your website has been soooooooo helpful as we’re starting our van build. Thank you so much for taking all the time to document your build. I am wondering how you finished the door. I’ve noticed that your door has some holes around the outer rim that could maybe be used to attached paneling–but our 2023 transit has none! Any ideas?
We didn’t finish the doors on our first conversion, and we’re still not sure what we’ll do on our upcoming build. We’re not there yet sorry!
cheers,
antoine