

The Simarine Pico Battery Monitor is actually much more than “just” a battery monitor. It has the ability to monitor multiple battery banks, current of multiple consumer devices, tanks, temperatures, inclinometer and barometer. Let’s call it a SYSTEM MONITOR 🙂 It’s a cutting-edge product with an impressive smartphone-like-high-quality feel. While it’s not essential to a working van electrical system, it’s definitely a sweeeeeet upgrade for your van conversion if you don’t mind the higher price tag. Here is everything to know about the Simarine Pico System Monitor!
In a Nutshell
Features
The Simarine Pico is completely customizable and expandable. To start off, you can use it as a battery monitor only:
House Battery Monitoring

Barometer (built-in)

Continue by adding any, or all, the following modules:
Consumers (battery screen)

Consumers (separate screen)

Temperatures

Tanks

Inclinometer

Components
In a nutshell, the Simarine Pico requires:
1- Simarine Pico Monitor

2- Simarine Input Module(s):
This is so the Simarine Pico can read the electrical input signal of the sensors (resistance or voltage), interpret it and display it for us humans.

3- Sensors (a.k.a. Senders)
This is to convert a physical measure (temperature, liquid level, angle, etc.) to an electrical input signal (resistance or voltage).

Models and Where to Buy
There are a few options here:
Simarine “Pico One” Package
It’s the “entry-level” package. You’ll be able to monitor:
- 1 battery bank (up to 300A current and voltage)
- 1 battery bank (voltage only)
- 2 Tanks (or 2 temperatures, or 1 tank and 1 temperature)
- Includes the “Pico-one” monitor, which cannot be expanded further to what’s listed above.

Simarine Pico Standard Package
You’ll be able to monitor:
- 1 battery bank (up to 300A current and voltage)
- 1 battery bank (voltage only)
- 4 resistance inputs (tanks or thermometers)
- 3 voltage inputs (1 inclinometer or any voltage-type sensor)
- Includes the “Pico” monitor, which can be expanded later (see “customize your own”)

Simarine Pico Blue Package
You’ll be able to monitor:
- Same as standard package
- Plus 4 consumers monitoring (current)
- Includes the “Pico” monitor, which can be expanded later (see “customize your own”)

Customize your own Package
Take advantage of the Pico flexibility and create a package to suit your needs!
- Up to 6 battery banks
- 6 additional battery voltage
- Up to 14 tanks/temps
- Up to 20 consumers
- 1 Inclinometer
5% discount with code “FAROUTRIDE”
Tank Sensor

Inclinometer

Don’t forget
- Electrical wires, terminal rings, connectors, etc.
- Check out our Electrical System Guide to build your knowledge and to download our wiring diagram & tutorial!

We’re super excited to get you 5% OFF ANY SIMARINE PRODUCT!! Just head to Simarine.net and enter the code “FarOutRide” at checkout to get the discount 🙂
5% Discount on any Simarine Product!

(Europe and Australia are excluded from the code)
In-Depth Look
Battery Monitor
Features
- Up to 6 battery banks
- State Of Charge (%)
- Current (A)
- Voltage (V)
- Time until charged/discharged
This is the battery screen without consumers monitoring:
With Solar, 12V and 120V consumers monitoring:
Components
1- Sensors
No proper sensors are required to read the voltage and current. Just electrical wires and terminal rings (to connect to shunt / voltage input) will do!

2- Simarine Input Modules:
Just like for any battery monitor out there, a shunt is required to read the current:
- SC303: 300A max
- SC503: 500A max

Setup
- Name: You decide.
- Type: Lead Acid, AGM, Gel, LiFePO4.
- Voltmeter: Assign a voltage input from a Simarine module.
- Shunt: Assign a current input from a Simarine module.
- Capacity C/20: Battery capacity (Ah) if discharged in 20 hours.
- Capacity C/10: Battery capacity (Ah) if discharged in 10 hours.
- Capacity C/5: Battery capacity (Ah) if discharged in 5 hours.
- Temperature: Assign a temperature input from a Simarine module (optional).

Consumers
Features
- Up to 20 consumers
- Current (A)
Consumers can be displayed on the battery screen (Below we chose to display SOLAR, 12V DC LOADS, 120V AC LOADS:
More consumers can be displayed on a separate screen as well (not visible on our Android app, for some reasons):
Components
1- Sensors
No proper sensors are required to read the current. Just electrical wires and terminal rings (to connect to shunt) will do!

2- Simarine Input Modules:
A shunt is required to read the current. The following modules can read current inputs.
- SCQ25 or SCQ25T: 4 inputs of 25A max each (35A peak for 1 minute). Inputs can be merged for higher current capacity (2 inputs = 50A).
- SCQ50 4 inputs of 50A max each (60A peak for 1 minute).
- SC303: 1 input of 300A max (for inverter)
- SC503: 1 input of 500A max (for inverter)
Setup
- Name: You decide.
- Range: Max value for graphical representation on the Pico Monitor.
- Reverse: Use this to swap the current value +/- (instead of swapping the cables on the shunt…).
- Add current: If multiple shunts are used to monitor the current of a single battery bank (example: one shunt on each branch of batteries in parallel).
- Battery: Assign a battery if you want to display this consumer on the battery screen.
- Display separately: To display the consumer on a separate screen on the Pico. Up to 12 consumers. (setting not available in app)
- Display priority: To set the display order of consumers on the screen.

Temperature Monitor
Features
- Up to 10 sensors
Components
1- Sensors
Temperature sensors are sold by Simarine on their website (1 or 5 meters length):

2- Simarine Input Modules:
Temperature sensors are connected with a JST input on the following modules:
- 1 input: SC303, SC503
- 4 inputs: ST107, SCQ25, SCQ25T, SCQ50
Setup
- Name: You decide.
- Type: NTC 10K (use this for Simarine sensors) or NTC 5K
- Sensor: Assign a temperature input from a Simarine module.
- Display priority: To set the display order of temperatures on the screen.
- Range Min: Min value for graphical representation on the Pico Monitor.
- Range Max: Max value for graphical representation on the Pico Monitor.
- Calibration: To offset (+ or -) the displayed temperature.

Tank Monitor
Features
- Up to 14 sensors
Components
1- Sensors
- Float Sensor: Must penetrate the tank. It uses a float to measure the input signal.
- Ultrasonic Sensor: Installed outside the tank. More expensive, has a blind spot close to the sensor, must be installed away from the tank vertical walls, must be installed either on top or bottom (depending on brand/model).
- Pressure Sensor: Installed with a “T” fitting at the bottom of the tank.
We went with float sensor type for simplicity of installation and $. We used KUS USA resistance-type sensors:
Make sure to select the right sensor length according to your tank depth! (leave one inch clearance at the bottom of the tank for proper functioning of the sensor)
2- Simarine Input Modules:
Tank sensors are connected to resistance-type input on the following modules:
- 1 input: SC303, SC503
- 4 inputs: ST107, SCQ25, SCQ25T, SCQ50
Setup
- Name: You decide.
- Type: Water / Fuel / Waste water.
- Sensor Type: Resistive / Voltage.
- Sensor: Assign a tank input from a Simarine module.
- Capacity: Max capacity of the tank.
- Calibration points: Before the Pico can display the tank level, at least two calibration points must be entered. More calibration points will enable Pico to show tank level more accurately. Added can be up to 11 calibration points. Set for each calibration point, the tank fill volume (liters or gallons) and a corresponding sensor value (resistance or voltage).
- Display priority: To set the display order of tanks on the screen.


Inclinometer
Features
- Up to 2 sensors (Pitch & Roll)
Components
1- Sensors
For 2020, Simarine finally released their own inclinometer sensor (SDI01); no need to buy a third-party one anymore. That’s good news!
2- Simarine Input Modules:
The Simarine inclinometer (SDI01) has a SiCOM output.
Setup
- Name: Pitch / Roll.
- Style: Line / Caravan / Camper.
- Sensor: Assign a pitch/roll input from a Simarine module.
- Nonlinear: Exaggeration of the visually displayed angle. This is useful for small angles since it can be difficult to distinguish on which side we are pitching/rolling. The true angle (X.X degrees) is still displayed.
- Calibration: To set the zero point (use actual sensor value OR enter manually) and to set the Step (mV/degree).
- Display: Show/hide the inclinometer on the Pico screen.
- Reverse: If the inclinometer shows the inverse value for pitch or roll angle (e.g., left instead of right), you can enable this option to reverse the display.

Our System
First things first, let us introduce you to our self-built van:
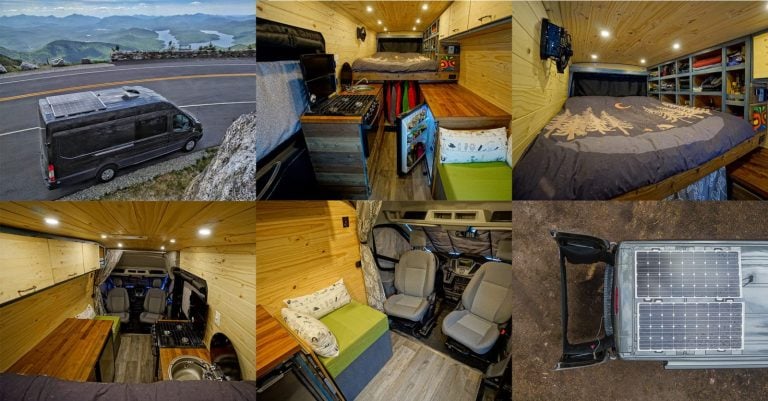
OK, back to our topic. Here is what we monitor with the Simarine Pico:
House Battery
- Current
- Voltage
Van Battery
- Voltage
Consumers
- Solar
- 12V DC Loads
- 120V AC Loads
- Webasto
- Propex
- Maxxfan
- Lights
- Fridge
Temperatures
- House Battery
- Interior
- Exterior
- Fridge
- Water Pump
Tanks
- Fresh Water
- Grey Water
- Nature’s Head Composting Toilet (liquid tank)
Inclinometer
- Pitch
- Roll
Temperature Sensors
There’s not much to say here… just install the temperature probe where you want to know the temperature!

(the blue sensors are Sensorpush wireless sensors. Read about them here)
Inclinometer Sensor
We installed our inclinometer under our kitchen countertop. It’s a flat surface and it’s easy to align the pitch/roll axis properly.

Nature’s Head Composting Toilet Liquid Tank
For the Nature’s Head liquid tank, we used a 9.5″ length sensor.
1- With the help of the gasket, locate where to install the sensor. Mark the center for drilling and mark the outside diameter (to help position the sensor later):

2- Drill using a 1-3/8″ hole-saw:

3- Find the correct alignment of the gasket on the screw holes, then apply a bead of Silicone II around. Do not let silicone stick to the sensor’s probe! So Just a small bead of Silicone…

Note: Silicone is normally not required with these sensors, but it’s an extra step we’re taking because the screws don’t have excellent grip into plastic)
4- Insert the sensor and apply a small drop of silicone into the screw hole:

5- Use stainless steel metal screws (not the bolts provided with the sensor). Do the final torque by hand, or else you will damage the plastic and have poor grip (= possible piss leak).

6- We used these electrical quick connects for easy dumping of the tank. They’re super easy to connect/disconnect (nice!), but they’re not true crimp connectors; if you pull too hard on them, you might break the wire loose from the connector…

Grey Water (4 gallons Aqua-Tainer)
For the Aqua-Tainer, we used a 8.0″ length sensor.
The procedure is exactly the same as for the Nature’s Head. But we used extra Silicone because the surface is not flat and the plastic is quite thin (screws don’t have very good grip). We were worried it wouldn’t work, but it does!

Fresh Water (25 gallons)
We used a 15.0″ length sensor (but check with your own tank). We kept the most expensive (and difficult to replace) part for the end. At this point we’re getting good at this 🙂

Simarine Modules
We won’t win the cable-porn award, but our main electrical cabinet is super compact (space saver!) and that makes it very challenging to work in it…
SC501 Shunt:
(Note that the SC501 has since been replaced with the SC503, connections might differ slightly)
- House battery current

SC301 Shunt:
(Note that the SC301 has since been replaced with the SC303, connections might differ slightly)
- Inverter current (can be installed on positive or negative)

SCQ25T Module #1
- Temperatures (x1 resistance-input)
- Tanks (x3 resistance input)
- Consumers (x4 shunt)
- House and van battery voltage (x2)

SCQ25T Module #2
- Temperatures (x4 resistance-input)
- Consumers (x4 shunt)
- Inclinometer (x2 voltage-input)

Wiring Diagram
Here is how we wired things. The inputs in the diagram below are not exactly as the photos above (for clarity), but the result is the same.
(Note that the SC501 and SC301 shunts have since been replaced with the SC503 and SC303, connections might differ slightly)

Our First Impressions
After some time using extensively the Simarine Pico system, we can say it delivers! Sweeeeeet!
The Pico Device
Build Quality
Simarine is doing very well in the hardware department… With an anodized aluminium casing and a Gorilla glass, the Pico has an “Apple-like” feel, a classy look and is a real pleasure to use. Because of that, we often find ourselves touching the screen to control it… Nope, it’s not touch-screen.
We built our van in 2016 and it’s the third monitor we’re testing. Battery monitors have come a long way!
2016:

2018:

2019:

User Interface
We think the user interface is stunning. In fact, it’s the first thing that caught our attention when we saw it first on a Norva van. The menus look clean, information is well displayed and the settings are easy to find. This thing is definitely an eye catcher and it will probably find its place more and more in high-end vans and RVs.
Only one complaint here: the only available mode for the inclinometer is “line”, while on the app the Campervan mode makes it much easier to read:
Also, the inclinometer can only be calibrated within the iOS or Android app, not within the Pico device itself… not sure why, but hopefully it changes in the next firmware updates.
Monitoring Performances
The temperature readings are super close to our Sensorpush wireless sensor, nice! The battery SOC, the consumers, the tank levels seem accurate as well; so far so good!
For some reasons, the voltage and temperature readings were TOTALLY off when plugged into the SC501 or the SC301. If plugged into the SQ25T, no problem…
A disappointment is the inclinometer which seems all over the place; we just can’t trust it. But the problem is not with the Simarine Pico, it seems to be the cheap “third-party” inclinometer we chose… We totally avoided “cheap chinese” products so far in our van build, except for our radio and the inclinometer; in both cases the products have under-performed. We’ll be on the search for a proper inclinometer sensor soon enough!
The Smartphone App
The App is an excellent complement to the Pico device. It makes the initial setup of the Pico MUCH easier and faster than doing it from the Pico’s screen. The displayed menus are very similar to the Pico and the settings are presented in the same order, so it’s super easy to find everything.
The iOS app seems to work flawlessly, but we had a hard time figuring how to use the Android app (our phone just couldn’t establish communication with the Pico). The only way to make it work is to set the Pico in STA mode: instead of creating its own WiFi network (you read it right: the Pico communicates via WiFi not via Bluetooth), in STA mode the Pico joins an existing router (in our case, our Verizon JetPack). Once set up this way, we could use the app on our Android phone.
Product Improvement Wishlist
Here is a nice comprehensive list for you, Simarine! 🙂
- We would LOVE if each consumer had history (i.e. daily total Ah consumption).
- A “screen off” button (i.e. short press of the enter button) would be nice (at night and when we leave the van in sketchy neighborhoods)
- The specification sheet of the thermometer probe says “minimum -20°C”… that’s not cold enough for Canada!
Here is our workaround for the fact that there isn’t a “screen off” button:

Victron Battery Monitor vs Simarine Pico Monitor
Which one should you choose?
We spent over a year testing the Victron battery monitor:

Here is our recommendation:
Get the Victron
- If looking for an excellent but affordable battery monitor that gets the job done.
- The smartphone app is awesome.
- It integrates seamlessly with other Victron products.
Get the Pico
- If looking for a SEXY, cutting edge battery monitor (Pico One package)
- If looking to monitor any of the following as well: tanks, temperatures, inclinometer (Pico Standard package, Blue package, or custom).
- As of now (2019), we think the Pico is above the rest in terms of look and functionality.




Thanks for posting your experiences.
I’m a little concerned that Simarine’s documentation is really bare-bones; it’s missing simple details like the size of the screws on for the shunts, or dimensioned drawings of the components.
I also missed in there docs that the consumer draws aren’t data logged, or did I misunderstand your comments?
How accurate are you finding the shunts and battery SoC?
Consumer draw aren’t logged. Maybe it’s a feature they’ll add in the future?
Shunts and SOC seems accurate!
Are you still happy with the Simarine? It seems like their app and firmware support has historically been pretty rough judging by their facebook page.
Happy with it, except they are indeed having issues with the phone app.
The hardware side of the Simarine is solid though.
I don’t really use the app, so I’m OK with it. But if the app is important to you, you might consider another product…
Not sure what we’ll do for our next van, will cross that bridge when we get there!
Hi,
Am I understanding correctly that you only get an instantaneous reading and that there is no history feature for the consumers or producers? So it’s not possible to know how much a consumer or producer that is turns on and off at semi-random intervals (such as a fridge or solar panels) really consumes or produces over a day?
That’s correct, unfortunately. You’d have to get the Victron BMV-712 to obtain that feature (but the BMV doesn’t have multiple consumers reading, only one…)
Bonjour à vous 2, super info merci beaucoup!
J’ai déjà le Pico dans ma van et j’aimerais ajouter un shunt pour mesurer le courant des accessoires 120V. Ma question : J’ai un module inverter/charger, est-ce un OK d’y mettre le shunt entre le module et le bus bar? Ça me donnera une mesure positive en mode ‘chargeur’ et négative en mode ‘onduleur’?
Merci!
Je ne vois pas de problème avec ça! Et je crois qu’il y’a moyen d’inverser la lecture (+, -) dans les settings, si requis.
Hi sorry if this has been asked before but I can’t see the older comments. How do you have the fuse block wired to the SCQ25T shunt? The fuse block is rated to 100A, and you have a 40A fuse on it so couldn’t you have 40A going to something only rated for 25A? I was also confused about why you chose a 40A for the fuse block when your 12V loads add up to more than 40.
Hi Sarah! Great question! When we first designed our electrical system, we calculated that 40A would be more than enough for our needs (with a margin if we needed to add new 12V loads). Two years later, when we upgraded to the Simarine monitoring system, we knew the draw of each of our appliances and that we would never use more than 20A. So we felt confident to connect the fuse block wire to one of the SCQ25T’s shunt. That being said, we know this limitation, and if we were to sell the van to someone else, we would split the wire in two like we did for the solar wire (for safety reason). A better option (which didn’t exist when we installed the Simarine) would be to install a SCQ50 which features 4 50A shunts.
Hey there, love the write up. I am installing the same inclinometer you have installed. It came with 4 wires, X-axis, Y-axis, Ground, and power. Your wiring diagram doesn’t show you running power to the inclinometer and I am curious on the correct wiring. Thanks
Bonjour à vous deux et félicitations pour ce contenu détaillé. Après l’avoir lu j’étais sur le point de commandé un kit semblable qui semble super mais j’ai également lu plusieurs reviews qui ne sont vraiment pas bonnes sur le long terme. Pourriez-vous nous indiquer ce qu’il en est après plus de 3 ans de test?
Merci!
En gros le hardware fonctionne super bien (sensors, modules, écran). Le problème est avec l’aspect “App” (SmartPhone). Il y’a eu beaucoup de bugs et de problèmes où le téléphone n’arrive pas à se connecter. Simarine travaille fort sur le problème, mais les résultats tardent à venir…
Bref si l’utilisation à partir d’un téléphone est important pour vous, pensez-y à 2 fois. Autrement le système fonctionne bien!
Salut vous 2,
J’ai acheté le Pico avec les shunts nécessaires pour avoir les températures, les niveaux et etc… J’ai acheté les mêmes sondes de niveaux que vous(KUS) et j’ai un bug sur 2 réservoirs…les sondes ne semblent pas envoyer les bons signaux…Sur le site de KUS j’ai trouvé les valeurs de 33 omh plein et 240 omh vide, c’est ce que j’ai entré dans la configuration mais ça ne fonctionne pas…
Avez-vous eu de la difficulté à régler ces items? Où avez-vous pris vos autres valeurs d’étalonnage?
Merci pour votre aide.
Il faut entrer le menu “Calibration Points” (manuel page 47: https://simarine.net/wp-content/uploads/2022/04/Pico-Manual-2.1_EN-3.pdf), puis utiliser le “Measured Value” (page 48). Par example:
– Vider complètement le réservoir, puis dans “Calibration Point” entrer 0L et ensuite MEASURED VALUE;
– Remplir le réservoir à pleine capacité, puis entrer votre capacité (e.g. 100L) et choisir MEASURED VALUE;
– Pour une meilleure précision, répéter ces étapes pour des points intermédiaires (20L, 40L, etc).
Voilà, bonne chance!
antoine
WOW, do you ever find yourself wondering if maybe you overbuilt your van lol.
Nope, loving it 🙂
Allo Isabelle et Antoine
Merci pour toute cette info !
Je pense installer un simarine sur mon prochain van.
Celui-ci pourrait remplacer le controler webasto au complet ???? (Vous indiquez la temperature et pico se charge du reste ?) Ou bien on doit tout de meme avoir un controleur webasto en plus ?
Ca prend définitivement le contrôleur Webasto.
Le rôle du Simarine est de vous INFORMER sur les températures actuelles (Intérieur, extérieur, fridge, etc., selon vos besoin); tout comme, par exemple, il vous faudra aussi un contrôleur de charge pour le solaire.
Bonne chance!
This is exactly what I was looking for! Y’all are amazing. In the wiring diagram, what does [1a] mean on the red wire from the shunt to the battery? What size wire gauge do you use for that?
Thanks for all the information on this. We have one simple question: what is the difference between “bezel” and “panel mount”? That’s how they are described on Amazon; the Simarine website says “standalone” and “panel mount.” We want to install it into the wall like yours so is that panel mount?
Second, the Simarine website sells the pico covers “for standalone.” So I’m wondering if your built-in is panel mount, then the cover won’t work?
Thanks for your help!
It looks like the answer is yes you still are happy with your Pico system but after reading all the Amazon reviews I just want to verify that your experience continues to be good. Looking forward to a “second thoughts” section soon. Thanks for all you do!
The smartphone app has several bugs, they are currently working on V2 app which hopefully address that. That being said, the monitor itself works just fine, so yes we would buy it again!
cheers
Hi guys,
Thanks for this great piece. I am confused about where the Simarine fits into your overall electrical system. It looks like the fuse block in your diagram is used only for the modules for the Simarine. That fuse block appears to be connected to a positive and negative bus bar.
Are those bus bars the same bus bars as your MPPT charge controller, batteries, inverter? You had an extra slot available for this extra DC fuse block? Or, do your van have TWO positive and negative bus bars?
Hope that makes sense. Everything else is super clear here, but that one piece is blocking our progress.
Thanks!
Dom
We have one positive bus bard and one negative bus bar. According the ABYC standard, you can stack up to 4 terminal connectors on each stud (16 possible connections).
For your information, we have more 12V loads connected on the fuse block that aren’t going through Simarine shunts…
Hello wonderful van builders,
I’ve been digging deep into the simarine Pico system and have one question, and a little background info. I want to use the Simarine inclinometer for my van, but was thinking of using another 3rd party inclinometer to measure a tilting solar array, in one of my extra voltage slots and realized the one I found is a similar WitMotion sensor you used.
Could you clarify which version of the WitMotion sensor you used (RS232 or RS485?) and how it’s connected to the shunt/which wires are used?
I can’t thank you enough for how in depth your guides are or how helpful this website has been in planning! I absolutely plan to send some love your way once I start building.
Best,
Steve
Hey,
It’s connected per our wiring diagram: https://faroutride.com/simarine-pico/#wiring_diagram
This is the sensor we have: https://amzn.to/3bHmWiA
But we’ll upgrade to the Simarine one soon (https://simarine.net/inclinometer/)
Cheers
Hi, why do you want upgrade? What is wrong with 3rd party obe?
Hi Isabelle and Antoine,
You mention on your battery monitor post that you prefer the Victron monitor then on this post you mention you use the Simarine to also monitor the system. I was just curious if you’re using both Victron and Simarine for monitoring? If so, how is your system wired for all those shunts, do you have a victron shunt as well as all the Simarine shunts?
Thanks!
Out of curiosity, where did you read that we prefer the Victron?
We like the Victron BMV-712 monitor and this is the one we recommend as entry-level monitor (good for most users, as it is more affordable). But, we are a little nerd; we like the ability to monitor more than just the battery (like tank levels, temperatures, etc) and this is why we like the Simarine monitor. We don’t use both, but each system would need its own shunt if we wanted to use both (for communication display).
Hey guys, I have a Simarine Pico as well and just wanted to see if you could clarify something for me.
Are you running your + wire from the MPPT solar controller through the SCQ25 module through two input ports (1 and 4) then out to the positive bus bar?
I have two panels in series not parallel, creating 40.4v and 8.91a. (I believe you guys are running in parallel so will probably have 20ish volts and 20ish amps.)
The inputs can share the load right, so I could do what you have done and split my + into two and run it through two ports.
Any comments or advice greatly appreciated, though I appreciate you aren’t electricians, but you do have some experience here!
How you wired the solar panels doesn’t impact the connection with the SCQ25 (solar panels wires go directly in the MPPT solar controller). The SCQ25 shunt must be connected between the MPPT solar charger (output) and the battery (bus bar). So depending on how much current your MPPT solar charger can deliver, you must split the wire to make sure no more than 25A will go through one input/output of the SCQ25. And just a reminder, splitting the wire in 2 wires will divide the current in 2; eg Victron MPPT 100|30 can deliver up to 30A, so splitting the wire in 2 will make sure not to have more than 15A (approx.) in each wire. Hope this all makes sense to you 🙂
Hello Isabelle. I also want to monitor my 30A MPPT controller with the SCQ25. Currently I have 8 AWG wire out of the MPPT then to a 40 amp breaker (as per your wiring diagrams) then to the positive buss bar. Because the wire will be split to go through two ports of the SCQ25, could I use two 14 AWG wires (using your wire calculator @ 15A) to go from the MPPT to two of the SCQ25 ports then from the SCQ25 to the 40 amp breaker (stacking both 14 AWG wires) then 8AWG from the breaker to the positive buss bar?
Many thanks,
Marcus in Taos
Do you not think you could add a simple switch between the positive bus bar and the sicom splitter to turn the monitor off? And if you turn if it off, would you reset the whole unit? Annoying you can’t turn the screen off…
If I buy 6 components on the Simarine website does it come with 6 cables or do I need to order those separately?
Hi Isabelle and Antoine,
First I want to say thank you for your website…all that information helped me a lot in my conversion!!! It’s pretty impressive all the time you spent on each detail and so…the time I saved because of that !!!
I bought the Pico blue package + SQC25T + SC301 and I’m now planning my installation. After reading all the information on this page I have 1 (or more)question(s)… what information do the Pico give you by connecting the solar charger on the consumer (2x) ports? Why 2 ports?…I only have 1 port available (I will monitor : 2x Maxxfans, 1 Novacool fridge, 1 Nature’s head, 1 Webasto, 1 lightning and the fuse block….)…
Thanks for helping me !
As our Victron Solar Charger 100|30 can theoretically deliver more the 25A (which is the max per SCQ25T port), we had to split into two inputs/outputs. SCQ50 would have been more appropriate but didn’t exist when we did our monitoring system.