The Ford Transit can be upgraded with an aftermarket radio, and we’ll show you how in the following article. We went from the basic Ford factory AM/FM radio to the Pioneer AVH-W4500NEX 6.94″ TouchScreen Multimedia Receiver: it has Android Auto & Apple CarPlay (wireless or USB), backup camera ready, DVD receiver, Bluetooth, SiriuxXM, etc. Sweet upgrade. Let’s get to work and get done with the installation!
Material and Resources
Time Spent
5 Hours
Total Cost
$ 525 USD
Prerequisite
Get A Van!
Material
| Item | Description | Quantity | Link |
| Pioneer AVH-W4500NEX | Flagship In-Dash Multimedia Receiver with 6.94″ WVGA Clear Resistive Touchscreen Display (Android Auto, CarPlay, DVD, etc.) | 1 | Amazon |
| Metra Dash Kit 99-5832G | Single/Double Din Dash Combo Kit for Ford Transit 2015-Up (includes wiring harness) | 1 | Amazon |
| Dual USB Flush Mount Panel | For Android Auto, Apple CarPlay & USB Stick Playback | 1 | Amazon |
Resources
Part A: Dash Kit Installation (Metra 99-5832G)
(Note: the Metra Dash Kit includes comprehensive instructions, but here is our take on it!)
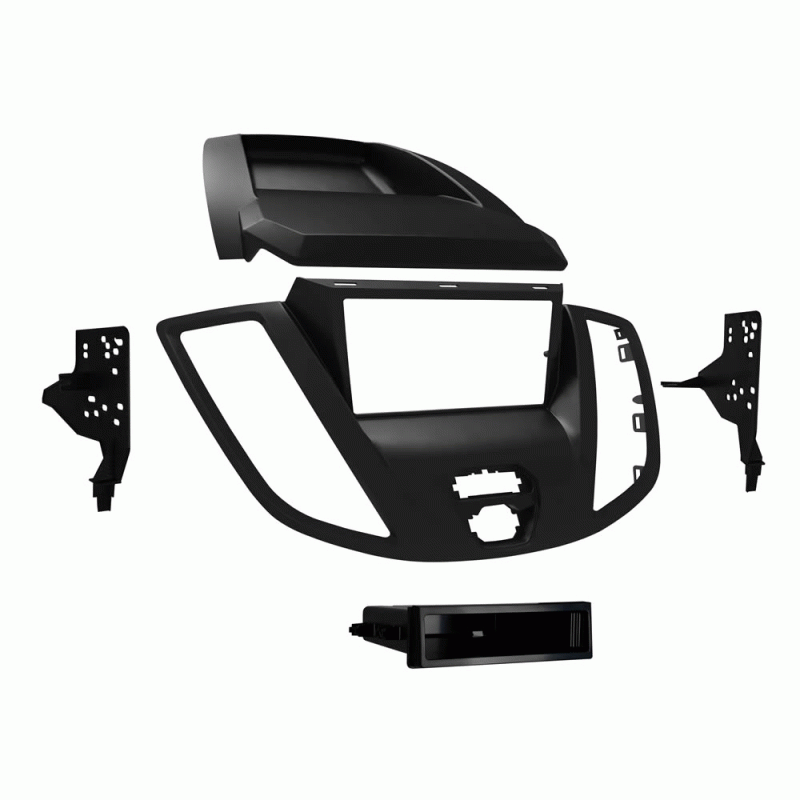
Metra 99-5832G Ford Transit Dash Kit
Unclip the dash panel above the radio:
There are no screws; just use a plastic scraper to pull UP.
Voilà!
Remove these two torX screws:
Unclip the factory trim panel:
Unplug the airbag & hazard cables from the factory trim panel:
Unplug the right & left vents from the factory trim panel and keep for re-installation:
Remove one screw per side, then unclip the left & right vents. (edit: that’s the picture of the new Metra panel, but the factory panel is pretty much the same thing…)
Unplug the airbag & hazard panels and keep for re-installation:
Install the left & right vents to the new Metra Panel:
Use the screws provided in the kit.
Snap the airbag & hazard into the new Metra panel:
Install the 4 plastic panel clips (included in the kit) to the new Metra dash panel:
That’s the white thingy in the picture below.
Install the 12 metal panel clips to the top Metra dash panel:
There are different types, follow the Metra instructions!
Now, trim the plastic brackets below:
A carpenter’s knife will do just fine.
After:
Install the left & right radio brackets to the head unit:
This step is iterative… Install the bracket where you think makes sense, then install the front dash panel to see if the head unit fits nicely into the cutout. Probably not, so make small adjustment to the bracket and check again. Repeat this until you’re satisfied with the location of the radio!
The radio is secured with 4 screws:
Install the Metra dash panels in place:
There are no screws, it just snaps there.
We did it!!
… Huh wait; no we didn’t… we still have to wire the radio… Keep reading!
Part B: Wiring the New Radio

Pioneer AVH-W4500NEX


The radio and the vehicle have a bunch of wires… The idea is to connect the radio wires to the vehicle wires in a specific way. For example, we must match the front-left speaker wire of the radio to the front-left speaker wire of the vehicle. To guide us, each wire has a unique color. Use the following table to make the appropriate connections:
| Item | AVH-W4500NEX Color | Metra Harness Color |
| Ground | Black | Black |
| Battery Constant Power | Yellow | Yellow |
| Switched Power (ACC) | Red | Pink |
| Illumination | Orange/White | Orange |
| Parking Brake | Light Green | N/A* |
| Front-Left Speaker (-) | White/Black | White/Black |
| Front-Left Speaker (+) | White | White |
| Front-Right Speaker (-) | Grey/Black | Grey/Black |
| Front-Right Speaker (+) | Grey | Grey |
| Rear-Left Speaker (-) | Green/Black | Green/Black |
| Rear-Left Speaker (+) | Green | Green |
| Rear-Right Speaker (-) | Violet/Black | Violet/Black |
| Right-Right Speaker (+) | Violet | Violet |
*Pioneer radios won’t let you watch movies (and disable some settings) if the parking brake is not engaged, for obvious safety reasons. To enable the watch-drive-and-die feature (and enable all settings), this microbypass can be installed: amzn.to/35xugJg. How to install the microbypass: youtu.be/__3IF9LWBCA
To connect the wires from the Metra kit to the radio, use crimp caps:

Part C: Dual USB Flush-Mount Panel Installation

Dual USB Flush Mount Panel
The Pioneer AVH-W4500NEX radio has 2 USB ports that allow Apple CarPlay, Android Auto or read from a USB stick. So we bought a USB flush mount from Amazon (Buy on Amazon) and installed it as follows:
Remove the blank USB factory panel:
Use a plastic scraper to pry it off. Disconnect the AUX jack.
Trim the plug at the back of the USB port:
Before:
After:
Make a cutout for the USB mount (it’s approximately 1″ diameter). Then install and secure it to the panel using the provided plastic nut:
Route the USB cables from the USB mount to the radio:
It’s tight in there. We had to remove some plastic parts and use lots of patience and dexterity. Good luck!
We made it! Now plug the USB cables into the radio.
That’s it! Good work…
…But there is still room for improvement:


On Second Thought…
Ford Transit Metra Dash Kit: Nothing to say here. We really dig it, it looks just like a factory install!
First Radio Upgrade (2017): Joying Android Head Unit:
We first installed a Joying Android radio and used it for two years. It’s a “cheap Chinese” product so it worked OK 80%, but the 20% worked more-or-less:
- The bluetooth disconnected every 20 seconds or so (which made calls or streaming music almost impossible).
- The GPS quit working after about an hour (which made Google Maps pretty much unusable).
- The touchscreen worked REALLY WELL, but the interface lagged a lot.
- And other minors bugs.
After two years, the defects grew on us and we finally decided to upgrade. Once again, this proves buying cheap Chinese products is just not worth it in the long run…
Second Radio Upgrade (2019): Pioneer AVH-W4500NEX
We installed this radio in December 2019, so it’s still too soon for a review. At first glance, it is definitely a nice upgrade:
- All the features work as they should (as expected from a high-end device).
- It took us some time to get used to Android Auto, but we’re really starting to LOVE THIS! The interface is streamlined to minimize distraction, without losing too many features. Google Maps & Spotify are what we use the most and they’re perfectly integrated into Android Auto!
- There are many audio settings to fine-tune the sound to match our setup/our taste, that’s an improvement from the Joying unit.
- So far we’re VERY HAPPY with it 🙂


On my 2017 transit passenger van, the easiest way to run the USB cables was to remove the AC controls. Then the USB wires were super-easy to run. When AC controls re-installed, the wires were snug and had friction when pulling out slack.
Hey Antoine,
Do you have a part number for the original Ford dash storage tray that you pop up at the start of this process?
I’m trying to find one to purchase for a different radio install as I removed a 4” factory screen and replaced with a 9” android option.
I need the cover you have pictured here to fill the gaps from the original one I had.
Thanks as always!
Will
Unfortunately I don’t have the number, sorry.
Cheers, antoine
Check out these guys…
https://www.crutchfield.com/S-cnhRf4XW3tG/
They have trim kits for ford that are fit replacement I dash radio.
Has anyone connected their stereo system to the house batteries? We expect to listen to the stereo for long periods while parked and don’t want to run down our starter batteries. If so, what is the simplest way that someone has wired to alternate between house and starter battery? Have they just connected exclusively to the house bank?
Hi Antoine, was this just a plug-and-play or was splicing/soldering wires required to install the radio? If it was a plug and play, can you please link the plug/wire that was used for this? We are looking for a simple solution 🙂
That looks like a viable solution too.
https://autokitcarplay.com/blogs/news/how-can-i-add-apple-carplay-to-stock-radio
hi. this is really helpful. I wanted to ask I just purchased an android unit with facia etc. I wanted to see if you connected the steering wheel controls and how please.. thanks
We don’t have steering wheel control on this van, sorry!
I went through Crutchfield and got the complete system including the wiring adapters for the steering wheel controls. it works! take your time.
Only problem I have is glare on the flat-screen probably because of the huge windshield of the van. Would love to know if anyone else has had this problem and how they fixed it.
I went through Crutchfield and got the complete system including the wiring adapters for the steering wheel controls. it works! take your time.
Only problem I have is glare on the flat-screen probably because of the huge windshield of the van. Would love to know if anyone else has had this problem and how they fixed it. my transit is a2018.
This info and instructions are great, alas, they are not applicable to later model Transits, like 2022, 2023. The dash bezel is different, so the Metra dash kit is different (will need Metra 107-FD1B kit). And depending on the original radio, whether a base model radio without Sync, or one with Sync system, the needed wiring adapters will differ.
It appears one can still install a double din upgrade radio, but most people opt for a single din with a “floating” larger screen, ala Ford’s OEM offerings.
A couple of things I’ve found in my 2017 Transit:
1. The reversing camera image remains in the mirror and isn’t displayed on the screen. There’s no wire in the mounting harness that will allow this
2. If the head unit is too far forwards, the covers won’t fit properly
3. If you take the top cover off again to make an adjustment, most of the metal clips will fall into the holes, never to be seen again
4. There is no pink wire, connect red to red
5. You can stick the GPS unit under the top cover instead of having it show on the dash – there’s a small ‘tray’ near the windscreen
I did look at adding the USB unit in the dash, but I’ve no idea what’s behind the plastic, and the photo on this page isn’t clear, so I’ve decided not to bother. I might replace the left hand 12V outlet at some point
Thank you for this great rate of. Does the rearview camera still work with your set up?
Did you ever get a response? I have the same question.
The rear view camera of our 2016 Transit is in the rear view mirror, so adding the radio didn’t affect it.
Cheers
Wow! Prices for that Pioneer head unit have went up a ton since you purchased it. Looks like it’s $995 on Amazon right now. I really like your install but I might have to find a cheaper option for the head unit. Thanks for the great write up though.
I choose this way to go. Share to you.
https://autokitcarplay.com/products/autokit-carplay-adapter-for-android-car-stereo/?zz=gy
Hi Antoine,
Just purchased the Pioneer AVH-W4400NEX unit and a Metra installation kit. You infer/mention a Metra wiring harness adapter in your instructions. Do you have a link for such an item(s)? Or did you just tap into the factory Ford harness? If so, do you have the wiring color codes for doing so?
Thanks, Mark
This post has been very helpful as I have just upgraded my radio in the same manor. I have order the identical speakers for door replacement and for headliner install. Big improvement with just the radio upgrade already. I had one question… my metra bezel that allows the new radio to fit does not seem to fit as in place and continues to pop out at the bottom. Nothing is blocking my way but the plastic clips that they give do not seem to fit completely into the dash clips and thus does not seem to hold it in place. Did you have any issues with that?
Thanks for a great post.
ANTOINE, thanks for all your info regarding the ford transit. I have purchased wiring diagrams from you in the past. I am now installing a pioneer 4660nex in my 2017 with basic am/fm radio. There are extra wires on the 4660 harness, (car speed signal input, reverse gear signal input, system remote control and a long green parking brake wire). My question is do these wires get connected to anything? I’ve matched up the wires on the Metra harness and have used them all. thanks in advance for any insight you can give me.
I updated mine too. The factory screen was left in the dash for backup but the clock went back to the time the vehicle was manufactured. Is there any way to adjust that date and time display after replacing the factory radio?
Thanks for your insight! I just bought the same setup for the 2019 I just purchased.
Where you able to get the factory backup cam to work? If so, how?
Just wired my Pioneer head unit, minor correction: the Metra harness does not have a pink wire, instead use the red wire. Also the speed sensor is located under the seat if you like to connect it to the Pioneer head unit: https://www.fordtransitusaforum.com/attachments/speed-sensor-location-jpg.98449/. And the handbrake switch is easy to do too once you fish the cable for the speed sensor signal.
I have seen others adding 10inch screens. The issue I have with the smaller screen is glare. Most the time so much glare with smaller screen cant see anuthing.
Hi Faroutride! I’m thinking about to replace the am/fm factory unit by an OEM cd player/bluetooth unit. Do you thing that the factory harness are already for all OEM radio option? You saw the factory harness and connectors so, by memory, is there any unused connections? (for steering control or backup camera for example) Thanks for you nice reference site.
I honestly don’t know, sorry. Someone would know here: https://www.fordtransitusaforum.com/
Good luck!