The Fiamma F45S awning is to be installed on the side of the camper van conversion; the Fiamma F65S awning is to be installed on the roof of the campervan. We opted for the F45S because we had the solar panels on the roof and because we liked the awning to be on the side of the van. We could not find any documentation on the F45S installation specific to the Ford Transit, but we gave it a try anyway.
The awning comes with the “generic” installation kit so we ordered the kit specific to the high-roof Ford Transit (which seems in fact to be for the European Ford Transit, but we had it working on our new-world Transit version).
Adapter kit manual here (pdf)
F45S awning manual here (pdf)

We were somewhat disappointed with the kit which only consists of 2 aluminum adapter plates and some wood screws; installed directly on the van, these plates will scratch the paint for sure (because of the mating surface) and welcome corrosion in the future.
In addition, we did not like the idea of using “wood” blocks (or equivalent) on the inside of the vehicle as suggested by the Fiamma manual (it is impractical anyway because the support surface is not flat and there are structural components too). We needed to complete the kit ourselves with the material shown below. Even with the specific installation kit, this job is not “plug-and-play” at all; there is some craftsmanship involved, but anyone could do it armed with patience and attention to detail.
Roof Rack
Hi, it’s us from the future! If we had to start over we would consider a roof rack, because installing all the accessories (maxxfan, solar panels, Fiamma awning direct-mount, etc.) would be much easier AND we would have a better access to the roof (with the permanent side ladder):


We like the Low Pro roof rack from FlatLine Van Co: it’s modular, low profile, easy to install, and affordable compared to other roof racks out there. And last but not least, the Fiamma awning is bolted directly into the FlatLine roof rack, which makes the installation MUCH easier than what we had to go through.

We did it! FVC roof rack installation on our new 2021 Transit (photos, instructions, etc.): faroutride.com/roof-rack
Time spent on the job: 6-8 hours
Total cost: $1300 USD
Disclosure: This post contains affiliate links, which means that if you click a product link and buy anything from the merchant (Amazon, eBay, etc.) we will receive a commission fee. The price you pay remains the same, affiliate link or not.

Material
- 1x Fiamma F45S 350 awning 11’6″ length
- 1x Fiamma adapter kit for Ford Transit High-Roof (Buy from Campervan-HQ)
- 1x Fiamma Rain Guard “L” (Buy from eBay)
- 1x Aluminum sheet 0.062″ thick (10$)
- 3M Anti-erosion tape 5″x16″
- 12x Flat head bolt 10-24 x ¾” length (Buy from Amazon)
- 4x Flat head bolt 10-24 x 1.5″ length (Buy from Amazon)
- 16x Rubber washer 3/16 (Buy from Amazon)
- ~30x Fender washer 3/16 (Buy from Amazon)
- 16x Split lock washer #10 (Buy from Amazon)
- 16x Nut 10-24 (Buy from Amazon)
- Sikaflex 291 black sealant (Buy from Amazon)
- Painter’s tape (Buy from Amazon)
- Primer, Paint, Clear Coat

Tools
- Drill
- Jigsaw
- Ladders
- Screwdriver
- Files (Buy from Amazon)
- Caulking Gun (Buy from Amazon)
How we did it
*Disclaimer: we’re good, but not that much. Use these instructions at your own risk!
Rules are made to be followed
First rule: The adapter plate must be located on the “Support” stickers, on the back of the awning.

Second rule: The awning must be installed “vertically” (that’s the role of the adapter plates anyway)

Third rule: The awning must be installed straight for the mechanism to work.

First of all, we asked a friend to come at our place to have a beer. Shortly after, we informed him of the Fourth rule: no beer until the job is done.
Then, to protect our sexy van, we applied some painter’s tape at the approximate location of the adapter plates.

We located the adapter plates at the “support” stickers and taped them to the awning.

The awning should be able to clear the sliding door during deployment. We partially deployed the awning (0.75 meter), held the awning on the van and marked the height.

Then we located the forward-and-aft position of the awning. Ideally, we wanted the awning to cover the door area completely. Two persons located and held the awning in place while the third person marked the location of the adapter plates on the van.

The awning is quite heavy and awkward to work with. So we first located and installed (using only 2 screws) the rear adapter plate (so we don’t have to carry the weight of the awning when we located the forward plate).

Then we fine-tuned the level of the awning by using mixed techniques (measuring tape, string, eye-leveling) and marked the location of the forward plate. Everyone involved had a different opinion. We fought. There were no more rules here.
We fixed the forward plate with only 2 screws and checked the awning fitting on both adapter plates. We ensured the three rules were followed. Nice.
Next, all holes were drilled through the van using the adapter plates as templates. As usual to prevent corrosion, primer, paint & clear coat were applied to bare surfaces.
We cleaned the van surfaces with isopropyl alcohol and applied the 3M anti-erosion tape. The tape is actually very strong, so we punctured it at hole locations so the screws would go through.
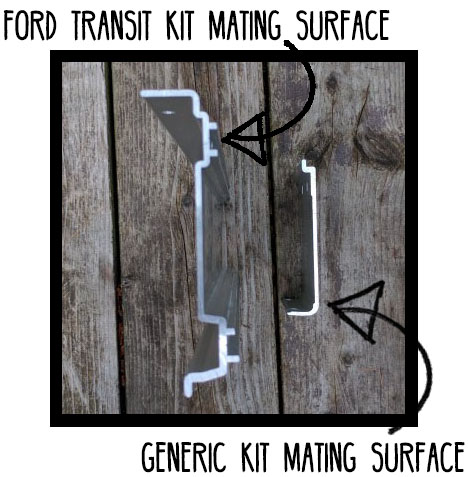
We found that the mating surface of the Ford Transit adapter plates is not ideal (the surface of the generic kit is fine); to help distribute the load, we fabricated aluminum strips from a 0.062″ thick sheet. This should help not to damage the erosion tape in the long run.

We pre-installed the 8 screws and the aluminum strip on the rear adapter plate. To prevent screws from falling, we put painter’s tape (duct tape works better) over the screw heads. Then we applied Sikaflex (that’s a polyurethane sealant, as recommended per OEM manual) around the screw shanks.

The rear plate was fitted.


The hardware inside the van is as follows: rubber washer (to protect the van), fender washer (oversized outside diameter for better load distribution), lock washer & nut.

At this point, the rear plate is fixed permanently; minor adjustments are performed on the forward plate in the subsequent steps.
The front adapter plate installation is similar, except the roof has a nice (but unpractical to work with) double-curvature in this area… the surface mating with the 4 screws in the back of the plate is almost flat, but then the surface at 4 forward screws is definitely not flat. We needed to shim the adapter plate somehow. We figured a stack up of washers would do the trick.*
*Technical talk: in a pure shear-type application, increasing the stack up will also increase the moment on the fastener and this might not be acceptable (depending on the context). In our installation, the shear load comes mostly from the weight of the awning and the 8 screws per plate will provide adequate support. The worst load case is probably the bending moment coming from an opened awning; in this case, the fasteners are mostly tension-loaded or compression-loaded and, we believe, it is acceptable to have such a big washers stack up.

Before sealing permanently (with Sikaflex), make sure to check that the awning will fit on BOTH adapter plates. The awning does not allow the plates to be off: the parallelism and alignment between the two plates must be almost perfect so adjust, check, re-adjust (by adding or removing washers), re-check, until perfect.
After the plates are fastened for good and the awning is fitted on the plates, it is still time to slightly fine-tune the forward and aft location of the awning. Then, 4 screws will be used to lock the awning in place. The adapter plates are pre-drilled, but the awning is not. Drill it. We had to slightly re-locate the forward screws because they would interfere with the mechanism.

That’s it! We made it!

On second thought…
After the installation, we realized that there is a gap between the van and the Fiamma F45S; this gap will allow some rain to go through as opposed to the F65S (which is installed on the roof). No big deal, we will eventually install something to close this gap. We would still choose the F45S over the F65S, but it’s good to be aware of this detail before buying it!

Update
We ordered 4 meters of the Fiamma Rain Guard “L” (9cm width) seal through this eBay Store.
It took less than an hour to install. The seal really snaps into the awning, feels very secure and has an “OEM” look.
We got heavy rain and it did what it’s supposed to do, except locally at one place above the sliding door where there are a few drops leaking. Not a big deal, we might add a tiny bit of sealant between the seal and the van to complete the installation.


Long term review
After almost two years on the road, do we think an awning is worth it? In our case, not so much. We used it maybe 10 times total.
- We spend most of our day riding our bikes, away from the van. We rarely hang out around the van (except in the morning and in the evening when the sun is down).
- We like to ride loam much more than desert, it means we camp in the forest and there is shade from the trees most of the time.
- When it’s raining we just stay inside the van, we don’t deploy the awning.
We could see it being very useful for:
- Families hanging out around the van during the day.
- People spending more time in the desert.
- Weekend warriors, when you want to maximize your time outside (rain or shine).
In other words, it totally depends on your habits!


Hello,
I am a van conversion manufacturer and I purchased your wiring diagram & tutorial 🙂 I have a question about the Transit awning installation. The body of the Transit is pretty flimsy. Does the weight of the awning distort the body when you extend the awning? Does the awning droop down as a result of the body flexing? Seems like some interior support would be beneficial. We like to suggest robust installations to our customers. We have 2 a/c units and 400 watts of solar on the roof and purchasing a rack to support the awning is a bit of a waste. I was going to build an awning mount into our solar panel rack, but that’s a bunch of extra work and cost as well. I look forward to your reply.
Hi!
Per Fiamma’s owner manual, you’re not suppose to open the awning more than 1 meter without the support legs. This protects the awning & the vehicle from unnecessary strain. So as long as you follow that, that’s fine.
In the case a a self supported awning (no support leg), then it would be safer to install this type of awning to a more robust structure (roof rack or such).
Cheers,
Antoine
Did you level the awing to the ground or even with the body line of the van?
With the body line, otherwise I think it would a bit odd (a bit shocking to the eye maybe?). The awning can easily flex to adapt to the ground.
Hi Antoine – You guys are amazing and thanks for all your ideas and support + your organization of this information…Amazing project!
In your article on the Fiama installation, You noted mounting the unit on the new rack would have been easier. I have this options in front of me now. Did you remount to the rack? If so, do you have a picture of the install? I assume no as this would mean plugging holes in the body.
I have an 2017 Transit 250 HR long boy. I am thinking I can bolt on the unstrut frame that my solar panels are mounted to. If you like, when I am done, I will send you some pics. Let me know your thoughts.
Hi.
The new roof rack is mounted on our new van, we won’t change the “old” van. 🙂 The Flatline rack is designed to accept a Fiamma awning I believe, so it should be pretty straightforward.
We still didn’t add a Fiamma on the new van, maybe next summer?
Cheers,
Antoine
Hello
I’m interested that you only used two mounting plates. I’ve been told I need three, with one in the middle. Do you see any need at all for a third plate?
Thanks
The awning is still working fine after all those years!
Hi guys, really appreciate all the work you have put into your site and van. No one seems to use a transit over here in the the UK for a conversion so your site has been a god send!
Do you think you could go longer on the awning? Say 4m? I would like as much space as possible under as will be using for motocross and when you have cover from our Welsh weather you suddenly become very popular!
Cheers
I think 4m would fit on the extended-length, but make sure you can install it (interior access).