Solar panels are a key element for off-the-grid vanlife; if you say freedom, we say solar power! The electrical system of our campervan is designed to power our appliances (fan, lights, 12V fridge, etc) and can be charged with solar power, alternator or shore. The present article covers the installation of our solar panels; if you are looking for more info about designing your own system, then we have a very comprehensive Electrical System Design Guide for you here: faroutride.com/electrical-system .
Disclosure: This post contains affiliate links, which means that if you click a product link and buy anything from the merchant (Amazon, eBay, etc.) we will receive a commission fee. The price you pay remains the same, affiliate link or not.
Material
ITEM | DESCRIPTION | QUANTITY | LINK |
Wiring Diagram & Tutorial | Follow this for a safe and reliable electrical system | 1 | FarOutRide |
Solar Panel | NewPowa 180W | 2 | Amazon |
VHB Tape Roll | 3M, 4991, Double-Sided | 1 | Amazon |
Z Bracket Kit | Renogy | 2 | Amazon |
Parallel MC4 Connectors | As Required (only if you choose to connect the panels in parallel) | 1 | Amazon |
Cable Entry Gland | Right Angle, 3/8″ (what we used) | 1 | Amazon |
Entry Box (other nice option) | 1 | Amazon | |
Extension Cable | 15 feet, Pair with MC-4 Connectors, 8AWG | 1 | Amazon |
Dicor 501 LSG-1 Lap Sealant | Self Leveling Lap Sealant, Grey (for horizontal surface) | 1 | Amazon |
Isopropyl alcohol | To clean the surfaces | ||
Primer, Paint & Clearcoat | To protect bare surfaces after drilling |
1- Disclosure
We would recommend this installation method for a new van, but we do NOT recommended this method for an older vehicle. Remember that the 3M VHB tape is holding on THE PAINT, so if the paint chips off (e.g. because of rust) you might loose your panels and potentially KILL someone.
2- Long Term Update
Hi, this is us from the future! It’s 2021, we still live full time in our van, and our panels are still holding strong (since 2016)! We didn’t have to re-do anything; we occasionally check them and it’s all good
3- Go Pro (An alternative to DIY)
Hi, it’s us again from the future. Vanlife has gone mainstream, it means a bunch of cool new products are now available! If we had to start over today, we would consider getting one of these new Flatline Van Co roof racks, because they have a few benefits:
FlatLine Van Co "Low Pro" Roof Rack
- Modular: you can shuffle the cross bars around to fit your custom roof layout (e.g. solar panels/roof fan/etc);
- Low profile: a bit more stealth and aerodynamic than the tubular aluminum “overland-style” roof rack;
- Easy installation: it’s attached to the van’s roof with the factory mount points (no-drill!), and because they are modular they ship flat packed in a box and they are easier to install (less bulky);
- Easy to install gear and accessories: the cross bars are 80/20 aluminum extrusions, so you can get creative and attach pretty much anything in any possible way: solar panels, decking, awning (Fiamma F45S direct-mount, no drill), light bar, etc.
For more info (features, specifications, installation, ordering, etc.) click below:
4- How we installed our solar panels on our van
4.1- Test everything
Just after we finished installing everything, we realized that we did not test any of the components… If any item was defective (panel, connector, wire), we would have to disassemble everything… Fortunately, things always work for the best so we did not have to undo our work!
To test, we could have just connect the panels to the MC4 parallel connector, then connect to the extension cable, and finally check the voltage at the end of the extension cables. We did that at the very end of our installation.
4.2- Pre-install the brackets on the solar panels
It’s easier to do this on the ground…
4.3- Relocate the brackets in the inside edge
This is to minimize the gap between the panels, so they are installed toward the middle of the roof and are less visible from the ground. A minimum gap should be left to account for thermal expansion and for installation access.
4.4- Install the 3M VHB tape on the brackets
We selected 3M VHB tape to avoid drilling through the roof. AM Solar have been doing it for YEARS and never lost a panel. Where a screw will grip through the sheet metal, the tape rely solely on the paint to hold; therefore, we don’t recommend to use tape on rusted, damaged or used paint. In other words, we trust the tape method because the van is NEW. Also, we check our panels installation regularly.
Per manufacturer recommendation, the minimum application temperature for 4991 tape is 60F.
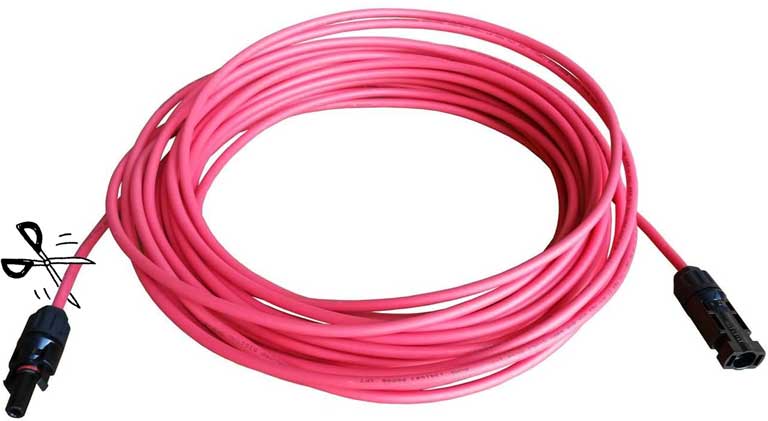
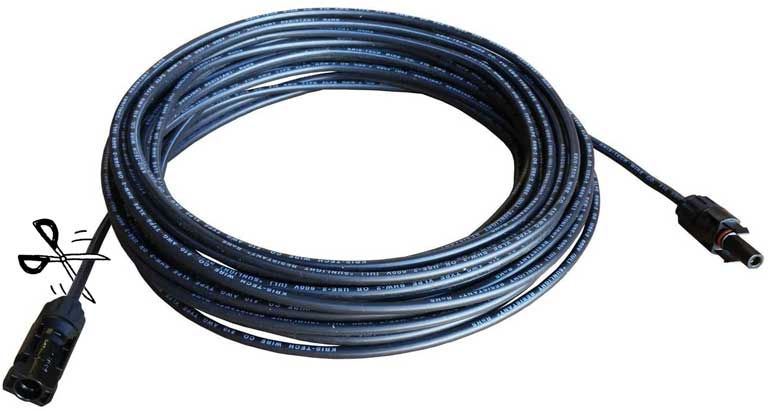
4.5- Trim Out the MC4 connector from the extension cables
This is to allow to route the extension cables through the roof AND to connect them into the Victron MPPT solar charge controller.
Red Cable
Trim out the MALE MC4 connector:
bLACK Cable
Trim out the FEMALE MC4 connector:
4.6- Route the extension cables through the cable gland
It’s easier to do on the ground! We used right angle glands, but if you chose an entry box it’s just fine too. Remember that the cable end with the MC4 connector goes OUTSIDE the van; the cable end without MC4 connector goes INSIDE the van.
4.7- Pre-Fit the solar panels on the roof
Now get up there with the solar panels and mark their exact location (e.g. by tracing the footstep of the Z brackets).
4.8- Drill the holes for the cable glands (or entry box)
4.8.1- Drill
We found it easier to do this by removing the solar panels. We pre-drilled and then used a hole saw:
4.8.2- Break the sharp edges with a file and smooth the surfaces with a fine sandpaper
This is to prepare the surface for touch-up.
4.8.3- Apply Primer, Paint & Clearcoat on hole edge
Paint protects bare metal from rusting. It’s important to restore the finish after drilling (or cutting) the metal.
TIP #1: You can have your exact van color prepared for you in almost any auto-parts store. Just give them your color-code (printed on the driver’s door frame), year of production and make.
TIP #2: Spray works best, but DO NOT spray directly on the surface for small touch ups (it does a messy job)! Spray a small amount of paint into a plastic container and touch up using a brush. This photo shows how NOT TO DO IT (lesson learned!) 🙂
4.9- 
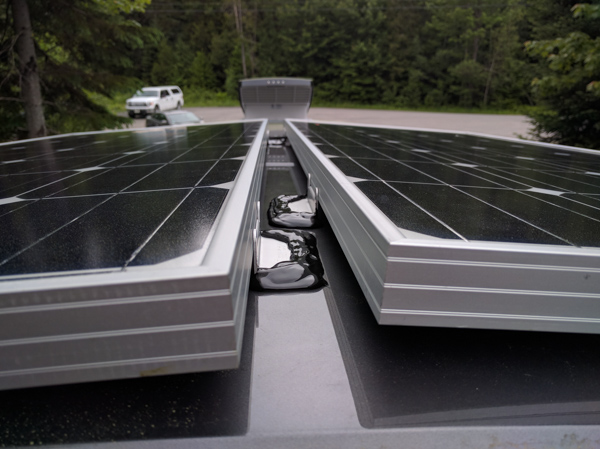
Install the solar panels on the roof (don't secure them with the vhb tape just yet)
Connect all the cables. Route all the cables in a way that they won’t rub with the roof (because this would damage the paint in the long term).
4.10- Route the extension cables through the roof without securing the glands yet
4.11- Clean the roof with isopropyl alcohol, peel off the 3M VHB tape and press firmly to adhere
No picture here, sorry… We had to act fast and it turned out a bit more complicated than anticipated: you get no access to the center of the roof, the cables must be neatly fitted and you get one chance only to stick the 3M tape at the right place…
4.12- Fasten the glands to the roof
No picture here, sorry…
4.13- Seal all the brackets and the glands with Dicor Lap Sealant
The bracket are sealed to prevent water contamination with the tape; it should help in the long run. We could not seal the inner edge of each bracket because we had no access.
4.14- Final Test
We don’t have the charge controller installed yet, but we can ensure there is voltage coming from the panels. It works!
4.15- Reward earned!
A fresh double I.P.A. and a poutine will do just fine as a reward 🙂
5- On second thought...
2 years 5 years later and we’re still super happy with the solar panels; it passed the test of time! We did upgrade our PWM solar charge controller for a MPPT solar charge controller, but we updated our Electrical System article and Wiring Diagram accordingly. We also reviewed the Victron MPPT charger and the Victron system monitor:
6- Inspiration of the moment
Did you ever have this wild dream of quitting your job and travel the world in a van? These guys had this dream, and went after it… very motivating reading!
Download the eBook from Amazon.
I read somewhere that slight angle of the roof allows rainwater to drain off the solar panels. That could be nice considering that we sometimes park on level surfaces.
Hi Isabelle and Antoine,
I so appreciate all of the info on your website. You all did a really good job documenting your project. On your solar panels, I did not see anything about grounding them to the roof of your van. Is this something you would recommend? I would think it may be a safety hazard if for some reason I needed to work on the panels at some point. What are your thoughts?
Thanks,
Ken
Thank you so much for your dedication to your van and to this website. Your work has been SO helpful to me.
Quick question: Why did you decide to drill two holes in your roof using the right angle cable glands instead of something like this https://www.amazon.com/exec/obidos/ASIN/B00KV1PFS0/faroutride_parts_list-20/
which would only require drilling one hole? I’m thinking about drilling one hole, and using the VHB tape and lap sealant to secure the gland to my roof.
The solution you proposed would definitely work. We might do something similar on our next build.
Cheers!
I’ve seen many van builds with solar power but they always mention a battery of some sort (usually lithium). Does this particulate setup not require one at all? Have you ever had an issue because of this?
Thanks!!
The whole idea of having solar panels is to store the energy from the sun in a battery so when you don’t have sun, you can still use your electrical devices (fan, light, fridge, etc). I strongly recommend reading this article: faroutride.com/electrical-system/ 🙂
Hi Antoine! Are your panels still wired in parallel with the Victron MPPT charge controller?
Yes still parallel, we didn’t change the wiring.
Do you think you could have possibly added a second Maxxfan without cast shadows compromising the solar panels output?
Hey Patrick! I just installed my solar with a second fan in the rear. With the angle of the maxxair / orientation of the lid when raised (high end faces the back of the van) there doesn’t seem to be much, if any, shadow casting onto the panels. I’ll know more tomorrow as I check it throughout the day but as of this afternoon it looked good! Hope that helps some
Hi rob how is the second fan working for you? any problems with cast shadows on the panels? Any regrets?
Also, what kind of tape did you use to secure the cabling under the solar panel?
Leslie
I am wondering the same thing! We are in the middle of installing our panels and not sure how to attach the excess cord to the bottom of the panel. Thank you so much in advance,
It looks like they used Tuck Tape. Good stuff for that application. -Ben
Hello and like the rest THANK YOU!
I’ll be installing my solar panels soon and I plan to use the pre-drilled/tapped M8 holes in the roof for the outside brackets of the solar panels to secure them down, while using your method with 3m tape & sealant for the inside brackets. But I’m thinking it must be a bad idea to use the predrilled holes if you didn’t do the same in your conversion?
Leslie
So there is no need to buy a roof rack system (i.e., either rails and/or cross bars) to attach the solar panels? You just simply put the VHB tape on the anchor of the solar panel and attach to the roof and cover with the lap sealant? With no roof rack system, is this why there seems to be a slight angle where the solar panels meet in the middle of the roof? I’m getting excited to find out there might not be a need to purchase a roof rack/rail/cross member system. Please advise
We didn’t want to install a roof rack and using VHB tape on our roof was possible because the van was new (tape is holding on the paint; it would not have been possible if there was any sign of rust!). And you’re right, the panels are slightly in angle as they follow the roof curvature.
I’m a fan of your site and info, but can I kindly ask you to remove the suggestion of mounting panels via VHB (or any structural adhesive for that matter).
This approach it too prone to error, and failure at highway speeds can cause death/injury to other motorists.
Here’s a recent story of 3 dead as the result of dislodged solar panels, though the article does not mention how the panels were fastened.
https://www.abc.net.au/news/2020-10-02/tasmania-fatal-crash-midland-highway-near-ross/12726538
Hi,
I see your point.
But it makes me wonder: where do we draw the line? Because one could say that building your own electrical system is dangerous. It is prone to error as well, because all the connections (crimp, wire gauge, fuse, etc) and all. And the same could be said about Propane, all the wood work inside (in case of accident)…
So I think I’ll leave it there, with a proper warning:
“We would recommend this installation method for a new van, but we do NOT recommended this method for an older vehicle. Remember that the tape is holding on THE PAINT, so if the paint chips off (because of rust) you might loose your panels and potentially KILL someone.”
Cheers,
antoine
I agree here that this is not the best method. You will have a bunch of people copying this method which is great but imagine a solar panel in a few years or with poor workmanship done that does not stay on. I get it everything has a danger involved but if you could minimize it then that is much better. If you are negligent then it could come back to bite you.
Use a safety cable or rope attached to the panels.
One thing that I didn’t see anybody mention is the use of safety cables attached to the solar panels. You can bolt mount an anchor ring attachment with 1 hole & 1 bolt (and not necessarily even on the roof) so as to lessen the leak risks, but still have the peace of mind knowing that the panels won’t fly off and hit other vehicles or people.
Hey, I appreciate all of the info you provide so much! What are the dimensions of your panels?
Alex
Hi guys!
I’ve been working on my camper for the last couple of weeks and have been putting off the solar panel install since I can’t quite bring myself to cut my brand new cables in two. Did you guys just snip them, and then crimp them back together on the inside?
Thanks!
Noah
Don’t cut the panel’s cables. Leave them on and connect them to the extension cables. Cut the other end of the extension cables; discard the MC4 connector on the end that you just cutted as you don’t need them (the solar charger connections require bare wire). Route the extension cables through the roof and connect them to the solar charger.
Hope that makes sense.
I’m thinking about getting solar panels so that I don’t have to spend that much on power anymore. Knowing I won’t have to take time out of my day to clean them off and maintain them makes this decision so much easier.
Thanks so much for all your notes. I followed your instruction for my solar panel installation exactly.
I found a bolt loose lying on my roof near one of my solar panels. It obviously came from one of the brackets but because of the tape and the dicor, I can’t get access to find the problem. It worries me that one of the brackets will no longer hold the panel securely. Have you ever had loose bolts and how did you fix it?
Okay. Did the solar panels today, finally.
Different from you guys, but I did incorporate some of your crazy ideas!
Same panels (I didn’t know they were Canadian! You guys are shameless!) Same fittings.
Turns out, if you drill a hole in the middle of the 4 mounting holes in the fitting, for a M8 bolt, and use the FORD roof anchor holes, the panels end up about 8 mm apart in the middle. So I got a 3/4″ box aluminum rail from Lowes, set it in lapping sealant to be under the inside edges of the panels, and used two 1/16″ lines of your VHB tape to glue the panels to the box rails. (So I DID use one of your ideas! So there!)
I do plan to attach the panels together front and back with aluminum straps.
In the end, I am about 1/2″ lower than your setup (because the roof over the bolt holes is recessed), so better gas milage I guess. But poorer cooling, esp since air can’t get through the middle of the panels via convection. Should be okay, but we will see.
For the wires, I was a little worried, what with having done the ceiling of the van last summer, and not really wanting to rip it down. But now, I am going thru one of the access holes in the back and covering it with a Go Power Plate. Wires about 5 ft longer than yours, but okay I think.
So, I was happy. The Panels are bolted to the roof. And I did not drill a single new hole in the roof of the van. Now, I may be need to buy a 1K$ battery…there goes my stimulus check…
One Q: why did you cover your VHB attachments with lapping sealant? Is it because water degrades the VHB attachment? If true, I might haf to put a bead of sealant in the “V” between the panels, over the aluminum box.
Cheers in lockdown,
Don
PS Good time to rotate your tires…
I wanted to introduce myself and thank you for such an amazing informative site. I am building out a 2019 Promaster 2500 and have referenced your site more than any other websites out there for DYI van conversions. In particular your electrical system (I purchased your wiring diagram.) I did deviate from your plan and purchased Renogy 100 watt panels, mppt controller, inverter and DC to DC charger. I haven’t pulled the trigger on a battery yet but I am leaning towards the Renogy 170ah lithium cell. The only con I can find for this battery is the odd size terminal connection. I am about to mount my panels and not sure if I will tape and lap seal like you guys or build a rack. Thank you for your hard work and attention to detail.
Respectfully
Tommy
Hello, Tommy, thanks for choosing Renogy 100 watt panels, mppt controller, inverter and DC to DC charger, if you are not sure about whether you can tape and lap seal or build a rack, welcome to ask for helps to Renogy online customer service staff, looking forward to sort it out, if any other query, just contact us any time, best wishes.
Hi,
I’ve purchased the electrical diagram/tutorial and I really appreciate your approach, your level of detail, and the website layout in general. I don’t find, however, what you did for the connection between the shore power source and the Samlex battery charger/converter. Specifically, I’m interested in the connections between a 125/250v power plug inlet (typically through the wall of the van) and the charger/converter. Looks like the charger has a std 120v 3-prong plug as the input.
Thanks.
We don’t have any outlet outside the van. We only plug 3-4 time a year, so we wanted to keep it simple. When we plug, we just route an extension cable through a door (or through the b-pillar opening in the rear of the van) and plug it to our shore charger (the samlex). That’s it!
Cheers!
Antoine,
I just purchased your electrical wiring diagram. Thank you so much for this invaluable resource. I’m a newbie DIY-er and am feeling very overwhelmed. I have two questions about solar panels.
Why did you choose a stiff panel vs. flexible? I like the idea of using the flexible because it’s super lightweight and would have next to no wind resistance on the van roof.
And the NewPowa 175w panel you have linked to Amazon shows an entry gland (?) attached to the back of the panel and your list of items used shows a separate (additional?) entry gland. Do I need to purchase this additional entry gland or is the one tacked to the back of the Newpowa panel all that I need? Thanks for your help.
Hi Mary!
Rigid solar panel are more efficient and are much more durable; a flexible solar panel will deliver less power as it ages. That’s why we went with rigid.
The NewPowa panel doesn’t come with an entry gland; it comes with a MC4 connector. The entry gland is used to make a weatherproof pass-through the roof of the van, while a MC4 connector is used to make the electrical connections (connect the panels in series/parallel or to connect the panels to an extension cable).
Hope that makes sense!
Good luck 🙂
Antoine,
Thanks for your excellent guidance on all aspects of RV conversion. Following your notes I just installed the cable gland and did a test fit of two 200W Newpowa panels using the Newpowa mounting brackets. Due to the curved nature of the roof I think the brackets don’t make enough contact with the roof to permit 100% VHB tape installation (also the tape is hard to remove in the future). I’m therefore considering using screws. To account for the curved roof I’m thinking of adding rubber pads under the brackets and screwing right through them. This would also provide some “shock absorption”. Do you think this is a good idea?
It’s a good idea to prevent metal-to-metal contact (bracket directly on the roof), but don’t use a rubber pad that’s too thick. Something like 1/8″ would work (or maybe use the VHB tape if you purchase it already). Too thick and it’ll add more stress to the screws.
Good luck 🙂
Can you tell me the reason for not using branch connectors with a MPPT controller?
You mean why connecting the panels in series instead of parallel with a MPPT? That’s because a PWM charger cannot convert “over-voltage” (voltage over 12V from the panels) to more AMPS. On the other side, a MPPT charger is able to convert “over-voltage” (voltage over 12V from the panels) into more AMPS.
Note that you CAN use branch connector (parallel) with a MPPT controller; it’s better for partial shading as discuss here: https://faroutride.com/electrical-system/#solar_power
Cheers!