Our campervan layout is designed for 2 adults, but we’re often asked for a solution to sleep family with kids. Our experience building a van and living in a van has taught us that EVERY decision is a compromise… So adding more beds will inevitably reduce the living space, right? Well, there’s always a clever way to make things, and the Cabbunk bunk bed system is a pretty neat way of optimizing space by adding child beds to the cabin of a campervan/RV/motorhome. On top of that it’s modular, does not require a permanent installation (no drill, no build), can be installed to a completed conversion, and fits the Transit/Sprinter/ProMaster vans (with swivel seats). Keep reading to learn more!
1. Cabbunk Bunk Bed In A Nutshell
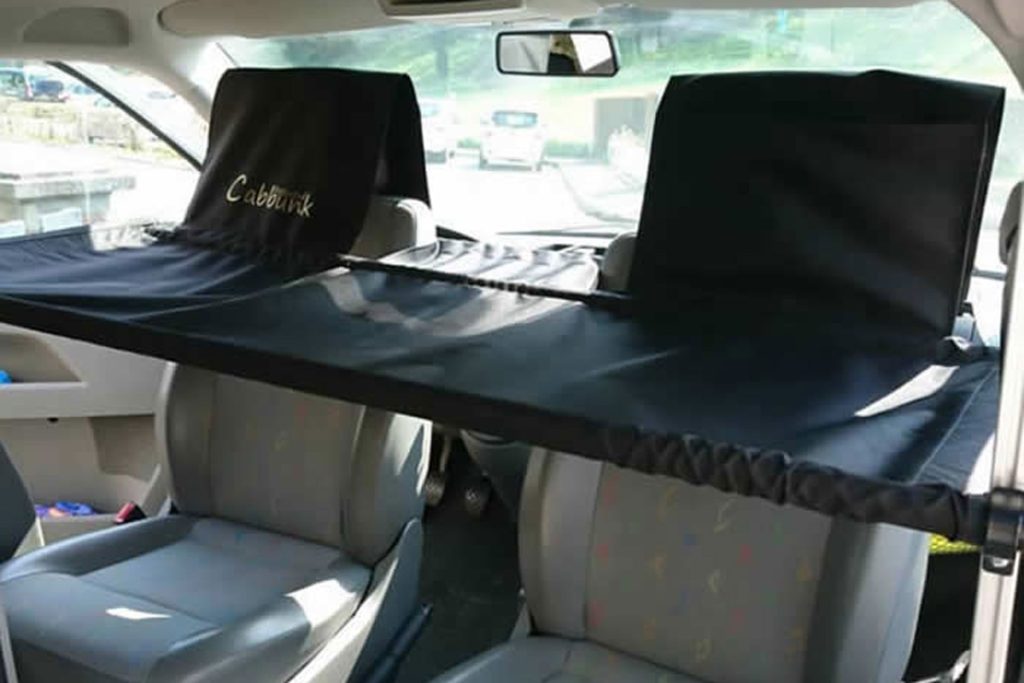
The Cabbunk system allows to easily and quickly add “hammock-style” bunk beds for kids to a van/RV/motorhome. It occupies the cabin, leaving the precious cargo space for living areas (kitchen, shower, etc.). It requires driver/passenger swivel seats, but does not require a permanent installation (no-drill) making it ideal for vans at any build stage (no-build, unfinished build or fully converted). It’s installed/removed in seconds, it’s light weight and compact, so it’s perfect for occasional uses (e.g. grandparents) or seasonal uses (family getaways).


Cabbunk models Available for the Transit/Sprinter/ProMaster vans:

Cabbunk Distributor (USA & Canada):
Get 5% Discount with “FarOutRide” Coupon at Checkout
2. Compatibility
2.1. Van
Cabbunk bunk beds (twin or single) are compatible with the Ford Transit, Mercedes Sprinter, and Ram ProMaster vans (for more compatibility with vans go to cabbunk.co.uk/cabbunk-selector). Here is a good starting point on choosing a van:
Choosing A Van
Transit vs Sprinter Van vs ProMaster

2.2. Swivel Seats
Cabbunk requires to have both driver/passenger swivel seats installed. We tried a bunch of different swivels and our favorite, by far, were the Scopema Swivels:

2.3. “No-Build” vs Fully Converted Van
Cabbunk is compatible with both empty or fully converted van/RV/motorhome. That being said, after testing a Cabbunk in our Ford Transit, we think it might not be compatible 100% of the time, depending on how the cabin is finished.
For example, in our test, the Cabbunk pole is pretty close to the sliding door handle and bumper. Finishing the cabin with thick material might bring the pole more rearward and potentially clash with the sliding door bumper/handle (highlighted by arrows below):


That being said, it’s probably possible to mitigate this issue with a touch of DIYer’s creativity and ingenuity 😉
3. Specifications
- Weight (empty): 16 lbs
- Material: Aluminum, Fabric, Plastic
- Maximum Weight: 155 lbs (per bed)
- Dimensions:
Dimensions (In-Use)

Dimensions (Storage)

4. Installation
4.1. Rotate both the driver & passenger seats:

4.2. Slide both the driver & passenger seats towards the back:

4.3. Unfold the Cabbunk:

4.4. Place the Cabbunk over the seats (the poles go over and behind the seats. See next photo for clarification):


4.5. Install the vertical aluminum mounts on the driver/passenger sides:

4.6. Extend the poles of the upper/lower bed through the brackets:

Adjustments for First-Time Install Only
The aluminum mounts height can be adjusted via this screw:

The lower/upper bed height can be adjusted via this screw:

Peel off Velcro back adhesive and press against the van structure:

4.7. Adjust the upper/lower bed tension using the seat slider and/or incline:


That’s pretty much it! The bunk beds are ready for use 🙂

And here’s a video of the installation process:
5. Removal
Removal is super straightforward, it takes just a few seconds and it’s back in the storage bag 🙂
6. Our Humble Opinion
Product
Overall we think it’s a great product, we like that a simple design fulfill the function so well. The aesthetics is where we’d like to see some improvements: the fabric is well made, no complains here. But the hardware (brackets, pole ends, etc.) looks like it was procured from the hardware store; a little too “DIY” looking for a product with a high price tag. Interestingly, the hardware in the official Cabbunk’s installation video (above) is looking much better than the hardware we got… Maybe we got a previous version, or the supply chain is to blame again?
We noticed that the pole ends of the lower bed are laying against the driver/passenger doors; this could potentially leave some scratches, and it could also prevent from adjusting the bed any lower. A solution could be to shorten the pole…

Installation/Removal
After the initial learning curve (just a few uses), the installation process is straightforward and easy enough to adopt this as a long term solution, we think.
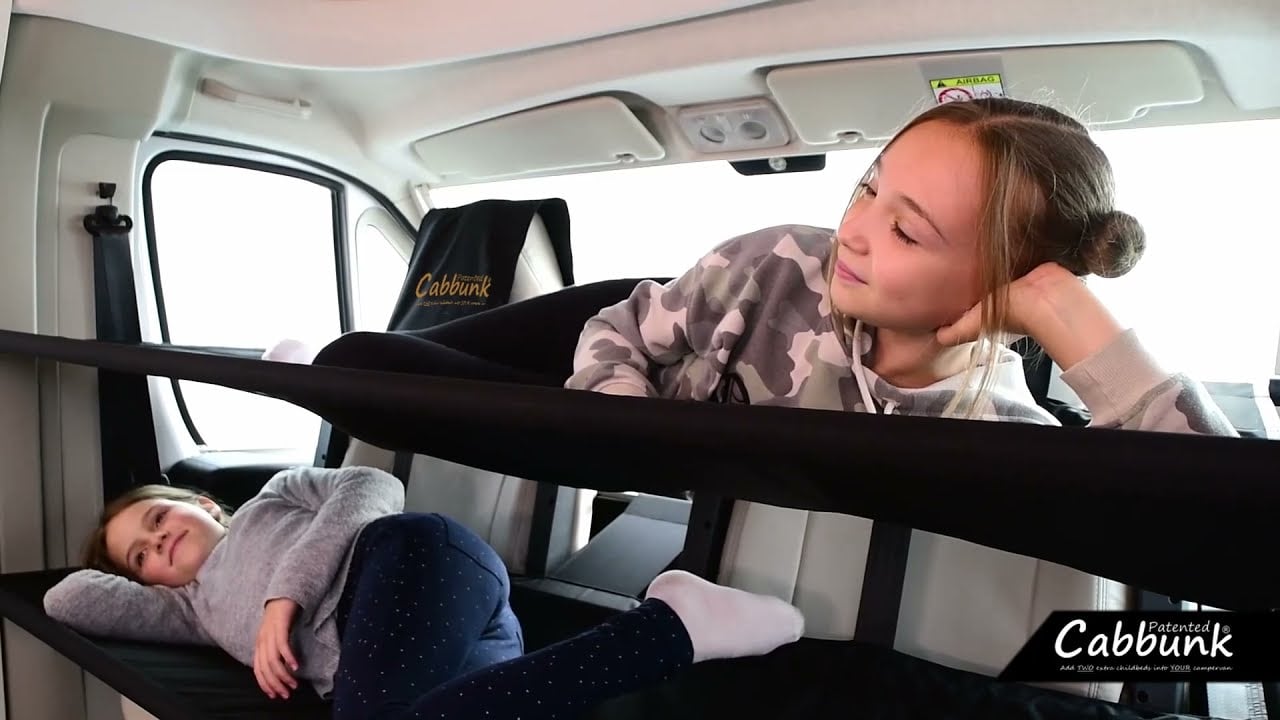
Comfort
We’re getting old, so the Cabbunk is not something we would use ourselves. The maximum allowable weight and size wouldn’t allow it anyway. That being said kids love that kind of setup, so if you have real word experience with the Cabbunk, please leave your feedback in the comment below! We’re especially interested of hearing about the comfort aspect. Thanks for contributing 🙂


GOod morning, Are there plans to make a cabbunk single for an adult?
Thank you kindly,
We got the double bunk for our now 4 and 6 year old about two years ago and have used it extensively on weeks or months long trips. I feel like the stitches on this really high priced item are loosening a bit on some spots. Because the hardware is aluminum, it’s light weight, but therefore might not feel as solid as steel. So far it seems sufficient.
One big issue I have with this is that the poles have come sliding out the holsters at least a couple times when my kids were trying to crawl into their bunks, and landed on the other kids head. I’m going to try and use some Velcro that has an adhesive on one side. Hopefully that solves the issue.
I also that that the one strap that goes over the head rest has a fairly long Velcro on it that always gets stuck on the fabric of the seat. A bit annoying at times. I don’t understand why it didn’t got attached the other way.
Other then that it serves us very well for now
We have these in our sprinter van and they work really well for our boys (8 and 11).
I agree that the hardware for fixing isn’t matching the quality of the fabric, but it does maximise adjustability and can be removed with the velcro. We eliminated it by attaching iron pipe brackets to the B pillars to slot the tubes into, it required adding rivnuts to the pillar but makes it much cleaner install.
any chance you could post a picture of your DIY retrofit?
hey Ben, can you please send a photo of this setup you mention? thank you!
Thanks for the write up! If you have the double version with 2 beds, is it possible to use just the lower level without the upper? The single cab bunk looks pretty high up. I’m wondering if the double can be used as a single with just the lower portion. Thanks!
Yes, you could use only one bed with the twin setup! Each bed has it’s own set of straps to keep it under tension 🙂
Thank you for sharing van information that has good utility with your followers, very helpful. !!