


Want More?
WE’RE JUST GETTING STARTED.
Stay in touch!
JOIN 40,000+ FOLLOWERS VIA FACEBOOK, INSTAGRAM OR YOUTUBE:
About us
NICE TO MEET YOU.

Exclusive Deals!
Thanks to all of you, we managed to negociate group discount on these. Strength in numbers!
Comments are closed.


Hello! I am thoroughly enjoying your site while I stumble though my van build. Mostly realizing how completely over my head this project is. I have a few questions that hopefully yourself or fellow followers can assist with. Do you need both size of cross-nuts for a Promaster build; or, does one suit most versus the other. Also thoughts on having water and power located behind the driver/passenger seats instead of traditional rear location over or near the wheel wells
Not familiar with the ProMaster, but you will most likely encounter two hole diameters; having both crossnut size might be necessary. But like I said, we haven’t work with the Promaster.
I don’t see any problem with water/power behind the seats if it works with your layout.
cheers
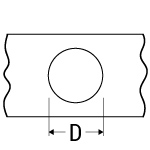
I’m a little confused by your recommendations for cross nuts in a Transit. When you describe Grip, you say “The thickness is generally around 0.032″ for the Transit.” But in the chart for the Transit you recommend two sizes, 1/4-20 and 5/16-18, that have a maximum grip of 0.028″. What am I missing here?
Thanks for your help and a fantastic website.
The crossnut we recommend have the following grip range:
MIN: 0.020″
MAX: 0.280″
So it works 🙂
Ah, I misread: thought it was 0.028. Thanks.
I’ve been using crossnuts, or inserts not sure exactly what they are called, in our 2020 Metris. They are especially useful on the smaller vans to save space instead of 3 or 4 inches of framing you can add to a Sprinter. The problem I’ve run across, however, is that a small amount of contamination, like insulation or even dust, can lock up a bolt inside the nut which requires drilling it out. I’ve had it happen on several nuts I’ve used. Could also be weak threads/cheap nuts I bought from Amazon but I have tried different ones. I’ve had best luck with M8 or larger.
Is it necessary to go with stainless 1/4×20 bolts? I already have the astro tool and plusnuts. I’m having difficulties finding bulk quantities of stainless 1/4×20 bolts in 1 3/4 or 2″ length
McMaster-Carr. http://www.mcmaster.com
https://www.mcmaster.com/stainless-steel-bolts/thread-size~1-4-20/length~1-3-4/18-8-stainless-steel-hex-head-screws-10/
Remember when using dissimilar metals, evaluate the potential for corrosion.
Stainless with steel is no problem, but stainless with aluminum is a problem unless the mass of the aluminum is far greater than the mass of the stainless e.g. stainless bolts into a cast-aluminum cylinder head.
So make sure to use the right metals in combination. An aluminum rivnut in a mild steel panel with a stainless bolt would be about as bad as it gets. When in doubt, use cad-plated or ‘ultra-coated’ steel rather than stainless.
Hi there! Long time (2 months) reader, first time poster. Do you have a sense on how many cross nuts you used in your build? I’m just trying to get a sense on how many to order. We are getting the van in 2 weeks, but we are trying to get materials procured in advance to hit the ground running. We have insulation, fan, and wood squared away. My main concern is that the cross nuts are a bottle neck is not ordered now. Thanks in advance!
We used a lot, over 50 I’d say. But it all depends on your own needs!
My rivnut tool is one of my favorites.
Bonjour Antoine
Cet été, j’ai redécouvert le plaisir du camping en louant un dodge caravan et en y ajoutant des modules que j’ai fabriqué. Quel plaisir. Du confort et de la mobilité.
A mon retour de vacance, je partage ma découverte à mes anciens voisins Marika et Mario… en leur faisant part de mon désir de poursuivre l’expérience avec un petit camion de type Promaster ou sprinter. Ils me parlent de votre expérience et votre site de partage. Je suis franchement ébahi. Moi même ingénieur, je m’y retrouve tellement. Vous êtes devenu ma lecture de chevet.
Quelle belle aventure vous poursuivez.
The large plus nut .485 to .489 that you have linked for the ProMaster has a very limited use with only a handful of opening at that size. Most of the large holes are hex opening that are a bit too small for the round plus nut.
I’m happy to use your Amazon links so you all get some $ for all the hard work. Any chance you’ll update that list with some hex rivets?
I’d be happy to add Hex Nut to the list… Do you have exact dimensions of the hex openings for the ProMaster by any chance? Unfortunately we don’t have access to a ProMaster so it’s hard for us to advise 🙁 Thanks for your help!
I used a hammer to get the 5/16 plusnuts into the hex openings. Some of them did bend the area around it a little, but it’s definitely worth having them in there.
Bonjour Isabelle et Antoine,
Il est mentionné que les crossnut pour le Transit sont de 0.386 à 0.391 alors que lorsque je mesure les trous dans mon Transit 2019, j’arrive à 0.362. Est-ce qu’il y a quelque chose qui m’échapperait par hasard?
Merci pour votre site, une incroyable mine d’information!!
Caro&François
Hey guys, awesome read (as always)! Question : When the heack do you install the crossnuts? Before or after insulation? Thanks in advance for the reply! 🙂
You can install the Thinsulate first, since you won’t cover the frames with it (where you’ll install the crossnut). Then crossnuts and EZ cool (see our build journal).
Cheers
When I installed a cross nut there is a small gap? It doesn’t seem to sit flush with the vans sheet metal, is this normal? There is an area on the back side of the cross nut that is slightly larger than the holes diameter which is preventing the cross nut from sitting flush.
Have you or anyone found a source for these crossnuts for the transit in Canada?
The shipping is almost the same as the cost of the crossnuts.
Not yet unfortunately, hopefully someone can suggest one!
I did find some in Canada. Little expensive but quick delivery. Tested Them on my 2019 Transit and they can be persuaded in with a little push. I think the bulbed portion compresses for a second.
https://www.grainger.ca/en/product/RNUT-1-4-20-280-STL-PREBULB-25-PK/p/SHXCPB22520-280-25?fbclid=IwAR3r7M3s6Ks86hxF3Kw6ZbNsMn7zkTnuY4ktLbHHs1Duzz-rCb9vXu1R0zM
Warren, did you find anything? We are also on the hunt for these cross nuts but would like to find a supplier in Canada if we can…
Just bought some cross nuts using your link (couldn’t do the same for the tool because Amazon didn’t have any). Thanks for this amazing website which has provided me so much useful information as I’ve progressed with my build.
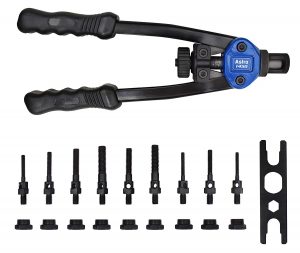
Summit racing has the install tool….. Astro 1450.
I Use the new Astro 1450 to set cross nuts, also drill linked to extraction nob to speed up removal of mandrel from set cross nut …. installed a bag of 50 in less then 2 hours
Wish I had this when we built our van!! Thanks for the heads up, I updated the article with it 🙂
Thanks for the links to the plus nuts and the tool to install them. There were many reviews that said the tool seized up after installing just a few nuts so I was nervous about this
. A helpful suggestion from a reader on the DIY Cargo Van Conversion Facebook page recommended using an anti-seize product. I bought Permatex and with a little practice, found the plus nuts easy to install.
Question about the hanging bolts, did you buy 80+ for every crossnut , then remove them and use a separate bolt to hang the walls?
We bought like 7-8 hanger bolts. The hanger bolt is temporary; you’ll need a “normal” bolt to attach the walls, cabinets, etc.
Hey great site,
Would you use the same 1/4” /20 cross nuts for a Sprinter Van?
From a quick search, looks like Sprinter owners use a combination of #10, 1/4″ and 5/16” cross nut.
I used 1/4” and mostly #10-24 plus nut
Hi Antoine,
Can you please link to the type of bolts and length you used for this plus nut? (I have a Ram Promaster 1500)
Thank you!
I don’t know about the Promaster sorry, but I’m sure someone would know in our Builder Group: https://www.facebook.com/groups/faroutride
Good luck!
Thank you!
Just starting my van build. Want to attach plywood using rivnuts to existing holes in floor. But REALLY struggled. Took all my strength yet never could never get one to seat properly. Do cross nuts require the same amount of force to attach? Thanks in advance for any help.
They require a “reasonable” amount of force… it’s fairly easy to do with the tool or the DIY way. Some people use a little bit of lubricant on the threads to make it easier.
Have a good one!
Just out of curiosity, did you look into using rivet nuts instead of cross nuts? It seems like rivet nuts would be easier to install?
Cross nuts have higher strength and have wider grip-range; they work well in “soft” material too. So we went with cross nuts 🙂
Hi Antoine,
Two things:
1. Another way to mark hole locations that I have used often in the past and now as well is to cover the end of any bolt with dry erase marker ink and push your board/cabinet/plywood against it. That ink transfers nicely. If you think you messed up, you can rub the ink off the wood and do it again.
One nice thing is that you can get closer to the wall and if a bolt is not marking because you need a shim, you can screw the bolt out a bit, and get the shim thickness.
2. I actually had to drill a few holes in the van to accept some cross nuts. Is that ironic or something? Idid paint but didn’t sand first.
Cheers, Don
thank you!